
Related Manuals for Reed Instruments R7920


Summary of Contents for Reed Instruments R7920
- Page 1 R7920 Ultrasonic Thickness Gauge 1 YEAR 1 AN 1 AN 1 YEAR Instruction Manual REED Instruments 1-877-849-2127 | info@reedinstruments.com | www.reedinstruments.com...
-
Page 2: Table Of Contents
Clearing Measurements Results ............12 Setup Mode ..................13-18 Select the Material under Test ............. 13 Adjusting the Sound Velocity of the Material under Test ..... 14 Select Unit of Measure (in/mm)............14 continued... REED Instruments 1-877-849-2127 | info@reedinstruments.com | www.reedinstruments.com... - Page 3 Measurements on Cylindrical Surfaces ..........21 Measuring Compound Profiles ............21 Measuring an Un-Parallel Surface ............22 Influence of Material's Temperature ............. 22 Material with Large Attenuation ............22 Measuring Castings ................22-23 continued... REED Instruments 1-877-849-2127 | info@reedinstruments.com | www.reedinstruments.com...
-
Page 4: Introduction
Product Disposal and Recycling .............. 26 Product Support ..................26 Introduction Thank you for purchasing your REED R7920 Ultrasonic Thickness Gauge. Please read the following instructions carefully before using your instrument. By following the steps outlined in this manual your meter will provide years of reliable service. -
Page 5: Features
• User adjustable High/Low alarms • Automatic material calibration • Auto shut off and low battery indicator Included • Ultrasonic Thickness Gauge • Ultrasonic Couplant Gel • Probe • USB Cable • Carrying Case REED Instruments 1-877-849-2127 | info@reedinstruments.com | www.reedinstruments.com... -
Page 6: Specifications
Operating Humidity Range: 20 to 80% Storage Temperature: 14 to 122°F (-10 to 50°C) Storage Humidity Range: 20 to 70% Dimensions: 5.5 x 2.6 x 1.12" (140 x 66 x 28.5mm) Weight: 6.17oz (175g) REED Instruments 1-877-849-2127 | info@reedinstruments.com | www.reedinstruments.com... -
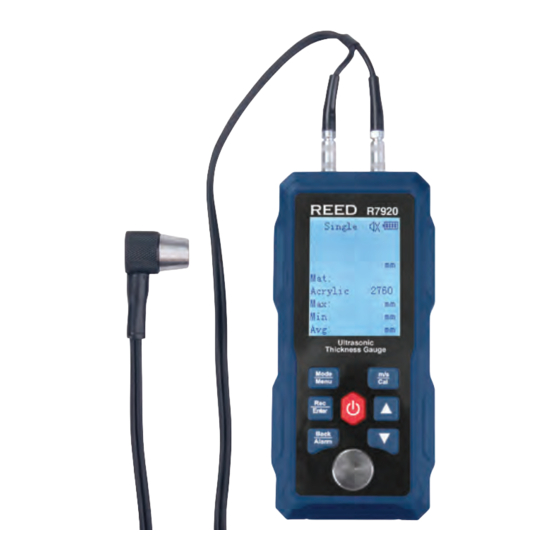
Page 7: Instrument Description
9. Up Arrow 10. Sound Velocity/ Calibration Button 11. Ultrasonic Sensor Display Description 1. Coupling Indicator 2. Measurement Mode Indicator 3. Beep Status Indicator 4. Battery Indicator 5. Unit of Measure 6. Measurement/Sound Velocity Values REED Instruments 1-877-849-2127 | info@reedinstruments.com | www.reedinstruments.com... -
Page 8: Operating Instructions
It is not necessary to calibrate the meter each time the unit is powered on unless measurements appear to be inaccurate. The calibration procedure confirms both the meter and ultrasonic sensor are functioning properly. continued... REED Instruments 1-877-849-2127 | info@reedinstruments.com | www.reedinstruments.com... -
Page 9: Selecting The Material Sound Velocity
Rough, uneven surfaces will prevent the ultrasonic sensor from seating properly against the surface, thus limiting the penetration of ultrasound through the material, resulting in unstable and therefore, unreliable measurements. continued... REED Instruments 1-877-849-2127 | info@reedinstruments.com | www.reedinstruments.com... -
Page 10: Taking Thickness Measurements
0° to 90° 5720 - 6120 with respect to the split face (Figure 1). Take the smaller of the two indicated values as the 5920 thickness of the material. Figure 1 continued... REED Instruments 1-877-849-2127 | info@reedinstruments.com | www.reedinstruments.com... -
Page 11: Determining The Sound Velocity For A Material With A Known Thickness
To preserve battery life, the meter is programmed to turn itself OFF after approximately 5 minutes of inactivity. To adjust the auto power off time, see the Setting the Auto Power OFF Timer section for details. continued... REED Instruments 1-877-849-2127 | info@reedinstruments.com | www.reedinstruments.com... -
Page 12: Enabling/Disabling Alarm Setting
Enabling/Disabling Alarm Setting The R7920 will alarm when the measured value is beyond the pre-set limits. When the measurement is lower or higher than the pre-set standard value limit, the alarm will sound. To enter the alarm limits, see the Setting the Alarm Thickness Limits section for details. -
Page 13: Setup Mode
Press the REC/ENTER button to confirm selection and return to the Setup Menu screen. Note: At any time, press the BACK/ALARM button while in the setup menu screen to exit the Setup mode and resume normal operation. continued... REED Instruments 1-877-849-2127 | info@reedinstruments.com | www.reedinstruments.com... -
Page 14: Adjusting The Sound Velocity Of The Material Under Test
Delete All Follow the instructions below to adjust each setting. Note: If there is no data in the memory, the meter will display "No Records" and return to the menu screen. continued... REED Instruments 1-877-849-2127 | info@reedinstruments.com | www.reedinstruments.com... -
Page 15: View From First/Last Page
10. Press the BACK/ALARM button three times to return to the stored data parameters screen. Note: At any time, press the BACK/ALARM button while in the setup menu screen to exit the Setup mode and resume normal operation. continued... REED Instruments 1-877-849-2127 | info@reedinstruments.com | www.reedinstruments.com... -
Page 16: Delete By Group Range (Delete The Item)
Press the REC/ENTER button when "Settings" appears on the LCD. Press the buttons to scroll through the following parameters within the system settings function: a) Sound c) Power OFF b) Backlight d) Alarm Follow the instructions below to adjust each setting. continued... REED Instruments 1-877-849-2127 | info@reedinstruments.com | www.reedinstruments.com... -
Page 17: Enable Or Disable The Audible Beep (Sound)
Press the REC/ENTER button to confirm selection. Note: At any time, press the BACK/ALARM button while in the setup menu screen to exit the Setup mode and resume normal operation. continued... REED Instruments 1-877-849-2127 | info@reedinstruments.com | www.reedinstruments.com... -
Page 18: View Device Information
The degradation and wear of the probe's interlayer plate will influence measurements. Replace the probe when the following occurs: • The same value is always displayed when measuring different thicknesses or; • A measurement displays no value. REED Instruments 1-877-849-2127 | info@reedinstruments.com | www.reedinstruments.com... -
Page 19: Charging The Battery
Charging the Battery Connect the R7920 via the included cable to a USB port on a PC or into a wall outlet using a USB Power Adapter (not included) to charge the Li-ion battery. Charge the meter until the battery indicator appears full. -
Page 20: Material Sound Velocities Table
0.094 2400 Nylon 0.105 2680 Silver 0.142 3607 Gold 0.128 3251 Zinc 0.164 4170 Titanium 0.236 5990 0.117 2960 Acrylic resin 0.109 2760 Epoxy resin 0.100 2540 0.157 3988 Nickel 0.222 5639 continued... REED Instruments 1-877-849-2127 | info@reedinstruments.com | www.reedinstruments.com... -
Page 21: Measurements On Cylindrical Surfaces
The exception is that one should have two analyses and get two results when the sensor's crosstalk interlayer plate is both parallel and perpendicular to the axial line of the material under test. Take the minimum readout as the material thickness. continued... REED Instruments 1-877-849-2127 | info@reedinstruments.com | www.reedinstruments.com... -
Page 22: Measuring An Un-Parallel Surface
5.5%. The compactness in different positions of the workpiece is different, which will also cause difference in sound velocity. All of these will produce inaccuracies in the measurements. continued... REED Instruments 1-877-849-2127 | info@reedinstruments.com | www.reedinstruments.com... -
Page 23: Preventing Errors
To solve this problem, the test piece should have an internal structure with same direction as that of the material under test, and the transmitting direction of sound wave in it should also be same as that of the material. continued... REED Instruments 1-877-849-2127 | info@reedinstruments.com | www.reedinstruments.com... -
Page 24: Ultra-Thin Material
If it is determined that this is the reason for the errors, grind the surface with sandpaper or oilstone to make it smooth again. If the readings are still not stable, the sensor must be replaced. continued... REED Instruments 1-877-849-2127 | info@reedinstruments.com | www.reedinstruments.com... -
Page 25: Overlapped Material And Compound Material
(such as the coupling gel provided or light engine oil). When measuring a coarse object surface, vertical surface or top surface, use a gel with high viscosity (such as glycerin grease, consistent grease, and lubricating grease, etc.). REED Instruments 1-877-849-2127 | info@reedinstruments.com | www.reedinstruments.com... -
Page 26: Product Warranty
REED Instruments total liability is limited to repair or replacement of the product. REED Instruments shall not be liable for damages to goods, property, or persons due to improper use or through attempts to utilize the instrument under conditions which exceed the designed capabilities. - Page 27 NOTES REED Instruments 1-877-849-2127 | info@reedinstruments.com | www.reedinstruments.com...
- Page 28 NOTES REED Instruments 1-877-849-2127 | info@reedinstruments.com | www.reedinstruments.com...
- Page 29 TEST & MEASURE WITH CONFIDENCE Access our Product Catalog Over 200 portable test and measurement instruments REED Instruments 1-877-849-2127 | info@reedinstruments.com | www.reedinstruments.com...
- Page 30 REED Instruments 1-877-849-2127 | info@reedinstruments.com | www.reedinstruments.com...
Need help?
Do you have a question about the R7920 and is the answer not in the manual?
Questions and answers