Table of Contents
Advertisement
Quick Links
Advertisement
Table of Contents

Related Manuals for Prolux RS7


Summary of Contents for Prolux RS7
- Page 2 Congratulations on the purchase of your new Prolux RS7 Vacuum! The RS7 was made with one purpose: to get your cleaning done quickly, so you can spend your time doing what you enjoy. Lightweight, easy to use, and a powerful brush roll to clean almost...
-
Page 3: Table Of Contents
LIFETIME WARRANTY!!! Table of Contents Important Safety Instructions..............4 Quick Assembly..................6 Specifications................... 7 Warranty....................8 Safety....................... 9 Overview....................12 RS7 Pet....................12 RS7 Pro....................13 Attachments...................20 RS7 Pet....................20 RS7 Pro....................21 Operation....................22 Maintenance..................26 Troubleshooting..................31 Frequently Asked Questions..............32... -
Page 4: Important Safety Instructions
Important Safety Instructions When using an electrical appliance, basic precautions should always be followed, including the following: READ ALL INSTRUCTIONS BEFORE USING THIS APPLIANCE Failure to follow the warnings and instructions may result in electric shock, fire and/or serious injury. WARNING –... - Page 5 15. Disconnect the battery pack from the appliance before making any adjustments, changing accessories, or storing appliance. Such preventive safety measures reduce the risk of starting the appliance accidentally. 16. Recharge only with the charger specified by the manufacturer. A charger that is suitable for one type of battery pack may create a risk of fire when used with another battery pack.
-
Page 6: Quick Assembly
Quick Assembly To view some videos on unboxing, assembling, and using your new vacuum you can find them at the link below, or scan the QR code to go to our YouTube page to see all our videos: https://proluxcleaners.com/pages/prolux-rs7-quick-assembly... -
Page 7: Specifications
Specifications Water Lift 102” Suction Power 26 kPa Filtration Type HEPA Charge Time 4 hours Battery Capacity 2500 mAh Run Times Motor Speed Time (with power head) Time (without power head) 35 minutes 40 minutes Medium (default) 21 minutes 26 minutes High 15 minutes 18 minutes... -
Page 8: Warranty
Warranty We take pride in the quality of our products, and most of our time and money is spent on R&D rather than on advertising. Because of this, we are confidently offering a Lifetime Warranty. We only require that you register your machine within 90 days of purchase. If a machine is not registered, we can only offer a 1-year warranty on the machine. -
Page 9: Safety
Safety Read the owner's manual in its entirety before using this product. Failure to do so can result in serious injury or death. Prolux takes no responsibility for damages/injuries due to violations of the following operating instructions. Notices for your safety are specially marked. Always observe these notices to avoid any damage to the appliance. - Page 10 12. Keep hair, loose clothing, fingers, and all body parts away from openings and moving parts of the vacuum. 13. Use extra care when cleaning on stairs. 14. Do not use it to pick up flammable or combustible liquids, such as gasoline, or in areas where they may be present.
- Page 11 Do not vacuum or clean: ● Hair and other parts of the body. They could be sucked in and cause injury. ● Pieces of clothing (e.g., shoe laces, scarves, etc.). They could be sucked in and cause injury. ● Water or other liquids, especially moisture from carpet cleaning agents. Moisture inside the appliance can lead to short-circuiting.
-
Page 12: Overview
Overview RS7 Pet... -
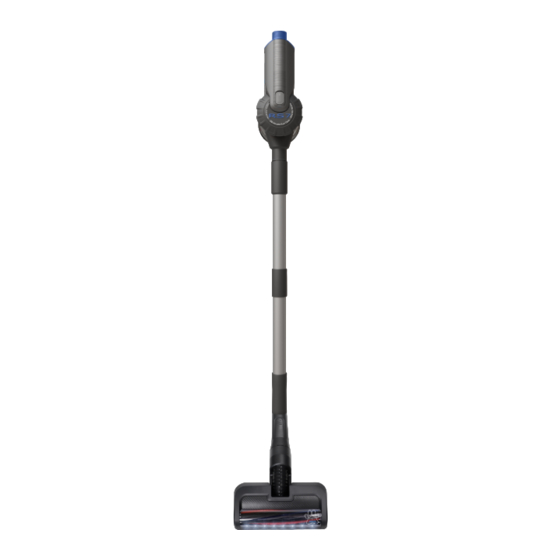
Page 13: Rs7 Pro
RS7 Pro... - Page 14 Assembly 1. Unpack everything from the box, making sure all the parts are there (see overview image on previous page). 2. Extend the wand. 3. Attach the upper end of the wand to the vacuum.
- Page 15 4. Attach the power head to the lower section of the wand.
- Page 16 5. Mount tool caddy to the wall using the included hardware.
- Page 17 6. Plug the charger in.
- Page 18 7. Hang tools on the tool caddy.
- Page 19 8. Hang vacuum on the tool caddy.
-
Page 20: Attachments
Attachments RS7 Pet Aluminum extendable wand EBK-250 electric power head RS7 vacuum body Extra exhaust filters Wall-mounted charging dock & tool AC adapter caddy Extra battery Duster brush Pet hair brush roll for EBK-250 Crevice tool power head... -
Page 21: Rs7 Pro
RS7 Pro Aluminum extendable wand Crevice tool RS7 vacuum body EBK-250 electric power head Wall-mounted charging dock & tool AC adapter caddy 2 Extra batteries Duster brush... -
Page 22: Operation
Operation The RS7 allows connecting all included attachments to either the end of the extendable wand or directly to the vacuum body (See illustrations below). - Page 23 Using the vacuum 1. Assemble the vacuum (see Assembly section). 2. Attach the desired tool to either the vacuum body or the wand. 3. Pull the trigger to turn the vacuum on. 4. Set the desired vacuum speed with the speed selector button on the back of the vacuum. 5.
- Page 24 Changing the battery...
- Page 25 Charging the battery The RS7 battery can be charged three different ways. 1) By plugging the charging cord into the wall-mounted tool caddy and hanging the vacuum on the caddy. 2) By plugging the charging cord directly into the vacuum with the battery installed. 3) By removing the battery and charging it separately from the vacuum.
-
Page 26: Maintenance
Maintenance Emptying the dirt bin Turn the vacuum off. The dirt bin can be emptied with it either connected to the vacuum body or removed from the vacuum body. To empty the dirt bin, simply hold the bin over a trash can and press the dirt bin release button. The dirt bin lid will pop open and the dirt and dust will remove itself using the amazing power of gravity. - Page 27 Changing the filters HEPA filter...
- Page 28 Exhaust filters...
- Page 29 Brush Roll Replacement Changing the brush roll is very easy, all you’ll need to do is: Remove the power head from the extendable wand. 2. Unlock the brush roll by turning the knob dial on the side of the head to ‘OPEN’ 3.
- Page 30 Cleaning the Brush Roll The EBK-250 power head has a built-in brush roll cleaner which helps you remove any built-up hair, string or any other material which has wrapped around the brush roll. To use the cleaning tool simply slide it out of its storage spot on the underside of the head.
-
Page 31: Troubleshooting
Troubleshooting WARNING: Never use a defective appliance. Always switch the appliance off and remove the battery before you start troubleshooting. Fault Possible Cause(s) Solution Remove the battery and re-insert, The battery is not fully seated into ensuring the battery is fully seated the vacuum. -
Page 32: Frequently Asked Questions
Frequently Asked Questions 3-12 months depending on use and the state of your home. Most people will need replacement filters around 6 months but if How often should I replace my filters? you live in an exceptionally dusty environment or have multiple shedding furry friends you will want to change them more frequently. -
Page 33: Warranty
Warranty Why do I have to register my warranty within 90 days to get my Lifetime Warranty? Proper maintenance will add years to your vacuum’s life. When you register your warranty, we will email you maintenance tips, remind you when it is time to maintain your vacuum, provide product info updates, and send you coupons for replacement parts and filters. - Page 34 This warranty is limited solely to the cost of the repair or replacement of the unit at the option of Prolux. This warranty does not cover normal wear of parts and does not apply to any unit that has been tampered with (by an unauthorized user) or used for commercial purposes.
Need help?
Do you have a question about the RS7 and is the answer not in the manual?
Questions and answers