
Related Manuals for Prolux AllVac


Summary of Contents for Prolux AllVac
-
Page 1: Owners Manual
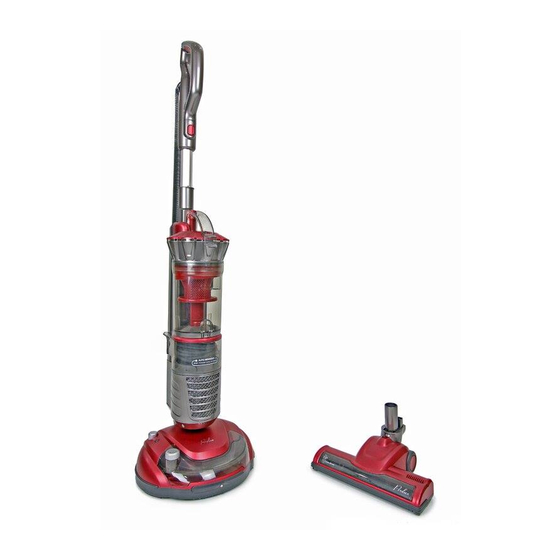
Prolux AllVac Floor Cleaner Owners Manual For your safety please read the Owners Manual in its entirety... - Page 2 From vacuuming carpets to scrubbing tile to polishing floors the Prolux Allvac is designed to do it all. With 2 year warranty, on board tools, powerful 9.5 amp suction motor and bagless cyclonic cleaning the Prolux AllVac is designed to do all your cleaning.
-
Page 3: Table Of Contents
Product Specifications …....................3 Parts Description..…....................4 Safety Instructions..…....................8 Assembling the Unit ...…....................10 Using the Unit in Vacuuming Mode…................14 Using the Unit in Waxing/Polishing/Scrubbing Mode............15 Using the Unit in Tool Cleaning Mode................23 Cleaning Of Pads & Discs....................28 Emptying the Dust Bin..….....................28 Cleaning the Filter......................30 Cleaning the Vacuum Brushroll..…................32 Troubleshooting..….....................32 Storing the Unit After Use..…..................33... -
Page 4: Parts Description
The Prolux AllVac is designed to clean any floor surface. The Waxing/Polishing/Scrubbing Floor Brush Component is designed for cleaning tile, tile grout, hardwood floors and any floor surface. Not only can is scrub and polish but it can spray cleaner or wax on the floor as you work. The Electric... - Page 6 Accessories:...
- Page 7 Rough Polishing Disc...
-
Page 8: Safety Instructions
· Please carefully read the Operating Instruction before using this vacuum cleaner to ensure operation safety and correctness. ·To prevent electric leakage or electric shock, this Prolux AllVac cleaner can’t be placed in the water or cleaned with water directly. -
Page 9: Assembling The Unit
order to avoid danger. Do not use the vacuum cleaner to vacuum articles such as drywall dust, cement powder, detergent, gasoline, glass, needle, soot, wet dust, sewage, matchsticks and so on. Do not forcibly bend, step on, or drag the hose. If the hose becomes damaged do not use it with the vacuum cleaner. - Page 10 Snap hose down into elbow section and attach hose to hose holder as shown in the image below. If user wants to remove hose end pull hose from hose holder first then press on the 2 release clips pull up and the hose may be pulled back out.
- Page 11 3. Snap in the dirt chamber to the main vacuum body (see image below) . 4. Make sure the on board multi-functional tool is attached to the tool holder on the back of the vacuum.
- Page 12 Make sure handle is adjusted to the height of the user (see image below). Make sure hose tube valve is changed to the cleaning mode the user wants. FLOOR CLEANING or TOOL CLEANING mode(s). (see images below) Find retractable power cord end on the vacuum as shown in the image below.
- Page 13 Pull out cord to right length for the user and plug into a standard 120 volt outlet. 9. To begin cleaning turn the power switch of the vacuum on. As shown in the images below one...
-
Page 14: Using The Unit In Vacuuming Mode
there 3 positions. POWER ON/OFF, FLOOR POLISHING MODE (no suction from vacuum but power to floor nozzle & polisher), VACUUM MODE ( suction from vacuum plus power to floor nozzles). Using Unit in Vacuuming Mode After unit is powered on release the handle. The power brush (floor cleaning nozzle with spinning brushroll) will not turn on until handle is released as shown in the image below. -
Page 15: Using The Unit In Waxing/Polishing/Scrubbing Mode
On vacuum mode it can be used to clean both carpet and hard floor surfaces. The unit is equipped with a soft brushroll designed to be used on ALL surfaces but always test first on a small section of floor first. 3. - Page 16 NOTE – Cleaning Carpet. Use of the Prolux AllVac with waxing/polishing/scrubbing nozzle for carpet cleaning is not intended for prolonged use. It can only be used for small jobs and spot cleaning. To do so one pad and fine polishing seat must be totally removed and the Floor Polishing/Lint pad must be added to the one remaining.
- Page 17 With the pads attached to the waxing/polishing/scrubbing nozzle it is now time to attach the nozzle to the vacuum cleaner as shown in the image below. To do this align the elbow of the waxing/polishing/scrubbing nozzle to the installation hole to the main body and insert down until you hear a “click”.
- Page 18 Even with the cord plugged into the wall outlet and the power turned ON the waxing/polishing/scrubbing nozzle will not start spinning until the handle has been released and angle shown below is achieved. When user is at the step to plug cord into wall outlet always make sure unit is in upright locked position.
- Page 19 To being waxing/polishing/scrubbing pull the handle back and lightly press the nozzle with the users foot to get the pivot assembly to release so waxing/polishing/scrubbing nozzle is flat on the floor (see image below).
- Page 20 NOTE – The Prolux AllVac in waxing/polishing/scrubbing mode is not designed to suck or vacuum up water or liquids but only dry suction. When using the spraying application make...
- Page 21 With the cord plugged into the wall, the suction turned to vacuum mode (image above), the pads inserted the user is now ready to turn the vacuum on, release the handle and start waxing polishing or scrubbing. How to use for Waxing or Wet Application in spraying mode: As shown in the image below when the switch is pressed the indicator light comes on and then the liquid spray or wax sprays out of the unit and onto the floor.
- Page 22 be different heating conditions on the motor. It is suggested that the unit not be used more than 30 minutes in this mode to keep the motor cool and dependable. Solution tank may be filled with liquid wax or other liquid cleaning detergents. To add solution to the solution tank unscrew the lid and add up to 2.7 Fluid Ounces.
-
Page 23: Using The Unit In Tool Cleaning Mode
Using the Unit in Tool Cleaning Mode Pull out the handle. Insert the 2 in 1 accessory into the metal wand. Turn suction valve to tool use as shown in the image below. - Page 24 4. You are now ready to begin cleaning with tools. 5. You may also clean closer objects without the metal extension wand. To do that press the release button in the wand and insert the tool as shown in the images below.
- Page 25 How to use the Multi-functional tool. The image below shows the tool in Crevice mode where it can vacuum flat surfaces and inside hard to reach areas. The image below shows it used in Dusting and Upholstery mode where it can be used on multiple surfaces.
- Page 26 When finished with cleaning Multi-functional tool put it back on the vacuum in its on board location as shown below. When done with cleaning pull the cord from the wall outlet (always pull by firmly grabbing the plug end and never by pulling or tugging on the cord) and pressing the cord rewind button as shown below.
-
Page 28: Cleaning Of Pads & Discs
Cleaning Of Pads & Discs: Do not clean the Fine Polishing Seat with Water to avoid gumming. Emptying the Dust bin- When the dust bin is full of dirt and ready to be emptied the first step is to turn the unit off. When this is done press the button shown by the arrow below and lift the dust bin off and away from the rest of the vacuum. - Page 29 Then holding the dust bin over a garbage sack or garbage container release the latch shown below.
-
Page 30: Cleaning The Filter
That latch will release and the door will open up. Shake or gently tap the dust bin so all of the dirt and dust will fall out and into the garbage. Then snap the door back into place and put the dust bin back on the vacuum. - Page 31 Grab the dust cup handle and rotate it counter clockwise to pull out the wind shield. 4. Clean the 2 parts as shown in the image above. When there is hair in these parts it is especially suggested to clean as to improve suction performance of the vacuum. Remove the top of the dust bin to gain access to the filter.
-
Page 32: Cleaning The Vacuum Brushroll
Cleaning the Vacuum Brushroll - Power off the unit and remove the vacuum brush attachment. 2. Turn the vacuum brush attachment upside down as shown in the image below. 3. With a flat head screw driver turn the release screw and remove the bottom plate. 4. -
Page 33: Storing The Unit After Use
Warranty Information for the Prolux AllVac The manufacturer Prolux provides warranty of this vacuum cleaner for a time period of 1 years on the appliance and 2 years on the motor, starting from the date on which the appliance is sold to the end user.
Need help?
Do you have a question about the AllVac and is the answer not in the manual?
Questions and answers