Table of Contents
Advertisement
Quick Links
Advertisement
Table of Contents

Subscribe to Our Youtube Channel
Related Manuals for Prolux PLC2.0d


Summary of Contents for Prolux PLC2.0d
- Page 2 Now you too can enjoy up to 50% less cleaning time! Weighing only 9lbs., and with 125 CFM, this vacuum is over 40% lighter and more powerful than the competition! The Prolux PLC2.0D comes with a 3-year/700 hour motor warranty, and thanks to its state-of-the-art Motor Bypass Technology, you won’t have to worry about overheating due to a clogged hose.
-
Page 3: Table Of Contents
Table of contents Specifications Optional Accessories Safety Precautions Assembly Getting To Know Your Vacuum Using The Accessories & Tools Operation Operating Instructions/Adjusting Harness Maintenance Emptying The Dust/Dirt Container Changing/Cleaning Intake Vortex Filter Changing/Cleaning HEPA Exhaust Filter Cleaning The Housing Troubleshooting Warranty - 2 -... -
Page 4: Specifications
● Cleans twice as fast as standard Upright Vacuums. ● 3-Stage filtration: ○ HEPA H13 Filter, which keeps the air clean with 99.95% efficiency ○ Patented Prolux Cyclonic Filtration Technology © ○ Micron Filter ● 50ft cord ● 0.64L Dust Receptacle Capacity ●... -
Page 5: Optional Accessories
The Prolux Commercial Grade 1-1/2” Tool Attachment Kit – This 1-1/2” tool kit is perfect for cleaning up the garage, or for light commercial use. This tool set includes a larger hose, wands, and tools, so you can pick up larger debris without clogging your attachments, and cover more area in less time, compared to the standard sized attachments. -
Page 6: Safety Precautions
Keep the operating manual for reference. Include the operating manual if you pass the appliance to third parties. Violations of the operating instructions can lead to severe injuries as well as damage to the appliance. Prolux takes no responsibility for damages due to violations of these operating instructions. - Page 7 Do not vacuum or clean: Hair and other parts of the body. They could be sucked in and cause injury. Pieces of Clothing (e, g, shoelaces, scarves, etc.). They could be sucked in and cause injury. Water and other liquids, especially moisture from carpet cleaning agents. Moisture inside the appliance can lead to short-circuiting.
-
Page 8: Getting To Know Your Vacuum
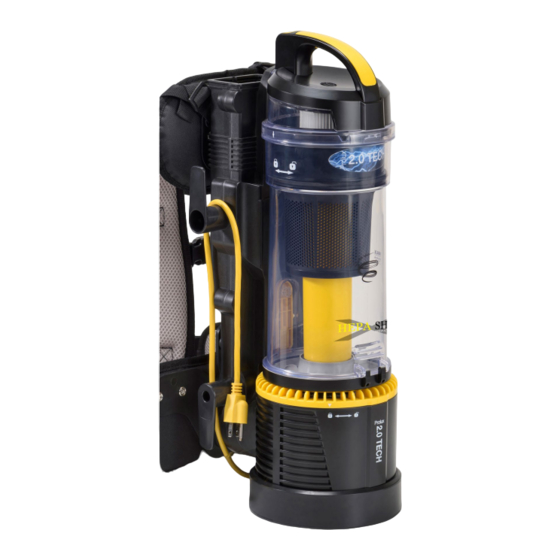
GETTING TO KNOW YOUR BACKPACK VACUUM 1. Main Motor Unit 2. Dust Container 3. Deluxe Electric Power Nozzle 4. Shoulder Straps 5. Exhaust HEPA Filter 6. Air Inlet Vortex Filter 7. Quick Adjusting Telescoping Wand 8. Mini Turbo/Pet Tool 9. Crevice Tool 10. - Page 9 ASSEMBLY AND OPERATING INSTRUCTIONS NOTE: Always remove the power plug from the wall outlet before assembling or removing accessories. ATTACHING THE FLEXIBLE HOSE & TELESCOPIC WAND TO THE VACUUM The flexible hose should be connected before strapping the unit on. 1.
- Page 10 Figure 2 Parts: 1. Deluxe Electric Power Nozzle 2. Extendable Electrical Wand 3. Flexible Hose - 9 -...
-
Page 11: Using The Accessories & Tools
USING THE ATTACHMENTS CREVICE TOOL Use for cleaning radiators, cracks & crevices along corners, baseboards, and in-between cushions. (Fig. 3) PET HAIR REMOVAL BRUSH The unique design makes it an excellent tool for removing unwanted pet hair from virtually any surface. (Fig. 4) NOTE: This tool is not a grooming tool and should not be used on animals. - Page 12 CONNECTING THE ATTACHMENTS TO YOUR WAND Connecting the tools to your telescopic wand is quick and easy. The tools use a Friction Fit Connection which means you push the tool on to the wand (or adapter if applicable) and twist in either direction. (Fig.
-
Page 13: Operating Instructions/Adjusting Harness
USING YOUR VACUUM 1. Insert the power plug into the wall outlet. 2. Connect hose and telescopic tube if desired. 3. Correctly place shoulder straps on each shoulder and secure the waistband strap. (Fig. 8 through Fig. 8b) Caution: If the waistband and both shoulder straps are not properly and securely in place, the unit could fall off your back, causing damage or injury. -
Page 14: Emptying The Dust/Dirt Container
HOW TO EMPTY THE DUST CONTAINER The dust container must be emptied as soon as it reaches the “MAX” mark indicated on the outside of the tank, or if the suction power has dropped. To empty the Dust Container, please follow the instructions below: 1. -
Page 15: Changing/Cleaning Intake Vortex Filter
NOTE: The Prolux Self-Cleaning Vortex filter only needs to be cleaned when the entire surface of the filter becomes dirty. Due to its highly efficient design the Self-Cleaning Vortex filter is three times more efficient than standard filters and will have the same amount of airflow whether it’s dirty or clean. -
Page 16: Changing/Cleaning Hepa Exhaust Filter
TO CLEAN AND REPLACE THE EXHAUST HEPA FILTER: 1. Open the exhaust cover by rotating it counterclockwise. (Fig. 13) 2. Pull the exhaust HEPA out of the unit. (Fig. 13) 3. Clean the filter using warm water, and allow air-drying completely, and then place the filter back into the unit. Or, if the filter is too dirty, or in an unusable condition, replace the filter with a new one. -
Page 17: Troubleshooting
Troubleshooting WARNING: Never use a defective appliance. Always switch off the appliance and disconnect it from the outlet or remove the battery before you start to troubleshoot. Fault Possible Cause(s) Solution The vacuum will not turn on. The plug is not connected to the Insert the plug into an electrical electrical wall outlet or the wall outlet and flip the “on/off”... - Page 18 TROUBLESHOOTING FOR ELECTRIC POWER NOZZLE Problem – electric power nozzle does not power up (motor does not turn on in power nozzle). Solution – Please follow all the steps below and try again: a. Unplug cord from power nozzle on hose, count 20 seconds and plug back in. b.
- Page 19 If a component fails to meet the term of the warranty due to defects in workmanship or materials, Prolux Cleaners will repair or replace the defective component free of charge, including labor according to our flat rate schedule and the Prolux Cleaners Warranty Procedures.
- Page 20 Product Category Polyethylene Steel Switches, Motors and Structural Body Electrical Parts Labor Foam Parts Paid Machine Years Years Years Years 3yr Switches 3yr or 700hrs (whichever Battery Walk Behind comes first) on the motor Scrubbers 14” and 3yr Electrical Parts 18”...
- Page 21 2yr Switches Central Vacuums 2yr or 800hrs (whichever comes first) on the motor 5yr Electrical Parts 3yr Switches Structural Foam Floor 3yr or 700hrs (whichever Machines comes first) on the motor 3yr Electrical Parts 1yr Switches Commercial Floor 2yr or 900hrs (whichever Scrubber comes first) on the motor 13”/15”/17”/20”...
- Page 22 6. Ozone Generators: Warranty does not ozone cover plates or filters. Warranty shall commence six (6) months from the purchase date by the Prolux Cleaners distributor, or on the purchase date by the original end user. Whichever comes first. Labor Rate Prolux Cleaners will allow $50.00 per hour for warranty labor work.
-
Page 23: Warranty
If any operation is not covered in this flat rate schedule, Prolux Cleaners will determine a labor rate when a claim is made based on actual repair times by our own service technicians. Please note: Situations may arise that require special consideration. In these cases, to request special consideration, please contact your Prolux Cleaners warranty department or Prolux Cleaners salesperson and or rep group. - Page 24 1. Contact the Prolux Cleaners warranty department with the machine information (Serial number, Date of Purchase etc.) 2. If the battery is deemed to be within the warranty period, Prolux Cleaners will arrange a date to inspect and replace (upon inspection approval) the battery with the OEM.
- Page 25 Freight damage is not covered under the Prolux Cleaners warranty policy. Replacement Parts: Prolux Cleaners will not honor any warranty claims for parts, labor, or travel if the replacement part was not purchased through Prolux Cleaners. Prolux cleaners reserves the right to review or modify the above document at any time without specific written or prior notice.
Need help?
Do you have a question about the PLC2.0d and is the answer not in the manual?
Questions and answers