Table of Contents
Advertisement
Quick Links
Advertisement
Table of Contents

Subscribe to Our Youtube Channel
Related Manuals for Labomed STELLA


Summary of Contents for Labomed STELLA
- Page 1 STELLA User Manual Ophthalmic Microscope To ensure proper use of this instrument as well as to avoid injury while operating instrument, Part No: 6219100-795 Issue 1.0 Understanding this manual completely before use is highly recommended. July,2021...
-
Page 2: Table Of Contents
Stella TABLE OF CONTENTS 1. INTRODUCTION 2. TARGET GROUP 3. FIELD OF USE 4. SAFETY COMPLIANCES AND STANDARDS 5. SAFETY AND LEGAL NOTES 8-10 6. KEY NOTES FOR USER 7. SAFE USE OFFUNDUS IMAGING SYSTEM 12-13 8. NOTES ON PHOTOTOXIC & RADIATION SAFETY 14-16 9. -
Page 3: Introduction
Stella 1. INTRODUCTION The LABOMED STELLA is an ophthalmic and diagnostic microscope, which is adaptable for different Surgical needs for consistent visualization during all intra operative phases of ophthalmic surgeries by providing a magnified view of the surgical field without compromise to performance. -
Page 4: Target Group
Stella 2.TARGET GROUP This user manual is intended for physicians, nurses and other medical staff who prepare, operate or main- tain the system after the appropriate training and in accordance with the instructions given in this manual. It is the duty of the customer or institution operating the system to trainand instruct all staff using the system. -
Page 5: Field Of Use
Stella 3.FIELD OF USE INTENDED USE STELLA is a surgical microscope intended for the illumination and magnification of the surgical area and for the support of visualization During surgical procedures in the field of ophthalmology. NORMAL USE In line with the intended use, the system can be used for surgical procedures on both the anterior segment of the eye (e.g. -
Page 6: Safety Compliances And Standards
Stella 4. SAFETY COMPLIANCES AND STANDARDS SAFETY The instrument described in this manual has been developed and tested in accordance with national and international regulations. A high degree on Instrument safety is thus ensured. Additional safety notes are also contained in other parts of this user’s manual; marked with a warning triangle containing an exclamation mark as shown here . -
Page 7: Safety And Legal Notes
Make sure that they are appropriate for one another. If any of the connectors are damaged, have our service representative to repair them. • Should you wish to use other accessories with this equipment, make sure that labomed has certified its use. - Page 8 Labomed or other persons authorized by Labomed. • This system must not be modified without Labomed approval. If modified, suitable inspections and testing must be completed to ensure that it can still be used safely.
- Page 9 • When mounting accessory equipment, please make sure that the admissible total weight of the surgical microscope is not exceeded. (Refer label "Maximum load”) • When mounting Non-Labomed equipment, make sure that sufficient free space is available for focus positioning.
-
Page 10: Key Notes For User
• Check that the movement of the surgical microscope is unobstructed to avoid any collisions and damage to cables. • When mounting non-Labomed equipment, make sure that sufficient free space is available for focus positioning. Issue 1.0... - Page 11 Stella KEY NOTES FOR USER (continued) • Have an OR illuminator or Endo-illuminator ready during every procedure. • Before every use, check the filter settings in order to prevent phototoxic injury to the patient's eye. • Depending on the type of application, take appropriate precautions to ensure that the surgical procedure or treatment can still be completed even if the full functionality of this microscope (e.g.
- Page 12 Stella KEY NOTES FOR USER (continued) • Defective or unidentified accessories may lead to increased leakage current on the system and injure the patient. Never connect any defective or unidentified accessories and never touch the power outlet or video interfaces while in contact with the patient.
-
Page 13: Safe Use Offundus Imaging System
Only use accessories expressly certified by the labomed for combination with the surgical microscope described in this manual. -
Page 14: Notes On Phototoxic & Radiation Safety
475 nm. • For protection of the retina, LABOMED use UV and IR safe LED for illumination of eye in Stella ophthalmic microscope and offers the swing-in blue block filter as standard feature of this surgical microscope. - Page 15 Labomed has taken care to this problem in the form of a swinging retinal protection device for insertion into the beam path of the surgical microscope. This device ensures total eclipsing of the pupil, prevent- ing light from entering into the patient's eye.
-
Page 16: Warning And Labels
Stella 9. WARNING AND LABELS Caution Observe all warnings labels and notes! If any label is missing on your instrument or has become illegible, please contact us or one of our authorized representatives. We will supply the missing labels. Instrument label plate... - Page 17 Stella WARNING AND LABELS (continued) Protective Earth This Way Up-Indicates correct upright position of the transport package. Keep Dry- Transport package shall be kept away from rain. The CE mark (an acronym for the French “Conformity Europeenne”) Certifies that a product has met European Union Health, safety and...
- Page 18 Stella WARNING AND LABELS (continued) Stella Issue 1.0 6219100-795 STELLA July,2021 July,2021...
-
Page 19: Description Of Parts
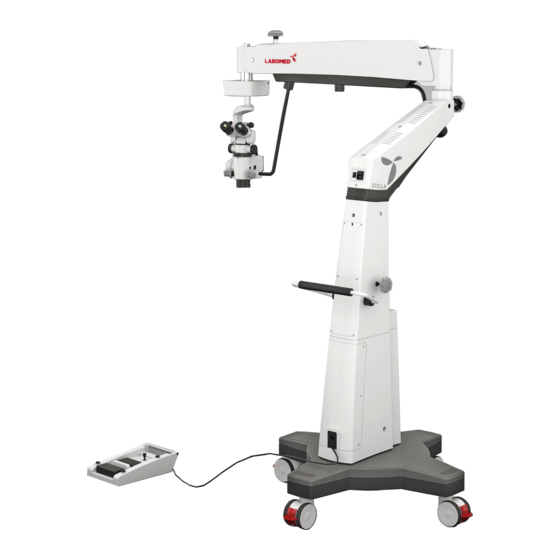
Stella 10. DESCRIPTION OF PARTS 15. Tilting Knob 1. Wheel with brake 16. Ergo Head 2. Star Base 17. Eye Pieces 3. Monitor Mounting 18. Lever Filter Change 4. Moving Handle 19. Handle 5. Locking Knob Column 20. Foot Switch 6. -
Page 20: System Diagram
Stella 11. SYSTEM DIAGRAM Issue 1.0 6219100-795 STELLA July,2021 July,2021... -
Page 21: Unpacking
Stella 12. UNPACKING The appliance is delivered in sub-assembled groups along with one set of Installation Kit and one instruction / service manual. Please check following at the time of unpacking: 1. Mobile supporting base with brakes on castor wheels with spanner. -
Page 22: Installation
Stella 13. INSTALLATION 1. Open Base assembly box shown in fig.-1. Fig 1 Unbolt the two dead balts A & B as a shown in fig .-1 Remove sheets and open box as shown in fig .-2 3. Unscrew the safety nut tightened over wooden block in... - Page 23 Stella INSTALLATION (continued) Refering fig-6. Mount the column into base by align- ing the Corresponding holes in Column (A) and Dowels (B) in base. Tighten 4 bolts under the base to secure column with base using 8mm allen key provided with instrument.
- Page 24 Stella INSTALLATION (continued) Align arm assembly over column and secure with 4 screws as shown in fig.-9. Fig 9 Open another box and take out the carrier assembly from its packaging following arm as shown in fig.-10. Fig 10 Remove all the contents from package as shown in fig.-11.
- Page 25 Stella INSTALLATION (continued) Referring fig-13. Install Double Iris, DBS and Tiltable Binocular tube onto the magnichanger assembly. Fix both eyepieces (D) on ergo head and set dioptreto CMO (E) is factory pre-installed. Attach Fundus viewing system(F) if supplied . Fig. 13 Mounting the light guide •...
-
Page 26: Wiring Coding Diagram
Stella 14.WIRING CODING DIAGRAM XY-Axis Motors Connection 7 pin female connector connection Brown Wire Grey Wire Internal Wire- 1 Ft Each Brown Blue Wire (Front) 7 core wire- 5Ft 5 Inch Wire Pink Wire Green Wire (Right) Yellow Wire (Back) -
Page 27: Control And Functions
Stella 15.CONTROLS AND FUNCTIONS 1. ON/OFF SWITCH (shown as 2 in fig-15 ) It is located on the back of the swivel arm. At ‘I’ posi- tion, microscope is on and cooling fan starts running. Caution Keep the intensity control knob at Minimum level before switching on the system. - Page 28 10. FRICTION ADJUSTMENT KNOB TO CONTROL ROTARY MOTION OF COLUMN AND SWIVEL ARM In Stella, truncated pyramid column and suspension arm rotates together for better center of gravity at any given position of arm. Referring as (F) as in fig-18, the knob is to adjust the friction on the move- ment of the column and swivel arm.
- Page 29 Stella CONTROLS ON THE MICROSCOPE (continued) 11. XY RESET BUTTON The XY coupling allows motorized fine position of the magnichanger in a horizontal plane. The range of travel is 50 mm x 50 mm. The XY coupling is provided with a recentering mech- anism.
- Page 30 (iv) Retinal protection device. Injuries are likely to occur if the light intensity is high This Fig 21 is the reason labomed has provided a retina protection device which can be moved continuously in the light path. Fig. 21 15. SLIDING KNOB FOR RED REFLEX Referring fig 21 knob “B”...
- Page 31 Stella CONTROLS ON THE MICROSCOPE (continued) 17. Z-AXIS MOVEMENT Z axis coupling allows fine moterized focusing of the area of interest within a travel range of 40mm. two foot paddles are provided on the foot control to facilitate up and down movement. refer (X) fig 22 18.
-
Page 32: Use Of Microscope
Stella 16.USE OF MICROSCOPE (continued) 1.SETTING UP OF MICROSCOPE: i.Switch on the microscope ,check the unit as per check list and move the microscope over the sergical field ii. Lock all the brakes on base wheels after setting up adjustment screw of microscope on the attendance area for stability. -
Page 33: Depth Of Focus Adjustment
Stella USE OF MICROSCOPE (continued) vi.Visualize area of interest with both eyes. vii. Bring area of interest in the center of field of view using xy joystick. viii. change magnification from highest to lowest using foot switch. Area of interest should remain in focus and in the feild of view of eyepiece. -
Page 34: Recommendation Of Safe Use Of Microscope
Stella USE OF MICROSCOPE (continued) 7.RECOMMENDATIONS FOR SAFE USE OF MICROSCOPE Avoid looking directly into the light source, e.g. into the microscope ob jective lens or into a fiber light guidel. When selecting the brightness level for the patient's eye, always take care to keep the strain on the patient's eye to a minimum. -
Page 35: Changing The Objective & Eyepieces
Stella 17. CHANGING THE OBJECTIVES / EYEPIECES 1. The objectives can be taken out by rotating it in anti-clock wise direction. It can be threaded in by rotating in clock wise direction.fig 33 2. To install the eyepieces, insert in the eye tubes of observation head. -
Page 36: Thermal Cut Off
LED is above 70°C. In case if thermal cut-off fails, no risk will happen to the instrument, only LED may get fuse. Here user needs to replace the LED only and thermal cut-off will start working again. To replace LED user may call LABOMED service personal or authorized dealer. LED Specification: 3.7V 13.5 Amp 21. -
Page 37: Moving Position
Stella 22. MOVING POSITION Position of the system for safe transportation. Fold the system as shown before moving RELOCATING THE STAND • Turn off the unit at the power switch. • Disconnect the power cable from line power. • Remove the video cable from the video modules (e.g. video monitor. -
Page 38: Cleaning And Disinfection
Stella 23. CLEANING AND DISINFECTION Following disinfectants are recommended for cleaning and disinfection. 1. Normal household bleach (Sodium hypochlorite 5%)- strength 5000 ppm(10 parts water 1 part bleach). 2. 70% Isopropyl alcohol. Procedure: • Take a muslin cloth. • Moist it to feel wet •... -
Page 39: Care & Maintenance
Stella 25. CARE & MAINTENANCE CARE & MAINTENANCE This instrument is a high grade technological product and not required any special periodical Maintenance if handed carefully. To ensure optimum performance and safe working order of the Instrument, its safe functioning must be checked once every 12 months as per table below. We Recommended having this check performance by our service representative as part of regular Maintenance work. - Page 40 • Clean optical components using a lint-free cloth. Soak the cloth using a little methanol or Glass clean- er. Do not use ethanol and spirit. • LABOMED Max Lite coating are fungal resistant. If you clean as described above, the coatings will not be damaged.
-
Page 41: Troubleshooting Table
Stella 26. TROUBLESHOOTING TABLE This instruments a high grade technological product and not required any special periodical Maintenance if handed carefully. To ensure optimum performance and safe working order of the Instrument, its safety must be checked once every 12 months. We recommended having this check performance by our service representatives as part of regular maintenance work. - Page 42 Stella TROUBLESHOOTING TABLE (continued) PROBLEM REMEDY POSSIBLE CAUSE Clean thermal cut-off with a Thermal cut-off in lamp dry brush; blow it clean, if housing is contaminated. necessary. Contact service dept. Defective fan. Failure of Illumination surgical field using system electronics.
-
Page 43: Disposals
Stella 27. DISPOSAL Disposal must comply with locally applicable laws & regulations. Issue 1.0 6219100-795 STELLA July,2021 July,2021... -
Page 44: Specification
Stella 28. SPECIFICATIONS Technical Data (Specifications) Observation tubes: 0-210° Binocular tilt able head F= 140mm Stereo Base: 24mm Eyepieces: Standard: WF 12.5X/18 mm with eye guards Option: WF 10X/18 mm with eye guards Dioptre Adjustment: ± 7 mm Magnichanger: MaxLite coated,Apochromatic, motorized stepper zoom... -
Page 45: Guidance Tables
All Equipment and Systems Guidance and Manufacturer’s Declaration - Electromagnetic Emissions The STELLA is intended for use in the electromagnetic environment specified below. The customer or user of the STELLA should ensure that it is used in such an environment. - Page 46 All Equipment and Systems Guidance and Manufacturer’s Deceleration - Electromagnetic Emissions STELLA is intended for use in the electromagnetic environment specified below. The customer or user of the STELLA should ensure that it is used in such an environment. Electromagnetic Environment...
- Page 47 Guidance and manufacturer’s Deceleration – Electromagnetic Immunity The STELLA is intended for use in the electromagnetic environment specified below. The customer or user of the STELLA should ensure that it is used in such an environment. Immunity Test IEC 60601 Test Level...
- Page 48 The STELLA is intended for use in electromagnetic environments in which radiated RF disturbances are controlled. The customer or user of the STELLA can help prevent electromagnetic interference by Maintaining a minimum distance between portable and mobile RF communications equipment (Transmitters) and the STELLA as recommended below, according to the maximum output power of the communication equipment.
-
Page 49: Dimensions
Stella 30. DIMENSIONS 1002 Issue 1.0 6219100-795 STELLA July,2021 July,2021... -
Page 50: Glossary
Stella 31. GLOSSARY Ametropia Compensation Compensation of short-or-far-sightedness. This can be done for each eye using the two individual eyepieces (range: +7 to -7 diopters). Working Distance Distance front lens to object level (200mm). Color Temperature Refers to the color characteristic of a light source. Using color temperature, one can set the color of a light source to warm or cold light Relative to the color of natural light. -
Page 51: Warranty
No representative or other person is authorized to make any other obligations for a LABOMED product. LABOMED shall not be liable for any special, incidental, or consequent damages for any negligence, breach of warranty, strict liability, or any other damages resulting from or relating to design, manufacture, sale, use, or handling of the product. - Page 52 Revision History DCR # Rev. No. Date of Release Change App. By Issue 1.0 6219100-795 STELLA July,2021 July,2021...
- Page 53 920 Auburn Court Fremont, CA 94538 U.S.A. Phone: 510-445-1257 Fax: 510-991-9862 Email: sales@laboamerica.com www.laboamerica.com EU REP. Labomed Europe Essebaan 50 NL-2908 LK Capelle a/d IJssel The Netherlands Tel: +31 (0)10 4584222 Fax: +31 (0)10 4508251 E-mail: info@labomedeurope.com A16372 ISO 13485...
Need help?
Do you have a question about the STELLA and is the answer not in the manual?
Questions and answers