
Related Manuals for Labomed Lx POL


Summary of Contents for Labomed Lx POL
-
Page 1: User Manual
Lx POL User Manual Research Microscopy To ensure proper use of this instrument as well as to avoid injury while operating instrument, understanding this manual completely before use is highly recommended. -
Page 3: Table Of Contents
INTRODUCTION SAFETY INFORMATION a. General Instructions b. Symbol Used c. Maintenance and Care d. Health Risks e. Electric Data Lx POL BINOCULAR Lx POL TRINOCULAR UNPACKING YOUR MICROSCOPE STANDARD COMPONENTS OPTIONAL ACCESSORIES & INSTALLATION 10-11 DETAILED INTRODUCTION OF ASSEMBLIES 12-14 a. - Page 4 CONTENTS CENTRATION 17-19 a. Preparation for centration b. Kohler illumination centration c. Flip Top Abbe Condenser centration d. Objective centration e. Extinction adjustment f. Conoscopical adjustment SUMMARY OF POLARISED OBSERVATION PROCEDURE SUMMARY OF POLARISED OBSERVATION PROCEDURE 21-24 a. Placing the specimen on stage b.
-
Page 5: Introduction
Halogen bulb (6V-20W) has an average life span of up to 2,000 hours. The Lx POL is equipped with a Flip Top Abbe Condenser N.A. 1.25 and a swing in and swing out provision for the Top Lens to attain for brighter illumination levels. An iris diaphragm is also provided for better resolution and contrast control. -
Page 6: Safety Information
Lx POL SAFETY INFORMATION General Instructions A microscope is a precision instrument with delicate glass components, please handle with care Do not use the microscope where it is subjected to direct sunlight, high temperature, humidity, dust and vibrations. The microscope is ventilated by natural convection. Be sure to leave enough space (10 cm or more) around body when installing the unit. - Page 7 Do not disassemble any part of the microscope as this could result in malfunction or mitigated performance. When not using the microscope, ensure that the frame is fully cooled before storing the unit in a dry locker or covering with a dust cover (provided). To clean the Flip Top Condenser, fully loosen the securing thumb screw (1) and remove the condenser then, wipe the front lens of the condenser with optical cleaning solution (mixture suggested above) and lens tissue.
-
Page 8: Health Risks
Do not place microscope on a flexible surface as this could result in blocking the air vents and cause overheating. Always use the power cord provided by LABOMED. If the proper power cord is not used, product safety performance cannot be warranted. - Page 9 Always use the designated bulb. Using a bulb other than those specified by LABOMED may lead to a fire hazard. Fingerprints or stains on the lamp bulb reduce its life. If contamination occurs, wipe bulb surface with a cloth slightly moistened with alchohol.
-
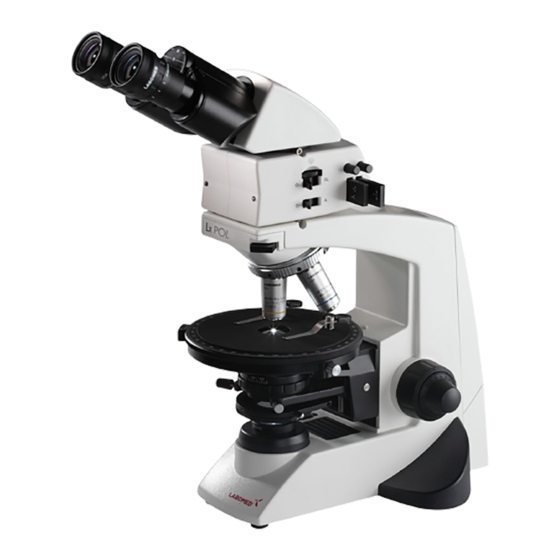
Page 10: Lx Pol Binocular
Lx POL Lx POL Binocular Binocular viewing tube 30° inclined Bertrand lens focusing knob Eyepieces Bertrand lens on/off Allen keys for objective centering Intermediate Analyzer Kit Parking for additional Bertrand Lens centering screw wave plates (2) Analyzer on/off Port of wave plate... -
Page 11: Lx Pol Trinocular
Lx POL Lx POL Trinocular Trinocular viewing tube, 30° inclined Bertrand lens focusing knob Eyepieces Bertrand lens on/off Allen keys for objective centering Intermediate Analyzer Kit Parking for additional wave plates (2) Bertrand Lens centering screw Analyzer on/off Port of wave plate... -
Page 12: Unpacking Your Microscope
UNPACKING YOUR MICROSCOPE Power Cord Observation head Microscope Arm Eyepieces... -
Page 13: Standard Components
Lx POL STANDARD COMPONENTS After removing your microscope from its packaging, make sure that all of the following contents are present. “Please note that the contents of your microscope may vary as the optional configuration, contrasting method or viewing body opted for may not be of the standard configuration highlighted here”... -
Page 14: Optional Accessories & Installation
OPTIONAL ACCESSORIES System Diagram of Optional Accessories iVu 7000 iVu 5100 Binocular head Trinocular head WF 10x WF 16x WF 20x Analyzer Module RP 2.5x RP 4x RP 10x RP 20x RP 40x (SL) RP 100x (SL, Oil) Polarizing kit Blue filter Flip Top Abbe Condenser Halogen Bulb... - Page 15 Lx POL Installation and Operation of Optional Accessories iVu Camera Module System 1. Mount the Video adapter 1/2” (part # 3143300-912) Fig. 4 on Trinocular observation head (Fig. 5). 2. Mount iVu Camera Module System (Fig. 3) on video adapter.
-
Page 16: Detailed Introduction Of Assemblies
(Polarizer out of Light Path) Lx POL Polarizer is also equipped with a mechanism of swing in / out the polarizer from the light path Round Stage Lx POL round stage has both the key feature of rotatability & centerability (Fig. -
Page 17: Centerable Revolving Nose Piece
1-4 Order Fig. 10-a Objectives Lx POL objectives are free from stress & both type of 'strain' i.e. glass characteristics during various stages of the assembly like cementing or mounted in close proximity with tightly fitted frames. Lx POL objectives are marked P on objectives barrel only after passing the strict testing. -
Page 18: Eye Pieces
Eye Pieces Lx POL comes with a pair of Eye Pieces. One of the eyepieces has a crosshair reticule to mark the center of the field of view and the second for normal viewing. Orientation of the Eye Piece with respect to the Polarizer and Analyzer is ensured by the eye tube lower that slides into the observation Bino Body tube. -
Page 19: Initial Setup
Lx POL INITIAL SETUP Observation Head Install the observation head using the following procedure: 1. Using the 3mm allen wrench (provided), loosen the Head Locking Screw (1) and remove the dust cover cap provided in the dovetail cavity. 2. Mount the Analyzer attachment by engaging the dovetail provided on the attachment into the dovetail cavity on the microscope arm and tighten the Head Locking Screw (1) See figure 15. -
Page 20: Mounting The Daylight (Blue) Filter
Mounting the Daylight (Blue) Filter This filter modifies the color of observation light into a natural (daylight) color. Place Blue filter on Koehler Mount. Fig. 18 Stage Clips Fix Stage Clips on round rotatable stage for holding the pol specimen. Fig. -
Page 21: Centration
Lx POL CENTRATION Preparation for Centration Step: 1 Disengage the Analyzer and Bertrand Lens by switching the operating lever to “O” position as shown in Fig. 13. Fully open the aperture diaphragm of the condenser by rotating its ring to the extreme left. -
Page 22: Objective Centration
Objective Centration Swing in 10x objective in the light path. Adjust the condenser aperture diaphragm. Retrieve the two centering keys (Ref Fig 13 Part 5) and insert them in the centering holes (Ref Fig 10 Part 1) above the objective you want to center. -
Page 23: Extinction Adjustment
Extinction Adjustment Remove all compensator; specimen & test plates out of light path. Swing in 10x Objective in the light path. Swing out Top lens of Flip Top Abbe Condenser from light Path (Ref. Fig. 08) Bring preset vibration direction Analyzer plate by moving Analyzer lever to ‘A’... -
Page 24: Summary Of Polarised Observation Procedure
SUMMARY OF POLARIZED LIGHT OBSERVATION PROCEDURE Flip the main switch to “ON” Disengage Analyzer and Bertrand Lens lever to “O” position. Fuse Holder Main switch Engage the 10x Objective in the light path Adjust the observation tube and eyepieces Adjust the interpupillary distance. Adjust the dioptric setting. -
Page 25: Summary Of Polarised Observation Procedure
Lx POL DETAILED OBSERVATION PROCEDURE Placing specimen on the stage Rotate the coarse adjustment knob (2) in anticlockwise direction to fully lower the stage. Press the spring loaded clip lever (3) by pushing lever handle (1), place the specimen by sliding the specimen glass plate(s) on the... -
Page 26: Adjusting The Focus
Adjusting the Focus Focusing Procedure (Figure 30) Rotate the coarse adjustment knob (1) clockwise so that the objective (3) is as close as possible to the specimen (We recommend starting with 10X). While observing the specimen through the eyepieces, slowly rotate the coarse adjustment knob (1) counterclockwise to lower the stage. -
Page 27: Adjusting The Diopter
Lx POL Adjusting the Diopter Procedure for adjusting the diopter: 1. Rotate the right eyepiece to match the markings of your IPD (If your IPD is 64, rotate the eyepiece to 64 mark). 2. While looking through the right eyepiece with your right eye, rotate the coarse and fine adjustment knobs to bring the specimen into focus. -
Page 28: Switching The Objectives
The designated immersion oil should be in contact with the cover lens of the 100X immersion objective. If not, the specimen will appear distorted and dull. It is recommended that LABOMED immersion oil is always used. Immersion Process: 1. Bring the specimen in focus using first the 10x, then 40x objective. -
Page 29: Troubleshooting Guide
Under certain conditions, performance of the unit may be adversely affected by factors other than defects. If problems occur, please review the following list and take corrective action as needed. If problem persists, please contact LABOMED or your local LABOMED dealer. - Page 30 Lx POL Observation Cause Remedy 8. Objective hits the specimen when The specimen slide is upside down Set the specimen correctly with the an objective is switched to a higher cover glass facing upwards magnification objective The cover glass is too thick Use a cover glass with thickness of 0.17mm...
-
Page 31: Specifications
SPECIFICATIONS 1. Illumination Built-in illumination system Halogen 2. Focusing mechanism Stage height adjustment mechanism Fine adjustment scale: 3.0µm per graduation Fine adjustment stroke: 0.3mm per turn Total stroke: 12.7mm Co-axial coarse and fine focusing on ball drive 3. Revolving nosepiece Quadruple positions fixed (Reverse angle) 4. - Page 32 920 Auburn Court Fremont CA 94538 LABOMED and Lx POL are registered trademarks of Labo America, Inc. With a policy of continuous development, Labo America, Inc. reserves the right to change design and specifications without prior notice. ISO 9001 : 2008 ©...
Need help?
Do you have a question about the Lx POL and is the answer not in the manual?
Questions and answers