Advertisement
1 - Left sidewall
1 pc.
6 - Lower base of
drawer
350
1 pc.
11 - Lower base of box
4 pcs.
16 - Facade of drawer
#2
1 pc.
b - Set of minifixes
12 pcs.
g - 3 mm hex key,
1 pc.
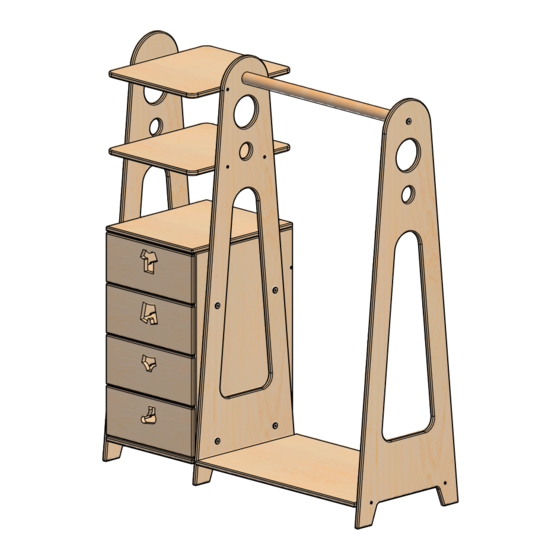
"Dewdrop" wardrobe
ASSEMBLY DETAILS
2 - Right sidewall
1 pc.
7 - Upper cover of
drawer
350
1 pc.
12 - Back plank of box
4 pcs.
17 - Facade of drawer #3
1 pc.
c - Erikson nut
8 pcs.
h - 4 mm hex key
1 pc.
3 - Middle wall
1 pc.
8 - Left drawer sidewall
1 pc.
13 - Left side plank of
drawer
4 pcs.
18 - Facade of drawer #4
1 pc.
d - Confirmat screw 5х40 е - Self-tapping scres 6,3
40 pcs.
i - 5 mm hex key
1 pc.
4 - Lower base
550
1 pc.
9 - Right drawer sidewall
1 pc.
14 - Right side plank of
drawer
4 pcs.
19 - Nog
1 pc.
х40
2 pcs.
j - Screwdriver
1 pc.
5 - Shelf
350
2 pcs
10 - Back wall of drawer
1 pc.
15 - Facade of drawer
#1
1 pc.
а - Screw М6х20
8 pcs.
f - Shelf-holder
8 pcs.
Advertisement
Table of Contents

Related Manuals for Montessori Furniture Dewdrop


Summary of Contents for Montessori Furniture Dewdrop
- Page 1 "Dewdrop" wardrobe ASSEMBLY DETAILS 1 - Left sidewall 2 - Right sidewall 3 - Middle wall 4 - Lower base 5 - Shelf 1 pc. 1 pc. 1 pc. 1 pc. 2 pcs 6 - Lower base of 7 - Upper cover of...
- Page 2 Pic. 1 Connect the lower base (4) to the right sidewall (2) with the help of confirmat screws (d) and hex key (g). Take the middle wall (3) and connect it with confirmats (d). Take the nog (19) and screw it betwen the right sidewall (2) and the middle wall (3) with the help of self-tapping screws (e) and hex key (h).
- Page 3 Pic. 3 Take the lower base of drawer (6) and using the confirmat screws (d) and hex key (g), connect the left and right drawer sidewalls (8, 9). Insert the back wall of drawer (10) between them and fix it with confirmats (d). Put the upper cover of drawer (7) and close the eccentrics (b) on the details (8) and (9) clockwise.
- Page 4 Pic. 5 Insert the shelves (5) into the previously assembled construction ans fix them with the confirmat screws (d). See Pic. 5 Install the dowels from minifixes (b) Pic. 6 Take the drawer facades (15,16, 17, 18) and using the screwdriver, screw the dowels from minifixes (21) in.
- Page 5 Pic. 7 Take the lower base of box (11) and using the confirmat screws (d), connect the back, left and right drawer planks (12, 13, 14). The install the facade #1 (15) and close the eccentrics (b) located on the side planks (13, 14) clockwise with the screwdriver (j).
Need help?
Do you have a question about the Dewdrop and is the answer not in the manual?
Questions and answers