Table of Contents
Advertisement
Quick Links
1 - Hexagon for
2 - Hexagon for
3 nogs
2 nogs
20 pcs.
10 pcs.
Assemble the lower hexagon:
Pic. 1
Take one of the hexagons for 2 nogs (2) and install the nog (3) in it fully to get
such a position, so that the holes of the wooden hexagon matched the holes
of the nog. Join the details with the screw (a) using the hex key (b). See Pic.1.
Pic. 2
To the receive construction attach another wooden hexagon for 2 nogs(2)
and fix it with the screws (a). See Pic.2.
"Spider" climber
ASSEMBLY DETAILS
3 - Nog
40 pcs.
3
а
а
2
a - Screw 6.3x50
80 pcs. + 5 spare
3
a
2
b - 4mm hex key
1 pc.
Advertisement
Table of Contents

Related Manuals for Montessori Furniture climber Spider


Summary of Contents for Montessori Furniture climber Spider
- Page 1 "Spider" climber ASSEMBLY DETAILS 1 - Hexagon for 2 - Hexagon for 3 - Nog a - Screw 6.3x50 b - 4mm hex key 3 nogs 2 nogs 20 pcs. 10 pcs. 40 pcs. 80 pcs. + 5 spare 1 pc. Assemble the lower hexagon: а...
- Page 2 а Pic. 3 Attach another nog (3) to the detail 2 using the screws (a). See Pic.3. Engraved mark а Pic. 4 Attach the wooden hexagon for 3 nogs (1) to the previously assembled construction. It should be located in such a way, so that engraved mark looked outside the construction.
- Page 3 Engraved mark а Pic. 6 Attach the hexagon for 3 nogs (1) to the received construction in a way, so that the engraved mark looked outside the construction, and fix with the screw (a). See Pic.6. а Pic. 7 Attach another detail 3 using the screw (a) and hex key (b) to the hexagon for 3 nogs (1).
- Page 4 Engraved mark а а а а Engraved mark а а Engraved mark а а а а Engraved mark Engraved mark Pic. 9 It is to be assembled in a same way as the lower hexagon parts. Use the wooden hexagons for 3 nogs (1) and nogs (3). Fix with the help of screws (a) and hex key (b).
- Page 5 Pic. 11 After attaching all 6 hexagonal parts you will receive the following construction. See Pic.11. а а а а Pic. 12 Attach the nogs (3) to previously assembled construcion using the screws (a) and hex key (b). See Pic.12.
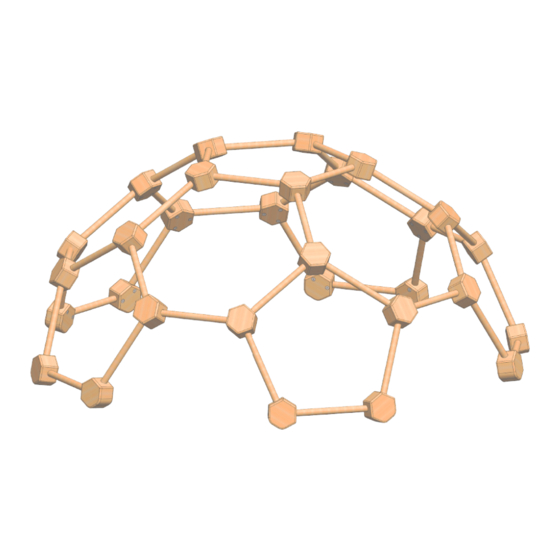
- Page 6 Pic. 13 Join the previously assembled construction and the upper hexagon part, depicted in the Pic.9. See Pic.13. Pic. 14 Fix the received construction with the screws (a) using hex key (b). See Pic.14. To be used for its intended purpose only and under the direct supervision of an adult! All the responsibility for children’s injuries received during games on the furniture lies on adults watching after them.
Need help?
Do you have a question about the climber Spider and is the answer not in the manual?
Questions and answers