Advertisement
Quick Links
1 - 960*50*20 Down back base
1 pc
4 - 880*50*20 Side base
1 pc
7 - 750*50*20 Up big base right
1 pc
10 - 900*50*20 Vertical base
1 шт.
13 - 900*50*20 Ladder with 2 steps
side right
1 pc
16 - 386*25*25 Short nog
2 pcs
20 - 154*138*12
Down connector right
2 pcs
24 - 366*180*12
Right chimney
1 pc
c - Flat head 20 mm screw
22 pcs - 2 pcs spare
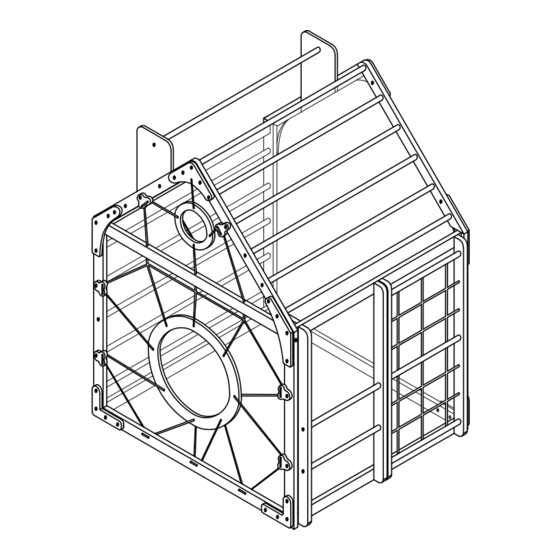
Climbing complex "Home"
ASSEMBLY DETAILS
2 - 900*50*20 Vertical base
1 pc
5 - 880*50*20 Side base
2 pcs
8 - 700*50*20 Up small base left
1 pc
11 - 900*50*20 Vertical base
1 шт.
14 - 886*25*25 Long nog
14 pcs
17 - Plywood rope ladder
1 pc
21 - 264*138*12
Up connector left
2 pcs
25 - 366*180*12
Left chimney
1 pc
d - Flat head 17 mm
dull nut
22 pcs - 2 pcs spare
3 - 900*50*20 Vertical base
1 pc
6 - 750*50*20 Up big base left
1 pc
9 - 700*50*20 Up small base right
1 pc
12 - 900*50*20 Ladder with 2 steps
side left
1 pc
15 - 862*25*25 Nog
3 pcs
18 - Rope ladder
1 pc
22 - 264*138*12
Up connector right
2 pcs
a - Flat head 60 mm screw
3 pcs - 1 pc spare
e - Dowel 32 mm
14 pcs - 1 pc spare
19 - 154*138*12
Down connector left
2 pcs
23 - 220*130*12
Up connector
1 pc
b - Flat head 40 mm screw
52 pcs - 5 pcs spare
f - 4mm hex key
2 pcs
Advertisement

Related Manuals for Montessori Furniture Climbing complex Home


Summary of Contents for Montessori Furniture Climbing complex Home
- Page 1 Climbing complex "Home" ASSEMBLY DETAILS 1 - 960*50*20 Down back base 3 - 900*50*20 Vertical base 2 - 900*50*20 Vertical base 1 pc 1 pc 1 pc 4 - 880*50*20 Side base 6 - 750*50*20 Up big base left 5 - 880*50*20 Side base 1 pc 2 pcs 1 pc...
- Page 2 Pic. 1 Assemble Down back base (1) with Down connector left (19) and Down connector right (20) using screws c, nuts d and both hex keys f as shown in the Pic. 1. Pic. 2 Insert the dowels e into Side bases (4 and 5). Assemble Down connector left (19) and Vertical base (3) using screws c, nuts d and both hex keys f Attach Down connector left (19), Vertical base (3) and Side base (4) with screw b, using hex key f.
- Page 3 Pic. 3 Insert the dowels e into Up small base right (9) and Up big base right (7) and connect them together. Assemble Up connector left (21) and Up big base right (7), Up connector right (22) and Up small base right (9) with screws c, nuts d and both hex keys f as shown in the Pic.
- Page 4 Pic. 5 Insert the dowels e into Side bases (4 and 5). Assemble Up connector left (21) and Vertical base (3) using screw c, nut d and both hex keys f. Connect Up connector left (21), Vertical base (3) and Side base (4) with screw b, using hex key f. Connect Up connector right (22), Vertical base (2) with Side base (5) and Long nog (14) with screws b, using hex key f.
- Page 5 Pic. 7 Assemble Up connector left (21), Up big base right (7) and Long nog (14) using screw b with hex key f. Connect Up big base right (7) and 3 Long nogs (14) with screws b, using hex key f. Assemble Up connector (23), Up big base right (7) and Long nog (14) using screw b with hex key f.
- Page 6 Pic. 9 Assemble Plywood rope ladder (17) with Down connector left (19) and Down connector right (20) using screws c, nuts d and both hex keys f as shown in the Pic. 9. Pic. 10 Assemble Down connector right (20) with Vertical base (11) using screw c, nut d and both hex keys f .
- Page 7 Pic. 11 Insert the dowels e into Up small base left (8) and Up big base left (6) and connect them together as shown in the Pic. 11. Pic. 12 Assemble Plywood rope ladder (17), Up small base left (8) and Up big base left (6) with screws c, nuts d and both hex keys f as shown in the Pic.
- Page 8 Pic. 13 Assemble Up connector left (21) and Up small base left (8) with screw c, nut d and both hex keys f . Connect Up connector right (22) with Up big base left (6) and Vertical base (11) with screws c, nuts d and both hex keys f as shown in the Pic. 13. Pic.
- Page 9 Pic. 15 Assemble Down connector right (20), Vertical base (11) with Side base (4) using screw b and hex key f. Assemble Up connector right (22), Vertical base (11) with Side base (4) using screw b and hex key f. Attach Up connector right (22), Up big base left (6) with Nog (14) using screw b and hex key f.
- Page 10 Pic. 17 Screw the Rope Ladder with Side bases (4) with screws b, using hex key f. See Pic. 17. Pic. 18 Screw the Ladder with 2 steps with Side bases (4) with screws b, using hex key f. See Pic. 18. To be used for its intended purpose only and under the direct supervision of an adult! All the responsibility for children’s injuries received during...
Need help?
Do you have a question about the Climbing complex Home and is the answer not in the manual?
Questions and answers