Table of Contents
Advertisement
Quick Links
Advertisement
Table of Contents

Subscribe to Our Youtube Channel
Related Manuals for AudioPressBox APB-112 OW-D-USB


Summary of Contents for AudioPressBox APB-112 OW-D-USB
- Page 1 APB-112 OW-D-USB Press Conference Audio Distribution Amplifier Owner’s manual...
- Page 2 If this device should be dropped or damaged, immediately disconnect the Dante network and have the device inspected by qualified AudioPressBox service personnel. way. The device contains no user-serviceable parts. If it should appear to be malfunctioning, discontinue use immediately and have it inspected by qualified AudioPressBox service personnel. Water warning •...
- Page 3 Company names and product names herein are trademarks or registered trademarks of their respective companies. Specifications and descriptions in this owner’s manual are for information purposes only. AudioPressBox reserves the right to change or modify products or specifications at any time without prior...
-
Page 4: The Package Contains
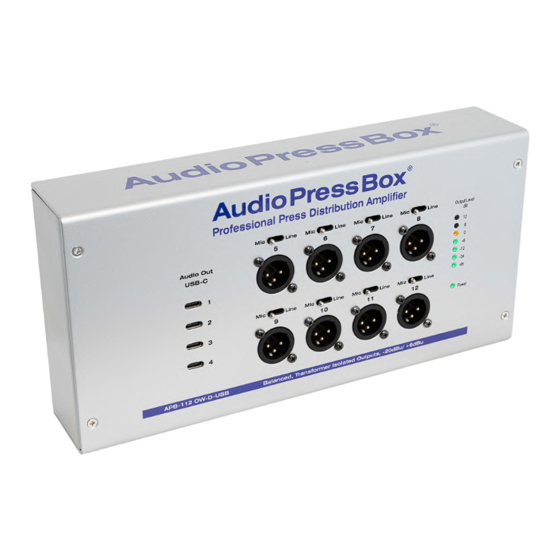
Thank you for purchasing the AudioPressBox APB-112 OW-D-USB. APB-112 OW-D-USB is an active AudioPressBox unit with one channel DANTE input, 8 XLR transformer isolated outputs with switchable Mic/Line output level and 4 USB-C outputs. OW suffix means that the unit is designed for wall mounting. The unit is powered directly from Dante network via PoE. - Page 5 APB-112 OW-D-USB 1.) Mic/Line switch 4.) Output level indicator Output level switch. You can individually Indicates the analog output level in dB. 0dB select nominal output level for each output. is nominal output level which corresponds Mic = -26dBu, Line = +6dBu to +6dBu (Line) or -26dBu (Mic) on outputs 2.) XLR Ouputs...
- Page 6 Dante network, eight analog audio outputs with individual output level switch – MIC/LINE and four USB-C outputs*. There is no signal processing inside. All desired processing should be done in other devices (e.g. mixing console or DSP). So, the APB-112 OW-D-USB is suitable for fixed installations with integrated Dante network.
- Page 7 Set up the output level on your source device with PoE capability to reach the nominal output on APB – 0dB LED APB-112 OW-D-USB is a PoE Class 3 on Output Level indicator. You can also set the device, so it can be powered from a basic output level switch for each output as desired –...
-
Page 8: Installation
Installation APB-112 OW-D-USB is designed for “On Wall” installation. 1.) Unscrew 4 screws on top panel 3.) Screw it to the wall, the wall may be 5.) Screw the APB to the back plate from concrete, stud, wood… Please use... -
Page 9: Specifications
Specifications Audio Press Box APB-112 OW-D-USB Type 1 In 12 Out Groups Input section Inputs Input connectors RJ45 - Dante PoE Requirement Reference level -18dBFS Output section Analog Outputs Outputs 8 Line/MIC level Output connectors Balanced, XLR Nominal Output Level... - Page 10 Specifications Audio Press Box APB-112 OW-D-USB Indicators Output section: Output level. Power Power Power Supply PoE (Type 1, Class 3 (12,95W)) Mechanical Dimensions (WxHxD) 280x138x54mm Weight 2400 g...
-
Page 11: Block Diagram
Block diagram... - Page 12 | web: www.audiopressbox.com MediaTech Central Europe, a.s., Drienova 34, 821 02 Bratislava, Slovak Republic (EU) Tel: +421 2 20 999 700...
Need help?
Do you have a question about the APB-112 OW-D-USB and is the answer not in the manual?
Questions and answers