Table of Contents
Advertisement
Available languages
Available languages
Quick Links
IMPORTANT: FOR YOUR PROTECTION, YOU MUST CAREFULLY READ ALL WARNINGS AND INSTRUCTIONS IN THEIR ENTIRETY PRIOR TO INSTALLATION,
OPERATION, SERVICE OR MAINTENANCE. FAILURE TO DO SO CAN RESULT IN DEATH, PERSONAL INJURY AND PROPERTY DAMAGE. If you do not understand
these warnings and instructions, or if additional information is desired, please contact Signify TSC@signify.com phone 1-833-744-6439.
•
Installation, service and maintenance of luminaires must be performed by a qualified professional and in accordance with all federal, state and local
laws, regulations and electrical codes. This professional should be familiar with the construction and operation of this product and any hazards
involved. If not qualified, do not attempt installation, service or maintenance.
•
To reduce the risk of death, personal injury or property damage from fire, electric shock, falling parts, cuts, abrasions and other hazards, please read
all warnings and instructions included with the luminaire, on the luminaire's packaging and affixed to the luminaire itself.
•
Maintenance of the luminaires should be performed by person(s) familiar with the luminaire's construction and operation and any hazards involved.
WARNING
RISK OF FIRE, ELECTRIC SHOCK OR PERSONAL INJURY
•
Disconnect or turn off power before attempting any installation, service or
maintenance.
•
Verify that supply voltage is correct by referencing the luminaire label
information.
•
Make all electrical and ground connections in accordance with the National
Electrical Code (NEC) and any other applicable laws, regulations or codes.
•
All wiring connections should be capped with UL-approved wire connectors.
WARNING
RISK OF FIRE OR PERSONAL INJURY
•
Keep combustible materials away from LED/lamp & lens
•
Do not operate in close proximity to persons, combustible materials
or substances affected by heat or drying.
CAUTION
RISK OF PRODUCT DAMAGE
• Never connect luminaires and/or components under load with supply voltage turned on.
• Do not mount or support these luminaires in a manner that can cut the outer jacket or damage wire insulation.
• Do not restrict fixture ventilation. Allow for some volume of airspace around luminaire. Avoid covering luminaire with insulation, foam or other material that will
prevent convection or conduction cooling.
• Do not exceed luminaire maximum ambient temperature.
• Do not modify the luminaire.
• Only use luminaire in its intended application and location.
• Led products are polarity sensitive. Ensure proper polarity before installation.
• Electrostatic Discharge (ESD) can damage LED. Personal grounding equipment must be worn during all installation and servicing of the luminaire.
• Do not touch individual electrical components as this can cause ESD, shorten LED life, or impact LED performance.
• Some components inside the luminaire may not be serviceable. In the unlikely event your luminaire may require service, stop using it immediately and contact
Signify.
• Always read the luminaires complete installation instructions prior to installation for any additional luminaire specific warnings.
• In the case of HID or Fluorescent luminaires, regular re-lamping is required to keep luminaire operating within safe limits
• Do not install damaged product. Handling and installing damaged products can potentially increase the risks mentioned In case of damage and/or missing parts
upon arrival of the luminaire.
• These instructions do not purport to cover all details or variations in equipment nor to provide every possible contingency to meet in connection with installation,
operation or maintenance.
• Please see luminaire specific Installation and Maintenance Instruction for additional warnings or any applicable FCC or regulatory statements. Failure to follow
any of these Instructions could void luminaires warranties.
Luminaire Maintenance
• Regular luminaire maintenance programs are recommended.
• It is recommended to clean the outside of the luminaire and the refractor/lens.
• Frequency of cleaning will depend on ambient dirt level and minimum light output which is acceptable to user.
• If clean water is not sufficient for cleaning, use a neutral, synthetic, not-scratching and not-abrasive cleaning substance.
• Never use alkaline and/or acetous cleaning substances.
• Make sure that the cleaning substance is carefully removed by rinsing with lots of clean water.
• Signify recommends using a cleaning solution that has a PH between 5 and 8.
• Recycle: For information on how to recycle electronic products and components, please visit www.epa.gov.
8/16/2023
11/24/2020
page
1
www.gardcolighting.com
Page 1
Solar Solution
OPFS-SOL
442296118621-R4
WARNING
RISK OF FIRE, ELECTRIC SHOCK OR PERSONAL INJURY
•
Wear gloves and safety glasses at all times when removing luminaire
from carton, installing, servicing or performing maintenance.
•
Avoid direct eye exposure to the light source while it is on.
WARNING
RISK OF FIRE, ELECTRIC SHOCK OR PERSONAL INJURY
•
Allow Led/lamp & lens to cool before handling.
•
Do not touch enclosure or light source
•
Do not exceed maximum wattage marked on luminaire label.
•
Follow all manufacturer's warnings, recommendations, instructions
and restrictions for driver type, burning position, mounting locations
and replacement.
12NCs-Rx
Advertisement
Table of Contents

Related Manuals for SIGNIFY GARDCO OptiForm Solar


Summary of Contents for SIGNIFY GARDCO OptiForm Solar
- Page 1 IMPORTANT: FOR YOUR PROTECTION, YOU MUST CAREFULLY READ ALL WARNINGS AND INSTRUCTIONS IN THEIR ENTIRETY PRIOR TO INSTALLATION, OPERATION, SERVICE OR MAINTENANCE. FAILURE TO DO SO CAN RESULT IN DEATH, PERSONAL INJURY AND PROPERTY DAMAGE. If you do not understand these warnings and instructions, or if additional information is desired, please contact Signify TSC@signify.com phone 1-833-744-6439. •...
-
Page 2: Installation Instructions
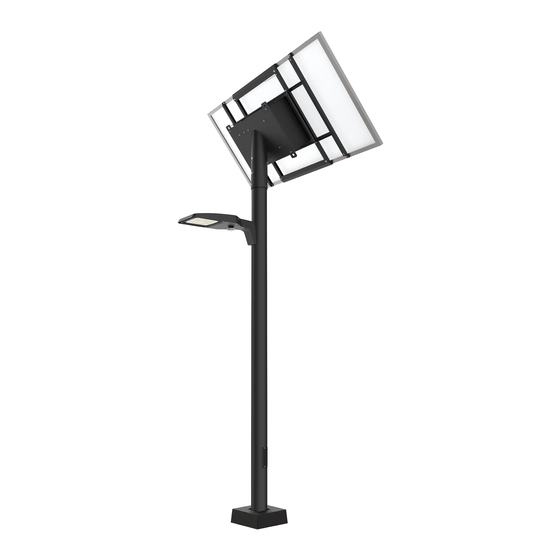
Solar Solution Installation Instructions 12NCs-Rx Installation best practice In daytime, sunlight should shine on the PV panel directly without any shade and blocking, otherwise it will not work for charging and harm the battery lifetime. DETAIL DESCRIPTION Avoid location in the shade of the tree or building First Installation should avoid deeply discharge the battery, installing in daytime or recharge the battery before installation, or shut down the luminaire in first... - Page 3 Solar Solution Installation Instructions 12NCs-Rx Battery Box & Solar Panel Assembly CAUTION: Please handle batteries carefully to avoid damage. (handles on some models) Before starting the battery box assembly, provide a suitable work surface to lay the battery box flat. Example: use two trestles.
- Page 4 Solar Solution Installation Instructions 12NCs-Rx CAUTION: Do not attempt to install the solar system in windy conditions. IMPORTANT: The PV panel is fragile. Never install the solar panel on the ground upside down, this could damage the panel. Always handle the solar panel carefully. NOTE: Remove protective film on PV panel frame before installation.
- Page 5 Solar Solution Installation Instructions 12NCs-Rx Pole Assembly Lay the pole flat on the ground without damaging it. Pass the SOOW cable through the top of the pole and bring it out through the hole provided on the pole. IMPORTANT: Do not install the arm and/or luminaire before lifting the pole into place.
- Page 6 Solar Solution Installation Instructions 12NCs-Rx Solar System Installation Remove the 3/8X 1” locking bolt, lock washer & washer to install the solar system tenon on the pole. Loosen the set screws (6) 3/8-16, 1/2'', to install the solar system tenon on the pole. With the proper equipment, attach the lifting straps to the (4) eyelets provided.
- Page 7 Solar Solution Installation Instructions 12NCs-Rx Using a compass, orient the face of the solar panel towards the south. Once the system is aligned in the desired orientation, make a mark on the pole at the position of the locking bolt. Lift the solar system slightly to clear the mark and drill a 1/2"...
- Page 8 Solar Solution Installation Instructions 12NCs-Rx OPFS-SOL luminaire Installation WARNING: THE ELECTRICAL POWER MUST BE DISCONNECTED DURING ALL INSTALLATION OR SERVICE WORK. FAILURE TO FOLLOW THE INSTALLATION DOCUMENTATION OR OPERATING THIS PRODUCT OTHERWISE THAN FOR ITS INTENDED USE VOIDS THE WARRANTY. 3/8-16 bolts Install the mounting arm passing the SOOW cable.
-
Page 9: Sensor Information
Solar Solution Installation Instructions 12NCs-Rx Power supply of the system Open the door and secure it with the safety arm. Turn the switch to ‘’ON’’ to turn on the system Verify that the system is operational and that the light turns on. -
Page 10: Electrical Diagram
Solar Solution Installation Instructions 12NCs-Rx Electrical diagram DETAIL DESCRIPTION Signify North America Corporation 2021 400 Crossing Blvd Suite 600 Bridgewater Township, NJ 08807 Telephone 732-563-3000 page www.lumec.com... - Page 11 Si des renseignements additionnels sont requis, ou si des problèmes particuliers surviennent qui ne sont pas couverts suffisamment aux fins prévues par l’acheteur ou le propriétaire, veuillez soumettre la question ou le problème à avec Signify TSC@signify.com composez le 1-833-744-6439.
-
Page 12: Instructions D'installation
Solution Solaire Instructions d’Installation 12NCs-Rx Bonnes pratiques d'installation Pendant la journée, la lumière du soleil doit briller directement sur le panneau photovoltaïque sans ombre ni obstruction, sinon elle ne fonctionnera pas pour la charge et nuira à la durée de vie de la batterie. DETAIL DESCRIPTION Éviter les emplacements à... - Page 13 Solution Solaire Instructions d’Installation 12NCs-Rx Assemblage du boîtier et du panneau solaire ATTENTION : Veuillez manipuler les piles avec précaution pour éviter de les endommager. (poignées sur certains modèles) Avant de commencer l'assemblage du boîtier à batteries, prévoyez une surface de travail appropriée pour poser le boîtier à...
- Page 14 Solution Solaire Instructions d’Installation 12NCs-Rx REMARQUE : Retirez le film de protection du cadre du panneau solaire avant l'installation. IMPORTANT : Le panneau solaire est fragile. Ne jamais installer le panneau solaire sur le sol à l'envers, cela pourrait l'endommager. Manipulez toujours le panneau solaire avec précaution.
- Page 15 Solution Solaire Instructions d’Installation 12NCs-Rx Assemblage du poteau Posez le poteau à plat sur le sol sans l'endommager. Faites passer le câble SOOW par le haut du poteau et faites-le sortir par le trou prévu à cet effet sur le poteau. IMPORTANT : N'installez pas le bras et/ou le luminaire avant de soulever le poteau pour le mettre en place.
- Page 16 Solution Solaire Instructions d’Installation 12NCs-Rx Installation de systèmes solaires Retirez le boulon de blocage 3/8X 1", la rondelle de blocage et la rondelle plate afin d'installer le tenon du système solaire sur le poteau. Desserrez les vis de pression (6) 3/8-16, 1/2'', pour installer le tenon du système solaire sur le poteau.
- Page 17 Solution Solaire Instructions d’Installation 12NCs-Rx À l'aide d'une boussole, orientez la face du panneau solaire vers le sud. Une fois le système aligné dans l'orientation souhaitée, faites une marque sur le poteau à l'emplacement du boulon de verrouillage. Soulevez légèrement le système solaire pour dégager la marque et percez un trou de 1/2"...
- Page 18 Solution Solaire Instructions d’Installation 12NCs-Rx Installation du luminaire OPFS-SOL ATTENTION: COUPER L'ALIMENTATION ÉLECTRIQUE PENDANT TOUS LES TRAVAUX D'INSTALLATION OU D'ENTRETIEN FAUTE DE SUIVRE LA DOCUMENTATION D'INSTALLATION OU L'UTILISATION DE CE PRODUIT AUTRE QUE POUR SON USAGE Boulon 3/8-16’’ PRÉVU ENTRAÎNERA L'ANNULATION DE LA GARANTIE. Installez le bras de montage en passant le câble SOOW.
- Page 19 Solution Solaire Instructions d’Installation 12NCs-Rx Alimentation électrique du système Ouvrez la porte et sécurisez-la avec le bras de sécurité. Mettez l'interrupteur sur ''ON'' pour alimenter le système. Vérifiez que le système est opérationnel et que le luminaire s'allume. Une fois au sol, vérifiez la connectivité au BLE et validez les configurations à...
-
Page 20: Schéma Électrique
Solution Solaire Instructions d’Installation Schéma électrique Signify North America Corporation 400 Crossing Blvd Suite 600 Bridgewater Township, NJ 08807 Telephone 732-563-3000 page 20...
Need help?
Do you have a question about the GARDCO OptiForm Solar and is the answer not in the manual?
Questions and answers