Table of Contents
Advertisement
Quick Links
IMPORTANT!
• Read and understand this instructions completely before installation. Failure to follow these
instructions could prevent the valve from working properly. Consult a professional installer if needed.
• This installation guide is subject to change without notice, please contact us to request the most
updated version of this installation guide.
• This is a general installation guideline, actual installation may vary. It is recommended the
Installation is performed by a trained and experienced installer.
• Please follow all local building and plumbing codes.
• Proper pressure must be maintained for the pressure balance valve to work properly. Make sure
water pressure is about the same on both hot and cold water side.
• Product drawings in this installation guide is for illustration purpose only. Actual product may vary
depends on model.
• Always take extra precautions and wear appropriate safety equipment when installing this product.
• Unpack and inspect the parts from the package for shipping damage and make sure all parts are
included in the package. Keep the product in its package until you are ready to install.
• Make sure the installation site is clean and free of dust and debris.
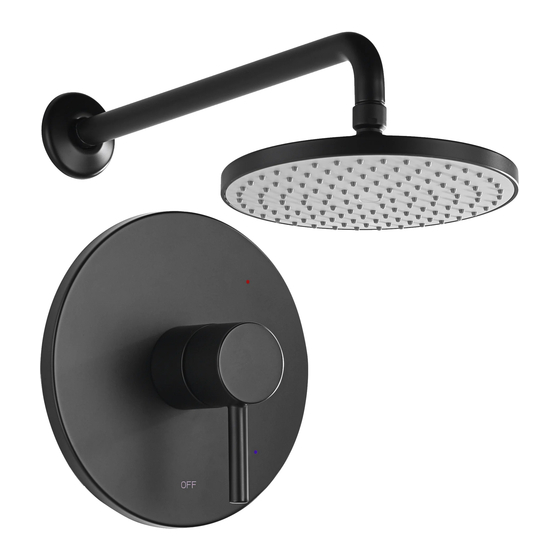
Luxier
Rainfall Shower System
SS-B01-TB (Brushed Nickel)
SS-B01-TC (Chrome)
SS-B01-TM (Matte Black)
SS-B01-TO (Oil Rubbed Bronze)
Specifications:
Shower head flow rate: maximum 1.8 gpm at 80 psi
Plumbing connection: standard 1/2" pipe fitting
1
SS-B01 Rev. F 072021
Advertisement
Table of Contents

Related Manuals for Luxier SS-B01-TC


Summary of Contents for Luxier SS-B01-TC
- Page 1 Rainfall Shower System SS-B01-TB (Brushed Nickel) SS-B01-TC (Chrome) SS-B01-TM (Matte Black) SS-B01-TO (Oil Rubbed Bronze) Specifications: Shower head flow rate: maximum 1.8 gpm at 80 psi Plumbing connection: standard 1/2” pipe fitting IMPORTANT! • Read and understand this instructions completely before installation. Failure to follow these instructions could prevent the valve from working properly.
- Page 2 Should a malfunction occur within the warranty period, Luxier USA will, as its option, (1) repair or replace the defective part(s) or product at no charge; (2) issue a refund of the purchase price paid for the product (Valid within 30 days from the date of purchase);...
- Page 3 15 Protective Sleeve* 7 5/16” 16 Escutcheon 17 O-Ring 18 Handle 19 Plunger 20 Spring 21 Screw 22 Stop Valve Nut * Drawings not to Scale. All Measurements are Approximate * * NOT used in final installation Luxier SS-B01 Rev. F 072021...
- Page 4 • Turn the valve to ON position and check all connections for leaks for about a minute. • Turn the valve to OFF position after pressure test and remove the 1/2” plug. Make sure the pipes are free of debris or sediments (Shower) COLD Luxier SS-B01 Rev. F 072021...
- Page 5 Attach the shower head as shown in Fig. H. (NOTE: Do not over tighten the connections.) 9. Turn on the water and check for leaks at all connections. The installation is now complete. Luxier SS-B01 Rev. F 072021...
- Page 6 This step will reset the Stop Valves. (See Fig. 2) 8. Re-install the Cartridge and assemble the parts 9. Turn of water to the valve and test the unit to complete the service Plunger Spring Luxier SS-B01 Rev. F 072021...
- Page 7 • When using spray cleaners, spray fi rst onto a soft cloth or sponge. Never spray directly onto the faucet as droplets can enter openings and gaps and cause damage. • After cleaning, rinse thoroughly with clean water to remove any cleaner residue. Luxier SS-B01 Rev. F 072021...
Need help?
Do you have a question about the SS-B01-TC and is the answer not in the manual?
Questions and answers