Table of Contents
Advertisement
Quick Links
Item #1000 000 000
Model #SFZ-500-1, SFZ-500-2, SFZ-500-3
USE AND CARE GUIDE
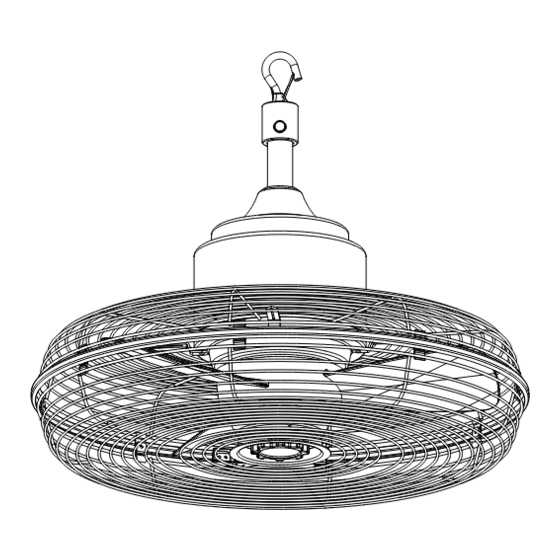
20 in. Indoor/Wet Outdoor Anywhere Fan
Questions, problems, missing parts? Before returning to the store,
call Hampton Bay Customer Service
8 a.m. - 7 p.m., EST, Monday – Friday, 9 a.m. – 6 p.m., EST, Saturday
1-855-HD-HAMPTON
HAMPTONBAY.COM
THANK YOU
continually create quality products designed to enhance your home. Visit us online to see our full line of products available for your home
improvement needs. Thank you for choosing Hampton Bay!
Advertisement
Table of Contents

Related Manuals for HAMPTON BAY SFZ-500-1


Summary of Contents for HAMPTON BAY SFZ-500-1
- Page 1 8 a.m. - 7 p.m., EST, Monday – Friday, 9 a.m. – 6 p.m., EST, Saturday 1-855-HD-HAMPTON HAMPTONBAY.COM THANK YOU continually create quality products designed to enhance your home. Visit us online to see our full line of products available for your home improvement needs. Thank you for choosing Hampton Bay!
-
Page 2: Table Of Contents
Table of Contents Tools required ........4 Table of Contents . -
Page 3: Warranty
Safety Information (continued) □ Do not insert your hand or other objects into the guard or the OPERATION SAFETY movable parts. □ Do not operate the fan until fully assembled with all parts properly □ Do not touch the fan with wet hands. in place. -
Page 4: Pre-Installation
Pre-Installation WARNING: Items in this section are not assembled to the product by the manufacturer and require installation. Use of a product that may have been improperly assembled could result in serious personal injury. WARNING: the fan installation, cleaning, or servicing. WARNING: To reduce the risk of personal injury, do not bend the blade brackets when installing the brackets, balancing the blades, or cleaning the fan. -
Page 5: Hardware Included
Pre-Installation HARDWARE INCLUDED NOTE: Hardware not shown to actual size. Part Description Quantity Hitch Clevis pin Lock screw Installation hardware bag Mounting bracket Nail screw Plastic anchor Sleeve anchor HAMPTONBAY.COM Please contact 1-855-HD-HAMPTON for further assistance. -
Page 6: Package Contents
Pre-Installation (continued) PACKAGE CONTENTS Part Description Quantity Hanger bracket assembly Decorative cap Mounting collar Fan Head... -
Page 7: Installation
Installation Attaching Fan Head to Hanger Attaching Hanger Bracket Assembly Bracket Assembly and Decorative Cap □ Pull out the hitch pin (AA) and then remove the clevis pin (BB) from the mounting collar (C) of fan head (D). Loosen the lock WARNING: screws (CC). - Page 8 Installation (continued) Installing the Mounting Bracket to the Positioning the Decorative Cap Ceiling □ Push down the decorative cap (B) to cover up the mounting DANGER: The proper method for installing the mounting collar (C). bracket must be chosen for different ceilings. Failure to do so could allow the fan to wobble and/or fall.
- Page 9 Installation (continued) □ Optional installing method is to replace the nail screws (FF) with Hanging the Fan to the Mounting Bracket sleeve anchors (HH). □ Place the mounting bracket (EE) at the desired postion on the ceiling, mark the position through the holes of the mounting □...
-
Page 10: Operation
Operation WARNING: Do not operate the fan until fully assembled with all parts properly in place. WARNING: Always plug the fan directly into a GFCI-protected wall outlet/receptacle only. Never use with an extension cord or outlet power strip. WARNING: Always switch off and unplug the fan when not in use, before moving fan from one location to another, before putting on or taking off parts and before cleaning or performing maintenance. -
Page 11: Care & Cleaning
Care and Cleaning □ Remove the lock screw and nut (II) on the rim. WARNING: Always switch off and unplug the fan before cleaning. Never connect the fan to a power supply when it is not in use, when moving fan from one location to another, assembling parts, making adjustments, cleaning or performing maintenance. -
Page 12: Maintenance
Care and Cleaning (continued) □ Remove the two lock screws (JJ) and then the speed setting label. □ Remove the eight lock screws (LL) along the guard edge and then remove the front guard. □ Remove the three lock screws (KK) to the front guard. □... - Page 13 Questions, problems, missing parts? Before returning to the store, call Hampton Bay Customer Service 8 a.m. – 7 p.m., EST, Monday – Friday, 9 a.m. – 6 p.m., EST, Saturday 1-855-HD-HAMPTON HAMPTONBAY.COM Retain this manual for future use.
Need help?
Do you have a question about the SFZ-500-1 and is the answer not in the manual?
Questions and answers