Table of Contents
Advertisement
Quick Links
Advertisement
Table of Contents

Related Manuals for DFI EHL051


Summary of Contents for DFI EHL051
- Page 1 EHL051 2.5" Pico-ITX User’s Manual © September 12, 2023 DFI Inc.
-
Page 2: Copyright
1. The changes or modifications not expressly approved by the party responsible for com- are the properties of the respective owners. pliance could void the user’s authority to operate the equipment. 2. Shielded interface cables must be used in order to comply with the emission limits. User's Manual | EHL051... -
Page 3: About This Manual
It must be returned to the purchase point, factory or authorized sales representative. service agency for all such work. 4. We will not be liable for any indirect, special, incidental or consequential damages to the product that has been modified or altered. User's Manual | EHL051... -
Page 4: Static Electricity Precautions
Make sure the system is placed or mounted correctly and stably to prevent the chance of dropping or falling may cause damage. • The openings on the system shall not be blocked and shall be kept in distance from User's Manual | EHL051... -
Page 5: Table Of Contents
RC ACPI Settings ......................24 CPU Configuration ......................24 Power & Performance ....................25 PCH-FW Configuration ....................25 Trusted Computing ......................26 PTN3460 Configuration ....................26 NCT5525D Super IO Configuration ................27 NCT5525D Super IO Configuration ► Serial Port 1, 2 Configuration ....27 User's Manual | EHL051... -
Page 6: Chapter 1 - Introduction
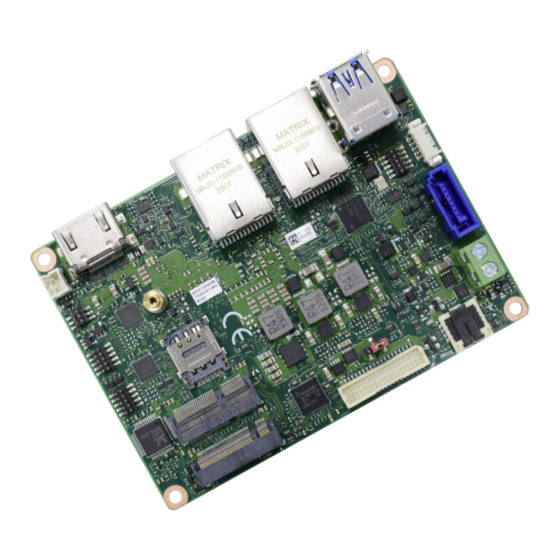
*PCIe share with SATA LED (BOM Optional) AUDIO Audio Codec Realtek ALC888S-VD2-GR ETHERNET Controller 2 x Inte I225LM/IT (10/100/1000Mbps) l® REAR I/O Ethernet 2 x GbE (RJ-45) 2 x USB 3.2 Gen2 Display 1 x HDMI User's Manual | EHL051... - Page 7 563,338 hrs @ 25°C; 391,802 hrs @ 45°C ; 278,646 hrs @ 60°C; 146,635 hrs @ 85°C MTBF Calculation model: Telcordia Issue 4 Environment: GB, GC – Ground Benign, Controlled STANDARDS AND Certifications CE, FCC , RoHS CERTIFICATIONS User's Manual | EHL051...
-
Page 8: Dimensions
Chapter 1 INTRODUCTION X Dimensions X Block Diagram User's Manual | EHL051... -
Page 9: Chapter 2 - Hardware Installations
R8135 R8108 R693 C162 C8191 R8275 C8183 R1191 DPR637 R8597 R1189 DPC626 R694 DPR643 R110 R8044 AUR69 R8043 D8050 R8906 DDR4 (SO-DIMM1) R626 C155 C154 DIMM3 C253 C156 M2R72 R9005 R930 R104 R105 R929 R109 R108 User's Manual | EHL051... -
Page 10: Jumper Settings
M2R20 DPR623 C252 M2CN2 M2R21 DPC610 R407 R417 DPCN601 R8997 DPC603 R412 DPFB602 R413 DPFB601 C9942 R125 R113 R9004 R993 M2R7 M2R9 R1198 R126 R995 R994 R992 „ 1-2 On: 5V „ 2-3 On: 3.3V (default) User's Manual | EHL051... -
Page 11: Pin Assignment
R8997 R412 R413 DPFB602 DPFB601 R413 C9942 C9942 DPFB601 R125 R113 R125 R113 R9004 R993 R9004 R993 R1198 R1198 M2R7 M2R9 R126 R995 R994 R992 M2R7 M2R9 R126 R995 R994 R992 Assignment Assignment DCJACK_IN RTC Signal User's Manual | EHL051... -
Page 12: Smbus (J58)
R105 C9942 DPFB601 R125 R113 R109 R108 R9004 R993 R929 R1198 M2R7 M2R9 R126 R995 R994 R992 Assignment Assignment Assignment Assignment 3V3SB +12V (Default) SMB_I2C_CLK SMB_I2C_DATA BLONOFF DIMMING SMB_ALERT# Note: Pin#5 share 5V with SATA power. User's Manual | EHL051... -
Page 13: Front Panel (J59)
DPFB601 R125 R113 R125 R113 R9004 R993 R9004 R993 R1198 R1198 M2R7 M2R9 R126 R995 R994 R992 M2R7 M2R9 R126 R995 R994 R992 Assignment Assignment Assignment Assignment SIO_PWSIN# 3V3SB SATA1_TXP SUS_LED# SATA1_TXN SYSRST# HD_LED# SATA1_RXN SATA1_RXP User's Manual | EHL051... -
Page 14: Dio (J54)
DPFB601 R125 R113 R929 R109 R108 R993 R9004 M2R7 M2R9 R1198 R126 R995 R994 R992 Assignment Assignment Assignment Assignment DO_0 DI_0 MDCD1# MSIN1 DO_1 DI_1 MSOUT1 MDTR1# DO_2 DI_2 MDSR1# DO_3 DI_3 MRTS1# MCTS1# 5VSB MRI1# User's Manual | EHL051... -
Page 15: Com2 (J52)
R9004 R993 R9004 R993 R1198 R1198 M2R7 M2R9 R126 R995 R994 R992 M2R7 M2R9 R126 R995 R994 R992 Assignment Assignment Assignment Assignment MDCD2# MSIN2 5V_USB45 5V_USB45 MSOUT2 MDTR2# USB2_4_C_N USB2_5_C_N MDSR2# USB2_4_C_P USB2_5_C_P MRTS2# MCTS2# MRI2# User's Manual | EHL051... -
Page 16: Front Audio (J55)
R1189 DPC626 R694 DPR643 R110 R8044 AUR69 R8043 D8050 R8906 C155 DDR4 (SO-DIMM1) R626 C154 C253 DIMM3 C156 M2R72 R9005 R930 R104 R105 R109 R108 R929 Assignment Assignment MIC2_L AGND_AUDIO MIC2_R LINE2_R MIC2-JD AGND_AUDIO LINE2_L LINE2-JD User's Manual | EHL051... -
Page 17: Lvds (Dpcn601)
DPCN601 R417 DPC603 R8997 DPFB602 R412 R413 DPFB601 C9942 R125 R113 R9004 R993 R1198 M2R7 M2R9 R126 R995 R994 R992 LVDSA_LANE1_N LVDSB_LANE1_N LVDSA_LANE0_P LVDSB_LANE0_P LVDSA_LANE0_N LVDSB_LANE0_N LVDSA_CLK_P LVDSB_CLK_P LVDSA_CLK_N LVDSB_CLK_N LVDS_DDC_CLK LVDS_DDC_DATA VCC_PANEL VCC_PANEL VCC_PANEL VCC_PANEL User's Manual | EHL051... -
Page 18: Expansion Slots
DPR624 R415 R418 M2R20 DPR623 M2CN2 DPC610 C252 M2R21 R407 R417 DPCN601 DPC603 R8997 R412 DPFB602 R413 DPFB601 C9942 R113 R125 R993 R9004 M2R7 M2R9 R1198 R126 R995 R994 R992 Stand-off Notch M.2 E-Key M.2 B-Key User's Manual | EHL051... - Page 19 Screw tight the card onto the stand-off with a screw driver and a stand-off screw until the gap between the card and the stand-off closes up. The card should be lying parallel to the board when it’s correctly mounted. User's Manual | EHL051...
-
Page 20: Installing The So-Dimm Module
R694 DPR643 R110 R8044 AUR69 R8043 D8050 R8906 R626 C155 DDR4 (SO-DIMM1) C154 DIMM3 C253 C156 Retention Clip M2R72 R9005 R930 R104 R105 R929 R109 R108 Socket Top View DDR4 SO-DIMM 4 5 ° User's Manual | EHL051 Step 1... - Page 21 Inspect that the clip sits in the notch. If not, please pull the clips outward, release and remove the card, and mount it again. User's Manual | EHL051...
-
Page 22: Chapter 3 - Bios Settings
When “X” appears on the left of a particular field, it indicates that a submenu which contains additional options are available for that field. To display the submenu, move the highlight to that field and press <Enter>. User's Manual | EHL051... -
Page 23: Main
The time format is <hour>, <minute>, <second>. The time is based on the 24-hour military-time clock. For example, 1 p.m. is 13:00:00. Hour displays hours from 00 to 23. Minute displays min- utes from 00 to 59. Second displays seconds from 00 to 59. User's Manual | EHL051... -
Page 24: Rc Acpi Settings
The system automatically powers on after power failure. • S5 State The system enter soft-off state after power failure. Power-on signal input is required to power up the system. • Last State The system returns to the last state right before power failure. User's Manual | EHL051... -
Page 25: Power & Performance
Enable or disable turbo mode of the processor. This field will only be displayed when EIST is enabled. C states Enable or disable CPU Power Management. It allows CPU to enter "C states" when it’s idle and nothing is executing. User's Manual | EHL051... -
Page 26: Trusted Computing
Select the color depth of the LCD Panel — 18 Bit, 24 Bit, 36 Bit, 48 Bit. Backlight Type Normal+PWM Mode Normal+DC Mode Note: The configuration must match the specifications of your LCD Panel in order for the LCD Panel to display properly. User's Manual | EHL051... -
Page 27: Nct5525D Super Io Configuration
Select WatchDog Timer Unit — Second or Minute. SuperIO WatchDog Timer Set SuperIO WatchDog Timer Timeout value. The range is from 0 (disabled) to 255. Note: The sub-menus are detailed in following sections. Serial Port Enable or disable serial port. User's Manual | EHL051... -
Page 28: Nct5525D Hw Monitor
This section displays the system’s health information, i.e. voltage readings, CPU and system Enable or disable XHCI Hand-off. temperatures, and fan speed readings USB Mass Storage Driver Support Enable or disable USB Mass Storage Driver Support. User's Manual | EHL051... -
Page 29: Network Stack Configuration
Set the wait time in seconds to press ESC key to abort the PXE boot. Use either +/- or numeric keys to set the value. Media detect count Set the number of times the presence of media will be checked. Use either +/- or numeric keys to set the value. User's Manual | EHL051... -
Page 30: Chipset
Chapter 3 BIOS SETTINGS X Chipset Chipset System Agent (SA) Configuration Please select a submenu and press Enter. The submenus are detailed in the following pages. Memory Configuration Memory Configuration Parameters Graphics Configuration Graphics Configuration Parameters User's Manual | EHL051... -
Page 31: Pch-Io Configuration
Select one of the PCI Express channels and press enter to configure the following settings. PCI Express Configuration Settings M.2-E, M.2-B SATA Configuration Control the PCI Express Root Port. SATA Device Otpions Settings Audio Configuration Audio Subsystem Configuration Settings User's Manual | EHL051... -
Page 32: Configuration► Sata Configuration
The mode selection determines how the SATA controller(s) operates. • Enabled HDA will be unconditionally enabled. • AHCI This option allows the Serial ATA controller(s) to use AHCI (Advanced Host Controller Interface). Ports Enable or disable the Serial ATA port function. User's Manual | EHL051... -
Page 33: Security
Clear the database from the NVRAM, including all the keys and signatures installed in the Key Management menu. Press Enter and a prompt will show up for you to confirm. Key Management Enables expert users to modify Secure Boot Policy variables without full authentication. User's Manual | EHL051... -
Page 34: Boot
Select this option to save BIOS configuration settings to a USB flash device. • Restore Setting from file This field will appear only when a USB flash device is detected. Select this field to restore set-ting from the USB flash device. User's Manual | EHL051... -
Page 35: Updating The Bios
When the BIOS IC needs to be replaced, you have to populate it properly onto the system board after the EEPROM programmer has been burned and follow the technical person's instructions to confirm that the MAC address should be burned or not. User's Manual | EHL051... -
Page 36: Appendix A- Mating Connectors
V-STAR, SHY-JCL180810P: 2*5, 1.27mm, PIN PLUG 5V/1A AUDIO header V-STAR, SHY-JCL180810P: 2*5, 1.27mm, PIN PLUG COM1 header V-STAR, SHY-JCL180810P: 2*5, 1.27mm, PIN PLUG COM2 header V-STAR, SHY-JCL180810P: 2*5, 1.27mm, PIN PLUG Front Panel header 3V3/1A V-STAR, SHY-JCL180806P:2*3, 1.27mm, PIN PLUG User's Manual | EHL051...
Need help?
Do you have a question about the EHL051 and is the answer not in the manual?
Questions and answers