Advertisement
Quick Links
Order #XXXXX -
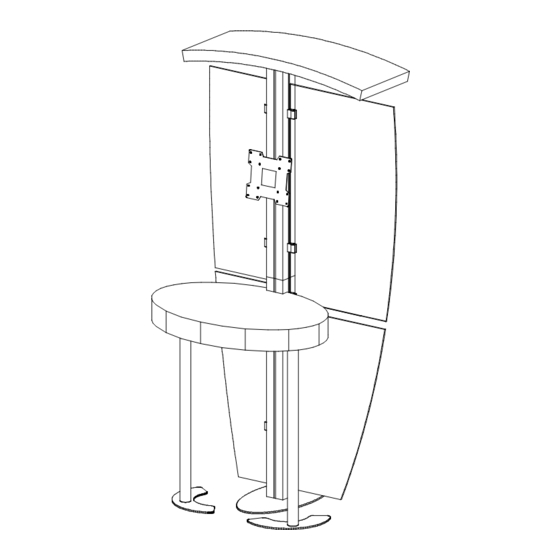
MOD-1524 - General Layout
Canopy
*
*
Q914
Use thumbscrew & washer
Connector
to attach to vertical extrusion.
3
Thumbscrew
*
Silde extrusion
over connector;
secure with screws.
2
**To prevent product loss,
Keep all screws attached
to connector piece after
disassembling
1
w w w . c l a s s i c e x h i b i t s . c o m
Item
Qty.
Description
1
1
Oval Base Plate
1A
2
Curved Base Plates
2
1
41"h Square Vertical Extrusion
3
1
41"h Square Vertical Extrusion
4
2
38" Round Vertical Extrusion
*
Counter Attachment
Counter Support
Leg Attachment
Insert screws located
on underside of counter
into holes on flange plate
and secure with wing nuts.
Washer
*
Counter Top
*
*
4
4
1A
1A
WHEN DISASSEMBLING ALUMINUM EXTRUSION, TIGHTEN ALL
SETSCREWS AND LOCKS TO PREVENT LOSS DURING SHIPPING
All manuals and user guides at all-guidesbox.com
Steps:
1) Connect verticals [2] & [3] together.
See
Q125 Connector
2) Attach base plate [1] to assembly [2/3].
3) Connect curved base plates [1A] to verticals [4].
4) Attach assemblies [1A/4] to the bottom side of counter top.
See
Counter Support Leg Attachment
5) Secure counter top to vertical [3].
See
Counter Attachment
6) Connect Monitor Mount to vertical [3].
See
Monitor Mount Attachment
7) Install Graphic Wings to A10 clips on vertical extrusions.
See
A10 Clamp
Wing Nut
A10 Clamp Detail
1) Slide Connector of A10
into extrusion groove.
2) Tighten setscrew when
A10 is in desired location.
3) Insert Infill into Clamp
4) Tighten knob on A10 to
secure wing in place.
Setscrew
Knob to attach graphics
detail.
detail.
detail.
detail.
detail
*
*
Attach monitor mount to vertical
Slide Mount
into Groove of
Vertical Extrusion.
Step 1
866.652.2100
When assembled
Monitor Mount Attachment
extrusions after assembly.
Tighten
Attach top
Setscrew
Plate and
tighten screws
© 2015
Page 1 of X
Advertisement

Related Manuals for Classic Exhibits visionary design MOD-1524


Summary of Contents for Classic Exhibits visionary design MOD-1524
- Page 1 All manuals and user guides at all-guidesbox.com Step 1 Order #XXXXX - MOD-1524 - General Layout 866.652.2100 Steps: Item Qty. Description 1) Connect verticals [2] & [3] together. Oval Base Plate Q125 Connector detail. Curved Base Plates 2) Attach base plate [1] to assembly [2/3]. 41”h Square Vertical Extrusion 3) Connect curved base plates [1A] to verticals [4].
- Page 2 All manuals and user guides at all-guidesbox.com Step 2 Order #XXXXX - MOD-1524 - General Information 866.652.2100 Using Your Setup Instructions The Visionary Designs Setup Instructions are created specifically for your Detail A configuration. They are laid out sequentially, including an exploded view of the entire display, and then a logical series of detailed steps to assemble the main structure and components.
Need help?
Do you have a question about the visionary design MOD-1524 and is the answer not in the manual?
Questions and answers