Advertisement
© 2023
Order #XXXXX
Item
Qty.
Description
1
1
Base Plate
2,3
1,1
36" Q914 Vertical Extrusion
2A,3A
1,1
36" Q914 Vertical Extrusion w/ Caps
4
1
28.835" Z45 Horizontal Extrusion
5
1
Mount Plate
Steps:
1) Attach base plate [1] to verticals [2] and [3], using bolts.
2) Attach verticals [2A] to [2] and [3A] to [3], using connector.
See
Extrusion Connector
detail.
3) Attach horizontal [4] between verticals [2A] and [3A].
4) Attach mount plate [5] and monitor mount. See
Monitor Mount Attachment
detail.
5) Route monitor cord through conduit then attach to verticals
[2] and [2A]. See
Cord Management
detail.
*
Monitor Mount Attachment
Mount Plate
Bolt
Monitor Mount
Attach mount plate to verticals. Attach monitor mount to
mounting plate, using bolts and wing nuts.
MOD-1519 Monitor Stand
2A
*
Wing
Nut
2
Bolt
*
V15
Connector
Set Screw
4
3A
5
*
3
1
Bolt
SETUP INSTRUCTIONS
If you would like to tell us about your experience with your setup instructions please email us at info@classicexhibits.com
Slide upper extrusion
over connector and
rest on lower extrusion.
Secure with set screws.
To prevent product loss,
keep all screws attached
to connector after
disassembling.
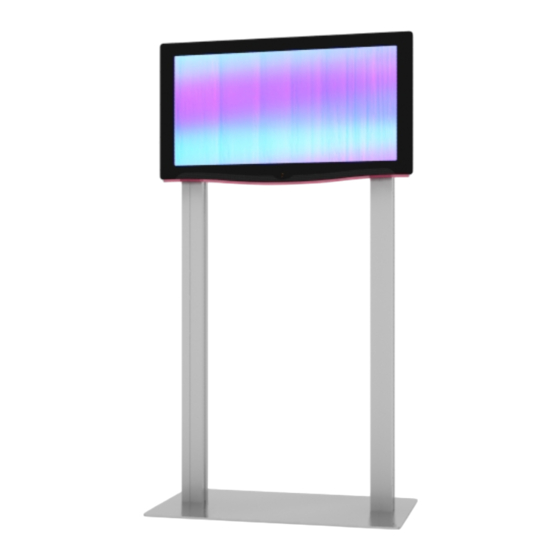
Completed Assembly
*
Monitor
Mount
Cord Management
Cord
pinch
Route cord through conduit.
Attach conduit by pinching
the opening and inserting
into the groove of extrusion.
Advertisement
Table of Contents

Subscribe to Our Youtube Channel
Related Manuals for Classic Exhibits visionary DESIGNS MOD-1519


Summary of Contents for Classic Exhibits visionary DESIGNS MOD-1519
- Page 1 © 2023 Order #XXXXX MOD-1519 Monitor Stand Item Qty. Description Slide upper extrusion Base Plate over connector and 36” Q914 Vertical Extrusion rest on lower extrusion. 2A,3A 36” Q914 Vertical Extrusion w/ Caps Secure with set screws. Connector 28.835” Z45 Horizontal Extrusion Mount Plate Set Screw To prevent product loss,...
- Page 2 © 2023 Order #XXXXX General Information General Setup Instructions - Read entire setup instruction manual prior to WARNING unpacking parts and pieces. - The setup instructions are created specifically for this configuration. - Setup instructions are laid out sequentially in steps, including exploded views with detailed explanation for assembly.
- Page 3 © 2023 Order #XXXXX Case Packing Top View of Each Level PR63 Monitor Mount Setup Hardware Level 1 Level 2 Level 3 Level 4 (Bottom level) Case 1 of 1...
Need help?
Do you have a question about the visionary DESIGNS MOD-1519 and is the answer not in the manual?
Questions and answers