Advertisement
Quick Links
© 2019
Order #XXXXX
Item
Qty.
Description
1,1A
1,1
43.614" GS300 Vertical Extrusion w/ PR53
2
2
11.417" Z45 Horizontal Extrusion
3,3A
1,1
40.578" Z45 Curved Vertical Extrusion
4,4A
1,1
4.893" Z45 Horizontal Extrusion w/ V4
5,5A
1,1
11.514" Z45 Horizontal Extrusion
--
1
Base
--
1
Podium Top w/ S10, PR37, & (2) Z46
Keep V4 connectors permanently attached to [4] and [4A].
Keep PR53 permanently attached to [1] and [1A] and
attach M8 bolts, when packing.
Keep extrusions [1] [1A] with clamps and [2] assembled,
when packing.
Keep extrusions [3,4,5] and [3A,4A,5A] assembled,
when packing.
3
2
t r a
S i n
5
l
5A
n e
P a
1
1A
4
4A
2
FRONT VIEW
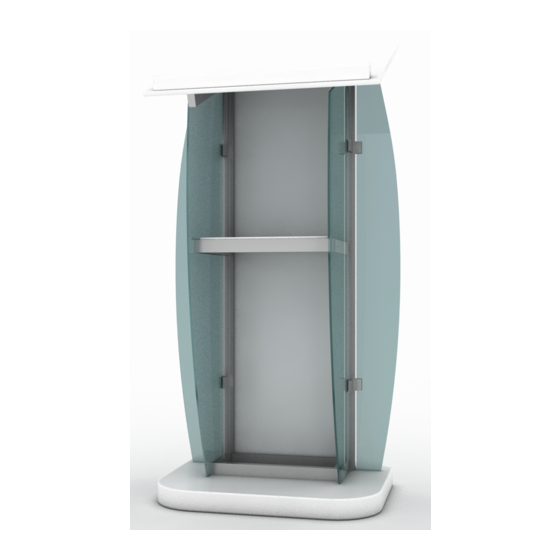
MOD-1549 Podium
Steps:
1) Attach assemblies [3/4/5] and [3A/4A/5A] to assembly [1/1A/2/2].
2) Connect Sintra panels to Velcro on sides of assemblies [3/4/5] and [3A/4A/5A].
3) Attach [3] [3A] to base, using M8 bolt into PR53 and [4] [4A] to base, using
5/16" bolts into V4 connectors.
4) Place shelf onto lips of [5] and [5A]. See
5) Attach podium top between [1] [3] and [1A] [3A].
6) Attach wings to clamps on [1] and [1A]. See
3A
t r a
S i n
l
n e
P a
5/16"
Extrusion Lip
detail.
A10 Clamp
detail.
Podium Top
Extrusion Lip
Lip
Extrusion [5] and [5A] have
lip for the shelf to rest upon.
Shelf
Base
M8
M8
5/16"
BACK VIEW
SETUP INSTRUCTIONS
If you would like to tell us about your experience with your setup instructions please email us at info@classicexhibits.com
A10 Clamp
Tighten set screw to
secure A10 to extrusion.
Completed Assembly
Tighten knob to secure
wing panels.
Wing
Wing
FRONT VIEW
Advertisement

Related Manuals for Classic Exhibits VISIONARY DESIGNS MOD-1549


Summary of Contents for Classic Exhibits VISIONARY DESIGNS MOD-1549
- Page 1 © 2019 Order #XXXXX MOD-1549 Podium Item Qty. Description Steps: 1,1A 43.614” GS300 Vertical Extrusion w/ PR53 1) Attach assemblies [3/4/5] and [3A/4A/5A] to assembly [1/1A/2/2]. 11.417” Z45 Horizontal Extrusion 2) Connect Sintra panels to Velcro on sides of assemblies [3/4/5] and [3A/4A/5A]. 3,3A 40.578”...
- Page 2 © 2019 Order #XXXXX General Information General Setup Instructions - Read entire setup instruction manual prior to WARNING unpacking parts and pieces. - The setup instructions are created specifically for this configuration. - Setup instructions are laid out sequentially in steps, including exploded views with detailed explanation for assembly.
Need help?
Do you have a question about the VISIONARY DESIGNS MOD-1549 and is the answer not in the manual?
Questions and answers