Table of Contents
Advertisement
Quick Links
Advertisement
Table of Contents

Subscribe to Our Youtube Channel
Related Manuals for Advantech AMAX-5070


Summary of Contents for Advantech AMAX-5070
- Page 1 User Manual AMAX-5070 Modbus/TCP Communication Coupler...
- Page 2 No part of this manual may be reproduced, copied, translated or transmitted in any form or by any means without the prior written permission of Advantech Co., Ltd. Information provided in this manual is intended to be accurate and reliable. How- ever, Advantech Co., Ltd.
- Page 3 This product has passed the CE test for environmental specifications when shielded cables are used for external wiring. We recommend the use of shielded cables. This kind of cable is available from Advantech. Please contact your local supplier for ordering information.
- Page 4 In accordance with IEC 704-1:1982 specifications, the sound pressure level at the operator's position does not exceed 70 dB (A). DISCLAIMER: These instructions are provided according to IEC 704-1 standards. Advantech disclaims all responsibility for the accuracy of any statements contained herein. AMAX-5070 User Manual...
-
Page 5: Table Of Contents
Chapter Introduction..........1 Introduction ....................2 Hardware System Diagram ............... 2 Figure 1.1 AMAX-5070 Hardware System Diagram ....2 Figure 1.2 AMAX-5070 Cable Redundancy Hardware System Di- agram in Tree Topology ..........3 Figure 1.3 AMAX-5070 Cable Redundancy Hardware System Di- agram in Ring Topology .......... - Page 6 Module Information ................. 21 Figure 3.5 Coupler Configuration Page ........21 Figure 3.6 Different Subnet Mask Error........22 Figure 3.7 Re-setting the AMAX-5070 IP Address ....23 Figure 3.8 Coupler Configuration in Different Internet Segment 23 3.2.1 Main Node Information page (Coupler) ........24 Figure 3.9 Coupler Information Page ........
- Page 7 Figure 5.1 Add New Favorite Group .......... 62 Figure 5.2 Create New Group............ 62 Figure 5.3 Add New Device for Favorite Group......62 Figure 5.4 Configure the Ethernet Device ......... 63 Figure 5.5 New Device Has Been Added Under Newgroup ..64 AMAX-5070 User Manual...
- Page 8 Figure 5.8 Configure the Modules in Favorite Group ....65 Terminal for Command Testing Function..........66 Figure 5.9 Entire the Terminal for Command Testing ....66 Figure 5.10Connect to AMAX-5070 via Terminal for Command Testing..............67 Figure 5.11Modbus Information in Terminal for Command Testing Figure 5.12ASCII command in Terminal for Command Testing.
-
Page 9: Chapter 1 Introduction
Chapter Introduction... -
Page 10: Introduction
Introduction In order to enhance the experience of AMAX-5070, please download the below man- ual and software from Advantech office website: AMAX-5000 Series I/O Modules User Manual Advantech I/O Module Utility This manual will only introduce AMAX-5070 Modbus/TCP Coupler. To know more about the AMAX-5000 series I/O modules, please download AMAX-5000 Series I/O user manual from our official website. - Page 11 Figure 1.2 AMAX-5070 Cable Redundancy Hardware System Diagram in Tree Topology AMAX-5070 User Manual...
- Page 12 Figure 1.3 AMAX-5070 Cable Redundancy Hardware System Diagram in Ring Topology AMAX-5070 User Manual...
-
Page 13: Power Application And Consumption
1.2.1 Power Application and Consumption The AMAX-5070 provide maximum 2A current for the following SubDevices. Insert- ing AMAX-5001 between I/O modules if user demand to apply more SubDevices (Figure 1.4). For the power modules and SubDevices power consumption please refer to the Table 1.1 and Table 1.2. - Page 14 AMAX-5070 User Manual...
-
Page 15: Chapter 2 Amax-5070 Modbus/Tcp Coupler With
Chapter AMAX-5070 Modbus/ TCP Coupler with ID Switch... -
Page 16: Amax-5070 Specification
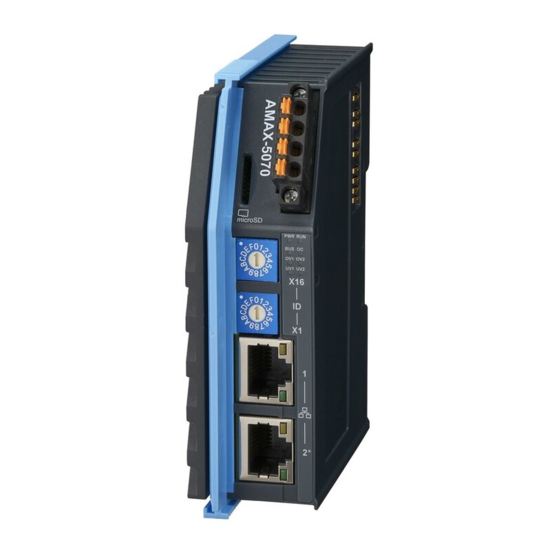
AMAX-5070 Specification AMAX-5070 is a coupler for AMAX-5000 slice IO system. It is a compact and flexible Modbus/TCP IO System. AMAX-5000 series IO modules have some common design features to help customers shorter their engineering time. This includes push-in wir- ing terminal / front LED for diagnosis / slide-in installation on DIN rail as well as a bus power monitoring mechanism. -
Page 17: General
– LAN2: Modbus/TCP (default) or EtherCAT Cable Redundancy TCP Connection No.: 16 Response Time: 5ms IO Configuration: Advantech I/O Module Utility Maximum IO Modules: 256 (excluding AMAX-5079) Group ID Support: 0~255 (maximum 20 groups) 2.1.4 Environment Operation Temperature: -25~60°C (vertical mounted) -
Page 18: Led Indicator
LED Indicator Figure 2.2 AMAX-5070 Module LED Indicator Table 2.1: AMAX-5070 Module LED Indicator Color Indication Behavior Green Power On Orange Locating Module EtherCAT Connected Green Blinking EtherCAT Connecting Green Bus Power On Bus Over Current (2A) V1 Over-voltage (28.8V) V2 Over-voltage (28.8V) -
Page 19: Id Switch
ID Switch Figure 2.3 AMAX-5070 ID Switch Table 2.2: AMAX-5070 ID Switch Switch Number (Top to Bottom) Multiple Range (HEX) 0 ~ F 0 ~ F Example (SW2, SW1) = (4, C), then ID = 4x16 + 12x1 = 76... -
Page 20: Pin Definition
Pin Definition Figure 2.4 AMAX-5070 Module Front View Figure 2.5 AMAX-5070 Module Side View AMAX-5070 User Manual... -
Page 21: Application Wiring
Pin Number (Top to Bottom) Pin Definition Table 2.4: Lower 2 LAN Port LAN Number (Top to Bottom) Port Definition Modbus/TCP signal input Modbus/TCP signal input or EtherCAT cable redundancy Application Wiring Figure 2.6 Wiring for AMAX-5070 Power Input AMAX-5070 User Manual... -
Page 22: Dimensions
Dimensions Figure 2.7 AMAX-5070 Dimensions AMAX-5070 Object Dictionary Table 2.5: Input Data (4x9901 - 4x9913) Index (hex) Name Meaning Data Flags Default type value 4x9901 Over_Voltage_1 Voltage 1 > 28.8V UINT RO 0x0000 (24V*1.2) [1] 4x9902 Under_Voltage_1 Voltage 1 < 19.2V... - Page 23 [1]: The formula to calculate the real voltage or current is as follows: Real Voltage/ Current = (Measured voltage / 1000). For example, if the measured voltage is 24168, the real voltage would be 24.168 V. [2]: This value won't count the AMAX-5070 and AMAX-5079. AMAX-5070 User Manual...
- Page 24 AMAX-5070 User Manual...
-
Page 25: Chapter 3 System Configuration
Chapter System Configuration... -
Page 26: Connect And Search Modules
Connect and Search Modules 3.1.1 Searching for the Coupler Right click Ethernet and select the Search Device (Figure 3.1). The default node name is AMAX-5070, which is the main node of the device. Figure 3.1 Searching for AMAX-5070 AMAX-5070 User Manual... - Page 27 If Coupler (e.g. AMAX-5070, AMAX-5074) is under a different network segment, it will be displayed under the Others node (Figure 3.2). Figure 3.2 : AMAX-5070 in Different Network AMAX-5070 User Manual...
-
Page 28: Searching For The Ethercat Subdevice
Group ID will be set to G161. However, in the case of AMAX-5070, the Group ID is always set to G0 (Group ID 0) and is not affected by the rotary switch on the Coupler. The Group ID for AMAX-5070 remains fixed and does not change based on the rotary switch position. -
Page 29: Module Information
If the following error message pops up, it indicates that the utility has recognized the same network segment but the command cannot reach the module due to subnet mask settings (Figure 3.6). Figure 3.5 Coupler Configuration Page AMAX-5070 User Manual... - Page 30 At this point, a page will appear allowing the user to reconfigure the IP address of AMAX-5070.(Figure 3.7) If you do not want to change the IP addresses of both the Host and AMAX-5070, another approach is to modify the subnet mask of both devices to 255.0.0.0. By doing so, both devices will be within the same network (10.0.0.0), enabling proper commu-...
- Page 31 Figure 3.7 Re-setting the AMAX-5070 IP Address For different network, the AMAX-5070 Coupler will display the Setting page if the module was in the different Internet segment. In this condition, the user only can adjust the Internet configurations (e.g. IP address), the other option would be display Unknown, meaning it can’t be adjusted.
-
Page 32: Main Node Information Page (Coupler)
In the page Information will display Firmware Version and user can modify the Device Name and Description. (Figure 3.9) Figure 3.9 Coupler Information Page 3.2.2 Subordinate Node Information page (SubDevice) The SubDevice node of Information will display Module, Current Connected Module and Description. (Figure 3.10) Figure 3.10 SubDevice Information Page AMAX-5070 User Manual... -
Page 33: Subdevice Support List
DHCP and Static Mode can be selected dependence on different applications. DHCP will be assigned internet configuration from DHCP server; In Static Mode user can modify IP address, Subnet Mask and Default Gateway. (Figure 3.12) Figure 3.12 Network Configuration Page AMAX-5070 User Manual... -
Page 34: Amax-5070 Switch Id
3.3.2 AMAX-5070 Switch ID AMAX-5070 rotary switch state would be displayed in the Setting page (Figure 3.13). For more information about switch ID function please check the blue information icon nearby the switch ID number. Figure 3.13 AMAX-5070 Switch ID 3.3.3... -
Page 35: Restart The Os Of The Amax-5070
If the AMAX-5070 connects to more than 255 SubDevices or the topology changed during the scan progress, the Utility will display Error (Figure 3.15). Figure 3.15 Time out 3.3.4 Restart the OS of the AMAX-5070 After clicking the Apply button, AMAX-5070 will rebooting the system (Figure 3.16). -
Page 36: Cable Redundancy Configuration
Apply to save setting (Figure 3.17). Figure 3.17 Cable Redundancy Setting When set to Enable and click Apply, a notification pops up to remind the user to con- firm the wiring (Figure 3.18). Figure 3.18 Cable Redundancy Notification for Wiring AMAX-5070 User Manual... -
Page 37: Obtaining The Topology Status
(is only enabled in cable-redundancy if it has been set to “Enable”, other- wise the value would be set to 0. Scan Busy: 0 for non-busy, 1 for busy (If Scan Busy value =1, AMAX-5070 inter- nal system is working with each SubDevice for re-establishes the topology. At this time the SDO command doesn’t work, only the PDO data can operate). - Page 38 Figure 3.20 Topology Status AMAX-5070 User Manual...
-
Page 39: Modbus Address Setting
To adjust the Fixed Mode or Flexible Mode and obtain the corresponding Modbus addresses, click on Modbus Mapping. For the AMAX-5070 device, the Modbus client address should always be set to Group 0 (G0), and it is not affected by the rotary switch on the device (as shown in Figure 3.21). - Page 40 Figure 3.22 System Topology with Group ID and Device ID Modbus address will change depending on which mode (Fixed Mode or Flexible Mode) or Group ID are currently used (Figure 3.23). Figure 3.23 Modbus Address in Different Group ID and User Mode AMAX-5070 User Manual...
-
Page 41: Modbus Addresses For Connected Modules (Fixed Mode)
Click on Fixed Mode to obtain the current Modbus Address and Topology (Figure 3.24). Figure 3.24 Modbus Address Setting Page Modbus address will be reserved but won’t display in the Advantech Utility because the unknown device occupies an address (Figure 3.25). Figure 3.25 Modbus Address ... -
Page 42: Export The List Of Modbus Tcp Addresses For All Modules
Press the Export button to export the list with CSV file (Figure 3.26). Figure 3.26 Export the ModBus TCP Address in Fixed Mode The CSV file will be downloaded (Figure 3.27). Figure 3.27 Modbus TCP Addresses and Modules List in CSV File (Fixed Mode) AMAX-5070 User Manual... -
Page 43: Modbus Addresses For Connected Modules (Flexible Mode)
SubDevice configurations in this group. The Coil Status will be displayed in 0x tab (data size is bit, e.g. DI value, burnout status) and the Holding Register in 4x tab (data size is word) (Figure 3.29). AMAX-5070 User Manual... - Page 44 The Topology Status indicates whether the system is in flexible mode and if the Mod- bus address mapping is functioning correctly. Initially, the status is "Unmatched" which means that the AMAX-5070 device was not mapping the Modbus address. To save the current mapping and topology, click on the "Update" button.
-
Page 45: Export The List Of Modbus Tcp Addresses For All Modules (Flexible Mode)
Figure 3.31 Check the Unmatched SubDevices 3.4.4 Export the List of Modbus TCP Addresses for All Modules (Flexible Mode) Press the Export button to export the list with CSV file (Figure 3.32). Figure 3.32 Export the ModBus TCP Address in Flexible Mode AMAX-5070 User Manual... -
Page 46: Identify The Modules Of Abnormal Communication
Error Threshold Middle value, or red flag if the error counter goes over the Error Threshold High value (Fig- ure 3.34). Figure 3.34 Mark Communication Status AMAX-5070 User Manual... - Page 47 If the module disconnects, it will be marked with "?" (Figure 3.35). Figure 3.35 Mark Communication Status when Module disconnection AMAX-5070 User Manual...
- Page 48 AMAX-5070 User Manual...
-
Page 49: Tion
Chapter Coupler and SubDevice Configuration... -
Page 50: Coupler And Subdevice Configuration
Coupler and SubDevice Configuration 4.1.1 Device Categories It can be roughly divided into three categories (Figure 4.1): Coupler Modules with segmentation groups (AMAX5070, AMAX5074). Modules that don't have segmentation groups (SubDevices). Unknown SubDevices. Figure 4.1 Device Categories AMAX-5070 User Manual... - Page 51 Module Name, SubDevice ID (N/A as default), Description, and Group ID can be found in the Module Information page (Figure 4.2). Figure 4.2 Coupler or Coordinator Module Information 4.1.1.2 SubDevice In the SubDevice, information includes Module, SubDevice ID, and Description (Fig- ure 4.3). Figure 4.3 SubDevice Information AMAX-5070 User Manual...
-
Page 52: Storing And Loading Configurations
Load/Save configuration operation can be performed in the Module Information tab. For example, the configuration of the AI tab in the following figure can be saved or loaded through the button (Figure 4.5). Figure 4.5 Save and Load Configuration AMAX-5070 User Manual... - Page 53 Load buttons will be hidden (Figure 4.7. For example, the AMAX-5056SO only supports setting and reading DO values, but doesn't support any DO configuration functions such as safety functions. Figure 4.7 Example of Not Supported SubDevice UI AMAX-5070 User Manual...
-
Page 54: Locate Subdevices
LED (Figure 4.8. Figure 4.8 Locating SubDevice Function For devices that do not support the Locate feature, the locate button is hidden (Figure 4.9). Figure 4.9 SubDevice without LED Locate Function AMAX-5070 User Manual... -
Page 55: Obtain And Configure Coupler And Subdevice
The Channel information will display the value of current, voltage1, voltage2 and the corresponding Modbus address. Figure 4.10 Power Status The tree in Channel Information can be expanded to show more detailed information (Figure 4.11). Figure 4.11 Power Status and Modbus Address Information AMAX-5070 User Manual... -
Page 56: Analogue Input Subdevices
Through the AI tab, users can obtain the AI-related status and the Modbus address in the channel information (Figure 4.12). Figure 4.12 Analogue Input Status The tree in Channel Information can be expanded to show more detailed information (Figure 4.13). AMAX-5070 User Manual... - Page 57 1 input range from K to ±2.5V. Expand the channel's tree and the selected Items will be shown in the blue area (Figure 4.14). Figure 4.14 Expand the Tree and Change the AMAX-5018 Range AMAX-5070 User Manual...
-
Page 58: Analogue Output Subdevices
Figure 4.15 Apply the Change for All Channels of This SubDevice 4.2.3 Analogue Output SubDevices 4.2.3.1 Obtain Analogue Output Status Through the AO tab, users can obtain the AO-related status and the Modbus address in the channel information (Figure 4.16). Figure 4.16 Analogue Output Status AMAX-5070 User Manual... - Page 59 Expand the channel's tree and the selected Items will be shown on the blue area. Select the ranges you want and click the Apply button. Users also can apply the setting to all channels. Figure 4.18 Expand the Tree and Change the AMAX-5024 Range AMAX-5070 User Manual...
-
Page 60: Digital Input Subdevices
Through the DI tab, user can obtain the DI-related status and the Modbus address in the channel information (Figure 4.19). Figure 4.19 Digital Input Status The tree in Channel Information can be expanded to show more detailed information (Figure 4.20). Figure 4.20 Digital Input Value and Modbus Address Information AMAX-5070 User Manual... - Page 61 Enable the channel 0 digital filter (Figure 4.21). Expand the channel's tree and the selected Items will be shown on the blue area. Enable the Digital Filter and Select the range you want. Next, click the Apply button. Figure 4.21 Enable AMAX-5060 Digital Filter AMAX-5070 User Manual...
-
Page 62: Digital Output Subdevices
Through the DO tab, users can obtain the DO-related status and the Modbus address in the channel information (Figure 4.22). Figure 4.22 Digital Output Status The tree in Channel Information can be expanded to show more detailed information (Figure 4.23). Figure 4.23 Digital Output Value and Modbus Address Information AMAX-5070 User Manual... - Page 63 0 output status for high level (Figure 4.24). Expand the channel's tree and the selected Items will be shown in the blue area. Click the Set True button. Figure 4.24 Change AMAX-5060 Digital Output Status AMAX-5070 User Manual...
- Page 64 After clicking the Set Value button, the Safety Setting page will be displayed, and individual channels can be checked for Enable/Safety State. Click the Apply button to save the changes (Figure 4.26). Figure 4.26 AMAX-5060 Safety Setting AMAX-5070 User Manual...
-
Page 65: Counter/Encoder Subdevices
Through the CNT tab, user can obtain the CNT-related status and the Modbus address in the channel information (Figure 4.27). Figure 4.27 Counter and Encoder Status The tree in Channel Information can be expanded to show more detailed information (Figure 4.28). Figure 4.28 Counter/Encoder and Modbus Address Information AMAX-5070 User Manual... - Page 66 4.2.6.2 Configure Counter/Encoder Channel information can be configured in different mode for one channel or all chan- nels. Figure 4.29 Change AMAX-5080 CNT Mode AMAX-5070 User Manual...
- Page 67 The Latch Value can be found in the Channel Infor- mation if the Latch Counter Value is enabled. If you would like to discard the current Latch Counter Value, please click the Clear button (Figure 4.30). Figure 4.30 Enable the Latch Counter AMAX-5070 User Manual...
- Page 68 AMAX-5070 User Manual...
-
Page 69: Chapter 5 Utility Management Tool
Chapter Utility Management Tool... -
Page 70: Favorite Group Function
On the Group page, give the group a name and click Add (Figure 5.2). Figure 5.2 Create New Group Right-click on the New Group (This name can be modified by user), and then click Add New Device in the menu (Figure 5.3). Figure 5.3 Add New Device for Favorite Group AMAX-5070 User Manual... - Page 71 Select the Ethernet Device tab, change the Module typle to AMAX-5070 and key in the IP Address. Click Add for saving change (Figure 5.4). Figure 5.4 Configure the Ethernet Device The Ethernet device will appear below the NewGroup node after adding new ethernet device.
- Page 72 Figure 5.5 New Device Has Been Added Under Newgroup Figure 5.6 Connect Status is GOOD AMAX-5070 User Manual...
- Page 73 Figure 5.7 Connect Status is CorrespondingFail User can configure the modules in Favorite Group (Figure 5.8). Figure 5.8 Configure the Modules in Favorite Group AMAX-5070 User Manual...
- Page 74 A terminal for Command Testing Function is supported for users to communicate with SubDevices via Modbus or ASCII command. After searching the Ethernet node, click on the Ethernet node and click the lightning icon (Figure 5.9). Figure 5.9 Entire the Terminal for Command Testing AMAX-5070 User Manual...
- Page 75 Select the AMAX-5070's address and click the Connect button (Figure 5.10). Figure 5.10 Connect to AMAX-5070 via Terminal for Command Testing Select Modbus Type and click Start button to get Modbus information (Figure 5.11). Figure 5.11 Modbus Information in Terminal for Command Testing...
- Page 76 Click Disconnect and change from TCP to UDP in Send UDP/TCP. Click the Advant- ech ASCII tab and test the ASCII command (Figure 5.12). Figure 5.12 ASCII command in Terminal for Command Testing AMAX-5070 User Manual...
- Page 77 AMAX-5070 User Manual...
- Page 78 No part of this publication may be reproduced in any form or by any means, such as electronically, by photocopying, recording, or otherwise, without prior written permission from the publisher. All brand and product names are trademarks or registered trademarks of their respective companies. © Advantech Co., Ltd. 2023...
Need help?
Do you have a question about the AMAX-5070 and is the answer not in the manual?
Questions and answers