Table of Contents
Advertisement
Quick Links
Advertisement
Table of Contents

Related Manuals for Siemens Gigaset SE568 Series


Summary of Contents for Siemens Gigaset SE568 Series
- Page 1 Gigaset ® SE567/SE568 Series Residential Gateway User’s Guide...
- Page 2 4. Warranty Procedures. If a problem develops during the limited warranty period, the end user shall follow the procedure outlined below: A. Prior to returning a product under this warranty, the end user must first call SIEMENS at (888) 286-9375, or send an email to SIEMENS at support@efficient.com to obtain a return materials authorization (RMA) number.
- Page 3 SIEMENS. Expedited service is available at additional cost to the end user. E. Upon request from SIEMENS, the end user must prove the date of the original purchase of the product by a dated bill of sale or dated itemized receipt.
-
Page 4: Table Of Contents
Contents CHAPTER 1 INTRODUCTION ........................1 Features of the Residential Gateway....................1 Network (LAN) Features ........................1 Security Features..........................1 Configuration & Management......................2 Advanced Gateway Functions......................2 Minimum System Requirements ......................3 USB Driver-Related Requirements....................3 Package Contents..........................3 Physical Details............................ - Page 5 SE567/SE568 Series Residential Gateway User’s Guide Contents CHAPTER 6 CONFIGURING ADVANCED FEATURES................36 ISP Connection ..........................37 Advanced ISP Settings ........................38 ATM Virtual Circuits ........................39 Static Routes ..........................40 Dynamic DNS ..........................41 RIP (Routing Information Protocol)....................42 Home Network............................
-
Page 6: Chapter 1 Introduction
Chapter 1 Introduction This chapter provides an overview of the Gateway's features and capabilities. Congratulations on the purchase of your new Gigaset SE567/SE568 Series Residential Gateway (Gateway). The Gateway is a multi-function device providing the following services: • Built-in DSL Modem that provides shared Internet access for multiple users. •... -
Page 7: Configuration & Management
SE567/SE568 Series Residential Gateway User’s Guide Introduction • Stateful Inspection Firewall All incoming data packets are monitored and all incoming server requests are filtered, thus protecting your network from malicious attacks from external sources. • Attack Protection System Attacks can flood your Internet connection with invalid data packets and connection requests, using so much bandwidth and so many resources that Internet access becomes unavailable. -
Page 8: Minimum System Requirements
SE567/SE568 Series Residential Gateway User’s Guide Introduction Minimum System Requirements At a minimum, your computer must be equipped with the following to successfully install the Gateway. Your Internet Service Provider may have additional requirements for use of their service. • Ethernet connection method −... -
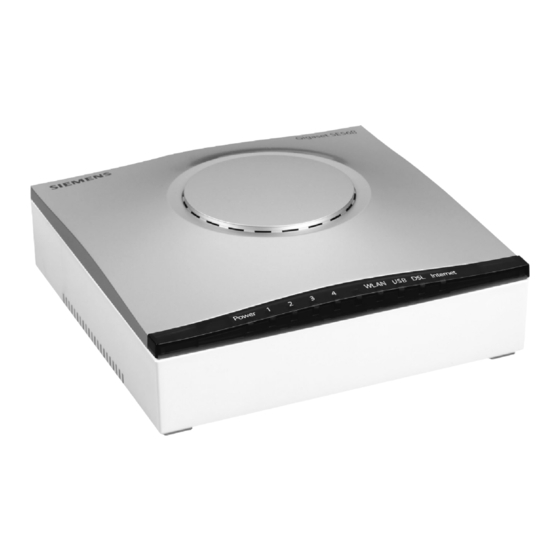
Page 9: Physical Details
SE567/SE568 Series Residential Gateway User’s Guide Introduction Physical Details Familiarize yourself with the Gateway before installing. Front Panel LEDs The front panel contains the following LEDs: Power is on. Power Green Power is off. The Power LED briefly shows red during power-up. -
Page 10: Rear Panel
SE567/SE568 Series Residential Gateway User’s Guide Introduction Rear Panel DSL Port Connect the RJ11 DSL cable (looks like a telephone cord) here to use your DSL connection through an (RJ11) existing phone line. USB Port If your Gateway has a USB port, connect the USB Example Rear Panel cable here. -
Page 11: Chapter 2 Installation
Chapter 2 Installation This chapter covers the physical installation of the Gigaset Gateway. Minimum System Requirements • DSL service and an Internet access account from an Internet Service Provider (ISP). • Network cables for each device you intend to connect to the Gateway. •... -
Page 12: Installing Line Filters
SE567/SE568 Series Residential Gateway User’s Guide Installation Installing Line Filters Because DSL shares your telephone line, you may need to separate the two signals so they do not interfere with each other. A line filter (may be included with some models) prevents DSL traffic from disrupting the voice signal on the telephone line, and vice versa. -
Page 13: Connecting Cables
SE567/SE568 Series Residential Gateway User’s Guide Installation Connecting Cables The Gigaset Gateway provides ports for either a USB or an Ethernet connection to your primary computer. Select the interface you will use to connect the Gateway, and follow the step-by-step instructions below for your chosen installation method. - Page 14 SE567/SE568 Series Residential Gateway User’s Guide Installation USB Installation Method (Microsoft Windows) 1. Connect the USB Cable 1) With your computer off, connect the provided USB cable to the USB port on the Gateway. 2) Connect the other end of the USB cable to an open USB port on your computer.
-
Page 15: Chapter 3
Chapter 3 Operating System Configuration This chapter explains how to configure each computer on your network to work with the Gateway. To access the Internet through the Gigaset Gateway, the TCP/IP protocol must be installed on your computer. If TCP/IP is not already installed on your computer, install it. Refer to your system documentation or online help for instructions. -
Page 16: Checking Tcp/Ip Settings (Windows 9X/Me)
SE567/SE568 Series Residential Gateway User’s Guide Operating System Configuration Checking TCP/IP Settings (Windows 9x/ME) Select Start>Control Panel >Network. This displays the Configuration tab on the “Network” window. Select the TCP/IP protocol for your network card. Click Properties. This displays the “TCP/IP Properties” window. Click the IP Address tab. -
Page 17: Checking Tcp/Ip Settings (Windows 2000)
SE567/SE568 Series Residential Gateway User’s Guide Operating System Configuration Checking TCP/IP Settings (Windows 2000) On the Windows taskbar click Start>Settings>Control Panel. This displays the “Control Panel” window. Double-click Network and Dial-up Connections. This displays the “Network and Dial-up Connections” window. Right-click Local Area Connection and select Properties. -
Page 18: Checking Tcp/Ip Settings (Windows Xp)
SE567/SE568 Series Residential Gateway User’s Guide Operating System Configuration Checking TCP/IP Settings (Windows XP) On the Windows taskbar click Start>Control Panel. This displays the “Control Panel” window. Double-click the Network Connection icon. This displays the “Network Connections” window. Right-click Local Area Connection, then click Properties. This displays the “Local Area Connection Properties”... -
Page 19: Checking Tcp/Ip Settings (Mac Os 8.6 Through 9.X)
SE567/SE568 Series Residential Gateway User’s Guide Operating System Configuration Checking TCP/IP Settings (MAC OS 8.6 through 9.x) Select Apple >Control Panel >TCP/IP. This displays the “TCP/IP” window. Select one of the following from the Connect via drop-down menu. • Ethernet or Ethernet built-in if connecting via Ethernet. •... -
Page 20: Checking Tcp/Ip Settings (Mac Osx)
SE567/SE568 Series Residential Gateway User’s Guide Operating System Configuration Checking TCP/IP Settings (MAC OSX) Click Apple -> System Preferences. This displays the “System Preferences” window. Double-click the Network icon under the Internet & Network section. This displays the “Network” window. Select one of the following from the Show drop-down menu: •... -
Page 21: Internet Access Configuration
SE567/SE568 Series Residential Gateway User’s Guide Operating System Configuration Internet Access Configuration Windows users must configure their computers to use the Gateway for Internet access. Ensure that the Gateway is installed correctly and the DSL line is functional. Then follow the appropriate procedure below to configure your Web browser to access the Internet via the LAN, rather than by a dial-up connection. -
Page 22: Chapter 4 Gigaset Gateway Setup
Chapter 4 Gigaset Gateway Setup This chapter describes how to connect to and setup your Gateway configuration. This chapter describes the steps to set up the Gigaset Gateway configuration using the Gateway Setup Wizard. Other configuration may also be required on the Gateway, depending on which features and functions of the Gateway you wish to use. -
Page 23: Connecting To The Gateway
SE567/SE568 Series Residential Gateway User’s Guide Gigaset Gateway Setup Connecting to the Gateway You can connect to the Gateway using UPnP (if it is enabled on your computer) or through the browser. (Windows XP and Me) Using UPnP If your Windows operating system supports UPnP (Universal Plug and Play) and UPnP is enabled, an icon for the Gateway appears in the system tray near the time display, notifying you that a new network device has been found and offering to create a new desktop shortcut to the newly discovered device. -
Page 24: Gateway Setup Wizard
SE567/SE568 Series Residential Gateway User’s Guide Gigaset Gateway Setup Gateway Setup Wizard The first time you connect to the Gateway, the Setup Wizard runs automatically. (The Setup Wizard also runs if the Gateway's default settings are restored.) Proceed through the entire Setup Wizard to ensure accuracy of the installation. - Page 25 SE567/SE568 Series Residential Gateway User’s Guide Gigaset Gateway Setup Click Next. This displays the “Configure Time Zone” window. Optionally set the time zone of the area of the world in which you live on the “Configure Time Zone” window. This option must be enabled to define time of day restrictions for users. To set the time zone, select the Yes option for Enable Time Client.
- Page 26 SE567/SE568 Series Residential Gateway User’s Guide Gigaset Gateway Setup Set the wireless security level from the “Wireless Security Configuration” window. ALL wireless devices attached to the Gateway MUST have the same wireless security settings for your network to have proper communications and security. 13.
- Page 27 SE567/SE568 Series Residential Gateway User’s Guide Gigaset Gateway Setup Wireless Setup WEP 64-Bit Option WEP security offers the same security offered by a wired LAN with encrypted packets. This option offers 64-bit encryption, which is the least secure WEP option. This section assumes you currently have the “Wireless Security Configuration”...
- Page 28 SE567/SE568 Series Residential Gateway User’s Guide Gigaset Gateway Setup Wireless Setup WEP 128-Bit Option WEP security offers the same security offered by a wired LAN with encrypted packets. This option offers 128-bit encryption, which is the most secure WEP option. This section assumes you currently have the “Wireless Security Configuration”...
- Page 29 SE567/SE568 Series Residential Gateway User’s Guide Gigaset Gateway Setup Wireless Setup WPA PSK Option WPA security changes encryption keys after a specified amount of time. This is the most secure option for wireless networks. This section assumes you currently have the “Wireless Security Configuration” window displayed on your computer.
-
Page 30: Home Window
SE567/SE568 Series Residential Gateway User’s Guide Gigaset Gateway Setup Home Window After finishing the Setup Wizard and clicking Configure, the Home window appears. This window also appears from now on when connecting to the Gateway. After finishing the Setup Wizard and clicking Configure, the “Home” window is displayed. This window is also displayed from now on when connecting to the Gateway.
Need help?
Do you have a question about the Gigaset SE568 Series and is the answer not in the manual?
Questions and answers