Table of Contents
Advertisement
Quick Links
KEEP FOR FUTURE REFERENCE
INSTRUCTIONS
International Version
MODEL NUMBERS: PT10FS10TAC(O),
P .O. Box 368 – 908 W est M ain
Laurel, M T USA 59044
PT14FS10TACO
phone 800-548-7341
phone 406-628-8231
SERIAL NUMBER: ___________
fax 406-628-8354
(please see serial label and record number here)
POWER TILTER
AC-VOLTAGE
R EAD ALL I NSTRUCTI ONS AND W AR NI NGS
BEFOR E OPER ATI NG THI S LI FTER
DESIGNED FOR THE MATERIALS HANDLING PROFESSIONAL
Advertisement
Table of Contents

Subscribe to Our Youtube Channel
Related Manuals for WPG PT10FS10TAC


Summary of Contents for WPG PT10FS10TAC
- Page 1 KEEP FOR FUTURE REFERENCE INSTRUCTIONS International Version MODEL NUMBERS: PT10FS10TAC(O), P .O. Box 368 – 908 W est M ain Laurel, M T USA 59044 PT14FS10TACO phone 800-548-7341 phone 406-628-8231 SERIAL NUMBER: ___________ fax 406-628-8354 (please see serial label and record number here)
-
Page 3: Table Of Contents
CHEDULE Every-Lift Inspection ..........................16 Frequent Inspection ........................... 16 Periodic Inspection ............................ 16 Infrequent Use ............................17 ........................17 ESTING CHEDULE Operational Tests............................17 Load Test ..............................17 ......................18 AINTENANCE CHEDULE ..................... 18 ACUUM AINTENANCE Rev 13.1/9-16 PT10FS10TAC: #35142... - Page 4 F) Replacing O-Rings and Reassembling the Head Assembly .................24 ....................25 ACUUM WITCH DJUSTMENT Vacuum Switch Function ..........................25 Conditions Requiring Readjustment ......................25 Adjustment Procedure ..........................25 ......................26 INEAR CTUATOR REPLACEMENT PARTS LIST ..................27 LIMITED WARRANTY ....................28 Rev 13.1/9-16 PT10FS10TAC: #35142...
-
Page 5: Specifications
PT10FS10TAC(O) or PT14FS10TACO Description: Designed for use with a crane or other hoisting equipment, all variations of the PT10FS10TAC lifter employ vacuum to hold a load for lifting, and they provide powered 90° tilt movement for load manipulation. Power Source: See serial number plate for specific AC voltage, frequency and amperage. -
Page 6: Warnings
For consultation, contact Wood's Powr-Grip (see LIMITED WARRANTY). Alw ays employ a ground fault circuit interrupter when connecting the power cable to the power source. Rev 13.1/9-16 PT10FS10TAC: #35142... -
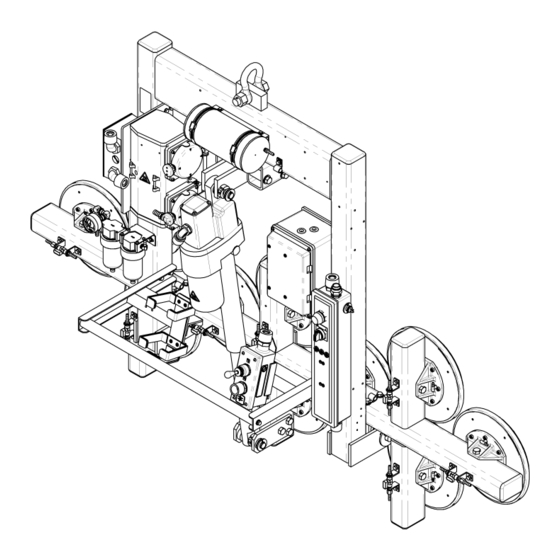
Page 7: Operating Features
OPERATING FEATURES Note: Components featured in the following instructions for assembling, operating or maintaining the vacuum lifter are underlined on their first appearance in each section. Standard PT10FS10TAC shown. 1 LIFT BAR 7 POWER SWITCH 13 LIFT SHACKLE 2 VACUUM PUMP... -
Page 8: Assembly
Then attach the hoisting equipment hook to the lift shackle. W AR NI NG: Hoisting equipm ent hook m ust be fitted w ith restraining latch to prevent lift shackle from slipping off under any circum stances. Rev 13.1/9-16 PT10FS10TAC: #35142... - Page 9 Remove the pad covers and save them for use whenever the lifter is stored. Now the lifter is operational. 4) Perform Operational and Load Tests for the lifter as directed in MAINTENANCE: T ESTING CHEDULE Rev 13.1/9-16 PT10FS10TAC: #35142...
-
Page 10: Intended Use
Lifters that feature concave vacuum pads can also attach to some kinds of curved loads. Since curvature affects the lifting capacity, contact Wood’s Powr-Grip for help in determining the Load Capacity for a particular curved load. This thickness is also known as “1-1/4 inch” in the American stone industry. Rev 13.1/9-16 PT10FS10TAC: #35142... -
Page 11: Perating Nvironment
ISPOSAL OF THE IFTER After the vacuum lifter has reached the end of its service life, you must dispose of the lifter in compliance with all local codes and regulatory standards that are relevant for the geographical region. Rev 13.1/9-16 PT10FS10TAC: #35142... -
Page 12: Operation
In order for the operator to use the lifter on wet load surfaces, it must be equipped with 2 or more filters that are connected series . However, see MAINTENANCE: V : Friction Coefficient before using the lifter on wet load surfaces. ACUUM AINTENANCE Rev 13.1/9-16 PT10FS10TAC: #35142... -
Page 13: Generating Vacuum Flow
2" [5 cm] of the pad frame’s center point. Occasional loading deviations are permissible, provided that the operator can maintain control of the load at all times and that the load weight is low enough to avoid damaging the lifter. Rev 13.1/9-16 PT10FS10TAC: #35142... -
Page 14: Reading The Vacuum Gauge
Certain load materials are too rough or porous to allow the lifter to form a seal which can be maintained for 5 minutes without power. However, in geographical locations where CE Standards do not apply, it may be possible to use the lifter to lift such loads. Contact Wood’s Powr-Grip for more information. Rev 13.1/9-16 PT10FS10TAC: #35142... -
Page 15: Load Capacity And The Lift Light
If the lifter is equipped with Control Handle Extensions, do not use the control handle to fully correct the hang angle of a lifter loaded to the Maximum Load Capacity (see SPECIFICATIONS). The Control Handle Extensions are not designed to sustain more than 100 lbs [45.5 kg] of force upward or downward on the control handle. Rev 13.1/9-16 PT10FS10TAC: #35142... -
Page 16: In Case Of Power Failure
After the pads have disengaged completely from the load, move the lifter away. Continue to hold the release button until the pads are well away from the load; otherwise, the lifter would reattach itself to the load. Rev 13.1/9-16 PT10FS10TAC: #35142... -
Page 17: Fter Sing The Ifter
Avoid placing the lifter in this position; or if this is unavoidable, place a support under the lift bar. Also be sure to provide manual assistance to the tilt actuator when raising the lift bar to the vertical position (see ASSEMBLY). Rev 13.1/9-16 PT10FS10TAC: #35142... -
Page 18: Maintenance
CAUTI ON: Be sure to use appropriate cleaning m ethods for each type of electrical com ponent, as specified by codes and standards. I m proper cleaning can dam age com ponents. • Keep a written record of all Periodic Inspections. Rev 13.1/9-16 PT10FS10TAC: #35142... -
Page 19: Infrequent Use
Note: See MAINTENANCE topics to follow for additional directions about inspecting and testing specific lifter components. ASME Standard B30.20 requires the lifter to be tested to 125% of its Load Capacity. Flat Lifters are exempt from this requirement. Rev 13.1/9-16 PT10FS10TAC: #35142... -
Page 20: Aintenance Chedule
(see REPLACEMENT PARTS LIST). If the lifter is equipped with VPFS10T or VPFS625 pads, the sealing edge is the replaceable sealing ring. When it is damaged, see T to follow. EPLACE EALING NSERT IN ACUUM Rev 13.1/9-16 PT10FS10TAC: #35142... -
Page 21: Cleaning
If these cleaning methods are not successful, contact Wood’s Powr-Grip or an authorized dealer for assistance. Any test material used must be fully and independently supported, and capable of bearing the lifter’s weight. Do not use the lifter to lift the test material during the vacuum test. Rev 13.1/9-16 PT10FS10TAC: #35142... -
Page 22: Eplace Ealing Ing Nsert In Acuum Ad
Note: If the ring insert ever comes partially or entirely out of the mounting groove, inspect the ring insert for damage and reinstall an undamaged ring insert according to preceding directions. Rev 13.1/9-16 PT10FS10TAC: #35142... -
Page 23: Air Filter Maintenance − Large
When the air filter is being used on a system, rather than with Never pressure, using the twist drain to remove liquid from the bowl is recommended. disturb the twist drain, as contaminants could lodge in the drain seal and cause a vacuum leak Rev 13.1/9-16 PT10FS10TAC: #35142... -
Page 24: Vacuum Pump Maintenance − Gast Daa-V505-Gb/D
3 FILTER ELEMENT 6 VALVE PLATE 9 RETAINER PLATE Whenever you remove the valve plate assembly, be careful to save any shims located between the valve plate and the pump body and reinstall them during reassembly. Rev 13.1/9-16 PT10FS10TAC: #35142... -
Page 25: Vacuum Pump Maintenance − Gast N70
2) Remove the four retainer screws (4) from the two retainer plates (5). Remove the cylinders (7), leaving the retainer plates and cups (6) inside. 3) Invert the cylinders (7) and push the retainer plates (5) out through the top. The cylinders and cups (6) will be replaced next. Rev 13.1/9-16 PT10FS10TAC: #35142... -
Page 26: E) Replacing The Cylinders And Cups
Cylinder O-ring Long Valve Screw (T15 Torx) Valve Limiter Leaf Valve (Exhaust) Short Valve Screw (T15 Torx) Retainer Plate Leaf Valve (Intake) * Special Order – Non-Stocked Item Included in service kit #66178 Rev 13.1/9-16 PT10FS10TAC: #35142... -
Page 27: Vacuum Switch Adjustment
In order to observe lifter functions while vacuum is decreasing, it may be necessary to create a controlled leak in the vacuum system (e.g., by breaking the seal between one or more vacuum pads and the test surface). Rev 13.1/9-16 PT10FS10TAC: #35142... -
Page 28: Linear Tilt Actuator
If the actuator is not used for a week or more at a time, oil may begin to separate from the lubricant and leak out. Although this leakage is not detrimental to the lubrication or operation of the actuator, you can avoid this condition by simply running the actuator for a few cycles each week. Rev 13.1/9-16 PT10FS10TAC: #35142... -
Page 29: Replacement Parts List
60 (84) SER VI CE ONLY W I TH I DENTI CAL R EP LACEM ENT P AR TS, AVAI LABLE AT W P G.COM OR THR OUGH AN AUTHOR I ZED W P G DEALER Rev 13.1/9-16 PT10FS10TAC: #35142... -
Page 30: Limited Warranty
Contact your dealer or the Technical Service Department at Wood’s Powr-Grip Co. for assistance. Wood's Powr-Grip Co., Inc. 908 West Main St. / P.O. Box 368 Laurel, MT USA 59044 phone 800-548-7341 phone 406-628-8231 fax 406-628-8354 Rev 13.1/9-16 PT10FS10TAC: #35142... - Page 31 Rev 13.1/9-16 PT10FS10TAC: #35142...
- Page 32 Rev 13.1/9-16 PT10FS10TAC: #35142...
- Page 33 Rev 13.1/9-16 PT10FS10TAC: #35142...
- Page 34 Rev 13.1/9-16 PT10FS10TAC: #35142...
- Page 35 Rev 13.1/9-16 PT10FS10TAC: #35142...
- Page 36 Rev 13.1/9-16 PT10FS10TAC: #35142...
- Page 37 Rev 13.1/9-16 PT10FS10TAC: #35142...
- Page 38 Rev 13.1/9-16 PT10FS10TAC: #35142...
Need help?
Do you have a question about the PT10FS10TAC and is the answer not in the manual?
Questions and answers