Table of Contents
Advertisement
Quick Links
SS-2N/AST/STD/LSD-2
SS-2N/AST-WH/LSD-2
215-1498 Rev. G; ECN 17-08-026
© 2018 Bradley
Page 1 of 15
5/14/2018
Installation
SS-2N/AST/STD
SS-2N/AST-WH
Express
Lavatory
®
System SS-Series
Express Lavatory Systems are ADA and TAS compliant
Menomonee Falls, WI 53052 USA
800 BRADLEY (800 272 3539)
P.O. Box 309
+1 262 251 6000
bradleycorp.com
Advertisement
Table of Contents

Related Manuals for Bradley Express SS-2N/AST/STD


Summary of Contents for Bradley Express SS-2N/AST/STD
- Page 1 Express Lavatory Systems are ADA and TAS compliant SS-2N/AST/STD/LSD-2 SS-2N/AST-WH/LSD-2 P.O. Box 309 215-1498 Rev. G; ECN 17-08-026 Menomonee Falls, WI 53052 USA © 2018 Bradley 800 BRADLEY (800 272 3539) +1 262 251 6000 Page 1 of 15 5/14/2018 bradleycorp.com...
- Page 2 Separate parts from packaging and make sure all parts are accounted for before discarding any packaging material. If any parts are missing, do not begin installation until you obtain the missing parts. Product warranties may be found under “Products” on our website at www.bradleycorp.com. Bradley • 215-1498 Rev. G; ECN 17-08-026 5/14/2018...
- Page 3 Drain Plug (P16-072) Bowl Mounting Hardware 1/8" Rubber Washer (125-001DP) 1/4"-20 1/4"-20x1/2" Washer Pan Head (qty 4) Screw (qty 4) P-Trap (Polypropylene) (142-002DB) Tailpiece (129-056) (160-389) (269-1697) Optional P-Trap (Chrome-Plated Brass) (S29-094) Bradley • 215-1498 Rev. G; ECN 17-08-026 5/14/2018...
-
Page 4: Supplies Required
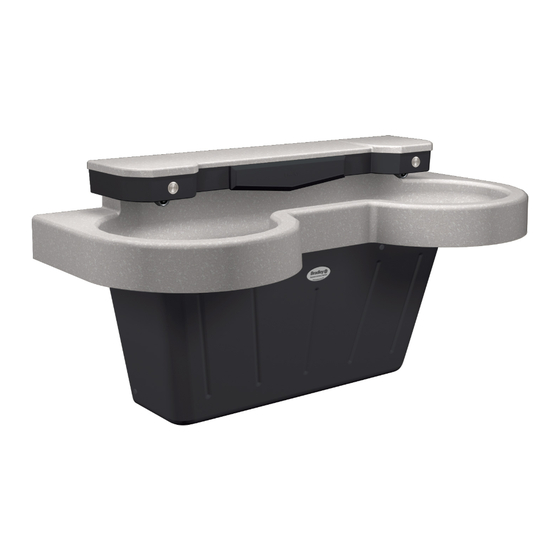
15" 10" (254) (381) (381) Radius 38-1/4" (972) Front View Standard Frame 7" (178) 21-1/4" (540) 30" (762) 36" (914) 38-1/4" (972) Front View Wall-Hung Frame 7" (178mm) 30" (762) 36" (914) Bradley • 215-1498 Rev. G; ECN 17-08-026 5/14/2018... -
Page 5: Dimensions - Side Views
Grades: 6 through 8 or 9 Grades: Pre-K through 5 or 6 11-1/2" 11-1/2" (292) (292) 36-1/2" 34-1/2" (927) (876) 32" 30" (813) (762) 8-5/8" 8-5/8" 28" (219) 26" (219) (711) (660) 11-1/4" 9-1/4" (286) (235) Bradley • 215-1498 Rev. G; ECN 17-08-026 5/14/2018... - Page 6 34" None Standard Height 34" None Wall-Hung 32" Subtract 2" TAS, Grades 6 through 8 or 9 31" Subtract 3" Juvenile Height 30" Subtract 4" TAS, Pre-K through Grades 5 or 6 Bradley • 215-1498 Rev. G; ECN 17-08-026 5/14/2018...
- Page 7 3/8" bolts and 1" min. O.D. washers, two places. DO NOT OVERTIGHTEN! Tighten the pan-head screws. Do not overtighten. Bradley • 215-1498 Rev. G; ECN 17-08-026 5/14/2018 SCUFF BASE FRAME AND DRAIN ASSEMBLY NOT SHOWN FOR CLARITY...
- Page 8 Loosen but do not remove the two mounting screws holding the valve bracket to the frame. Slide the valve bracket up and lift it from the frame. Attach the stop to the tempered wall stub-out. Bradley • 215-1498 Rev. G; ECN 17-08-026 5/14/2018...
- Page 9 Tighten the compression nuts by hand. Loosen the compression nuts. Push the matching color 1/8" tubes firmly into the tube connectors until they are fully seated. Tighten the compression nuts by hand. Bradley • 215-1498 Rev. G; ECN 17-08-026 5/14/2018...
-
Page 10: Adjust The Temperature
U-Cup (125-099) Duckbill (198-010) Spring (135-065) Actuator Body ASM (S39-802) Bracket, SSN Push Button (140-956) ¼" Tube Connector (169-890) Nut, ½" - 14 NPSM (110-115) Push Button Aerator (S05-180) (S08-324) #10 Screw (160-353) Bradley • 215-1498 Rev. G; ECN 17-08-026 5/14/2018... -
Page 11: Cleaning And Maintenance For Terreon
For complete instructions on this additional maintenance, visit bradleycorp.com. Repair Kits: Terreon repair kits are available. Contact your Bradley representative or distributor for part numbers and pricing. Repair kits are made to order and have a shelf life of 30 days. - Page 12 2. Clean valve seat and inspect for deep gouges or scratches. Replace valve body if streamformers. orifices. necessary. 3. Remove any debris clogging off-center hole in rubber diaphragm. Bradley • 215-1498 Rev. G; ECN 17-08-026 5/14/2018...
-
Page 13: Thermostatic Mixing Valve Troubleshooting
198-014 Check Valve* 132-051 Retaining Ring* 118-319 Valve Body 146-079 U-Clip * Included with Prepack S65-326 Tempered Line Adapter Option Part no. S39-804 (replaces S59-4000 if tempered line is used) Strainer (173-028) Bradley • 215-1498 Rev. G; ECN 17-08-026 5/14/2018... - Page 14 2. Inspect the stop valves to see that they have been properly installed. 3. Inspect the thermostatic mixing valve for proper installation and connection to hot and cold supplies. Bradley • 215-1498 Rev. G; ECN 17-08-026 5/14/2018...
- Page 15 To change soap, pour out all of the soap from the dispenser and rinse with hot water several times until all residue is removed. Pump the valve until clean water appears. Rinse the dispenser with ethyl alcohol; air dry before refilling. Bradley • 215-1498 Rev. G; ECN 17-08-026 5/14/2018...
Need help?
Do you have a question about the Express SS-2N/AST/STD and is the answer not in the manual?
Questions and answers