Dreame H12 Pro Wet and Dry Vacuum Manual
- User manual (192 pages) ,
- User manual (111 pages) ,
- User manual (121 pages)
Advertisement
Safety Information
Important Safety Instructions For Household Use Only
- Please read this manual carefully before use and retain it for future reference.
- When using an electrical appliance, basic precautions should always be followed, including the following:
- READ ALL INSTRUCTIONS BEFORE USING (THIS APPLIANCE). Failure to follow the warnings and instructions may result in electric shock, fire and/or serious injury.
![]()
To reduce the risk of fire, electric shock, or injury: - Use only as described in this user guide. Use only manufacturer's recommended attachments.
- Use indoors only, on non-carpeted floor surfaces such as vinyl, tile, sealed wood, etc. Be careful not to run over loose objects or the edges of area rugs. Stalling the brush may result in premature belt failure.
- This appliance should not be used by children younger than 8 years old nor persons with physical, sensory, intellectual deficiencies, or limited experience or knowledge without the supervision of a parent or guardian to ensure safe operation and to avoid any risks. Cleaning and maintenance shall not be performed by children without supervision.
- Do not use a flammable or combustible liquid to clean floors.
- Do not use to pick up flammable or combustible liquids, such as gasoline. Do not use in areas where flammable or combustible liquids may be present.
- Do not immerse the appliance in liquid.
- Plastic film can be dangerous. To avoid the danger of suffocation, keep it away from children.
- Keep hair, loose clothing, fingers, and all parts of the body away from openings and moving parts of the appliance and its accessories.
- Use only officially-approved floor cleaner as described in the user guide.
- Do not put any object into openings. Do not use the appliance when any opening is blocked; keep free of dust, lint, hair, and anything that may inhibit air flow.
- Keep ground cables away from the appliance when using it, because a hazard may occur if the appliance runs over a supply cord.
- Do not use it without filters in place.
- Do not use the appliance with a damaged attachment (eg: Charging base, Supply cord etc.). If the attachment is damaged, it must be replaced by the manufacturer, its service agent or similar qualified persons in order to avoid hazards.
- Do not pick up toxic material (chlorine bleach, ammonia, drain cleaner, etc.). Do not pick up hard or sharp objects such as glass, nails, screws, coins, etc.
- Do not use the appliance in an enclosed space filled with vapour given off by oilbased paint, paint thinner, some moth-proofing substances, flammable dust, or other explosive or toxic vapour. Do not pick up anything that is burning or smoking, such as cigarettes, matches or hot ashes.
- Do not pull or carry adapter by cable, use cable as a handle, close door on cable, or pull cable around sharp edges or corners.
- Switch off and unplug when not in use, before cleaning, maintaining or servicing the appliance, and before connecting or disconnecting the tool with a moving brush.
- Do not use an appliance that is damaged or modified. Damaged or modified appliance may exhibit unpredictable behavior resulting in fire, explosion, or risk of injury.
- Do not expose the appliance to fire or excessive temperature. Exposure to fire or excessive temperature may cause an explosion.
- Ensure that the appliance is placed on a horizontal surface. Do not use the appliance at the same position if the appliance is equipped with a brush roller and the handle is not completely upright. Do not store the appliance in a place where it may freeze.
- Use extra care when cleaning on stairs.
- Prevent unintentional starting. Ensure the switch is in the OFF-position before picking up or carrying the appliance. Carrying the appliance with your finger on the switch or energizing appliance that have the switch on invites accidents.
- Have servicing performed by a qualified repair person using only identical replacement parts. This will ensure that the safety of the appliance is maintained.
- Do not modify or attempt to repair the appliance except as indicated in the instructions for use and care.
- If appliance has been dropped, damaged, left outdoors, dropped into water, or is not working as it should, never attempt to operate it. Please have it repaired at an authorized service center.

Battery and Charging
- Do not use in extremely hot or cold environments (below 0℃ /32°F or above 40℃ /104°F). Please charge the appliance in temperature above 0℃ /32°F and below 40℃ /104°F).
- For the purpose of recharging the appliance, only use the charging base provided with this appliance. Use only with HCB3 charging base.
- A charging base that is suitable for one type of appliance may create a risk of fire when used with another one.
- Follow all charging instructions and do not charge the appliance outside of the temperature range specified in the battery as doing so increases the risk of fire.
- Charging base output terminals should not be short-circuited. Do not use it with a damaged charging base. If the appliance has been dropped, damaged, left outdoors, dropped into water, or is not working as it should, return it to a service center.
- Keep the charging base cable away from heated surfaces. Do not handle the charging base plug or appliance with wet hands. To unplug, grasp the charging base plug, rather than the cable.
- This appliance contains batteries that are non-replaceable.
- Charging base is equipped with drying function and only suitable for drying this appliance's brush.
SAVE THESE INSTRUCTIONS
![]() class II equipment
class II equipment
 time-lag miniature fuse-link where T 3.15A is the symbol for the time/current characteristic
 detachable supply unit
 read operator's manual
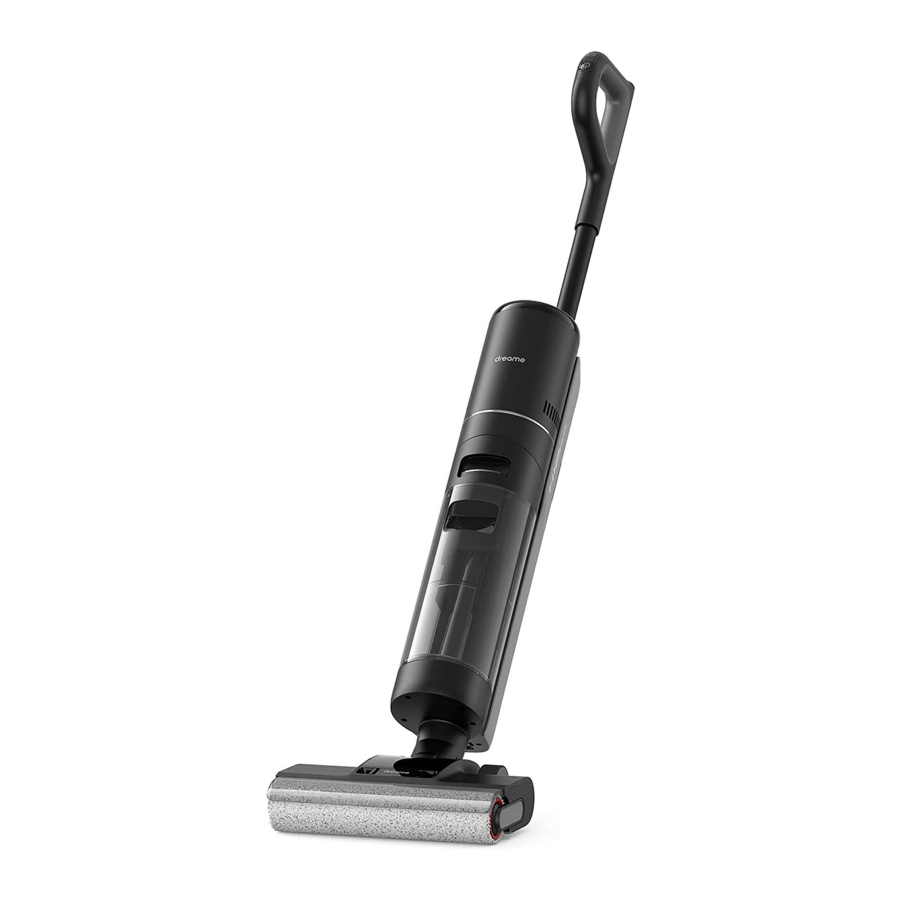
Product Overview
Packing List

Wet and Dry Vacuum

![]() Self-Cleaning Button
Self-Cleaning Button![]() Mode Switch
Mode Switch![]() Power Switch
Power Switch- Display Screen
- Used Water Tank Release Button
- Used Water Tank Handle
- Used Water Tank
- Brush Roller Cover
- Brush Roller
- Brush Roller Handle
- Brush Roller Release Button
- Brush Roller Cover Release Buttons
- Clean Water Tank
- Clean Water Tank Handle
- Clean Water Tank Release Button
- Voice Prompt Button
- Press briefly to activate the voice prompt or adjust the volume.
- Press and hold for 3 seconds to set the language. Press to switch between languages. Press and hold to confirm the selection.
 Self-Cleaning Button
 Mode Switch
 Power Switch
Charging Base

- Charging Contacts
- Air-Drying Outlet
- Air-Drying Inlet
- Power Cord
Display Screen

- Ultra Mode
- Suction Mode
- Battery Status Indicator
- Self-Cleaning Blocked Tube
- Error Messages
![]() Insufficient water in the Clean Water Tank
Insufficient water in the Clean Water Tank
![]() Used Water Tank full
Used Water Tank full
![]() Blocked Tube
Blocked Tube
![]() Brush roller stuck / Brush roller not installed
Brush roller stuck / Brush roller not installed - Drying Mode
- Auto Mode
- Dirt Level Indicator
The color of the indicator changes in real time according to the amount of dirt
 Insufficient water in the Clean Water Tank
 Used Water Tank full
 Blocked Tube
 Brush roller stuck / Brush roller not installed
Note: If the appliance is not working properly, the screen display will show an error message. Please refer to the troubleshooting table to find your solution.
Installation
Storage Box Installation
Install the storage box onto the charging base as shown in the diagram.

Assembly and Disassembly of Handle
Insert the end of the handle vertically into the port on the top of the vacuum as indicated until you hear a click.

Note: To disassemble, press the contacts in the hole on the back of the appliance with the appropriate tool and pull the handle upwards at the same time.
Charging
- Place the charging base against a wall on level ground and connect it to a power source. Fully charge the appliance before first use.
- Place the appliance on the charging base. When the voice prompt "Charging Started" is displayed, the appliance activates the charging mode. When charging, the number on the display screen represents the current battery level as a percentage. When the number reaches 100, the battery is fully charged.


Note:
- If there is no operation within 10 minutes of being fully charged, the vacuum will enter sleep mode. Please restart the appliance if you need to use it.
- To extend the battery life time, the battery keeps cooling down for about one hour automatically after you have used the appliance for a long time.
How to Use
Working Modes
The appliance will start in auto mode by default. You can switch to the suction mode or the Ultra Mode based on your needs.
 Auto Mode
While cleaning the floor, the appliance will automatically adjust its suction power according to different situations.
 Ultra Mode
Preparing Ultra Mode, please wait for 30 seconds. This mode is suitable for deep cleaning.
![]() Suction Mode
Suction Mode
If the suction mode is selected, the appliance will vacuum water only and the brush roller will not be dampened. No water is coming out of the Clean Water Tank.
Filling the Clean Water Tank
Press the Clean Water Tank release button and pull the tank outwards to remove it. Remove the cover of the Clean Water Tank and fill the tank with clean water. Install the Clean Water Tank and ensure it clicks into place.

Note:
- For better cleaning performance, it is recommended to add 10ml detergent with the bottle cap into the full Clean Water Tank, then shake gently and evenly for use.
- Do not add any liquids other than the officially-approved cleaner. The cleaner can be available on the official online store.
Start Cleaning
Gently step on the brush cover and recline the appliance backwards. Press the power switch to start operating. Press the
 to switch among the auto mode - the ultra mode - the suction mode according to your needs.

Note:
- Do not vacuum any foamy liquids.
- The appliance will be suspended in the upright position while running.
- The appliance is suitable for cleaning floors, marble, tiles and other hard surfaces.
- Do not recline the appliance backwards more than 140° to prevent the appliance from leaking water.
- When the appliance is in operation, do not lift it off the ground or lay it flat. Doing so may cause the used water to flow into the motor.
Cleaning the Used Water Tank
Press the Used Water Tank release button to take out the tank. Remove the tank cover and pour out the used water. Close the tank cover and re-install the tank before use.

One-Press Self-Cleaning
- Place the appliance back onto the base while you finish cleaning. Ensure that the water in the Clean Water Tank is sufficient for self-cleaning.
- Briefly press the self-cleaning button on the top of the handle, the self-cleaning indicator will light up, and the appliance will start self-cleaning.
- Please empty the Used Water Tank after self-cleaning is completed and drying mode has been engaged. Press the button
![]() to exit the drying mode.
to exit the drying mode.
 to exit the drying mode.
Note: The self-cleaning function can be enabled only when the appliance is being charged and the battery level is more than 15%.
Drying Mode

- Press and hold self-cleaning button
![]() for 3 seconds to activate drying mode.
for 3 seconds to activate drying mode. - The appliance will be charged once drying is completed.
Note:
- After self-cleaning is complete, promptly clean the Used Water Tank. Clean the charging base if there are any stains left on the base.
- If cleaning the brush roller manually, please air-dry it thoroughly or dry it by using drying mode several times to ensure a good drying effect.
Care & Maintenance
Tips:
- Turn off the appliance before maintenance. Do not touch the power switch.
- Replace parts if needed. The parts must be replaced by those available from the manufacturer or its service agent.
- If the vacuum is not used for an extended period, fully charge it, unplug the power plug, and store the vacuum in a cool, low-humidity environment away from direct sunlight. To avoid over-discharge of the battery, charge the vacuum at least once every 3 months.
Cleaning the Used Water Tank and the Filter
- Press the Used Water Tank release button, and pull the Used Water Tank outwards to remove it.
![]()
- Take out the filter from the Used Water Tank cover. Remove the tank cover and empty the tank.
![]()
- Rinse the Used Water Tank and the tank cover with clean water. Clean the tank by the provided cleaning brush.
![]()
- Re-install the filter and the Used Water Tank cover. Then re-install the Used Water Tank until you hear a click.


Note:
- If the filter is dirty, rinse it with clean water and dry it completely before use.
- Replacing the filter every 3 to 6 months is recommended.
Cleaning the Tube and the Dirt Sensor
Remove the Used Water Tank, gently wipe the tube and the dirt sensor with a wet cloth before use.

Note: Do not rinse the tube or the dirt sensor.
Cleaning the Brush Assembly
- First, press the brush roller cover release buttons inwards on both sides to remove the brush roller cover. Press the brush roller release button, and the brush roller handle will pop out. Pull it to take out the brush roller.

- Clear the hair and debris tangled on the brush roller with the provided cleaning brush. Rinse the brush roller with clean water. Air dry the brush roller thoroughly, or dry it by activating the drying mode several times.
![]()
- Wipe the suction inlet with a dry cloth or wet tissue. Do not rinse the brush assembly with water.
![]()
- Re-install the brush roller and the brush roller cover until you hear a click.
![]()


Note:
- Clean as needed. Alternating use of the two provided brush rollers is recommended.
- Replacing the brush roller every 3 to 6 months is recommended.
FAQ
If an error occurs, the appliance will stop working. Please refer to the following table for troubleshooting. If the problem persists, please contact customer service.
| Error | Possible Cause | Solution |
| The appliance does not work | The appliance is out of battery or its battery level is low | Fully charge its battery before use |
| The appliance is in the upright position | Recline the appliance backwards | |
| Blockage activated overheat protection mode | Clear the blockage and wait until the temperature returns normal | |
| The Used Water Tank is full | Empty the Used Water Tank | |
| The handle, brush roller, or Used Water Tank is not properly installed | Ensure the handle, brush roller, or Used Water Tank are all properly in place | |
| The appliance charges slowly | The temperature of the battery is too low or too high | Wait until the battery's temperature returns normal |
| The suction power of the appliance is weak | The filter is clogged | Cleaning the filter |
| The suction inlet or tube is blocked by a foreign object | Clean the tube and the suction inlet | |
| The motor is making a strange noise | There is too much used water in the Used Water Tank | Empty the Used Water Tank |
| The suction inlet is blocked | Clear any blockage in the suction inlet | |
| The dirt level indicator is solid red | The dirt sensor needs cleaning | The dirt sensor is in the tube. Follow tube cleaning instructions |
| The cleaning solution concentration is too high | Dilute the cleaning solution with water at the recommended ratio | |
| A third-party cleaning solution caused a large amount of foam | Use only the officially-approved cleaning solution | |
| The display screen does not light up while charging | The charging base cable is not plugged into the electrical outlet | Make sure the charging base cable is plugged in |
| The appliance is not placed onto the charging base properly | Make sure the appliance is placed onto the charging base properly | |
| No water is coming out of the appliance | The Clean Water Tank is not properly installed in place, or the water in the Clean Water Tank is insufficient | Re-install or fill the Clean Water Tank |
| It takes 30 second to dampen the brush roller | Turn on the appliance and check again in 30 seconds | |
| The vent leaks water | A collision or a sharp pull causes water to enter the motor | Move the appliance gently back and forth while it is turned on |
| The filter is not completely dry after being cleaned | Dry the filter completely before use | |
| Self-cleaning fails | The brush roller may be jammed by large debris | Open the brush roller cover to check and clean the brush roller |
| The appliance is not placed onto the charging base properly | Make sure the appliance is being charged before selfcleaning | |
| Self-cleaning cannot be enabled if the battery level is lower than 15% | The self-cleaning function can only be enabled when the appliance is being charged and the battery level is more than 15% | |
| The Used Water Tank is not installed in place, or the Used Water Tank is full | Re-install or empty the Used Water Tank | |
| The Clean Water Tank is not installed in place, or the water in the Clean Water Tank is insufficient | Re-install or fill the Clean Water Tank | |
| Poor drying performance or strange noise while drying | The air outlet and air inlet of the charging base may be blocked | Check and clear the blockage of air outlet and air inlet |
For additional services, please contact us via aftersales@dreame.tech
Website: https://global.dreametech.com

Documents / Resources
References
Download manual
Here you can download full pdf version of manual, it may contain additional safety instructions, warranty information, FCC rules, etc.
Advertisement


Need help?
Do you have a question about the H12 Pro and is the answer not in the manual?
Questions and answers