
Related Manuals for Kellfri 13-VT250


Summary of Contents for Kellfri 13-VT250
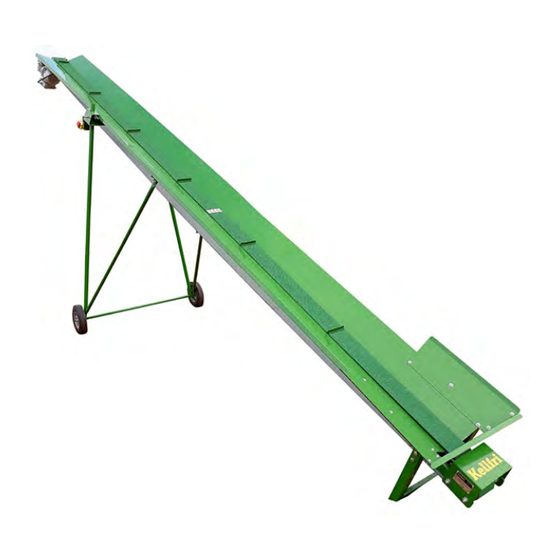
- Page 1 13-VT250 FIREWOOD CONVEYOR Carefully read the operating instructions before using the product! Operating instructions translated from Swedish...
- Page 2 ASSEMBLY OTHER PART NO. Kellfri designs and supplies efficient, affordable machinery and components for forestry, ag- riculture, construction and gardening in Sweden, the rest of the Nordic region and Europe. We recommend that you always read and follow the safety instructions and the instructions in the product's operating manual.
-
Page 3: Product Information
INTRODUCTION Thank you for choosing a product from Kellfri AB. Compliance with the safety instructions, operating manual and sound common sense will guarantee many years of enjoyment using the product. Kellfri’s equipment and products are aimed at self-employed farmers, horse en- thusiasts and other country-dwellers who have stringent performance demands. -
Page 4: Safety Instructions
If the safety instructions or the operating manual are dam- aged, or become unusable for any other reason, new copies may be ordered from: Kellfri AB, Munkatorpsgatan 6, SE-532 37 SKARA, Sweden. Tel.: +46 511 242 50 The safety instructions can also be downloaded from Kellfri’s website: www.kellfri.co.uk... -
Page 5: Before Use
SURROUNDINGS Check that the work area is free from bystanders and objects before hitching or using the equipment. Otherwise, there is a risk of serious injury. Be extra careful if there are children in the vicinity of the area where the equipment or product is used or stored. Check that there are no low-hanging electrical cables within the work area. -
Page 6: After Use
Only those who understand the safety instructions and the operating manual may use the equipment or product. Exercise caution and care when working with the equipment or prod- uct and only use it in the way described in the instruction manual. There is a risk of crushing when working with equipment that has moving parts. -
Page 7: Maintenance And Service
Contact your local authority for further information. Kellfri AB has a policy of continuous product development and therefore reserves the right to make modifications, e.g. to the design and appearance of the product, without prior notice. - Page 8 THINGS TO CONSIDER WHEN USING ELECTRICALLY POWERED PRODUCTS/ EQUIPMENT • Carefully read the operating manual before using the product. • Electrically powered machines must always be connected to an earthed power socket (see symbol below). The socket must be installed by a qualified electrician. •...
-
Page 9: Operation
OPERATION There is a risk of crushing when working with equipment that has moving parts. Always make sure that no one is near the conveyor when starting the belt. If you leave the conveyor, even if it is only for a short time, always disconnect the power supply to the electric motor and discon- nect the power plug from the socket. -
Page 10: Warning Decals
WARNING DECALS Make sure warning decals are always visible and clean them when necessary. Do not use a high-pressure washer directly on the warning decal. If apart with a decal is replaced, or the decal becomes worn or in any other way unusable, order a new set of decals. SYMBOL EXPLANATION Read the operating manual! Before carrying out work. -
Page 11: Parts Included
PARTS INCLUDED 1 – Adjusting stay – ten- sioning of conveyor belt 2 – Wheels 1 – Belt pulley, upper 1 – Belt pulley, lower Metal guard Bolt kit 2 Stabiliser rods 1 – Wheel axle 1 – Electric 2 – Long Wheel stays motor 1 – Conveyor belt Channel –... - Page 12 ASSEMBLY Some parts require 2 persons or a lifting device during assembly. Illustration 1. Place the channels on the ground with the underside facing upwards. Assemble the lower part with the upper part. Note: Check that the fastening lugs align with each other. Fit the bolts;...
- Page 13 Illustration 4. Carefully lift the channel. Get help from a friend or use a lifting de- vice. Place, for example, a wooden block un- derneath. Insert the wheel stays. NOTE! Right and left. 5a. Tighten the angle screw. Illustration 5. Fit the stabiliser rods (NOTE: Right and left), and wheel axle.
- Page 14 Illustration 6. Fit the wheels (2) and tighten the bolts. Illustration 7. Unscrew the bolts, see illustration. Illustration 8. 1. Screw the motor onto the motor mount on the upper channel. 2. Screw on the belt pulley, upper. 3. Fit the metal guard over the belt pul- ley.
- Page 15 Illustration 9. Turn the firewood conveyor so it stands on its wheels. Be careful! Get help from a friend or use a lifting device. Warning! Risk of crushing! Do not permit anyone to stand un- der the firewood conveyor. Fit the switch under the wheel stays. Belt pulley, upper Illustration 10.
- Page 16 Illustration 10 continued. Install the conveyor belt. Get a friend to help join together the ends of the conveyor belt. Adjust the tension of the conveyor belt. Table of contents...
- Page 17 Illustration 11. Fit the metal guard. Illustration 1. The parts are screwed into the channel. Illustration 2. The part is screwed under the plates as in Illustration 1. Table of contents...
- Page 18 ITEM SPARE PART NO. DESCRIPTION QUAN- TITY R13-VT250.009 Channel upper with motor mount R13-VT50.009 Drive wheel motor part 120x25 mm R13-VT250.011 Drive wheel axle 25 x 220 mm R13-VT250.012 Belt guard R13-VT250.013 Motor guard bracket R13-VT50.026 Motor and gearbox 0.37 kW 230 V R13-VT50.029 Motor protection Tripus 1-phase 230 V 3 A R13-VT250.016...
- Page 19 ITEM SPARE PART NO. DESCRIPTION QUAN- TITY R13-VT250.019 Bolt M8x16 R13-VT250.020 Washer 3X9x35 R13-VT250.021 Spline 8x40 R13-VT250.022 Circlip SGH 25 R27-HTFL.023 Blade bolt M6x16 R13-VT250.024 Washer Ø6 R13-VT250.025 M6 nut R13-VT250.026 Bolt M4x40 R13-VT250.027 Washer Ø4 R13-VT250.028 Nut M4 Table of contents...
- Page 20 ITEM SPARE PART NO. DESCRIPTION QUAN- TITY R13-VT250.029 Channel, lower section R13-VT250.030 Support foot, lower section R13-VT250.031 Feed plate, left R13-VT250.032 Feed plate, right R13-VT250.033 Feed plate, rear R13-VT250.034 Cap head bolt M10x30 MTB50.003 Washer Ø10 R13-VT250.036 Nut M10 R13-VT250.037 Round cap head M6x20 R13-VT250.024 Washer Ø6...
- Page 21 ITEM SPARE PART NO. DESCRIPTION QUAN- TITY R13-VT50.024 Turning pulley/tension roller 122 x 20 mm R13-VT250.040 Turning pulley fastening R13-VT250.041 Guard, turning pulley R10-UCFL204 Flanged bearing housing with bearing UC204 R13-VT250.043 Bolt M10x35 R13-VT250.035 Washer Ø10 R13-VT250.036 Nut M10 Table of contents...
- Page 22 ITEM SPARE PART NO. DESCRIPTION QUAN- TITY R13-VT250.044 Wheel axle R13-VT275.004 Diagonal leg 25 x 2.2 x 1795 mm R13-VT275.004 Diagonal leg 25 x 2.2 x 1795 mm R13-VT275.005 Leg height adjustable 32 x 2.2 x 1970 R13-VT50.008 Wheel, 250x65 mm axle ø20 mm or axle R13-VT250.048 Washer Ø12...
- Page 23 ITEM SPARE PART NO. DESCRIPTION QUAN- TITY Channel, upper Channel, lower Drive roller Wheels R13-VT250.001 Conveyor belt rubber lugs R13-VT250.002 Joint profile 40x20x2.2x400 R13-VT50.018 Adjusting screw belt tension R13-VT250.004 Stabiliser lock R13-VT250.005 Bolt M10x30 MTB50.003 Washer Ø10 MTB50.002 Nut M10 MTB50.002 Nut M10 Table of contents...
- Page 24 NOTES: Table of contents...
- Page 25 NOTES: Table of contents...
- Page 26 NOTES: Table of contents...
- Page 27 DEVIATION FORM We are grateful for your help in pointing out any defects in the product supplied to you by Kellfri. Before making a claim, read Kellfri’s general purchase terms and conditions in our catalogue or on our website www.kellfri.co.uk, and in the operating manual if supplied.
-
Page 28: Warranty Terms And Conditions
You are always welcome to give feedback or ask us about our equipment and products. Kellfri AB has a policy of continuous product development and therefore reserves the right to make modifications, e.g. to the design and appearance of the product, without prior notice.
Need help?
Do you have a question about the 13-VT250 and is the answer not in the manual?
Questions and answers