
Subscribe to Our Youtube Channel
Related Manuals for Kellfri 28-RBH220


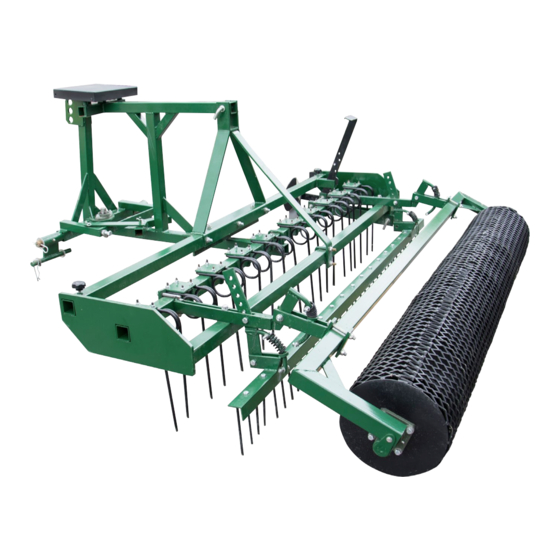
Summary of Contents for Kellfri 28-RBH220
- Page 1 28-RBH220 PADDOCK HARROW 3-POINTLINKAGE Read this manual carefully before using the product! Translated from the original...
-
Page 2: Table Of Contents
Table of contents Introduction Product information Intended use Safety instructions Product safety instructions Instruction for emergencies Warning decals Personal protective equipment Surroundings Before using Connecting the machine Operating the machine Transport and storing Maintenance and service After use Recycling Assembly instruction 9 - 17 Exploded view 18 - 19... -
Page 3: Introduction
INTRODUCTION Thank you for choosing a product from Kellfri AB. By following the general safety information, instruction manual and common sense, you will get many years of enjoyable use of the prod- uct. Kellfri’s tools and machines are aimed for farmers with high demands on functionality. -
Page 4: Safety Instructions
Kellfri AB, Munkatorpsgatan 6, 532 37 SKARA Sweden. Tel.: +46 (0)511 242 50 (Pls. contact the retailer) https://www.kellfri.co.uk/ Do not use the equipment or product if you feel ill, tired or are under the influence of alcohol. -
Page 5: Instruction For Emergencies
INSTRUCTION FOR EMERGENCIES In case of an emergency please dial 112. Keep cell phone or emergency phone available specially when working alone. First aid kit and fire extinguishers must be kept easily accesable during all work, maintenance and service.To stop winch movements, release the starter cord. WARNING DECALS Make sure that the warning labels are always visible, clean the warning labels if necessary. -
Page 6: Personal Protective Equipment
PERSONAL PROTECTIVE EQUIPMENT Wear suitable clothing and footwear. Do not wear loose clothing or jewelry when working with the equipment. Remember to put up long hair when working with equipment that rotates. SURROUNDINGS Check and make sure that the area is clear of people, children and objects before switching on or using the equipment. -
Page 7: Connecting The Machine
CONNECTING THE MACHINE • Check that if the product is damaged before connecting it to the vehicle. • Connect the harrow onto the tractors 3 point hitch. Check that the machine does not come loose. • Set the desired angle on the different functions; road drag, harrow pins and roller. •... -
Page 8: Transport And Storing
Rinse the machine with water if necessary. AFTER USE When the machine is not in use, store it under cover. It’ll extend the life of the product. For parts: Contact Kellfri Service RECYCLING Dispose the product correctly, disassemble and transport to the municipality’s recycling station. -
Page 9: Assembly Instruction
ASSEMBLY INSTRUCTION List of all parts: Three-point frame Swing frame Framefor the front tines Triangle bracket Rear bar with harrow tines Roller holder Roller 1set Adjusting Lever- consist of two falt bars and handles Side plow Steering wheel against the rim 10st Tines 10st... - Page 10 Table of contents...
- Page 11 5p U-bracket (short) 1st big U-bolt 12 M12 Nut 12st M12 Washers Pin (110 mm) Pin (130 mm) for the height 5 pcs - M12x100 Washer (D60mm) adjustment of the plow. Large R-pin to the tower Washer (60mm) and large R sprint Bearing housing + 2 - M16x40 bolts with washers and lock nuts...
- Page 12 Prepare all parts. Be careful during assembly, there is always the risk of crushing. It is recommended that installation is carried out by at least two persons due to its weight. 1.) Set the parts to be assembled on the ground to get a better overview.(image1) image 1 2.) Install bearing housing (image 2) on the three-point frame,then lift the frame and mount the swing frame.
- Page 13 3.) Assemble the swing frame, triangle bracket and tine frame. Pin (110 mm) + washer (D60mm) and large R sprint 3st - Bultar M12x100 2st -Bult M12x70 to the triangular bracket 4.) Assemble the roller and the roller holder, lubricate the bearing with grease. 2p pins + 2 M8x20 bolt with nut and washers Table of contents...
- Page 14 5.) Assemble the rear of the paddock harrow (image 4) perform the same procedure on the other side. 2st - M12x100 2 -U-bracket 2st - M12x50 image 4 4st - M12x45 6.) Fit the roller. 7.) Fit and lubricate pivots with universal grease Washer 4x D50 2p D60...
- Page 15 8.) Fit the plow and height adjustment lever. Note the right and left bracket, the lever screwed on the bracket ears, see images below. The plow is mounted between lever bracket. M12x50 2st-M12x45 9.) Mount the tines, distributed throughout the bar. Tines should be fitted every two sticks in different directions for better result.
- Page 16 10.) Install the steering wheel either on the right or left side of the machine. 11. Fit stabilizer bar. M12x35 Table of contents...
- Page 17 12. Lubricate all lubrication points and check that all bolts / nuts are tightened. Table of contents...
-
Page 18: Exploded View
Table of contents... - Page 19 ITEM DESCRIPTION ITEM DESCRIPTION Front suspension assembly Screws M8 x 40 8 SET (blot, washer + lock nut) Front bottom assembly Screws M12 x 110 2 SET Middle suspension assembly (blot, washer + lock nut) Handle Screws M12 x 80 3 SET Side blade assembly (blot, washer + lock nut)
-
Page 20: Warranty Terms And Conditions
You are always welcome to give your feedbacks, reviews or ask us about our equipment and products. Kellfri AB is constantly working on further developing their products and therefore reserves the right to modify, among other things the design and appearance without further notice.
Need help?
Do you have a question about the 28-RBH220 and is the answer not in the manual?
Questions and answers