Table of Contents
Advertisement
Quick Links
Advertisement
Table of Contents

Subscribe to Our Youtube Channel
Related Manuals for Intense TAZER ALLOY PRO


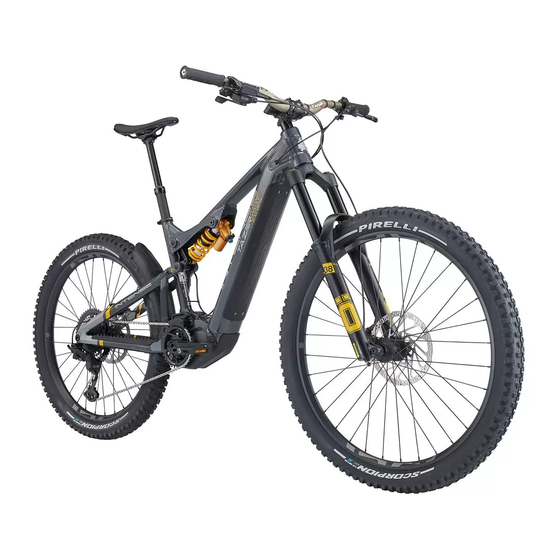
Summary of Contents for Intense TAZER ALLOY PRO
- Page 1 TAZ ER ALLOY PRO TAZ ER ALLOY EXPE RT MANUAL...
-
Page 2: Table Of Contents
CONTENTS Register your Bike INTENSE bicycle information identification Welcome to INTENSE Know your Tazer How to use your Tazer Set-up guide 50 Charging the battery Remove wheels and 53 Turning on your prepare bike Tazer 13 Charge the battery 54 Using the power modes... - Page 3 From the early days of INTENSE, when founder Jeff Steber worked alone in his garage, to today with our crew of talented people working in our Temecula,...
-
Page 4: Know Your Tazer
K N O W Y O U R T A Z E R A L L O Y COMPONENT BREAKDOWN Grips Rear brake Shifter Cassette Handlebars Rear derailleur Digital display panel Chain Stem Chainring Dropper post lever Crankset Brake lever Headset Power button Suspension fork... -
Page 5: Set-Up Guide
GO TO INTENSE.COM/PAGES/TECHVIDEOS WE ARE HERE TO HELP! If at any time you feel unsure about what you are doing then please contact us at INTENSE or seek the help of a professional mechanic at your local bike shop. INTENSE +1 951.307.9211... - Page 6 S T E P 1 REMOVE BIKE FROM BOX When you first open your bike box you will find a Quick Start Guide, accessory box (including a tool box, torque wrench and tubeless conversion kit) battery, battery charger and the bike itself. First, remove the wheels and put to one side (A).
-
Page 7: Charge The Battery
S T E P 2 CHARGE BATTERY The battery is supplied in sleep mode. To wake it up ON BIKE CHARGE PORT you need to connect it to your battery charger. You can do this with the battery in your bike. It may take up to 10 hours to fully charge the battery in the bike.. -
Page 8: Install The Rear Derailleur
S T E P 3 INSTALL REAR DERAILLEUR Remove the zip-tie from the main pivot bolt hole (A). Using a 5mm Allen key slowly begin to screw the rear derailleur into the derailleur hanger/frame until you have engaged the threads. It is important that you locate the ‘B Screw’... -
Page 9: Connecting The Motor Mode Selector And Display Wires
Display Selector slightly to help you gain access to the holes. The other cable that goes into your frame (down to the drive unit/motor) attaches to the second hole from the left, port number 2. *Tazer Alloy Pro model shown. -
Page 10: Install Rear Wheel
S T E P 6 INSTALL REAR WHEEL Remove the rear brake pad spacer. At this stage be careful not to pull the rear brake lever until the wheel has been installed. Remove any packaging left on the rear wheel, including the large black plastic rotor guards (A). - Page 11 S T E P 6 INSTALL REAR WHEEL PRO BUILD: For your TRP equipped Tazer Pro build, you will need to pull the lower cage release button on the rear derailleur (A). Insert the rear wheel into the frame by first positioning the chain on the smallest cog on the cassette.
-
Page 12: Install Front Wheel
S T E P 7 INSTALL FRONT WHEEL Just like the rear wheel, remove all packaging from the front wheel making sure the hub end caps are still in the correct place and that they haven’t been pulled off by accident. If they do come off, just press them back into position. -
Page 13: Install Pedals
(being careful not to trap anything in the chain or wheel). If you are having any issues with the gears, please check out our Tech Video series on the INTENSE website. -
Page 14: Adjust Headset
S T E P 1 0 ADJUST HEADSET & BARS You want to ensure that your headset moves easily with a very slight amount of resistance, but with no play. You will need to set your headset pre-load to 2-4Nm. If your headset feels a little loose then undo the stem clamping bolts slightly using a 4mm Allen key and then gently tighten the top cap bolt by a quarter... -
Page 15: Check Tire Pressure
S T E P 1 2 CHECK TIRE PRESSURE The ideal tire pressure setting is determined by three factors: rider weight, type of terrain and the desired balance of comfort and traction. The pressures here are a suggested starting point and can typically range +/- 5psi. -
Page 16: Install Battery
S T E P 1 4 INSTALL BATTERY If you removed your battery from your bike, follow these steps to install: GENTLY PUSH THE Install the battery by inserting the lower tab of the ALIGN THE TABS AND BATTERY UPWARDS battery into the tab recess hole on the frame of the INSERT AT THE BOTTOM bike at an angle of approximately 45º... -
Page 17: Front Suspension Set-Up
S T E P 1 5 FO RK : PR O F OX 38 P ER FO R MA NC E ELIT E / EX PER T DVO DIAMOND E3 FRONT SUSPENSION SUGGESTED STARTING POINTS FOR SETTING FORK SAG SET UP RIDER WEIGHT PRO BUILD FOX EXPERT BUILD DVO... - Page 18 S T E P 1 6 S T E P 1 7 SETTING FORK SAG SETTING FORK REBOUND You now need to measure the ‘sag’ of the fork. Sag is The rebound setting on your fork is how quickly important as it allows the fork to work properly. With your suspension reacts to impacts and returns to the help of a friend sit on the bike in a normal riding its normal position after compression.
- Page 19 S T E P 1 7 C O N T I N U E D . . . HIGH AND LOW SPEED FRONT SUSPENSION SETUP COMPRESSION ADJUSTERS Different models of forks (and rear shocks) have different levels of adjustment that will enable you to fine tune your suspension.
-
Page 20: Rear Suspension Setup
S T E P 1 8 REAR SUSPENSION SETUP TAZER PRO (US) COMPRESSION ADJUSTMENTS To achieve the best performance from your FOX Float X Performance Elite rear The 2-position lever is useful to make on-the-fly adjustments shock you first need to adjust the air pressure to get the correct sag setting for you. to control shock performance, and is intended to be adjusted Sag is the amount your suspension compresses under your weight (in riding gear). - Page 21 S T E P 1 8 REAR SUSPENSION SETUP TAZER PRO (EU) COMPRESSION ADJUSTMENTS 2 POSITION LEVER To achieve the best performance from your FOX Float X2 Factory rear shock you The 2-position lever is useful to make on-the-fly adjustments first need to adjust the air pressure to get the correct sag setting for you.
- Page 22 S T E P 1 8 C O N T I N U E D . . . U S P R O V E R S I O N S T E P 1 8 C O N T I N U E D . . . E U P R O V E R S I O N S H O CK : FOX F LOAT X PER FOR M AN CE ELIT E SHOCK: FOX FLOAT X 2 FACT ORY SUGGESTED STARTING POINTS FOR SETTING UP YOUR SHOCK...
- Page 23 S T E P 1 9 STEP 4: BLADDER PRESSURE STEP 5: REBOUND REAR SUSPENSION SETUP TAZER EXPERT THE BLADDER SYSTEM Air Valve AIR VALVE To achieve the best performance from your DVO Topaz Air rear shock you first need The bladder is a tuning feature to tailor the feel of the shock to the The bladder is a tuning feature to tailor the feel to adjust the air pressure to get the correct sag setting for you.
- Page 24 S T E P 1 9 C O N T I N U E D . . . S H O CK : DVO TO PA Z AIR SUGGESTED STARTING POINTS FOR SETTING UP YOUR SHOCK BLADDER REBOUND PRESSURE PRESSURE (PSI) (PSI) PRELOAD...
-
Page 25: Intense Bicycle Identification
IN THE DOWNTUBE AS THIS COULD RESULT IN SUBPAR PERFORMANCE, MAY LEAD TO BATTERY AND OR FRAME DAMAGE AND IS NOT COVERED UNDER WARRANTY. PLEASE CONTACT THE INTENSE TECH CENTER IF YOU HAVE ANY QUESTIONS RELATING TO THE BATTERY MOUNTS. -
Page 26: How To Use Your Tazer
H O W T O U S E Y O U R T A Z E R GET CHARGED When the battery is completely charged, both it and the charger will turn off, but it is good practice to unplug and turn the charger off once the battery is fully charged. -
Page 27: Turning On Your
TURNING ON YOUR TAZER eBIKE The power ON/OFF button is located on the toptube, toward the front of your bike. It is easy to find and simple to use. Press and hold the power button until you hear an audible ‘beep’. The green LED lights on the Power ON/OFF button will come on at this stage, and the CHARGER LED LAMP computer display on your handlebars will be activated. -
Page 28: Using The Power Modes
BOOST USING THE BOOST Mode is a lot of fun, especially on long steep climbs and if you’re looking to minimize rider effort for POWER MODES a fantastic riding experience. BOOST will consume the battery the fastest. Your Tazer motor comes with three main assist TRAIL modes: BOOST, TRAIL and ECO, and a fourth TRAIL mode is the primary mode you will find yourself... - Page 29 CHANGING THROUGH THE MODES You only get assistance from the motor when you start In a safe area, away from traffic, go through the to pedal. The motor ‘kicks in’ almost immediately with a different modes as you pedal around, feeling the nice, smooth transition.
-
Page 30: The Display
SCREEN DISPLAY BATTERY LEVEL INDICATOR The Screen Display is your ‘eyes on the system’. It shows information such as what mode you are in, the speed you are going and more. The battery level indicator is located in the top left of the display screen. -
Page 31: Shimano E-Tube App
SHIMANO’S E-TUBE APP HOW TO ACCESS THE TWO PRE-SET Your Tazer comes with pre-set ‘profiles’, CUSTOM PROFILES which we believe to be the perfect level of power and assistance in each of the modes for this model of bike. The Tazer EXPERT (SHIMANO EP600 motor) comes with one pre-set With the power system on (and no weight on the bike), profile, and the Tazer PRO (SHIMANO EP800 motor... -
Page 32: Troubleshooting
TROUBLESHOOTING BATTERY LED ERROR INDICATORS System errors and similar warnings are indicated by the battery LED through various lighting patterns. BATTERY ERROR INDICATOR LIGHTING PATTERN ERROR INDICATION TYPE INDICATION CONDITION RECOVERY Communication error with the bicycle Make sure that the cable is not loose or improperly connected. system. - Page 33 WARNING MESSAGE ON THE DISPLAY SCREEN. THIS DISAPPEARS ONCE THE ERROR IS FIXED. WARNING AND ERROR MESSAGES ON THE CYCLE COMPUTER DISPLAY Warning and Error messages are displayed at the top in the middle of the computer display screen. These messages usually start with a ‘W’...
-
Page 34: Maintenance
CLEAN AND REGREASE INTERFACE WITH FRAME best to have your frame inspected by a qualified FRAME PIVOTS REMOVE PIVOT BOLTS, CHECK BEARINGS FOR INTENSE Tazer dealer. Any direct impact to the PITTING AND WEAR frame can cause serious structural damage. HEADSET DISASSEMBLE STEM, HEADSET AND FORK. -
Page 35: Component Listings
COMPONENT LISTINGS TAZER ALLOY PRO SPEC TAZER ALLOY EXPERT SPEC FRAME FRAME INTENSE TAZER ALLOY FRONT AND REAR TRIANGLE WITH INTERNAL CABLE ROUTING IINTENSE TAZER ALLOY FRONT AND REAR TRIANGLE WITH INTERNAL CABLE ROUTING REAR TRAVEL REAR TRAVEL 155MM 155MM... -
Page 36: Geometry Charts
These drawings, any and all specifications and data herein contained and the products manufactured in TRAVEL: 160MM, BLACK, FAST BLACK. accordance with the said drawings, specifications and data are the exclusive property of Intense Cycles of accordance with the said drawings, specifications and data are the exclusive property of Intense Cycles of LOWER HEADSET STACK HEIGHT 4 MM / 0.16”... - Page 37 These drawings, any and all specifications and data herein contained and the products manufactured in accordance with the said drawings, specifications and data are the exclusive property of Intense Cycles of Temecula, CA (USA), in accordance with the provisions of the National laws and International Conventions TEL: 1.951.296.9596...
- Page 38 These drawings, any and all specifications and data herein contained and the products manufactured in accordance with the said drawings, specifications and data are the exclusive property of Intense Cycles of Temecula, CA (USA), in accordance with the provisions of the National laws and International Conventions TEL: 1.951.296.9596...
- Page 39 These drawings, any and all specifications and data herein contained and the products manufactured in accordance with the said drawings, specifications and data are the exclusive property of Intense Cycles of Temecula, CA (USA), in accordance with the provisions of the National laws and International Conventions TEL: 1.951.296.9596...
- Page 40 These drawings, any and all specifications and data herein contained and the products manufactured in accordance with the said drawings, specifications and data are the exclusive property of Intense Cycles of Temecula, CA (USA), in accordance with the provisions of the National laws and International Conventions TEL: 1.951.296.9596...
-
Page 41: Parts Kits
Bolt SHCS Flat Head M5 x 11 140054 Frame Protection Fender Tazer Rear BLK FRAME PROTECTION KIT IT150166 Frame Protection Kit Skidplate Tazer Alloy Pro 410068 Bolt SHCS Flat Head M5 x 11 140076 Skidplate EP8 Black, Tazer Alloy LOWER LINK KIT... - Page 42 KSCEN600A Display Unit Kit Tazer Alloy Expert 410083 FHCS, Flat Head M4 x 0.7 x 8, Black Oxide 410080 FHCS, Flat Head M4 x 0.7 x 12 Stainless Steel DISPLAY UNIT KIT PRO IT150171 KSCEN610A Display Unit Kit Tazer Alloy Pro...
- Page 43 TAZER MX ALLOY PRO 25 Nm / 221 in-lbs Axle (non-drive side): TAZER MX ALLOY EXPERT 11 Nm / 100 in-lbs TAZER ALLOY PRO TAZER ALLOY EXPERT NOTE Torque specifications are the same M8 HEX 7 Nm / 60 in-lbs...
-
Page 44: Declaration Of
TEL: 951-307-9211 Beth Swarthout riding condition. Director of Quality and Compliance HEREBY CONFIRMS THE www.intensecycles.com FOLLOWING PRODUCTS Product Name: INTENSE TAZER and Phone: Tazer e-Bike +1 (951) 307 9211 Year of Construction: 2023 Jeff Steber CEO/Founder Customer Service: Conformity with all applicable provisions techcenter@intensecycles.com... - Page 45 TA ZER A L L OY P RO TA ZER A L L OY EX PE R T MANUAL...
Need help?
Do you have a question about the TAZER ALLOY PRO and is the answer not in the manual?
Questions and answers