Table of Contents
Advertisement
Quick Links
Advertisement
Table of Contents

Related Manuals for Intense 2022 TAZER MX


Summary of Contents for Intense 2022 TAZER MX
- Page 1 2 0 2 2 / / T A Z E R M X MANUAL...
-
Page 2: Table Of Contents
PDF manual download QR codes How to use your TECHNICAL ASSISTANCE Welcome to INTENSE Tazer MX We are here to help. If you need any technical Know your Tazer MX assistance, please contact us: 44 Charging the battery techcenter@intensecycles.com... - Page 3 VERSIONS AVAILABLE GOAL - TO PROVIDE THE RIDE OF YOUR LIFE The 2022 Tazer MX manual is also available in French, Spanish, German and Italian. Scan the QR code for your region below and you will be able to Our team of designers, engineers and product download this manual in your language of choice.
-
Page 4: Know Your Tazer Mx
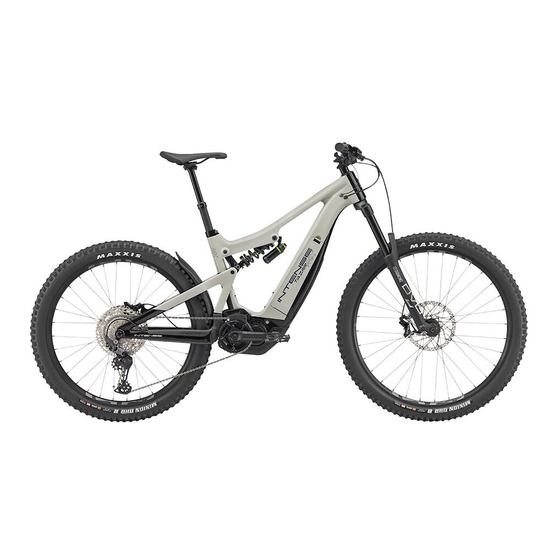
K N O W Y O U R T A Z E R M X COMPONENT BREAKDOWN Grips Rear brake Shifter Cassette Handlebars Rear derailleur Digital display panel Chain Stem Chainring Dropper post lever Crankset Brake lever Headset Frame Suspension Fork 1 Toptube A Fork crown 2 Downtube... -
Page 5: Set-Up Guide
GO TO INTENSE.COM/PAGES/TECHVIDEOS WE ARE HERE TO HELP! If at any time you feel unsure about what you are doing then please contact us at INTENSE or seek the help of a professional mechanic at your local bike shop. INTENSE +1 951.307.9211... - Page 6 S T E P 1 REMOVE BIKE FROM BOX When you first open your bike box you will find a Quick Start Guide, accessory box (including a tool box, torque wrench and tubeless conversion kit) battery, battery charger and the bike itself. First, remove the wheels and put to one side (A).
-
Page 7: Charge The Battery
S T E P 2 CHARGE BATTERY The battery is supplied in sleep mode. To wake it USE YOUR KEY up you need to connect it to your battery charger. TO UNLOCK You can do this with the battery in your bike, but THE BATTERY for simplicity we suggest removing the battery and placing directly on charge. -
Page 8: Install The Rear Derailleur
S T E P 3 INSTALL REAR DERAILLEUR Remove the zip-tie from the main pivot bolt hole (A). Using a 5mm Allen key slowly begin to screw the rear derailleur into the derailleur hanger/frame until you have engaged the threads. It is important that you locate the ‘B Screw’... - Page 9 S T E P 4 INSTALL HANDLEBAR: EXPERT BUILD Spin the handlebar stem 180° so that the stem and forks are facing forward (A). Make sure the forks are the correct way around – the front brake caliper should be on the left (non-drive) side of the bike, with the fork arch facing forward.
-
Page 10: Connecting The Motor Mode Selector And Display Wires
S T E P 5 CONNECTING THE MOTOR MODE SELECTOR AND DISPLAY WIRES Included in your accessory box is a special SHIMANO connector tool (TL-EW300 for the PRO model and TL-EW02 for the EXPERT). Use this tool to connect the wires to your handlebar display. The tool helps to protect the plug and wire from damage. -
Page 11: Install Rear Wheel
S T E P 6 INSTALL REAR WHEEL Remove the rear brake pad spacer (usually yellow, red or orange plastic). At this stage be careful not to pull the rear brake lever until the wheel has been installed. Remove any packaging left on the rear wheel, including the large black plastic rotor guards (B). -
Page 12: Install Front Wheel
S T E P 7 INSTALL FRONT WHEEL Just like the rear wheel, remove all packaging from the front wheel making sure the hub end caps are still in the correct place and that they haven’t been pulled off by accident. If they do come off, just press them back into position. -
Page 13: Install Pedals
(being careful not to trap anything in the chain or wheel). If you are having any issues with the gears, please check out our Tech Video series on the INTENSE website. -
Page 14: Adjust Headset
S T E P 1 0 ADJUST HEADSET & HANDLEBARS Your headset comes pre-loaded (at 2-4Nm) from the factory, but it is always a good idea to check it. You want to ensure that your headset moves easily with a very slight amount of resistance, but with no play. -
Page 15: Adjust Saddle Height
S T E P 1 1 ADJUST SADDLE HEIGHT Set the height of your saddle (seat) with your dropper seatpost in its fully extended position. Using a 5mm Allen key loosen the seatpost clamp and adjust the seatpost to the correct height. A good base measurement is to stand next to your bike in your riding shoes. -
Page 16: Install Battery
S T E P 1 4 INSTALL BATTERY Once your battery is fully charged (see page 47) you need to reinstall it back into the bike. Remove the battery door by depressing the latch rearward, hinging the door and then pulling out and forward to remove from the tab insert (A). -
Page 17: Front Suspension Set-Up
S T E P 1 5 FO R K: PRO Ö H LI N S DH38 / EXPERT DVO D IA MOND E3 FRONT SUSPENSION SUGGESTED STARTING POINTS FOR SETTING FORK SAG SET UP RIDER WEIGHT PRO BUILD ÖHLINS EXPERT BUILD DVO (lbs) (kgs) PRESSURE (psi) - Page 18 S T E P 1 6 S T E P 1 7 SETTING FORK SAG SETTING FORK REBOUND You now need to measure the ‘sag’ of the fork. Sag is The rebound setting on your fork is how quickly important as it allows the fork to work properly. With your suspension reacts to impacts and returns to the help of a friend sit on the bike in a normal riding its normal position after compression.
- Page 19 HIGH AND LOW SPEED FO R K: PRO Ö H LI N S DH38 / EXPERT DVO D IA MOND E3 COMPRESSION ADJUSTERS SUGGESTED REBOUND SETTINGS Different models of forks (and rear shocks) have different levels of adjustment that will enable you to fine tune your suspension.
-
Page 20: Rear Suspension Set-Up
S T E P 1 8 S T E P 1 9 REAR SUSPENSION SET UP SETTING SHOCK SAG First check the spring rate-chart on this page to make sure that the spring fitted on Just as you did with your forks you now need to your Tazer MX is within range for your rider weight. - Page 21 HIGH AND LOW SPEED COMPRESSION ADJUSTERS As previously mentioned regarding your fork’s suspension settings, different models of rear shocks have different levels of adjustment that will enable you to fine tune your suspension. We recommend that you refer to each manufacturer’s website for full technical details and further info on the specific shock that you have on your bike.
-
Page 22: Intense Bicycle Identification
IN THE DOWNTUBE AS THIS COULD RESULT IN SUBPAR PERFORMANCE, MAY LEAD TO BATTERY AND OR FRAME DAMAGE AND IS NOT COVERED UNDER WARRANTY. PLEASE CONTACT THE INTENSE TECH CENTER IF YOU HAVE ANY QUESTIONS RELATING TO THE BATTERY MOUNTS. -
Page 23: How To Use Your Tazer Mx
CHARGING PORT H O W T O U S E Y O U R T A Z E R M X GET CHARGED BATTERY The battery in your Tazer MX is not fully charged at the time of purchase, so before you can use your CHARGING PLUG new bike you will need to charge it using the supplied SHIMANO battery and its dedicated charger. - Page 24 BATTERY CHARGE LEVEL LED You can check the current charging status of your battery by looking at the green LED indicator. CHARGER LED LAMP BATTERY LED LAMPS CHARGING-IN-PROGRESS INDICATION AS CHARGING STARTS THE LED LAMP ON THE CHARGER LIGHTS UP. BATTERY LEVEL INDICATION BATTERY LEVEL LIT UP...
-
Page 25: Turning On Your
BATTERY LEVEL TURNING ON YOUR INDICATION TAZER MX eBIKE The current battery level can be checked by pressing The on/off button is located on the upper part of the the battery’s power button. underside of the downtube of the bike. You will see a clear plastic rubberized window. -
Page 26: Using The Power Modes
USING THE BOOST BOOST Mode is a lot of fun, especially on long steep POWER MODES climbs and if you’re looking to minimize rider effort for a fantastic riding experience. BOOST will consume the battery the fastest. Your Tazer MX motor comes with three main assist modes: BOOST, TRAIL and ECO, and a fourth TRAIL WALK mode. - Page 27 CHANGING THROUGH THE MODES You only get assistance from the motor when you start In a safe area, away from traffic, go through the to pedal. The motor ‘kicks in’ almost immediately with a different modes as you pedal around, feeling the nice, smooth transition.
-
Page 28: The Display
BATTERY LEVEL INDICATOR The battery level indicator is located in the top left of the display screen. You can monitor the battery level as you ride. SCREEN DISPLAY BATTERY LEVEL INDICATOR ON DISPLAY UNIT The Screen Display is your ‘eyes on the system’. It BATTERY LEVEL INDICATION BATTERY LEVEL shows information such as what mode you are in, the... -
Page 29: Shimano E-Tube App
SHIMANO’S E-TUBE APP HOW TO ACCESS THE TWO PRE-SET Your Tazer MX comes with pre-set ‘profiles’, CUSTOM PROFILES which we believe to be the perfect level of power and assistance in each of the modes for this model of bike. The Tazer MX EXPERT (SHIMANO E7000 motor) comes with one pre-set profile, and the Tazer MX PRO (SHIMANO TAZER MX PRO MODEL ONLY... -
Page 30: Troubleshooting
TROUBLESHOOTING BATTERY LED ERROR INDICATORS System errors and similar warnings are indicated by the battery LED through various lighting patterns. BATTERY ERROR INDICATOR LIGHTING PATTERN ERROR INDICATION TYPE INDICATION CONDITION RECOVERY Communication error with the bicycle Make sure that the cable is not loose or improperly connected. system. - Page 31 WARNING MESSAGE ON THE DISPLAY SCREEN. THIS DISAPPEARS ONCE THE ERROR IS FIXED. WARNING AND ERROR MESSAGES ON THE CYCLE COMPUTER DISPLAY Warning and Error messages are displayed at the top in the middle of the computer display screen. These messages usually start with a ‘W’ and help you identify the problem.
-
Page 32: Carbon Care
CLEAN AND REGREASE INTERFACE WITH FRAME degree it’s best to have your frame inspected by a FRAME PIVOTS REMOVE PIVOT BOLTS, CHECK BEARINGS FOR qualified INTENSE Tazer MX dealer. Any direct PITTING AND WEAR impact to the frame can cause serious structural HEADSET DISASSEMBLE STEM, HEADSET AND FORK. -
Page 33: Frame Features And Component Spec
T A Z E R M X T A Z E R M X FRAME FEATURES COMPONENT SPEC • Rear Travel: 155mm/6.1” with Metric 185mm x 55mm stroke shock TAZER MX PRO • Front Wheel size: 29” Rear Wheel size: 27.5” x 2.80” FORK: ÖHLINS DH 38 RACE FORK, 29”, 1.125”... - Page 34 MAXXIS MINION DHR II MAXX TERRA 3C EXO+ 29” X 2.60” FRONT / 27.5” X 2.8” REAR SEATPOST INTENSE RECON DROPPER POST - 125MM LENGTH (S/M) 150MM LENGTH (L/XL) SEATPOST INTENSE RECON DROPPER POST - 125MM LENGTH (S/M) 150MM LENGTH (L/XL)
-
Page 35: Geometry Charts
T A Z E R M X GEOMETRY GEOMETRY NOTE MX PRO: Geometry taken at CHARTS 580mm axle to crown length and 50mm fork offset. MX EXPERT: Geometry taken at 572mm axle to crown length and 44mm fork offset. COMPONENT SPEC NOTE: The Tazer MX EXPERT and PRO are designed around the use of a BB Drop... - Page 36 ITEM PART ITEM DESCRIPTION QTY. TORQUE SPEC. NUMBER Lower Link Bearing Spacer 130754 Bearing Spacer Upper LInk Bearing Cap 130765 Bearing Cap, 24mm Lower Link Bearing Cap 130778 Bearing Cap, 28mm EXPLODED VIEW AND PARTS Pivot Bolt 130785 Lower Link Pivot Bolt 20Nm / 175in-lbs TAZER MX Hanger...
- Page 37 ITEM PART ITEM PART ITEM DESCRIPTION QTY. TRQUE SEC. ITEM DESCRIPTION QTY. TORQUE SPEC. NUMBER NUMBER Cable Guide 15 x 24 x 7, Double Row Radial 140039 Cable Guide Plug, Solid Bearing 3802 430014 Plug Bearing Cable Guide Guide Cable Plug, 140040 Plug 5mm ID...
- Page 38 ITEM ITEM PART NUMBER DESCRIPTION QTY. TORQUE SPEC. Bearing Lower Link 130754 Spacer Bearing Spacer Upper Link Bearing Cap 130765 Bearing Cap, 24mm Lower Link Bearing Cap 130778 Bearing Cap, 28mm EXPLODED VIEW AND PARTS Lower Link Pivot Bolt 130785 20Nm / 175in-lbs Pivot Bolt TAZER MX...
- Page 39 ITEM ITEM PART ITEM PART NUMBER DESCRIPTION QTY. TORQUE SPEC. ITEM DESCRIPTION QTY. TORQUE SPEC. NUMBER Cable Guide Plug 140039 Cable Guide Plug, Solid Lower Link 10 x 19 x 5 2RS Bearing Spacer 130754 Bearing 6800 430011 Bearing Spacer MAX Radial Bearing Guide Cable Plug, Cable Guide Plug...
-
Page 40: Parts Kits
T A Z E R M X PARTS KITS DERAILLEUR HANGER KIT IT340177 Works With Locking & Non-Locking Axle All Models 2017-2021 (4950-0011) 130790 Derailleur Hanger 2015 & Up Blk TW 130798 Bolt F/Derailleur Hanger Blk TW AXLE KIT REAR IT150098 148 x 12 BOOST Rear Axle Tazer MX 2021 140060... - Page 41 T A Z E R M X PARTS KITS CONTINUED... BEARING REBUILD KIT IT150021 Lower Tazer 2019-2021 (4950-0006) 43,46,1 430007 Bearing 7902-1ZS-MAX 43,46,1 430014 Bearing 3802 LLU Max 43,46,1 130754 Crush Tube M16C SEAT COLLAR KIT IT340210 Seat Collar Bolted 36.1 Tracer Carbine 2017-2021 Tazer 2019-2021 Primer 2020/2021 M29 2019-2021 (4950-0018) 36,41 340342...
- Page 42 TORQUE SPECIFICATIONS Achieving correct torque is vital to ensuring the proper 16Nm / 140in-lbs performance and function of the Tazer MX frame. Failure to do so could result in suboptimal performance 5Nm / 45in-lbs of your frame as well as premature wear and tear of individual parts.
-
Page 43: Declaration Of
TEL: 951-307-9211 Jeff Steber riding condition. CEO/Founder HEREBY CONFIRMS THE www.intensecycles.com FOLLOWING PRODUCTS Corey Hsu Product Name: INTENSE TAZER and Managing Director of Asia Operation Phone: TAZER MX e-Bike +1 (951) 307 9211 Year of Construction: 2021/2022 Thomas Harter Engineering Director... - Page 44 2 0 2 2 / / T A Z E R M X MANUAL...
Need help?
Do you have a question about the 2022 TAZER MX and is the answer not in the manual?
Questions and answers