
Related Manuals for VADDIO RoboSHOT 12E USB


Summary of Contents for VADDIO RoboSHOT 12E USB
- Page 1 Installation Guide for RoboSHOT USB Enterprise-Class PTZ Conferencing Cameras Including RoboSHOT 12 USB, RoboSHOT 12E USB, and RoboSHOT 30E USB Document 411-0000-31 Rev C May 2019...
-
Page 2: Table Of Contents
A Quick Look at the Camera Front of the Camera Back of the Camera – RoboSHOT 12 USB Back of the Camera – RoboSHOT 12E USB and RoboSHOT 30E USB Installation Don’t Void Your Warranty! Before You Install the Camera... -
Page 3: Overview
Class PTZ Conferencing Cameras. Features RoboSHOT 12 USB and RoboSHOT 12E USB: 12x optical zoom – perfect for huddle rooms and small to medium conference rooms RoboSHOT 30E USB: 30x optical zoom – best for medium to large venues such as houses of worship and lecture theaters ®... -
Page 4: Unpacking The Camera
Unpacking the Camera Make sure you have received all the items you expected. Download manuals, dimensional drawings, and other information from www.vaddio.com/support. Caution Always support the camera's body when lifting or moving it. Lifting the camera by its head or mounting arm will damage it. - Page 5 Installation Guide for RoboSHOT USB Enterprise-Class PTZ Conferencing Cameras RoboSHOT 12E USB, North America – 999-99200-000 (black); 999-99200-000W (white) RoboSHOT 12E USB, Europe/UK – 999-99200-001 (black); 999-99200-001W (white) RoboSHOT 12E USB, Australia/New Zealand – 999-99200-009 (black); 999-99200-009W (white) RoboSHOT 12E USB camera, black or white...
-
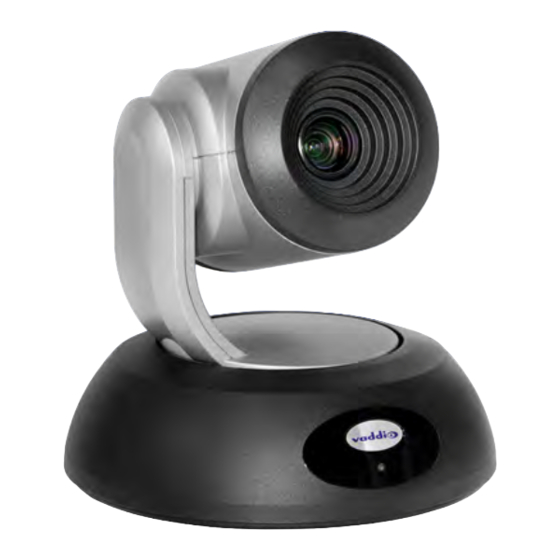
Page 6: A Quick Look At The Camera
This section covers the physical features of the camera. Front of the Camera This photograph shows a RoboSHOT 12 USB camera. The RoboSHOT 12E USB and RoboSHOT 30E USB are similar in appearance, and are available in either black or white. -
Page 7: Back Of The Camera - Roboshot 12 Usb
Installation Guide for RoboSHOT USB Enterprise-Class PTZ Conferencing Cameras Back of the Camera – RoboSHOT 12 USB 12 VDC 3.0 A – EIAJ-04 jack. Connect only the power supply shipped with the camera or approved replacement 12 VDC, 3A power supply. This connection is not needed if you connect to the network using a mid-span PoE+ power injector. -
Page 8: Back Of The Camera - Roboshot 12E Usb And Roboshot 30E Usb
Installation Guide for RoboSHOT USB Enterprise-Class PTZ Conferencing Cameras Back of the Camera – RoboSHOT 12E USB and RoboSHOT 30E USB Network PoE+ – RJ-45 connector. Connect to the network via mid-span PoE+ power injector. Provides power and network access for IP streaming and camera control via web interface or Telnet. -
Page 9: Installation
Do not install or operate this product if it has been dropped, damaged, or exposed to liquids. If any of these things happen, return it to Vaddio for safety and functional testing. Before You Install the Camera... -
Page 10: Installing The Wall Mount
Installation Guide for RoboSHOT USB Enterprise-Class PTZ Conferencing Cameras Prepare for a successful installation: Be sure you can identify all cables correctly. Check Cat-5 cables for continuity. Ensure that the video resolution rotary switch and the DIP switches (if any) are set appropriately. Talk to the network administrator. -
Page 11: Video Resolution Setting
Elite-series cameras. RoboSHOT 12 USB camera RoboSHOT 12E USB or RoboSHOT 30E USB camera For the newer Elite-series cameras: If the camera has been updated to version 3.1.0 firmware or later, Position 0 selects software control. -
Page 12: Camera Behavior Settings - Roboshot 12 Usb
Installation Guide for RoboSHOT USB Enterprise-Class PTZ Conferencing Cameras Camera Behavior Settings – RoboSHOT 12 USB The RoboSHOT 12 USB camera uses DIP switches to set camera behaviors; the RoboSHOT 12E USB and RoboSHOT 30E USB cameras set all camera behaviors in the web interface. -
Page 13: Rs-232 Serial Communication Settings
Installation Guide for RoboSHOT USB Enterprise-Class PTZ Conferencing Cameras RS-232 Serial Communication Settings The RS-232 serial port (RJ-45, color-coded blue) on the camera's back panel enables third-party control. Parameter Value Communication Speed 9600 bps or 38400 bps, switch- selectable Number of start bits Number of stop bits Number of data bits Parity... -
Page 14: Cabling Notes
Installation Guide for RoboSHOT USB Enterprise-Class PTZ Conferencing Cameras Cabling Notes Caution Do not use pass-through RJ-45 connectors. If they are crimped incorrectly, they can damage the connectors on the product, cause intermittent connections, and degrade signal quality. Physical damage to the connectors may void your warranty. Damaged –... -
Page 15: Connecting The Camera
Installation Guide for RoboSHOT USB Enterprise-Class PTZ Conferencing Cameras Connecting the Camera Note Talk to the network administrator before you connect the equipment. If you install this equipment on a non-DHCP network (one that uses only static IP addresses), you may need to configure the camera with a static IP address before you connect it to the network. Work with the network administrator to determine how to configure the equipment. -
Page 16: Basic Connections - Roboshot 12E Usb Or Roboshot 30E Usb
Installation Guide for RoboSHOT USB Enterprise-Class PTZ Conferencing Cameras Basic Connections – RoboSHOT 12E USB or RoboSHOT 30E USB Here is the same installation using an Elite-series camera. Again, please note that the camera's output is USB 3.0; the EasyUSB Mixer/Amp is USB 2.0. -
Page 17: Installing The Camera
Installation Guide for RoboSHOT USB Enterprise-Class PTZ Conferencing Cameras Installing the Camera Caution Before you start, be sure you can identify all cables correctly. Connecting a cable to the wrong port can result in equipment damage. Caution Check your cables. Connecting a cable to the wrong port or using the wrong pin-out can result in equipment damage and will void the warranty. -
Page 18: Powering Up The Camera
Installation Guide for RoboSHOT USB Enterprise-Class PTZ Conferencing Cameras Powering Up the Camera Connect camera power. The camera will initialize and move. This will take a few seconds. When an image is available, the camera is ready to accept control information. Status Light The light in the camera's base indicates its current state. -
Page 19: Compliance And Conformity Statements - Roboshot 12E Usb And Roboshot 30E Usb
(2) This device must accept any interference including interference that may cause undesired operation of the device. Changes or modifications not expressly approved by Vaddio can affect emission compliance and could void the user’s authority to operate this equipment. -
Page 20: European Compliance
Installation Guide for RoboSHOT USB Enterprise-Class PTZ Conferencing Cameras European Compliance This product has been evaluated for Electromagnetic Compatibility under the EMC Directive for Emissions and Immunity and meets the requirements for a Class A digital device. In a domestic environment this product may cause radio interference in which case the user may be required to take adequate measures. ... -
Page 21: Compliance And Conformity Statements - Roboshot 12 Usb
Connect the equipment into an outlet on a circuit different from that to which the receiver is connected. Consult the dealer or an experienced radio/TV technician for help. Changes or modifications not expressly approved by Vaddio can affect emission compliance and could void the user’s authority to operate this equipment. ICES-003 Compliance This digital apparatus does not exceed the Class A limits for radio noise emissions from digital apparatus set out in the Radio Interference Regulations of the Canadian Department of Communications. ... -
Page 22: European Compliance
Installation Guide for RoboSHOT USB Enterprise-Class PTZ Conferencing Cameras European Compliance This product has been evaluated for electromagnetic compatibility under the EMC Directive for Emissions and Immunity and meets the requirements for a Class A digital device. In a domestic environment this product may cause radio interference in which case the user may be required to take adequate measures. ... -
Page 23: Warranty And Return Policy
Vaddio Customer Service: Vaddio will test, repair, or replace the product or products without charge if the unit is under warranty. If the product is out of warranty, Vaddio will test then repair the product or products. The cost of parts and labor charge will be estimated by a technician and confirmed by the customer prior to repair. - Page 24 Initial shipments of equipment that are refused upon attempted delivery, for any reason, are subject to restocking charges. The Dealer has up to 60 days from the date of purchase to return Vaddio product for credit for future purchases of Vaddio product only.
- Page 25 Returns must be made in the original Vaddio packaging with all original materials if at all possible. Vaddio products with missing original materials will be billed to the dealer at dealer price.
- Page 26 Repair Charge Estimates: Estimates on repair charges for a specific problem will not be given before an RMA is issued and the actual product has been evaluated by a Vaddio technician. Repair estimates will be given after the repair department receives and evaluates the unit.
-
Page 27: Photo Credits
Installation Guide for RoboSHOT USB Enterprise-Class PTZ Conferencing Cameras Photo Credits This guide may include some or all of these photos. European Space Agency (ESA) astronaut Samantha Cristoforetti, a Flight Engineer with Expedition 42, photographs the Earth through a window in the Cupola on the International Space Station By NASA - https://blogs.nasa.gov/ISS_Science_Blog/2015/03/06/women-in-space-part-two-whats- gender-got-to-do-with-it/, Public Domain, https://commons.wikimedia.org/w/index.php?curid=38834990 Carl Sagan, Bruce Murray, Louis Friedman (founders) and Harry Ashmore (advisor), on the occasion of... -
Page 28: Index
IP address 13 Index preventing conflicts 13 static, configuring before installation 13 IR frequency (camera ID) setting 10 anatomy of the camera 4-6 light, status indicator 16 meaning of colors 16 baud rate setting 10 location of the camera 7 cable connectors 12 mount 7-8, 15 camera ID setting 10... - Page 29 Installation Guide for RoboSHOT USB Enterprise-Class PTZ Conferencing Cameras switch location 5-6 switch settings 8, 10 baud rate 10 camera ID 10 color space 10 image flip 10 image flip (DIP switch) 8 IR 10 super wide mode 10 video resolution 10 temperature, operating and storage 16 third-party control 11 video resolution setting 9...
- Page 30 ©2019 Legrand AV Inc. Vaddio is a registered trademark of Legrand AV Inc. All other brand names or marks are used for identification purposes and are trademarks of their respective owners. All patents are protected under existing designations. Other patents pending.
Need help?
Do you have a question about the RoboSHOT 12E USB and is the answer not in the manual?
Questions and answers