
Related Manuals for Vimar 0K03801.02


Summary of Contents for Vimar 0K03801.02
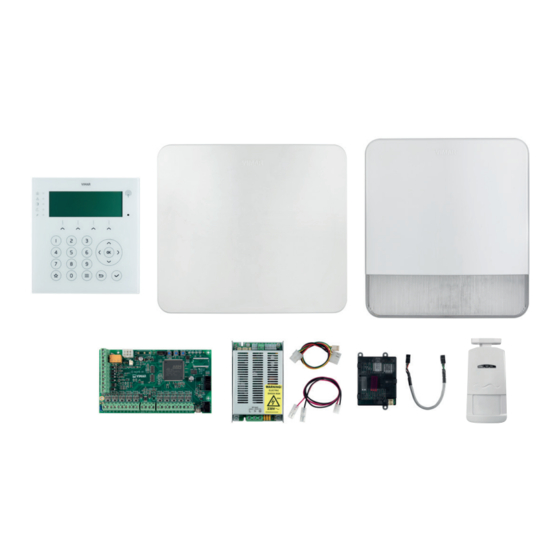
- Page 1 Manuale utente User manual Sistema antintrusione By-alarm Plus By-alarm Plus burglar alarm system By-alarm Plus...
- Page 2 By-alarm Plus...
-
Page 3: Table Of Contents
By-alarm Plus Indice 1. Introduzione . . . . . . . . . . . . . . . . . . . . . . . . . . . . . . . . . . . . . . . . . . . . . . . . . . . . . . . . . . . . . . . . . . . . . . . 1 .1 Tastiera . -
Page 4: Introduzione
By-alarm Plus Introduzione 1. Introduzione Il sistema antintrusione è tipicamente composto da: • Una centrale . • Dispositivi per la rivelazione degli intrusi . • Dispositivi per la segnalazione degli allarmi e, più in generale, degli eventi rilevati dal sistema . •... - Page 5 By-alarm Plus Introduzione Tasti Uso tipico Utilizzati per inserire i dati nel sistema Utilizzato per confermare una scelta Utilizzati per navigare all’interno delle pagine dei menù Utilizzato per abilitare/disabilitare un parametro o un’azione Utilizzato per fare un passo indietro nella navigazione del menù . Se premuto per un tempo prolungato (circa 2 s) riporta alla schermata iniziale (Home) da qualsiasi punto del menù...
-
Page 6: Inseritore
By-alarm Plus Introduzione 1.2 Inseritore L’inseritore è dotato di 4 Led a colori: L’inseritore è abilitato ad operare su determinate aree mentre ciascuna chiave a transponder è abilitata ad operare sulle aree proprie dell’utente al quale è stato associato . In questo modo, avvicinando una chiave ad un inseritore, le aree su cui sarà... -
Page 7: Telecomando
By-alarm Plus Introduzione 1.3 Telecomando Il telecomando è dotato di 4 pulsanti e di un LED centrale multicolore . Ogni pulsante può essere associato a 2 funzioni a seconda se la pressione del tasto è breve o prolungata (2 s) . Il dispositivo è... -
Page 8: Indicazioni Dello Stato Del Sistema
By-alarm Plus Indicazioni dello stato del sistema 2. Indicazioni dello stato del sistema 2.1 Indicazioni in tastiera La tastiera consente di gestire in modo completo e versatile l’impianto . Ad ogni tastiera l’installatore assegna le aree di appartenenza, porzioni/sezioni dell’impianto a cui gli utenti provvisti di codice possono accedere utilizzando la tastiera stessa . - Page 9 By-alarm Plus Indicazioni dello stato del sistema LED rosso LED giallo LED blu LED viola LED verde Attivazione Tutte le zone Le aree ap- La tensione di Tutte le aree appartenenti partenenti alla alimentazione della tastiera Non ci sono alle aree della tastiera sono primaria sono...
-
Page 10: Indicazioni Sulla Home
By-alarm Plus Indicazioni dello stato del sistema Indicazioni sulla HOME Il display visualizza tutte le informazioni grazie ad un’interfaccia testuale e un menu utente per le operazioni da effettuare . Alcune informazioni sono disponibili liberamente a tutti gli utenti mentre altre sono accessibili mediante PIN . -
Page 11: Indicazioni In Caso Di Allarme
By-alarm Plus Indicazioni dello stato del sistema Indicazione Collocazione Descrizione In fondo allo TO TALE PARZIALE DISINSER INFO Se presente indica che è possibile schermo, inserire in modalità TOTALE almeno sopra tasto una delle aree di tastiera funzione 1 In fondo allo TO TALE PARZIALE DISINSER... -
Page 12: Tasto Info
By-alarm Plus Indicazioni dello stato del sistema Tasto INFO Mentre i led forniscono un’indicazione generale dello stato del sistema, accedendo al menù INFO sarà pos- sibile conoscere il dettaglio dello stato del sistema . Per accedere al menù INFO premere il tasto sotto la dicitura INFO e inserire il PIN; in funzione delle aree su cui è... -
Page 13: Pronto All'inserimento
By-alarm Plus Inserimento, disinserimento e ripristino del sistema Pronto all’inserimento La programmazione di fabbrica prevede che l’inseritore abbia tutti i led spenti . Non pronto all’inserimento Se almeno un’area associata all’inseritore non è pronta all’inserimento il led azzurro è acceso . Allarme In condizione di allarme/sabotaggio si ha un lampeggio veloce di tutti i led . -
Page 14: Forzare L'inserimento
By-alarm Plus Inserimento, disinserimento e ripristino del sistema 5 . Utilizzando i tasti di navigazione portare il selettore sopra al tipo di parzializzazione desiderata (A, B, C o D) e premere il tasto contestuale in corrispondenza di: per procedere con l’inserimento . II . - Page 15 By-alarm Plus Inserimento, disinserimento e ripristino del sistema Indicazione Collocazione Descrizione Titolo pagina Elenco allarmi Lista delle zone in allarme . Per ogni riga viene riportata la descrizione di zona sulla sinistra, indicazioni aggiun- tive sulla destra . Tali informazioni spe- cificano il tipo di allarme e se la zona in questione è...
-
Page 16: Da Inseritore Presente In Tastiera Mediante Chiave A Transponder
By-alarm Plus Inserimento, disinserimento e ripristino del sistema 3.2 Da inseritore presente in tastiera mediante chiave a transponder 1 . Avvicinare la chiave all’inseritore della tastiera . 2 . Sul display verranno elencate, una per volta, le azioni disponibili . 3 . -
Page 17: Gestione Aree E Zone
By-alarm Plus Gestione aree e zone Per terminare le chiamate ricevute per gli eventi programmati è sufficiente premere il tasto “*” in chiamata . In fase di programmazione è inoltre possibile scegliere di terminare le chiamate con la semplice risposta, senza la necessità... -
Page 18: Auto Inserimento
By-alarm Plus Gestione aree e zone - Memoria eventi Premendo su una zona si accede ai dettagli aggiuntivi della zona ed si possono eseguire alcune oper- azioni su di essa . In particolare è possibile visualizzare lo stato di inclusione della zona: •... -
Page 19: Gestione Utenti
By-alarm Plus Gestione utenti Premendo in corrispondenza di un evento si visualizzano i dettagli aggiuntivi . Una volta visualizzati tutti i det- tagli dell’evento è possibile continuare a scorrere la lista, rimanendo nella visualizzazione estesa, mediante i tasti frecce SU e GIU . Per uscire dalla visualizzazione estesa premere il tasto 6. -
Page 20: Gestione Telecomandi
By-alarm Plus Gestione utenti Gestione chiavi a transponder È possibile arruolare una chiave solo mediante la tastiera . Portarsi sulla voce “Chiave” e premere il tasto MODIFICA; il display visualizzerà la scritta lampeggiante “In attesa…” . Avvicinare la chiave all’inseritore fino a quando non apparirà la scritta “Programmazione effettuata”; se una chiave era già... -
Page 21: Autorizzazioni Utente
By-alarm Plus Gestione utenti - Azionamenti Permessa scrittura PIN da SW: Abilita l’installatore alla scrittura dei PIN con il software: i PIN sono conservati in modo cifrato nel software (se letti dalla centrale) ma la scrittura, a scopo di ripristino di PIN salvati, è possibile solo con questa opzione attiva . Questa voce è... -
Page 22: Impostazioni
By-alarm Plus Impostazioni 8. Impostazioni 8.1 Imposta data/ora 1 . Premere il tasto menù 2 . Inserire il PIN 3 . Scorrere i menù fino a visualizzare Impostazioni e premere 4 . Selezionare Data e Ora e premere 5 . Mediante i tasti selezionare giorno/mese/anno;... - Page 23 By-alarm Plus Index 1. Introduction . . . . . . . . . . . . . . . . . . . . . . . . . . . . . . . . . . . . . . . . . . . . . . . . . . . . . . . . . . . . . . . . . . . . . . . 1 .1 Keypad .
- Page 24 By-alarm Plus Introduction 1. Introduction The burglar alarm system typically consists of: • A control unit . • Intrusion detection devices . • Alarm signalling devices, and more generally devices for reporting events detected by the system . • System management devices, namely keypads, actuators and remote controls . 1.1 Keypad The keypad is the most complete and versatile device for managing the system .
- Page 25 By-alarm Plus Introduction Keys Typical use Used to enter data into the system Used to confirm a choice Used to navigate within the menu pages Used to enable/disable a parameter or action Used to move one step back when navigating the menu . Pressing it for a long time (about 2 s) returns to the Home screen from any point in the menu Used to enter the user menu...
- Page 26 By-alarm Plus Introduction 1.2 Actuator The actuator has 4 coloured LEDs: The actuator is enabled to operate in certain areas, while each transponder key is enabled to operate in the area of the user with which it has been associated . This means that, after bringing a key up to the actuator, it will only be possible to operate in areas that are common to the actuator and user .
- Page 27 By-alarm Plus Introduction 1.3 Remote control The remote control has 4 buttons and a central multi-colour LED . Each key can be associated with 2 functions, depending on whether the key press is short or long (2 s) . The device is preconfigured with 3 functions associated with a short press of: •...
- Page 28 By-alarm Plus System status indications 2. System status indications 2.1 Indications on the keypad The keypad is versatile and can be used to manage the system fully . The installer assigns an area to each keypad . An area is a portion/section of the system that users with the appropriate code can access through the keypad .
- Page 29 By-alarm Plus System status indications Red LED Yellow LED Blue LED Violet LED Green LED Activation All zones of the The keypad There is no All keypad areas There are no keypad areas areas are ready primary power are deactivated . active faults .
- Page 30 By-alarm Plus System status indications Indications on HOME The display shows all information through a text interface, while a user menu allows operations to be selected . Some information is freely available to all users, while other information can only be accessed via PIN . The table below shows the display screens for different system statuses and events .
- Page 31 By-alarm Plus System status indications Indication Location Description At the bottom TOTAL STAY DISARM INFO When this appears, it indicates that at of the screen, least one of the keypad areas can be above function activated in TOTAL mode . key 1 At the bottom TOTAL...
- Page 32 By-alarm Plus System status indications INFO key While the LEDs provide a general indication of the system status, opening the INFO menu provides the system status in detail . To open the INFO menu, press the key under the word INFO and enter the PIN; you will have access to a set of additional information, depending on the areas for which you are enabled to operate and the permissions associated with your profile .
- Page 33 By-alarm Plus Activating, deactivating and resetting the system Ready for activation The actuator is programmed with all LEDs off at the factory . Not ready for activation The blue LED is on if at least one area associated with the actuator is not ready for activation . Alarm All LEDs flash fast in the event of an alarm/sabotage .
- Page 34 By-alarm Plus Activating, deactivating and resetting the system 5 . Use the navigation keys to move the cursor over the type of partitioning you want (A, B, C or D) and press one of the following function keys, as required: to continue with activation .
- Page 35 By-alarm Plus Activating, deactivating and resetting the system Indication Location Description Page title Alarm list List of zones in an alarm state . Each line shows the zone description on the left and additional indications on the right . This information specifies the alarm type and whether the zone concerned is still in an alarm state or has returned to the rest state .
- Page 36 By-alarm Plus Activating, deactivating and resetting the system 3.2 From the actuator in the keypad using a transponder key 1 . Bring the key up to the actuator . 2 . The available actions will be listed one at a time on the display . 3 .
- Page 37 By-alarm Plus Managing areas and zones To end the calls received for the programmed events, simply press the “*” key during a call . During the programming phase, you can also choose to end the calls simply by answering, without needing to press the “*”...
- Page 38 By-alarm Plus Managing areas and zones - Events memory Press on a zone to access additional details about the zone and to perform some operations on it . Spe- cifically, you can display whether the zone is enabled: • “Included” indicates that the zone is in its normal operating state; •...
- Page 39 By-alarm Plus User management Press on an event to display additional details . Once you have seen all the event details, you can continue scrolling the list from within the extended view using the UP and DOWN arrow keys . Press the key to exit from the extended view .
- Page 40 By-alarm Plus User management Managing transponder keys A key can only be registered from the keypad . Go to “Keys” and press the CHANGE key; the display will flash the message “Waiting…” . Bring the key up to the actuator until the message “Programming done” appears; if a key was already configured for the user, the new configuration will overwrite the previous one .
- Page 41 By-alarm Plus Managing users - Drives - Settings User authorisations You can use this menu to manage the system access and operation authorisations of other users . The individual authorisations shown in the sub-menus depend on how the installer programmed the control unit in relation to standard EN50131, and on the user profile settings, so some of them may be unavailable .
- Page 42 By-alarm Plus Settings 8. Settings 8.1 Set date/time 1 . Press the Menu key 2 . Enter the PIN 3 . Scroll the menu to “Settings” and press 4 . Select Date and Time and press 5 . Use the keys to select day/month/year;...
- Page 45 Viale Vicenza, 14 36063 Marostica VI - Italy www.vimar.com 49401787A0 02 2309...
Need help?
Do you have a question about the 0K03801.02 and is the answer not in the manual?
Questions and answers