
Related Manuals for Duke 5/9 Series


Summary of Contents for Duke 5/9 Series
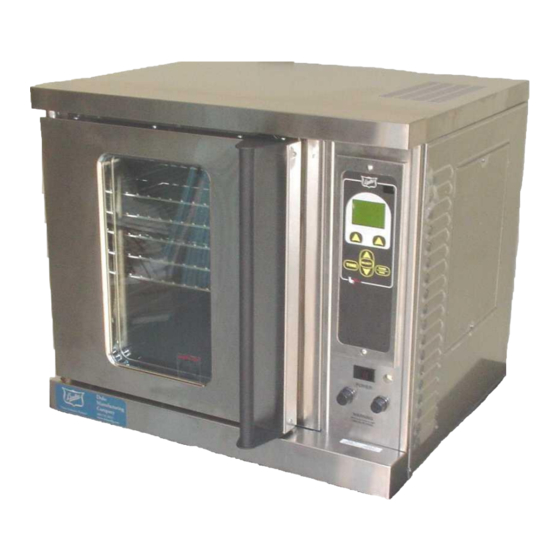
- Page 1 5/9 Series Ovens with “ZP” CONTROL PANEL OWNER’S MANUAL DUKE MANUFACTURING CO. 156879J 2305 N. Broadway • St. Louis, MO 63102 800.735.3853 • 314.231.1130 • 314.231.5074 Fax www.dukemfg.com...
-
Page 2: Table Of Contents
Electrical Schematic Please supply the Model Number and the Serial Number when ordering replacement parts or requesting service. We recommend service by Duke Authorized Service Agencies during and after the warranty period. FOR YOUR SAFETY Do not store gasoline or other flammable liquids in the vicinity of this appliance. -
Page 3: Installation Instructions
• Look over the shipping container carefully noting D. Electrical Connections any exterior damage on the delivery receipt Each Duke 5/9 Half-Size Convection Oven is rated at which must also be signed by the driver/ 8.0 KW. delivery person. Your oven is supplied for connection to a 208, or 240 •... -
Page 4: Oven Assembly
section. Remove the screws from the corner of the E. Oven Assembly oven that matches the holes in the stacking brackets. Before assembling and installing the oven, please check Install the brackets with the new screws provided. to make sure that all necessary parts are present. In addition to the oven itself, there will also be legs, feet or I. -
Page 5: Maintenance Instructions
If you should require assistance in the selection of a qualified service agency, please contact Duke Manufacturing Co.’s Service Department at 800-735- 3853. A. Adjustments Quite often malfunctions which are attributed to defects may be repaired by adjusting certain parts rather than replacing them. - Page 6 NOTE: You may add simultaneous or subsequent trays of the same or different products to the oven if they bake at the same temperature and fan setting. Products which are set up for event baking will not have shelf Display timer baking available.
- Page 7 A. PRE HEAT AND OVEN READY MODE OF OPERATION Pre Heat Displayed after power up. • • The Pre Heat Set temperature is displayed to the right of the thermometer. • Current oven temperature is displayed under Pre Heat. To adjust Pre Heat temperature: •...
- Page 8 RECIPE SELECT SCREENS Manual Cooking • From the OVEN READY display (Screen A2), press SELECT or one of the UP-and-DOWN arrow keys to display the MANUAL RECIPE. • Set Cook Time by pressing the TIME key. Adjust with the UP-and- DOWN arrow keys.
- Page 9 C. RECIPE EDITING SCREENS Edit Recipe Time • The recipe may be changed when it is being selected. (See Screen B2 – RECIPE SELECT.) Set Cook Time • Press the TIME key to highlight unit of time. Each successive press of the TIME key will highlight HOURS, MINUTES or SECONDS.
- Page 10 C. RECIPE EDITING SCREENS (CONTINUED Set Fan Pulse Time Pulse Fan • When the Low P or High P fan speed is selected, the screen to the right is shown. The ON TIME is the time that the fan will run. The OFF TIME is the time the fan will stop.
- Page 11 COOKING DISPLAYS Cooking in Progress • While cooking is in progress the screen to the right is shown on the display. If several shelf timers are running, the next product to be removed is shown. • Cancel Cook – Press the CANCEL key (LEFT FUNCTION KEY). •...
- Page 12 E. EVENTS Editing Events EVENTS • Events are a time sequence of temperature, fan speeds and steam. • Enter the EVENT SCREEN from the RECIPE SELECT SCREEN EV TIME TMP FAN STM (Screen B2) by pressing both SELECT and TIME keys. 0:00 0:00 •...
- Page 13 F. OTHER SCREENS Door Open • The display at right appears any time the door is open. • Cool Down – Press the COOL DOWN key (RIGHT FUNCTION KEY) to turn the fan to high, cooling down the oven. Temperature is displayed during cool down. •...
- Page 14 Change Temperature Units Enter the MENU screen by pressing both the • TIME and Right Function Keys. MENU Use the UP and Down Arrows to select Item 5 1-Set Temp Offset • (Change to °C). 2-Calibrate Probes 3-Change to Timer Press the SELECT key to change temperature •...
- Page 15 COOK & HOLD/ROAST & HOLD RECOMMENDED TIMES & TEMPERATURES COOK HOLD HOLD TIME PRODUCT TEMP TEMP COOK TIME MINIMUM TOTAL TIME PRIME RIB 3 HRS. 1 HR. 4 HRS. BONE IN 200°F 140°F CAP OFF 3-1/4 HRS. 1-1/2 HRS. 4-3/4 HRS. 14 - 18 LBS.
- Page 16 COOK & HOLD/ROAST & HOLD RECOMMENDED TIMES & TEMPERATURES PRODUCT °F °C COOK TIME RACKS YOUR YOUR TEMP TIME BEEF HAMBURGER PATTIES (3.3 OZ.) 8 - 10 MIN. MEATLOAF 40 - 45 MIN. 2 OR 3 STEAMSHIP ROUND (80 LBS. QUART) 2-3/4 HR.
- Page 17 Repair Parts List Part # Description 153036 Motor, 208/240v, 2-speed, 1/2 HP 153210 Terminal block 153156 Contactor, 208/240v, 3-pole, 50 amp 155077 Element, inner, 240v, 2.667 KW 155078 Element, center, 240v, 2.667 KW 155079 Element, outer, 240v, 2.667 KW 155074 Element, inner, 208v, 2.667 KW 155075 Element, center, 208v, 2.667 KW...
- Page 18 FLUE GUARD Securing Double Stacked Ovens 1.) On rear of top oven remove two existing screws that are located at the lower right hand corner. 2.) On rear of bottom oven remove two existing screws that are located at the upper right hand corner.
- Page 19 5/9 “ZP” Wiring Schematic 208/240 VAC...
Need help?
Do you have a question about the 5/9 Series and is the answer not in the manual?
Questions and answers