Advertisement
Quick Links
INSTALLATION AND USER'S INSTRUCTIONS
Thank you for purchasing a Genuine Mazda Accessory.
Before removal and installation, Please thoroughly read these instructions.
For your safety, please read the contents of this booklet to properly install and use the mud fl ap (rear).
Keep these instructions with your vehicle records for future reference.
•
There are several
removing the mud fl ap (rear). Always read and follow the instructions in order to prevent injuries, accidents, and
possible damage to the vehicle.
WARNING
CAUTION
• For areas indicating the tightening torque in this instruction manual, tighten to the specifi ed torque by using a
torque wrench. For areas in which the tightening torque is indicated inside parentheses ( ), the tightening torque is
indicated as a reference value, however tightening using a torque wrench is not necessary.
• Do not modify the mud fl ap (rear).
• Do not install the mud fl ap (rear) in any way other than described in the following instructions.
• If in doubt, please contact your Mazda dealer to install the accessory in order to prevent errors in installation.
• If you have any questions about the use of the accessory, ask your Mazda dealer for proper advice before using it.
• Mazda and its suppliers are not responsible for injuries, accidents, and damage to persons and property that arise
from the failure of the dealer or installer to follow these instructions.
• To ensure safety and reliability of the work, installation, removal and disposal work must be carried out by an
Authorized Mazda Dealership.
• Be careful not to lose removed parts, and be sure that they are kept free of dirt, scratches, or damage.
NOTE
To the dealer
• Please turn over these instructions to the customer after installation.
To the customer
• Keep these instructions after installation. The instructions may be necessary for installing
other optional parts or removal of this accessory.
• Should the vehicle or this accessory be resold, Always transfer these instructions to the
next owner.
MAZDA MOTOR CORPORATION
3-1 Shinchi, Fuchu-cho, Aki-gun, Hiroshima 730-8670
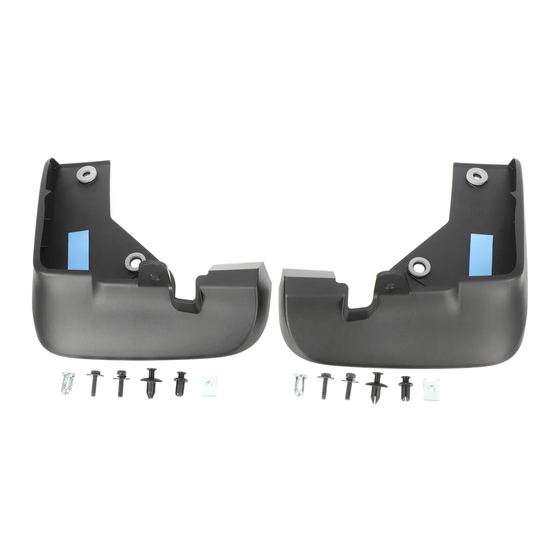
GENUINE MUD FLAP (REAR)
WARNING and
CAUTION sections in this booklet concerning safety when installing or
: Indicates a situation in which serious injury or death could result if the warning is ignored.
: Indicates a situation in which bodily injury or damage to the vehicle could result if the
caution is ignored.
PART NAME:
PART NUMBER: KPF1 V3 460 / KSD5 V3 460
VEHICLE:
WARNING
MUD FLAP (REAR)
MAZDA CX-5
KFNA-3460-00
Advertisement

Related Manuals for Mazda KPF1 V3 460


Summary of Contents for Mazda KPF1 V3 460
- Page 1 • If in doubt, please contact your Mazda dealer to install the accessory in order to prevent errors in installation. • If you have any questions about the use of the accessory, ask your Mazda dealer for proper advice before using it.
-
Page 2: Installation View
• If in doubt, please contact your Mazda dealer to install the accessory in order to prevent errors in installation. • If you have any questions about the use of the accessory, ask your Mazda dealer for proper advice before using it. -
Page 3: Before Installation
3. BEFORE INSTALLATION REQUIRED TOOLS (Make sure they are at hand before starting work) Phillips screwdriver Socket wrench (8mm) Nipper Fastener remover wrapped with protective tape Utility knife Burr remover WARNING Before performing any work, park the vehicle on level ground, apply the parking brake securely, and then block the wheels. - Page 4 4. MUD FLAP (REAR) INSTALLATION • This instruction manual shows the left side installation. Perform the same procedure for the right side. 1. Remove the fasteners (2 places) as shown in the diagram. • Discard these two (2) fasteners. They will not be reused. Fastener Fastener Vehicle front...
- Page 5 4. Securely push the clip nut into the rear bumper hole as far as it will go until it clicks into place. Splash • When installing the clip nut, install it so that the flat shield surface is facing toward the front of the vehicle. Clip nut Rear bumper Vehicle front...
- Page 6 9. Install while pushing the mud fl ap (rear) in the direction of the Rear over fender arrow so that the gaps between the contact surfaces at the top V-groove and bottom of the V-groove are even. At this time, fully tighten the bolts so that there is no gap between the contact surfaces of the rear over fender.
Need help?
Do you have a question about the KPF1 V3 460 and is the answer not in the manual?
Questions and answers