Advertisement
Quick Links
Advertisement

Related Manuals for Siruba ACS200


Summary of Contents for Siruba ACS200
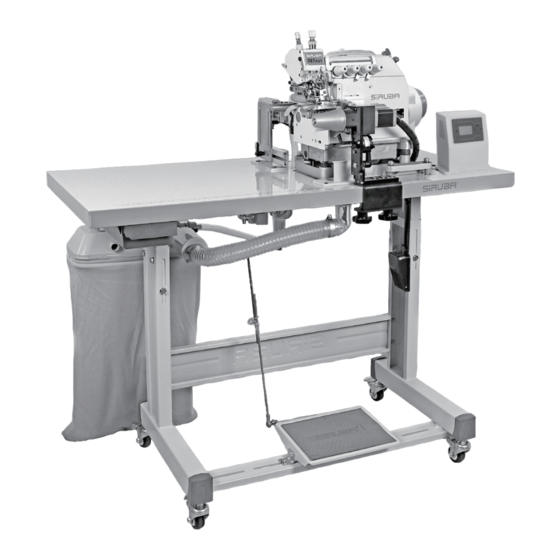
- Page 1 使用說明書 INSTRUCTIONS BOOK ACS200...
- Page 2 如果忽視此標記而運行了錯誤的機械操作,保養時肯定會引起當事者 或第三者人員重傷或死亡。 如果忽視此標記而運行了錯誤的機械操作,保養時有可能會引起當事 者或第三者人員受傷及造成設備損壞。 運動 部 位, 謹 防 工傷 事 故 Moving part, beware of industrial accident 高壓 部 位, 謹 防 觸電 事 故 High voltage, beware of electric shock 高溫 部 位, 謹 防 燙傷 事 故 High temperature, beware of burns 禁止...
- Page 3 頁 /PAGE INDEX 索引 P .1 一般安全事項說明 P .3 重要安全事項說明 P .7 特別事項 1、安裝腳架,集塵組,調壓閥,電磁閥,電機電控,速控器 P .9 2、安裝漏斗,墊塊,防震膠,車頭 P .10 3、安裝抬壓腳氣缸,後滾輪組 P .11 4、安裝送料滾輪組 P .12 5、安裝圓領裝置顯示幕一體電控 P .13 6、顯示幕插座信號指示 ( 主機殼端子圖 ) P .14 7、AC 220V 接線方式 P .14 8、觸控面板圓領裝置操作說明 P .15 一、按鍵使用說明...
- Page 4 頁 /PAGE INDEX 索引 GENERAL SAFETY INSTRUCTIONS P .1 IMPORTANT SAFETY INSTRUCTIONS P .3 WARNING P .7 1、Install the stand, dust collector, solenoid, motor, control box and speed controller P .42 2、Install the funnel, mat, rubber cushion and machine head P .43 3、Install presser foot cylinder and back roller P .44...
-
Page 5: General Safety Instructions
GENERAL SAFETY 一般安全事項說明 INSTRUCTIONS Warning! 警告! When using this machine, basic safety 當使用這台機器,基本安全預防應恆被遵守 Precautions should always be followed to ,以減輕火災、電擊、或是個人傷害的風險 reduce the risk of fire, electric shock and 。包含以下注意事項。 personal injury, including the followings. 在操作這台機器之前,請閱讀所有說明並且 Read all these instructions before 緊記於心。... - Page 6 Introduction 8. 中斷機器電源 8. Disconnect machine When not in use, before servicing and 當不使用機器時、維修前、以及更換配件 when changing accessories. 時。 9. 避免誤啟動 9. Avoid unintentional starting Do not carry a plug-in tool with a finger on 不要以手指置於啟動開關上之後,搬運一個 the switch. Ensure the power switch is off 已插入電源的工具。確定在插電之前,電源...
-
Page 7: Important Safety Instructions
IMPORTANT SAFETY 重要安全事項說明 INSTRUCTIONS For operating safely and getting the 恭喜您購買本機器,為了使這台機器能獲 best functions of this machine, you must 得最佳功能以及安全的操作,務必請正確 operate it correctly. Please read and 的使用這台機器,使用前請仔細閱讀使用 follow the instructions of this manual, 說明書,希望您能長期使用它。請記得將 and keep it at hand for future references. 此說明書放在容易取得的地方。... - Page 8 Introduction unattended. (5) 若使用離合器馬達而無煞車片裝置 (5)If clutch motors without brake pads are used,must wait until the motor stops 時,必須待馬達完全停止。 completely. 8. 假如不慎讓機器及配件使用之油或油 8. If grease, oil, or any fluid contacts your skin or eyes by any chance, please 脂,接觸到眼睛、皮膚或誤食時,請立 wash the contacted area completely 刻以水清洗接觸部位及就診。...
- Page 9 15. 為使機器能正常操作以及減少噪音, 15. In order to operate properly and to reduce the noise, please place the 機台務必平放地上,機器避免在強烈 machine flat and level on the ground. 噪音的環境下操作。 Avoid operating the sewing machine at a noisy surrounding. 16. 選用適當的電源插頭,並由電子技師 16. Select a proper power plug and install it by an electrician.
- Page 10 Introduction c. 當您打開電源開關後或機器已 在運轉 c. Please never put your fingers under the needle(s) or in the thread take-up cover 中,絕不可將您的手放在針的下方或針 to prevent physical injuries when you 線控線桿外蓋中,以免導致人員受傷。 turn on the power switch or operate the machine. d. 當機器運轉中,梭頭高速轉動,為了避 d. While the machine is in operation, the 免對手可能引起之...
- Page 11 WARNING 特別事項 Please confirm the followings to avoid 為了避免機器故障及損壞,請先確定以下 malfunction or damage to this machine. 事項: 1. 當您安裝好機器後,做第一次機器操作 1. After installing the machine, and before the first operation, please clean it 前,請徹底清潔機器。 completely. 2. 清除運送途中累積之灰塵及溢出之油 2. Clean all dust and overflowed oil during transportation.
- Page 12 Introduction GS-ACS-200 series 自 動 圓 領 裝 置 安 裝 說 明...
- Page 13 1、安裝腳架,集塵組,調壓閥,電磁閥,電機電控,速控器 23CM 18CM 22CM...
- Page 14 Introduction 2、安裝漏斗,墊塊,防震膠,車頭 油 盤 安 裝...
- Page 15 3、安裝抬壓腳氣缸,後滾輪組...
- Page 16 Introduction 4、安裝送料滾輪組 分佈組件 安裝高度 和針板面 送料滾輪、 水平 分料裝置和 縫紉機修邊 刀左右平齊...
- Page 17 5、安裝圓領裝置顯示幕一體電控 速控器專用連接線插線方法 速控器...
- Page 18 Introduction 6、顯示幕插座信號指示 主機殼端子圖 電眼 2( 黃色 ) 電眼 1( 紅色 ) 接近開關 ( 藍色 ) 電眼調節 ( 黑色 ) 膝動開關 6 路電磁閥 步進電機 踏板 7、AC 220V 接線方式 淺藍 Light Blue(AC) 淺藍 Light Blue(AC) 1øAC220 綠 / 黃 (FG) 插座 ACS 電控電源線 Green / Yellow Socket 電源線...
- Page 19 8、觸控面板圓領裝置操作說明 圖 1 一、按鍵使用說明 功能表鍵,長按 3 秒進入系統參數修改選項。 補償鍵,僅在自動狀態使用。 返回鍵,退出參數修改頁面,返回工作頁面,並保存資料。 4. 、 左右移動鍵,在更改工程參數的介面下,移動參數修改浮標。 5. 、 加減鍵,更改各項功能的參數大小。 二、工作模式下,左移右移鍵的作用 按下 鍵後,自動保存並退出更改參數介面,鎖定所有工作狀態。 1. 按下 左鍵,顯示上一個工程值的資料。 2. 按下 右鍵,顯示下一個工程值的資料。...
- Page 20 Introduction 三、顯示窗內容說明: 1. 器件功能測試 GOSEW 2. 功能參數設置 圓領系統裝置 3. 器件信號開關 自動模式 4. 高級設置 圖 2 圖 3 工作狀態顯示: 圓領系統裝置開機後預設顯示(圖 2),按隱藏 加減鍵,更改自動模式或手動模式。 參數功能設置顯示介面: 長按 鍵 3 秒可進入參數設置介面(圖 3): 1. 器件功能測試。 2. 功能參數測試。 3. 器件信號開關。 4. 高級設置。 四、介面操作說明 ( 一 )、器件功能測試: 長按 鍵 3 秒進入系統參數設置介面,按 、 加減鍵,選中“器件功能測試",按下 右鍵,進入子功能表介 面(圖...
- Page 21 1-1 壓腳功能測試 1-2 吸風功能測試 1-3 撐料氣缸測試 1-4 剎車氣缸測試 1-5 分料氣缸測試 1-6 步進電機測試 1-7 編碼器計數值 1-8 踏板輸入電壓 1-9 步進接近開關測試 1-10 布料檢測電眼測試 1-11 分料檢測開關測試 1-12 步進停車開關時間 1-13 迴圈功能測試 撐料氣缸測試 車氣缸測試 功能狀態:關閉 功能狀態:關閉 >1-4 車氣缸測試 >1-5 分料氣缸測試 圖 6 圖 7 分料氣缸測試 步進電機測試 功能狀態:關閉...
- Page 22 Introduction 踏板輸入電壓 編碼器計數值 電壓值: 147V 計數值: 000 >1-9 步進接近開關 >1-8 踏板輸入電壓 測試 圖 10 圖 11 1-7 編碼器計數值(圖 10) 編碼器計數值(預設狀態下顯示 000)的調試,暫不可調節。( 轉動機器上手輪,每轉 ( 正反轉皆可 ) 一圈 編碼器技術值會增加 1,說明編碼器工作正常。) 1-8 踏板輸入電壓(圖 11) 踏板輸入電壓的調試,(通過 左鍵、 右鍵)選擇“1-8 踏板輸入電壓"選項 ( 默認狀態下顯示 140V ~ 150V 之間 ),踩踏腳踏板,螢幕上會顯示踏板中立、前踏、後踏狀態時的電壓值。 * 踩踏腳踏板,往腳後跟方向倒踩時,踏板輸入電壓值會在...
- Page 23 1-10 步進接近開關測試 布料檢測開關測試 功能狀態:開啟 功能狀態:開啟 >1-10 布料檢測開 >1-11 分料檢測開 關測 關測 圖 12 圖 13 1-9 步進接近開關測試(圖 12) 步進接近開關測試(預設功能狀態:開啟)的調試,(通過 左鍵、 右鍵)選擇“1-9 步進接近開關測試" 選項,用手輕按“步進接近開關觸發器",顯示器中,“功能狀態"由“開啟"變為“關閉",表明“步進 接近開關"正常。 1-10 布料檢測開關測試(圖 13) 布料檢測開關測試(預設功能狀態:開啟)的調試,(通過 左鍵、 右鍵)選擇“1-10 布料檢測開關測試" 選項,當遮蓋機構上布料檢測的光電感測器,顯示器中,“功能狀態"由“開啟"變為“關閉",表明“布 料檢測開關"正常。 1-11 1-12 分料檢測開關測試 停機開關報障時間 參數值: 001min 功能狀態:開啟 >1-12 停機開關報...
- Page 24 Introduction 1-13 迴圈功能測試 功能狀態:開啟 請按左鍵返回 圖 16 1-13 迴圈功能測試(圖 16) 迴圈功能測試(預設功能狀態:開啟)的調試,(通過 左鍵、 右鍵)選擇“1-13 迴圈功能測試"選項, 選擇後, 機器自動迴圈測試以上 12 項功能, 作出對應動作。 按 返回鍵, 機器停止測試並返回到上一級介面 (圖 3)。 1. 器件功能測試 送料速度 2. 功能參數設置 3. 器件信號開關 >2-2 骨位停止位置 4. 高級設置 圖 17 圖 18 (二)、功能參數設置 加減鍵,選中“功能參數設置"(圖...
- Page 25 骨位停止位置 後吸風延遲針數 050 ms >2-3 後吸風延遲針數 >2-4 吸風保持時間 圖 19 圖 20 2-2 骨料停止位置(圖 19) 骨料停止位置(默認 50ms)設置,通過 、 加減鍵,可調節骨料停止位置。 2-3 後吸風延遲針數(圖 20) 後吸風延遲針數(默認 15 針)設置,通過 、 加減鍵,可調節針數以控制吸風開始時間。 吸風保持時間 前中吸風模式 0100/10ms 關閉前中吸風 >2-5 前中吸風模式 >2-6 中吸風間隔針數 圖 21 圖 22 2-4 吸風保持時間(圖 21) 吸風保持時間(默認...
- Page 26 Introduction 送料起動延時 中吸風間隔針數 >2-8 車延時時間 >2-7 送料起動延時 圖 23 圖 24 2-6 中吸風間隔針數(圖 23) 中吸風間隔針數(默認 10 針)設置,通過 、 加減鍵,可調節中吸風間隔針數。 2-7 送料起動延時(圖 24) 送料起動延時(默認 0ms)設置,通過 、 加減鍵,可調節送料起動延時時間。 車保持時間 車延時時間 300 ms 000 ms >2-10 下壓腳延遲時間 >2-9 車保持時間 圖 25 圖 26 2-8 剎車延時時間(圖...
- Page 27 2-10 2-11 分料延遲時間 下壓腳延遲時間 300 ms 500 ms >2-12 手動補償車縫 >2-11 分料延遲時間 圖 27 圖 28 2-10 下壓腳延時時間(圖 27) 下壓腳延時時間(默認 500ms)設置,通過 、 加減鍵,可調節下壓腳延時時間。 2-11 分料延遲時間(圖 28) 分料延遲時間(默認 300ms)設置,通過 、 加減鍵,可調節分料延遲時間。 2-12 2-13 手動補償車縫轉速 手動補償車縫針數 >2-14 分料電眼工作模 >2-13 手動補償車縫轉 圖 29 圖...
- Page 28 Introduction 2-14 2-15 電眼參數設定 分料電眼工作模試 設定 000 接收值 0000 上限值 900 下限值 800 >2-15 電眼參數設定 圖 31 圖 32 2-14 分料電眼工作模式(圖 31) 分料電眼工作模式(預設 ON)設置,通過 、 加減鍵,可關閉或打開分料電眼開關。 2-15 電眼參數設置(圖 32) 電眼參數設置(預設值不確定)設置,通過 、 加減鍵,可調節“設定"數值,“接收值"會自動 作出相應變化。 1. 器件功能測試 膝動開關信號方向 2. 功能參數設置 3. 器件信號開關 >3-2 步進接近開關...
- Page 29 布料檢測電眼信號 步進接近開關 >3-4 分料檢測電眼 >3-3 布料檢測電眼 圖 35 圖 36 3-2 步進接近開關(圖 35) 步進接近開關(預設 ON)設置,通過 、 加減鍵,可關閉或打開步進接近開關。 3-3 布料檢測電眼信號(圖 36) 布料檢測電眼信號(預設 OFF)設置,通過 、 加減鍵,可打開或關閉布料檢測電眼信號。 壓腳控制信號輸出 分料檢測電眼信號 >3-6 吸風控制信號 >3-5 壓腳控制信號 圖 37 圖 38 3-4 分料檢測電眼信號(圖 37) 分料檢測電眼信號(預設 OFF)設置,通過 、 加減鍵,可打開或關閉分料檢測電眼信號。...
- Page 30 Introduction 撐料控制信號輸出 吸風控制信號輸出 >3-8 車控制信號 >3-7 撐料控制信號 圖 39 圖 40 3-6 吸風控制信號輸出(圖 39) 吸風控制信號輸出(預設 OFF)設置, 、 加減鍵,可打開或關閉吸風控制信號輸出。 3-7 撐料控制信號輸出(圖 40) 撐料控制信號輸出(預設 OFF)設置,通過 、 加減鍵,可打開或關閉壓腳控制信號輸出。 骨位檢測 車控制信號輸出 >3-1 膝動開關信號 >3-9 骨位檢測 圖 41 圖 42 3-8 車控制信號輸出(圖 41) 車控制信號輸出(預設 OFF)設置,通過 、 ...
- Page 31 1. 器件功能測試 A. 語言設定 2. 功能參數設置 B. 初始化系統 3. 器件信號開關 4. 高級設置 圖 43 圖 44 (四)、高級設置 加減鍵,選中“高級設置"(圖 43),按下 右鍵,進入子功能表介面(圖 44): 按 、 A 語言設定(圖 44) 按下 右鍵,進入子功能表介面(圖 45),按 、 加減鍵,可選擇系統語言“簡體中文"或者 “English"(英語)。 系統語言選擇 A. 語言設定 簡體中文 B. 初始化系統 English 圖 45 圖...
- Page 32 Introduction 控速器參數設置(隱藏菜單) 加減鍵,選中“初始化系統"(圖 46),再按一次 在“高級設置"的子功能表介面下,按 、 加減鍵,遊標消失,出現(圖 47)介面,再按下 右鍵,進入控速器參數設置(圖 48)。“控速器參 數設置"為隱藏項,出廠調整用,一般不對外開放。 A. 後踩 84 020 A. 語言設定 B. 起壓腳 B. 初始化系統 C. 常態 D. 始縫 圖 47 圖 48 以下電壓值需根據踏板四種狀態時的即時電壓值來進行設定 如圖 48 所示: 84 為中立狀態電壓值, 全後踏時 84 會變化為 05(不同品牌電機會有差異) A. 後踩送料時電壓值(=05+015):020 B.
- Page 33 9、參 數 表 1. 器件功能測試 2. 功能參數設置 3. 器件信號開關 4. 高級設置 預設值 默認值 1-1 壓腳功能測試 2-1 送料速度 3-1 膝動開關信號方向 A. 語言設定 1-2 吸風功能測試 2-2 骨料停止位置 3-2 步進接近開關 B. 初始化系統 1-3 撐料氣缸測試 2-3 後吸風延遲針數 3-3 布料檢測電眼信號 1-4 剎車氣缸測試 2-4 吸風保持時間 3-4 分料檢測電眼信號 兩項均沒有底色...
- Page 34 Introduction 10、圓領裝置顯示幕一體電控匹配速控器參數調整 ①、打開檢測項 1-8,記錄常態下電壓值和反踩踏板電壓值 ②、打開高級設置 ,調到 A-B 兩項都沒有底色進入參數設置 A. 後踩:參數調到大於反踩踏板電壓 值, 小於即送帶輪沒法啟動 起壓腳:參數調到後踩和常態中位 數 C. 常態:參數調到踏板常態下電壓值 D. 始縫 參數調到比常態大於常態值 +30, 始縫如小於常態即會開機電機就 自行轉動 ③ 、按 返回鍵保存並退出...
- Page 35 11、安裝重點 & 使用維護調整 分料裝置高度調整 分料裝置高度調整與包縫機 針板高度一致。 分料裝置左右調整 調整分料裝置左右位置, 右邊擋板推到最左邊,移 動組件左右位置與包縫機 切刀平齊。...
- Page 36 Introduction 步進電機角度調整 調整步進電機送帶輪與包縫機角度大約在 5 度 ( 視乎羅紋面料再做調整 ),分料裝 置與包縫機平行。留有一點間距,防止包縫機在轉動時震動與分料裝置碰撞。 羅紋寬度調整 1. 右邊擋板移到最右邊, 調整左擋板到右擋板距離 和羅紋寬窄一致。 2. 分佈片向左推出與左擋板 留有 1mm( 視乎羅紋厚度 ), 中間間距越小最好。...
- Page 37 感應骨位調整 根據羅紋的厚度調整感應器的高 度。感應器正常狀態下亮燈,當 羅紋骨位通過感應片時,感應片 離開感應器,感應燈不亮。 自動分料裝置感應調整 感應片向前移動 2mm, 調整感應 反光片的位置,使電眼可以通過 反光片反射光線,分料裝自動退 回復位。...
- Page 38 Introduction 卡線處理 步進電機送帶輪, 只能單方向向前轉動, 反方向轉動會有阻力,如果向前轉動有 阻力,即會導致羅紋跑偏。可能卡有線 頭,拆下送帶輪清理,注意不要掉了鍵 條。...
- Page 39 自動對縫骨停止位置設置 1. 器件功能測試 圓領系統裝置 骨位停止位置 2. 功能參數設置 骨位檢測 自動模式 3. 器件信號開關 >2-3 後吸風延遲針數 4. 高級設置 1. 長按 鍵 3 秒,進入參數設置介面。 2. 按下鍵選中"功能參數設置"按右鍵,進入子菜單介面。 3. 按右鍵選中 2-2 骨位停止位置,按上下鍵調整參數大小 ( 數值越大骨位停止位置向後,參數 越小骨位停止位置向操作者 ),然後按返回鍵退出,參數自動保存。 設置調為長吸風 圓領系統裝置 1. 器件功能測試 2. 功能參數設置 前中吸風模式 中吸風間隔針數 骨位檢測 自動模式 3. 器件信號開關 關閉前中吸風 >2-7 送料起動延時...
- Page 40 Introduction 語言選擇 & 初始化參數 1. 長按 鍵 3 秒,進入參數設置介面。 2. 按下鍵選中 4. 高級設置,按右鍵進入菜單。 3. 按上下鍵選中 A. 語言設定或 B. 初始化系統,按右鍵進入子菜單。 4. 按上下鍵選中簡體中文或 English,按返回鍵,返回上一個介面。 5. 按下鍵選中 B. 初始化系統,按右鍵等待 2 秒,系統初始化完成自動返回主介面。...
- Page 41 感應布料電眼的調整 1. 長按菜單鍵 3 秒》 功能參數設置》 2. 將感應羅紋電眼插頭 ( 黃 ), 2-15 電眼參數設定 插到黑色插座, 3. 按上下鍵調整設定值使接收值 在 300-400 之間 4. 用布料遮擋電眼,接收值為 1023,如果沒有達到 1023,按 上下鍵調整設定值,使接收值達 到 1023,如果接收值沒有變化, 即需要檢查或更換電眼。...
- Page 42 Introduction 分料裝置自動復位電眼調整 1. 長按菜單鍵 3 秒》 2. 將感應羅紋電眼插頭 ( 紅 ) 插 功能參數設置》 到黑色插座 2-15 電眼參數設定 4. 用手指推動感應片使反光片 3. 按上下鍵調整設定值使接 遮擋電眼,接收值為 1023, 收值在 300-400 之間, 如果沒有達到 1023,按上下鍵調 整設定值,使接收值達到 1023, 如果接收值沒有變化,即需要檢 查或更換電眼。...
- Page 43 ACS-200 系列反踩踏板送帶輪不轉 檢查布料檢測開關 1:檢測步進電機線是否存在斷線與插頭是 否插好 2:檢測檢骨感應器與布料電眼正常否,進 介面檢測排除 3:進介面檢測排除腳控後踩電壓配對合適 否 調到檢測項,1-10,在沒有布料擋住電眼的 情況下,功能狀態顯示:關閉 用手擋住電眼,功能狀態顯示:開啟 如果沒有變化,即需要檢查電眼 ( 黃 ) 插頭 是否接觸良好及 或調整電眼參數設置...
- Page 44 Introduction ACS-200 系列反踩踏板送帶輪不轉 控速器與電控匹配參數調整方法 1. 先打開檢測項 1-8,紀錄常態下 電壓值和反踩踏板電壓值 2. 打開高級設置 A. 後踩:用於啟動送帶電機,參數調到大於 調到 A-B 兩項都沒有底色進入參數設置 反踩踏板 電壓值 005V,*** 小於 005V 即送帶輪沒 法啟動 B. 起壓腳:參數調到後踩和常態中位數 C. 常態:參數調到踏板輸入電壓值 116V D. 始縫 參數調到比常態大於常態值,116V 始縫如小于常態即會開機電機就自行 轉動...
- Page 45 GS-ACS-200 series Automatic Collar Attaching Device Installation Guide...
- Page 46 Introduction 1、Install the stand, dust collector, solenoid, motor, control box and speed controller. 23CM 18CM 22CM...
- Page 47 2、Install the funnel, mat, rubber cushion and machine head Oil tank install method...
- Page 48 Introduction 3、Install presser foot cylinder and back roller...
- Page 49 4、Installing the feeding roller set The components need to be install at the same height as The feeding roller the needle plate. set need to be neat with the trimmer...
- Page 50 Introduction 5、Install the ribbed collar device main board Connecting the speed controller speed controller...
- Page 51 6、Panel outlet signal indication Main terminal diagram) Sensor 2(Yellow) Sensor 1(Red) Proximity switch (Blue) Adjust sensor (Black) Knee touch switch 6. Solenoid Stepping motor Pedal 7、AC 220V wiring method Light Blue(AC) Light Blue(AC) A C S e l e c t r i c 1øAC220 Green / Yellow (FG) control powerWire...
- Page 52 Introduction 8、Touch panel collar device operation instructions figure 1 1. Instructions for the use of keys Menu key, long press 3 seconds to enter the system parameter modification options. Compensation key, used only in automatic state. Return key, exit parameter modification page, return to work page, and save data. 4. ...
- Page 53 3. Description of display window 1 Device Test RoundNeck System 2 ParameterSet Joint AUTO 3 Device Set 4 Adyanced Set figure 2 figure 3 Working status display The round collar system device is displayed by default after starting up (figure 2).,Pass the ...
- Page 54 Introduction work, the solenoid valve indicator light is on, indicating that the device function is normal. loosen key,The function state is restored to the default "off" (first 6 device function test options). Pass the Right click to enter the next device function test options, device function test options 1 to 6 (figure 4 to figure 9) : 1-1 FOOT TEST 1-2 INHALE TEST...
- Page 55 M COUNT T INPUT COUNT: 000 Voltage: 398V >1-8 T INPUT >1-9 SW-A STATE figure figure 1-7 encoder count value (figure 10) Debugging of encoder count value (display 000 by default), select "1-7 encoder count value" option (through the left button < and right button > ), turn the handwheel on the machine, the encoder count value will increase by 1 for each turn (positive and negative rotation can be used), indicating that the encoder works normally.
- Page 56 Introduction 1-10 SW-A STATE SW-B STATE Funcation: OFF Funcation: ON >1-11 SW-C STATE >1-10 SW-B STATE figure figure 1-9 proximity switch test (figure 12) Step proximity switch test (default function state: open) debugging, (through the left button < , right button >...
- Page 57 1-13 LOOP TEST Function: ON Please Retuirn figure 1-13 cyclic function test (figure 16) Debug the loop function test (default function state: open). Select the option of "1-13 loop function test" (through the left < and right buttons > ). After the selection, the machine will automatically loop test the above 12 functions and make corresponding actions.
- Page 58 Introduction M-STPDLY I STTDLY 050 ms >2-3 I STTDLY >2-4 INHALE MODE figure figure 2-2 stop position of aggregate (figure 19) The aggregate stop position (default 50ms) is set. The aggregate stop position can be adjusted by 、 adding and subtracting keys. 2-3 backward suction delayed stitches (figure 20) Set the number of delayed stitches (15 stitches by default) of the rear suction air.
- Page 59 I KPTIME G2 STTDLY >2-7 G2 STTDY >2-8 G3 DLYTTIME figure figure 2-6 number of air suction spacers (figure 23) Set the number of air suction interval stitches (10 stitches by default). The number of air suction interval stitches can be adjusted by 、 adding or subtracting keys. 2-7 feeding start delay (figure 24) Start delay of feeding (default: 0ms) is set.
- Page 60 Introduction 2-10 2-11 F DLYTIME G DLYTIME 500 ms 300 ms >2-11 G DLYTIME >2-12 C DTITCH figure figure 2-10 delay time of pressing foot (figure 27) The delay time of pressing foot is set (default is 500ms). The delay time of pressing foot can be adjusted by 、 adding or subtracting keys.
- Page 61 2-14 2-15 SWC SET SWC MODE >2-15 SWC figure figure 2-14 working mode of electric eye for separating material (figure 31) The working mode (default ON) of the electronic eye of material distribution is set. 、 The electronic eye switch of material distribution can be closed or opened through the add or subtract keys. 2-15 setting of electric eye parameters (figure 32) Electronic eye parameter setting (the default value is uncertain) is set.
- Page 62 Introduction >3-3 >3-4 figure 35 figure 36 3-2 Step approach switch (figure 35) Step proximity switch (default ON) setting, 、 through the key, add/subtract, you can turn off or open step proximity switch. 3-3 Cloth detection of electric eye signal (figure 36) Cloth detection electrical eye signal (default OFF) setting, 、 ...
- Page 63 OUTB OUTC >3-7 OUTC >3-8 OUTD figure 39 figure 40 3-6 Signal output of r Absorption control system (figure 39) Absorption control signal output (default OFF) setting, 、 can be turned on or OFF by add/ subtract keys. 3-7 Support control signal output (figure 40) Support control signal output (default OFF) setting, through the key, add/subtract, ...
- Page 64 Introduction 1 Device Test A language Set 2 Parameter Set B System Init 3 Device Set 4 Advanced Set figure 43 figure 44 D. Advanced Settings figure Press, 、 add/subtract, to select "advanced Settings" ( 43), press the right button, to enter figure the sub-menu interface.
- Page 65 Speed controller parameter settings (Hidden Setting) Under the sub-menu interface of "advanced Settings", press, 、 add/subtract, select and press" initialization system" (figure 46), Press again Add/subtract button, until interface appears (figure 47), press right button, enter the speed controller parameter settings (figure 48), "Speed controller parameter settings"...
- Page 66 Introduction 9、Parameters 2.Function Parameters 3.Device signal ON/ 4.Advance 1.Device function test Default Default setting setting A . L a n g u a g e Knee touch ON/OFF Press foot function test Feeding speed settings signal B . i n i t i a l i z a t i o n Suction function test Seam stop position Step proximity ON/OFF...
- Page 67 10、Setting the parameters for the speed controller ①、Select examination 1- 8, record the voltage value on normal state and the voltage value when the pedal is push down. T INPUT T INPUT Voltage : Voltage : SW-A STATE SW-A STATE ②、Select advance settings, and When A-B do not have any background, entrer the parameters setting.
- Page 68 Introduction 11、Installation and maintenance adjustment Distribution device height adjustment The hight of the distribution device need to be the same as the needle plate. Distribution device left and right adjustment Adjust the left and right position of the distribution device, push the right plate all the way to the left and move the set until same set is align with the trimmer.
- Page 69 Stepping motor angle setting Adjust the angle between the stepping motor and the machine for about 5 degrees. (Adjust according to the rib fabric) the material distribution set needs to be parallel to the machine. Leave a gap between the machine and the distribution device to prevent collision.
- Page 70 Introduction Seaming sensor adjustment according to the thickness to adjust the high of sensor. Normally the sensor is light on. seaming sewing though sensor sheet would be left sensor and light off. Auto distribution sensor device adjustment sensor sheet move 2mm ahead. adjust sensor reflection sheet position in order to reflect light from reflection sheet by though...
- Page 71 Thread stock issue solution step motor feed tape roller. single direction rolling. negative position rolling would make it unsmooth and fail rib- fabric seaming and thread stock. need to take off feeding tape roller and clean.
- Page 72 Introduction Stopping auto position setting 1 Device Test RoundNeck System M-STPDLY 2 Parameter Set 3 Device Set Joint AUTO >2-3 I STTDLY 4 Adyanced Set 1.long press 3 second. entering to data setting. 2.right press "function setting", enter into sub menu. 3.right press 2-2 seeming stop position, up and down to adjust data.
- Page 73 Language chooses and initialization data 1 Device Test RoundNeck System 2 Parameter Set 3 Device Set Joint AUTO 4 Adyanced Set Language Set 簡體中文 English A Language Set B System Init A Language Set B System Init 1.long press for 3 second. enter into setting menu. 2.select 4.adventage setting.
- Page 74 Introduction Fabric sensor adjustment. 2-15 SWC SET set 000 receive 000 Upper 900 lower 800 1.long press menu for 3 second. > function 2. rib-fabric sensor plug (yellow), setting > 2-15 sensor plug into black. data setting. receive 0325 SWC SET set 029 receive 0325 Upper 800 lower 800 3.
- Page 75 Auto positioning distribution material sensor adjustment 2-15 SWC SET set 000 receive 000 Upper 900 lower 800 1. long press 3 second > 2. rib-fabric sensor (red) plug to function data setting black socket. receive 1023 SWC SET set 003 receive 0310 Upper 900 lower 800 3.
- Page 76 Introduction Issue solution of feeding roller of ACS-200 opposite press pedal check the switch of fabric detection 1.check step motor wire, unplug or damaged. 2.check seeming sensor and fabric sensor SW-B STATE work or not. if no work need enter to Funcation: OFF screen solve the issue.
- Page 77 Issue solution of feeding roller of ACS-200 opposite press pedal Data adjust solution of speed controler and electric controler 1 . o p e n d e t e c t i o n 1 - 8 r e c o r d Pedal Input Voltage Pedal Input Voltage voltage data and back press pedal...
- Page 78 由於對產品的改良及更新 , 本產品零件圖及外觀的修改恕不事先通知 ! The specification and/or appearances of the equipment described in this parts list are subject to change because of modification which will without previous notice. ACS200.DEC.2022...
Need help?
Do you have a question about the ACS200 and is the answer not in the manual?
Questions and answers