Advertisement
Quick Links
Advertisement

Related Manuals for Torque 5854001-B


Summary of Contents for Torque 5854001-B
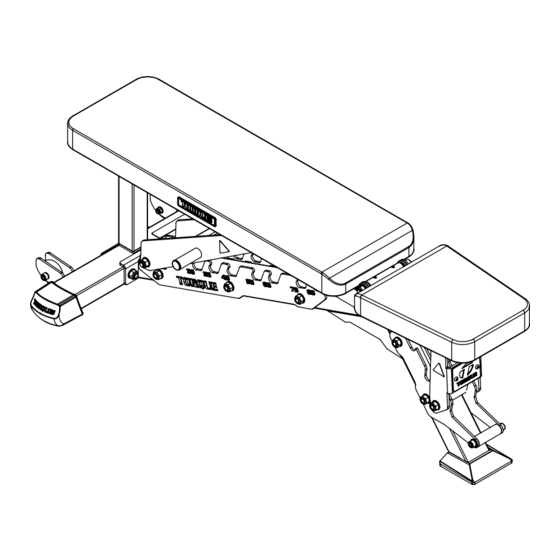
- Page 1 X-GYM FLAT INCLINE BENCH ASSEMBLY GUIDE VERSION: XG-FIB-101 PART #: 5854001-B...
- Page 2 TABLE OF CONTENTS Important safety instructions: • Important safety instructions for using equipment: Page 3 • Important safety instructions for assembling equipment: Page 3 • Obtaining service: Page 3 General Notes: • Unpacking equipment: Page 4 • Tools Required: Page 4 •...
- Page 3 DO NOT use product if product appears damaged. DO NOT attempt to fix a broken or jammed machine, contact Torque Fitness Customer service at: 763-754-7533 (8:30 am - 5:00 pm CST). Failure to comply with these instructions will void any and all product warranties.
-
Page 4: General Notes
If any items are missing, contact Torque Fitness Customer service at: 763-754-7533 (8:30 am - 5:00 pm • Insert all bolts in the direction indicated in •... - Page 5 ITEM PART NO DESCRIPTION BOM/QTY 58484PA PTD ASSY, BENCH FRAME 58485PA PTD ASSY, BENCH REAR BASE 58486PA PTD ASSY, BACK SUPPORT POST 2042601 WASHER, M12 X 24 X 1.5 CZ 2042501 WASHER, M10 X 20 X 1.5 CZ 2042201 SBHCS M10 X 1.5 X 65 CZ 2043005 SHCS, M12 X 1.75 X 100 CZ 2022001...
- Page 6 STEP 1 M10 FLAT WASHER M10 X 65MM BUTTON HEAD BOLT SECURELY tighten all bolt connections in this step...
- Page 7 STEP 2 M12 LOCK NUT (2) M12 X 100MM BOLT (2) M12 FLAT WASHER (4) SECURELY tighten all bolt connections in this step...
- Page 8 STEP 3 M12 X 100MM BOLT (3) M12 LOCK NUT (3) M12 FLAT WASHER (6) SECURELY tighten all bolt connections in this step...
- Page 9 STEP 4 M12 LOCK WASHER (2) M12 FLAT WASHER (4) M12 X 100MM BOLT (2) M10 X 20MM BOLT (2) M10 FLAT WASHER (2) SECURELY tighten all bolt connections in this step...
-
Page 10: M8 Flat Washer
STEP 5 M8 X 20MM BOLT (4) M8 LOCK WASHER (4) M8 FLAT WASHER (4) SECURELY tighten all bolt connections in this step... - Page 11 STEP 6A AND 6B M8 X 20MM BOLT (4) M8 LOCK WASHER (4) M8 FLAT WASHER (4) ENSURE THAT THE BEARINGS REMAIN SEATED IN THE BRACKET LOOSEN, REMOVE AND SAVE HARDWARE FOR NEXT STEP SECURELY tighten all bolt connections in this step...
- Page 12 STEP 7 USING A 4MM ALLEN WRENCH, LOOSEN BUT DO NOT REMOVE SET SCREWS TO INSTALL BOLT. M12 LOCK NUT M12 FLAT WASHER (2) M12 X 155MM BOLT (4) REUSE HARDWARE FROM PREVIOUS STEP SECURELY tighten, then LOOSEN 1/4 TURN in this step.
- Page 13 STEP 8A AND 8B M12 LOCK NUT M12 X 140MM BOLT M12 X 125MM BOLT POSITION AND CENTER NYLON SPACER BETWEEN M12 FLAT WASHER (4) THE SEAT ADJUSTMENT PLATES. SECURELY tighten all bolt connections in this step...
- Page 14 STEP 9 M12 X 155MM BOLT M12 FLAT WASHER (2) M12 LOCK NUT SECURELY tighten all bolt connections in this step...
- Page 15 STEP 10 SECURELY TIGHTEN SET SCREWS CENTER BRACKETS ADJUST BOTH THE SEAT AND BACK PAD. VERIFY THAT THE ADJUSTMENT OPERATES SMOOTHLY IF ADJUSMENT IS NOT SMOOTH, LOOSEN BOLT 1/8 TURN AT A TIME UNTIL THE PADS PIVOT FREELY.
-
Page 16: Maintenance
UPHOLSTERY: Wipe down and dry after each use. Clean and condition periodically. NEVER PLACE BODY PARTS BETWEEN THE For customer service contact Torque PAD SUPPORT BRACKETS Fitness Customer service at: 763-754- 7533 (8:30 am - 5:00 pm CST). www.service@torquefitness.com NOTE:...
Need help?
Do you have a question about the 5854001-B and is the answer not in the manual?
Questions and answers