Table of Contents
Advertisement
Quick Links
Advertisement
Table of Contents

Subscribe to Our Youtube Channel
Related Manuals for Insportline Hero B80


Summary of Contents for Insportline Hero B80
- Page 1 USER MANUAL – EN IN 20954 Multi-Purpose Bench inSPORTline Hero B80...
-
Page 2: Table Of Contents
CONTENTS SAFETY INSTRUCTIONS ........................3 SAFETY STICKER ..........................4 BACKREST ANGLE ADJUSTMENT ....................... 5 DIAGRAM ..............................6 PARTS LIST ............................7 ASSEMBLY ............................11 EXERCISE INSTRUCTIONS ........................ 16 ENVIRONMENT PROTECTION ......................17 TERMS AND CONDITIONS OF WARRANTY, WARRANTY CLAIMS ..........17... -
Page 3: Safety Instructions
SAFETY INSTRUCTIONS • Read the manual carefully before assembly and using the device to avoid injury. Instruct other users about security. • Only assemble, maintain and use the product according to the manual. Do not make unauthorized product modifications. • Regularly check all bolts and nuts. -
Page 4: Safety Sticker
SAFETY STICKER... -
Page 5: Backrest Angle Adjustment
BACKREST ANGLE ADJUSTMENT Backrest angles that are safe to use. -
Page 6: Diagram
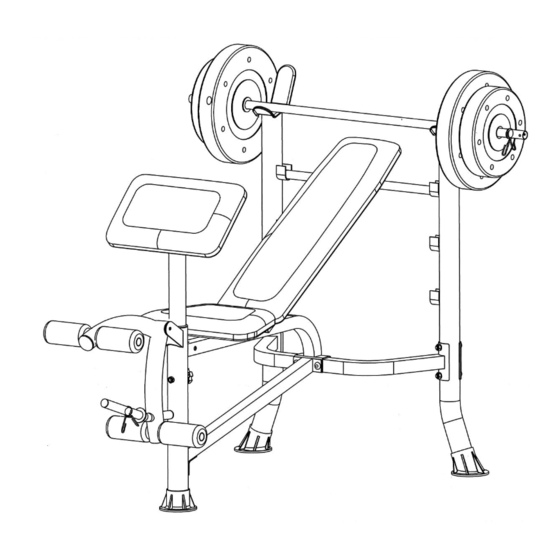
DIAGRAM... -
Page 7: Parts List
PARTS LIST Name Dimensions Qty. Right column Left column Seat frame Connection frame Front column Arm curl column Leg curl Barbell bar Bottom frame Backrest frame Form roller rod Plate M10 x 2 ¾” Knob Weight 25lb 1” x 1” End cap Ø... - Page 8 Ø 5/8” Washer Ø ½” Washer ST5 x 3/8” Screw Hexagonal bolt M6 x 1 1/2” Ø 1” End cap Allen key...
-
Page 11: Assembly
ASSEMBLY STEP 1 ASSEMBLY MATERIAL Attach the feet (17) to the left and right column (1 and 2) with the screw (38). Connect the left and right columns (1 and 2) with connecting frame (4) and 2x plates (12), 4x bolts (29), 4x washers (34) and 4x nuts (39). - Page 12 STEP 2 ASSEMBLY MATERIAL Attach the frame (3) and the frame (9) to the frame (4) and connect them 2x bolts (30), 2x washers (35) and 2x nuts (39). Attach the foot (20) to the front pillar (5). Attach the front pillar (5) to the frames (3 and 9) with 1x bolt (31) and 1x washer (36) on the lower frame (9) and 3x bolts (31) and 3x washers (36) on the upper frame (3).
- Page 13 STEP 3 ASSEMBLY MATERIAL Attach the leg curl frame (7) to the front pillar (5) with 1x bolt (32), 2x washers (36) and nut (40). Attach the foam roller bars (11) and the foam rollers (24) to the leg curl frame (7). Slide the safety sleeve (19) onto the weight pin.
- Page 14 STEP 4 ASSEMBLY MATERIAL Attach the backrest frame (10) to the frame (3). Attach the backrest (27) to the backrest frame (10) with 4x bolts (41) and 4x washers (37). Attach the seat (26) to the frame (3) with 4x bolts (34) and 4x washers (37).
- Page 15 STEP 5 ASSEMBLY MATERIAL Attach the post (6) to the post (5) with the hand knob (13). Attach the arm curl (25) to the post (6) with 2x bolts (31) and 2x washers (36).
-
Page 16: Exercise Instructions
EXERCISE INSTRUCTIONS Exercise is beneficial to your health, improves physical condition, shapes muscles and, in combination with a calorie-balanced diet, leads to weight loss. 1. WARM UP This phase serves to improve the blood circulation of the whole body and to warm up the muscles, to reduce the risk of convulsions and muscle injury. -
Page 17: Environment Protection
Stretching your muscles after exercise is extremely important - you need to avoid sudden movements and vibrations. With improved fitness, you can lengthen and increase exercise intensity. Train regularly, at least three times a week. SHAPING MUSCLES For muscle shaping, it is important to set a high load. The muscles will be more stressed, which may cause that you will not be able to exercise as long as usual. - Page 18 otherwise specified in the Purchase Agreement, in the Amendment to this Contract or in another written agreement. Warranty Conditions Warranty Period The Seller provides the Buyer a 24 months Warranty for Goods Quality, unless otherwise specified in the Certificate of Warranty, Invoice, Bill of Delivery or other documents related to the Goods. The legal warranty period provided to the Consumer is not affected.
- Page 19 26847264 VAT ID: CZ26847264 Phone: +420 556 300 970 E-mail: eshop@insportline.cz reklamace@insportline.cz servis@insportline.cz Web: www.inSPORTline.cz inSPORTline s.r.o. Headquaters, warranty & service center: Električná 6471, Trenčín 911 01, SK CRN: 36311723 VAT ID: SK2020177082 Phone: +421(0)326 526 701 E-mail: objednavky@insportline.sk reklamacie@insportline.sk servis@insportline.sk...
Need help?
Do you have a question about the Hero B80 and is the answer not in the manual?
Questions and answers