Table of Contents
Advertisement
Quick Links
Advertisement
Table of Contents

Related Manuals for Directechs Directed 933.GM11 v1.21.198.12


Summary of Contents for Directechs Directed 933.GM11 v1.21.198.12
- Page 1 933.GM11 DS3+ / DS4+ v1.21.198.12 2019 GMC Savana...
-
Page 2: Table Of Contents
Contents Introduction Vehicle function compatibilities Pre-installation and application warnings Wiring diagram Locating components in the vehicle Vehicle connections Module programming For Security-Only and Convenience-Only programming, see next sections. Module programming for convenience only (skip transponder) Module programming for security-only installations Pairing remotes Connecting the module 8556T Temperature Sensor... -
Page 3: Introduction
This guide provides information on the installation of the DS3/DS3+ and DS4/DS4+ modules as a digital solution. Using these modules in a digital configuration requires the module to be flashed with vehicle-specific firmware. Refer to our website (www.directechs.com) and click on the DIRECTLINK text in the header for additional information. -
Page 4: Vehicle Function Compatibilities
Vehicle function compatibilities This section lists all the functions compatible with this vehicle for the installation illustrated in this guide. Note: The telematics features listed below (with an asterisk) ONLY apply when using SmartStart. Arm Factory Security RAP Shut Down (Retained ACC Power) Disarm Factory Security Remote Start Takeover Door Lock Control... -
Page 5: Pre-Installation And Application Warnings
Pre-installation and application warnings Firmware notes: This section highlights important information for this specific firmware and will assist in pricing accordingly, as well as bringing awareness to any operational or vehicle limitations. T-Harness Keys required for Keys required for compatible programming operation The Cadillac CTS, Chevrolet Impala/Impala Limited and Buick Lucerne require the trunk feature to be set to Electric Rear... -
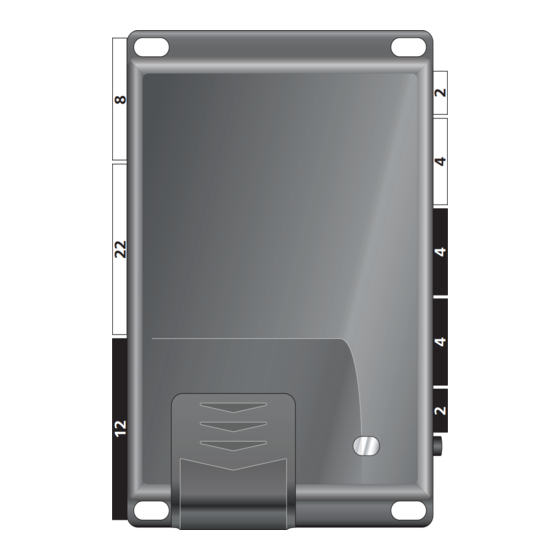
Page 6: Wiring Diagram
Wiring diagram Refer to "Pre-installation and application warnings" for important information, such as the description of each special note referenced in the diagram ( Immobilizer Power: Red/White, pin 1 HS CAN High: pin 6 Immobilizer Single Wire CAN: Dk.Green, pin 1 Control Module OBDII Plug (under ignition switch) -
Page 7: Locating Components In The Vehicle
Locating components in the vehicle Optional starter disable connection When using an external relay, use a 1N4002 diode or larger. 1A Diode [1N4002+] (+) Ignition (-) Ground When Armed (GWA) Output: Blue/White: 2 Refer to the Vehicle connections section for wire Starter (connector side) and connector details. -
Page 8: Vehicle Connections
Vehicle connections The connection information listed below is specific to the 2019 GMC Savana. Refer to “Pre-installation and application warnings” for a list of important notes. Data harness, 8-pin white connector (H1) Module Connects To Conn./Pin Color Description Wire Location (+/-) Wire Color Connection... - Page 9 Module Connects To Conn./Pin Color Description Wire Location (+/-) Wire Color Connection H2/17 Black/White (-) E-Brake Input No Connection H2/18 Orange/Black (+) Instant Alarm Input No Connection H2/19 Blue (-) Trunk Trigger Input No Connection H2/20 Green (-) Door Trigger Input No Connection H2/21 Gray...
- Page 10 Module Connects To Conn./Pin Color Description Wire Location (+/-) Wire Color Connection H4/10 Pink (+) Ignition Input/Output No Connection RF Port harness, 2-pin white connector (H5) Module Conn./Pin Color Description H5/1 RF Loop H5/2 RF Loop D2D harness, 4-pin white (1) and black (2) connectors (H6) Module Conn./Pin Color...
-
Page 11: Module Programming
For information on how to pair a specific remote, please refer to its corresponding owner documentation, which can be found inside the product packaging of the complete system or on www.directechs.com.* DATA/Hardwired Tach Learning: When using Data Tach, it is recommended to follow the Tach Learning procedure. -
Page 12: Module Programming For Convenience Only (Skip Transponder)
Your aftermarket remote may differ from the model shown in the illustrations. You have successfully completed the module programming sequence. 933.GM11 1.21.198.12 2019 GMC Savana... -
Page 13: Module Programming For Security-Only Installations
Your aftermarket remote may differ from the model show in the illustration. You have successfully completed the module programming sequence. 933.GM11 1.21.198.12 2019 GMC Savana... -
Page 14: Pairing Remotes
Pairing Remotes and Sensors To enter pairing: Key OUT Key IN Key IN Key IN Turn the vehicle ignition to the ON position. START START START START Within 10 seconds, on the Control Center (antenna) or the LED/Valet Pod (standalone switch), press and release once (1x), and then press and hold &... -
Page 15: When Used In Conjunction With Smartstart
before providing power to the Directed SmartStart unit: ® SmartStart with Loops – The brown loop must be cut. SmartStart with Pigtails – The gray wire must be connected to a ground source. Loops Pigtails DO NOT connect the Directed SmartStart 2-pin power harness when using the DS3+/DS4+. -
Page 16: Manual Transmission
Honda S2000, Mazda Miata, and other such vehicles. This system supports manual transmission installations. Refer to “Directwire” section at www.directechs.com for further information on vehicle-specific wiring connections. When flashing the module for Manual Transmission on the Directechs website: In the Remote Start Features section, select the desired configurations for Manual Transmission Initialization & Manual Transmission Completion. -
Page 17: Led Diagnostics And Troubleshooting
LED diagnostics and troubleshooting This section provides LED diagnostics and troubleshooting information to guide you through the various stages of your installation. Module Programming Description Troubleshooting Make sure the D2D harness is connected and that 12 Volt is present between the red and black wires. If Module has no power. - Page 18 External Module Synchronization Description Troubleshooting OBDII feature not supported. The diagnostic data bus was not detected, therefore the SmartStart features will be limited. (Flashes red, red, then orange) x 10 Active Ground When Running (Status) Description Troubleshooting Ground When Running (Status) command The module has initialized the remote start sequence.
-
Page 19: Soft Reset
Soft reset A module reset will only erase the steps perfomed in “Module Programming”. The firmware and settings flashed to the module will not be affected. Connect all but the If required for your installation, connect all the harnesses to the module, EXCEPT the 12-pin main 12-pin harness power harness. -
Page 20: Tach Learning Procedure (Not Needed With Virtual Tach)
Tach learning procedure (not needed with Virtual Tach) Data Tach: The procedure is not required as the tach comes preprogrammed. However, it is strongly recommended to learn the exact value of the vehicle for the most consistent and reliable starting and functionality. Hardwired Tach: The procedure is required. -
Page 21: Limited Lifetime Consumer Warranty
Limited Lifetime Consumer Warranty VOXX DEI LLC (the Company) warrants to the original purchaser of this product that should this product or any part thereof, under normal use and conditions, be proven defective in material or work- manship within the Lifetime from the date of original purchase in the original vehicle, such defect(s) will be repaired or replaced with new or reconditioned product, (at the Company’s option) without charge for parts or repair labor. -
Page 22: Quick Reference Guide
Quick Reference Guide Sending commands to your vehicle Pit stop/idle mode Whether you want to remote start the engine, lock/unlock the doors or pop the trunk, Stop the vehicle in a safe parking spot and put the gear in there are 3 possible ways you can send commands to your vehicle, using the: gear in Park (P). - Page 23 SmartStart Bluetooth compatiblity (applicable to DS4/DS4+ ONLY) Notes This system is equipped with a Bluetooth version of SmartStart offering up to 200' of range. The simple graphical interface gives you control over the following features of your installed remote start system or security with remote start system: •...
Need help?
Do you have a question about the Directed 933.GM11 v1.21.198.12 and is the answer not in the manual?
Questions and answers