Mocka Tahoe Assembly Instructions Manual
Change table
Hide thumbs
Also See for Tahoe:
- Assembly instructions manual (14 pages) ,
- Assembly instructions manual (11 pages) ,
- Assembly instructions manual (8 pages)
Advertisement
Quick Links
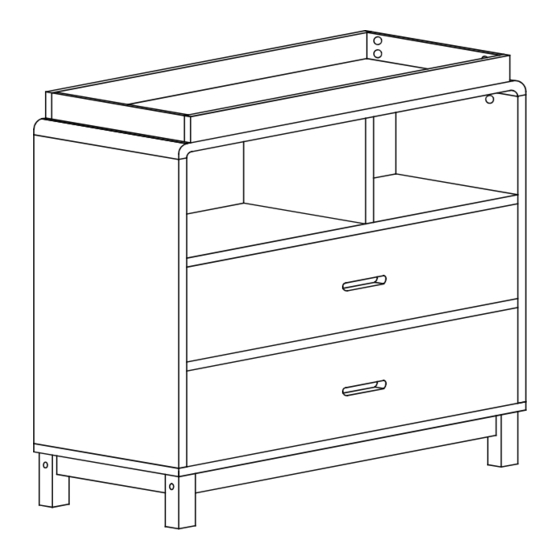
Tahoe Change Table
W A R N I N G
!
• READ all instructions before use of the change
table.
• FALL HAZARD: children have suffered serious
injuries after falling from changing tables. Falls can
happen quickly.
• STAY in arm's reach of your child and NEVER
leave a baby unattended on any change surface.
• ALWAYS keep one hand on the baby when using
the change table to prevent the baby from falling.
• DO NOT use if the product is damaged or broken.
• NEVER allow baby to sleep on the change table.
This item is NOT a safe sleeping surface.
• REMOVE all hazards from the change table area
out of reach of your baby (E.G pins, lotions, toys).
• SUITABLE FOR: newborn to 12 months. Maximum
to 11 kgs.
• READ and follow the manufacturer's instructions
and KEEP for future use.
• USE a changing pad that is 78cm x 46cm x 10cm.
mocka.co.nz I mocka.com.au
!
• WARNING this product is not intended to be used
without a changing pad. use of this product without a
changing pad may result in death or serious injury to
your child from falling.
• WARNING to help avoid any serious or fatal injury,
this product comes included with a wall strap to pre-
vent topping. we strongly recommend that this prod-
uct be permanently fixed to a wall or other suitable
surface by a qualified tradesperson.
• CLEANING & CARE
DO NOT use the product unless all components are
correctly fitted and adjusted. regularly inspect the
change table for maintenance of loose screws etc.
DO NOT use the change table if any part is broken,
torn or missing. contact the manufacturer for further
advice.
WIPE the change table clean using a clean damp cloth
and suitable commercial cleaner.
• ENSURE the changing table is level, stable and struc-
turally sound.
manufactured by: mocka products pty ltd. po box 18,
pinkenba, qld 4008. mocka limited, po box 29335, ric-
carton, christchurch 8440, nz
Advertisement

Related Manuals for Mocka Tahoe


Summary of Contents for Mocka Tahoe
- Page 1 KEEP for future use. turally sound. • USE a changing pad that is 78cm x 46cm x 10cm. manufactured by: mocka products pty ltd. po box 18, pinkenba, qld 4008. mocka limited, po box 29335, ric- carton, christchurch 8440, nz...
-
Page 2: Hardware Supplied
Tahoe Change Table locking nut long screw long screw bolt small screw cover L+R slide rail L+R slide rail HARDWARE SUPPLIED Phillips & Flathead screwdrivers and hammer required For quicker assembly, we recommend theuse of a power drill on a low-speed setting. - Page 3 Tahoe Change Table Insert 4x locking nuts (B) into panel [1] and connect Insert 8x bolts (A) into panels [5]. Tighten with a screwdriver. 2x panels [5] to panel [1] , tighten with a screwdriver. Insert 4x bolts (A) into panel [1], tighten with a screwdriver.
- Page 4 Tahoe Change Table Insert 6x long screws (D) into panel [1] and [6] and [9]. Insert 8x bolts (A) into 2x panels [6]. Tighten with a screwdriver. Connect panel [6] and panel [9] with 8x locking nuts (B). Tighten with a screwdriver.
- Page 5 Tahoe Change Table Connect panel [3] and panel [4] together with panel [11] Insert 8x bolts (A) into panel [3] and [4]. Tighten with a screwdriver. Attach 1x left slide rail (G) to panel [3] and secure with 2x small and panel [12], secure with 8x locking nuts (B).
- Page 6 Tahoe Change Table Connect panel [2] together with panel [3] and panel [4] Insert 6x bolts (A) into panel [2]. Tighten with a screwdriver. and panel [13], secure with 6x locking nuts (B), tighten with a screwdriver. Attach 1x safety strap (W) to panel [13] with 1x screw (Y) and 1x washer (Z).
- Page 7 Tahoe Change Table Connect panels [8] to bottom panel [2] and secure Insert 4x long bolts (C) into 2x panels [7] and connect with 2x panels [8]. Tighten with a screwdriver. with 8x screws (D). Tighten with a screwdriver. mocka.co.nz I mocka.com.au...
- Page 8 Tahoe Change Table Slide panel [14] and [15] between the grooves on panels [3] Insert 2x bolts (A) into panel [11]. Tighten with a screwdriver. Connect 1x panel [10], secure with 2x locking nuts (B), cover and [4] and [13] to form the back of the unit as shown.
- Page 9 Tahoe Change Table Drawer x 2 Insert 6x bolts (A) into panel [16]. Tighten with a screwdriver. Connect table top unit to panel [3] and [4] and [10] and [13], Connect panel [17] & [18] to panel [16], secure with 4x locking secure with 8x locking nuts (B).
- Page 10 Tahoe Change Table Drawer x 2 Move the unit into the desired location up against a wall. Insert 6x bolts (A) into panel [21]. Tighten with a screwdriver. Attach panel [21] to panels [17] and [18] and [19], secure with Use a drill to create a small hole lining up with the top of 6x locking nuts(B).
Need help?
Do you have a question about the Tahoe and is the answer not in the manual?
Questions and answers