PLAYSTAR Play Action Climbing Bar Kit Safety Manual & Assembly Instructions
Hide thumbs
Also See for Play Action Climbing Bar Kit:
- Safety manual & assembly instructions (32 pages)
Advertisement
Quick Links
Play Action
®
Safety Guide & Assembly Instructions
Important!
Intended for residential use by children ages 2 to 10, only on properly installed PlayStar playsets.
Before use refer to complete safety guidelines in your original playset, at www.playstarinc.com, or at 1-888-752-9782.
We're Here To Help!
1-888-752-9782
Call Toll Free
PS 7766
Customer Service: Monday - Friday, 8:00
to 5:00
C.S.T.
A.M.
P.M.
Advertisement

Subscribe to Our Youtube Channel
Related Manuals for PLAYSTAR Play Action Climbing Bar Kit


Summary of Contents for PLAYSTAR Play Action Climbing Bar Kit
- Page 1 Safety Guide & Assembly Instructions Important! Intended for residential use by children ages 2 to 10, only on properly installed PlayStar playsets. Before use refer to complete safety guidelines in your original playset, at www.playstarinc.com, or at 1-888-752-9782. We're Here To Help!
- Page 2 • Thoroughly read all safety instructions before Testing and Materials (ASTM) Home Playground beginning. Safety Standard. In order for PlayStar to comply with the ASTM Standard, we cannot recommend • Children must remain clear of construction site until anyone above these limits.
- Page 3 SAFETY INSTALLATION: seat or single planned activity should The chains or ropes provided are the be allowed on this set at one time, with maximum length designed for the swinging 1. Follow the instructions provided, do not a maximum weight of 105 pounds for element(s).
-
Page 4: Tools Required
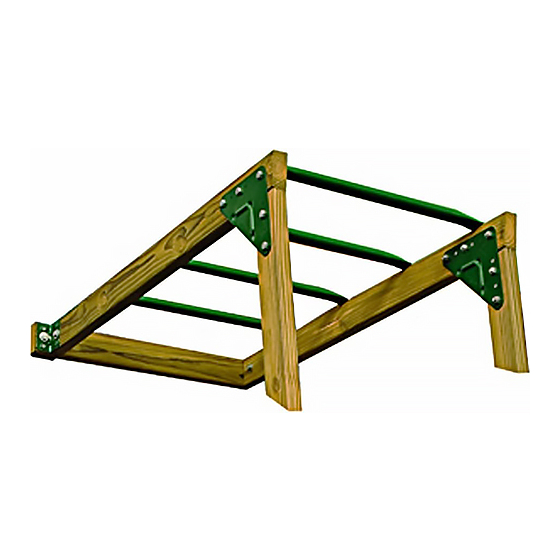
COMPONENTS INCLUDED (not actual size) Corner Brackets (4) Climbing Bars (4) Triangle Brackets (4) TOOLS REQUIRED Level Adjustable Wrench Screwdriver (regular or phillips) Sawhorses (optional) Square Socket Wrench Tape Measure Shovel Pencil Drill Safety Glasses Ladder Hammer HARDWARE INCLUDED (shown actual size) #14 x 1Z\v"... - Page 5 LUMBER LIST and CUTTING GUIDE (PURCHASE SEPARATELY) Go to Compatibility Chart on page 11 to identify your playset STOP design and locate modification pages. This will help you determine materials required to attach the Climbing Bar Kit. 2" x 4" x 8' – three (3) boards required for all playsets except Contender and Super Star (2) boards 96"...
- Page 6 10º angle CLIMBING BAR ASSEMBLY Items for STEP 1: On a flat work surface, lay out the 2" x 4" x 96" and 2" x 4" x 46C|v" boards as shown. (1) 2" x 4" x 96" board or the length required by your application.
- Page 7 Items for STEP 2: On a flat work surface, lay out the 2" x 4" x 96" and 2" x 4" x 46C|v" boards as shown. (1) 2" x 4" x 96" board (1) 2" x 4" x 46C|v" board Lay bracket flat on the board.
- Page 8 Items for STEP 3: Turn Climbing Bar Assembly over. (2) Climbing Bar Assemblies Lay bracket flat on the board. Slide bracket until the stops on the underside (2) Triangle Brackets are tight against the boards as in previous step. (8) #8 x 1Z\v" deck screws (10) C|,"...
- Page 9 Items for STEP 4: (4) Climbing Bars (16) #14 x 1Z|v" pan head screws Attach Climbing Bars at dimensions shown. Make sure to keep assemblies 21Z\x" apart. Use the Climbing Bar as a drill guide and drill Z|," holes 1" deep in the boards Attach with #14 x 1Z|v"...
- Page 10 Items for STEP 5: Attach corner brackets (see details below). Position brackets so that the long sides are against the (2) corner brackets 2" x 4" x 46C|v" board and the short side is flush with the (4) #8 x 1Z\v" deck screws end of the board.
- Page 11 Vertical Climbing Bars NOTE: Climbing Bar Kit only fits a 21Z\x" opening and is designed for PlayStar playsets with a deck height of 48" or 60". Extend Safety Zone and shock-absorbing material a minimum of six feet in all directions from the perimeter of the...
- Page 12 PLAYSET MODIFICATIONS & CLIMBING BAR ATTACHMENT TRAINER - GOLD Remove Climbing Steps. Items for this STEP: (4) #8 X 1Z\v" deck screws (2) C\," x 3" lag screws (2) C\," washers Ground to top of bars 92" Dig into the ground 6½" at the base so the top bars are leveled.
- Page 13 TRAINER - SILVER Attach Corner Brackets Position brackets so that the short sides are Items for this STEP: against the 2" x 4" x 47" board. (2) Corner Brackets Use the brackets as a drill guide and drill Z|," holes (8) #8 x 1Z\v"...
- Page 14 TRAINER - SILVER Remove Climbing Wall. Items for this STEP: (4) #8 x 1Z\v" deck screws (2) C\," x 2" hex bolts (2) C\," washers (2) C\," lock nuts Ground to 80" top of bars Cut boards to dimension shown 84"...
- Page 15 TRAINER - BRONZE & STARTER Remove Vertical Climber. Remove Rock Wall and Items for this STEP: attach to opposite side as shown. (4) #8 x 1Z\v" deck screws (2) C\," x 3" lag screws (2) C\," washers Move rock wall to opposite side Cut boards to dimension shown...
- Page 16 CONTENDER - GOLD, SILVER, BRONZE, STARTER Remove existing Monkey Rings and attachment hardware. Items for this STEP: NO swinging elements, including Monkey Rings, should be attached to overhead (4) Climbing Bars Climbing Bars since they pose a conflicting/ (16) #14 x 1Z\v" pan head screws fall hazard.
- Page 17 LEGACY - SILVER Remove Climbing Wall. Items for this STEP: (4) #8 x 1Z\v" deck screws (2) C\," x 3" lag screws (2) C\," washers 92" Dig into the ground 6Z\x" at the base so the top bars are leveled. Attach Climbing Bar Assembly Lift Climbing Bar Assembly into an upright position at the dimension shown.
- Page 18 LEGACY - BRONZE Remove Climbing Steps. Items for this STEP: (4) #8 x 1Z\v" deck screws (2) C\," x 3" lag screws (2) C\," washers 92" Dig into the ground 6Z\x" at the base so the top bars are leveled. Attach Climbing Bar Assembly Lift Climbing Bar Assembly into an upright position at the dimension shown.
- Page 19 LEGACY - STARTER Remove Vertical Climber. Items for this STEP: (4) #8 x 1Z\v" deck screws (2) C\," x 3" lag screws (2) C\," washers 92" Dig into the ground 6Z\x" at the base so the top bars are leveled. Attach Climbing Bar Assembly Lift Climbing Bar Assembly into an upright position at the dimension shown.
- Page 20 SUPER STAR XP - GOLD Remove existing Monkey Rings and attachment hardware. Items for this STEP: NO swinging elements, including Monkey Rings, should be attached to overhead (4) Climbing Bars Climbing Bars since they pose a conflicting/ (16) #14 x 1Z\v" pan head screws fall hazard.
- Page 21 SUPER STAR XP - SILVER, BRONZE Remove existing Monkey Rings and attachment hardware. NO swinging elements, including Monkey Rings, should Items for this STEP: be attached to overhead Climbing Bars since they pose a conflicting/fall hazard. (4) Climbing Bars (16) #14 x 1Z\v" pan head screws IMPORTANT: The Climbing Bars must be positioned as specified, otherwise a head entrapment could exist.
- Page 22 (4) C\," washers Silver Only (2) C\," x 3½" hex bolts Remove Vertical Climber. included with original PlayStar Playset. Attach Climbing Bar Assembly Cut boards to a length of 80". Lift Climbing Bar Assembly into an upright position at the dimension shown.
- Page 23 ALL-PRO - GOLD & SILVER Remove existing Climbing Bars from tower. Items for this STEP: (4) #8 x 1Z\v" deck screws (2) C\," x 2" hex bolts (2) C\," lock nuts (2) C\," washers 87" 83" Cut boards to dimension shown. Attach Climbing Bar Assembly Dig into the ground 6Z\x"...
- Page 24 ALL-PRO - BRONZE & STARTER Remove Slide. Items for this STEP: Remove existing Climbing Bars from tower. Remove 2" x 4" x 38C\v" board. (4) #8 x 1Z\v" deck screws Reattach Slide to tower opening where Climbing Bars were attached. (2) C\,"...
- Page 25 GRAND SLAM - SILVER & STARTER Remove existing Wood Rock Wall from tower. Items for this STEP: (4) #8 x 1Z\v" deck screws (2) C\," x 2" hex bolts (2) C\," lock nuts (2) C\," washers Cut boards to dimension shown. 83"...
- Page 26 GRAND SLAM - BRONZE Remove Slide. Remove 2" x 4" x 38C\v" board. Items for this STEP: Reattach Slide to Adventure Tunnel. Follow instructions provided with your Slide to attach to tunnel. (4) #8 x 1Z\v" deck screws (2) C\," x 2" hex bolts (2) C\,"...
-
Page 27: Accessory Attachments
ACCESSORY ATTACHMENTS CLIMBING BARS IMPORTANT: These Climbing Bars may or may not be from The Climbing Bars must be positioned as existing playset. Attach Climbing Bars at specified, otherwise a head entrapment dimensions from ground as shown. could exist. 36" 48"... - Page 28 CLIMBING WALL Use the screws provided to attach the three boards at the dimensions Items for this STEP: shown. (2) 2" x 4" x 24Z\x" board (1) 2" x 4" x 21Z\x" board (15) #8 x 2Z\x" deck screws Detail for board placement. Flush 42”...
- Page 29 1. Align top of Climbing Wall at right angle 90˚). Lip of 5. Reinstall Climbing Wall permanently, attaching it to climbing wall should rest on the play deck 1Z|x". Using play deck using #14 x 1Z|v" pan head screws provided. the Climbing Wall as a template, mark play deck through the three holes in the climbing wall.
- Page 30 CLIMBING STEPS Use the screws provided to attach the two boards at the dimensions Items for this STEP: shown. (2) 2" x 4" x 24Z\x" board (8) #8 x 2Z\x" deck screws Back detail for board placement. 48” Bottom board should be tight against the ground Dig into the ground so top bars are...
- Page 31 1. Place the left (L) step side rail on a flat work surface. Insert one 2" x 6" x 21" top step into the top hole. Note: This hole does not go completely through the side rail. 2. Insert three 2" x 6" x 23Z\x" standard steps into the remaining holes until they are flush with the outside of the side rail.
- Page 32 VERTICAL CLIMBER Use the screws provided to attach the three boards at the dimensions Items for this STEP: shown. (2) 2" x 4" x 24Z\x" board (1) 2" x 4" x 21Z\x" board (15) #8 x 2Z\x" deck screws Back detail for board placement. Flush 45¹⁄₂”...
- Page 33 VERTICAL CLIMBER Cont. 1. Position Vertical Climber so that the top is flush with the top of the deck and mark pilot holes. 2. Drill Z|," holes 1" deep into the board. 3. Attach with five #14 x 1Z|v" pan head screws (provided) on each side.
- Page 34 (2) C|," x 3Z|x" galvanized hex bolts See detail. (2) C|," galvanized washers (2) C|," galvanized nuts Reattach Playset Anchor to Wood Rock Wall following directions provided with your original PlayStar instructions. 45" 2" x 4" x 24Z|x" Bottom board should be tight against the ground.
- Page 35 ANCHORING Items for this STEP: (1) Playset Anchors PS 7690 (sold separately) (2) C|," x 2" lag screws (provided with PS 7690) (2) C\," washers (provided with PS 7690) At locations shown screw Playset Anchors into ground by hand (a long screwdriver will help). Use the anchor as a drill guide and drill a Z\v"...
- Page 36 PlayStar, Incorporated, Janesville, WI 53547 © 2014, 2009, 2007, PlayStar, Inc. Reproduction of this document in part or whole is prohibited without the permission of PlayStar, Inc. Protected by one or more of the following United States or Foreign Patents: US D418,189; US D409,708; US D424,154; US D428,637; US 6,402,663; US D422,332; US D410,059;...
Need help?
Do you have a question about the Play Action Climbing Bar Kit and is the answer not in the manual?
Questions and answers