
Related Manuals for PLAYSTAR Little Sprout Grow With Me Toddler Tunnel


Summary of Contents for PLAYSTAR Little Sprout Grow With Me Toddler Tunnel
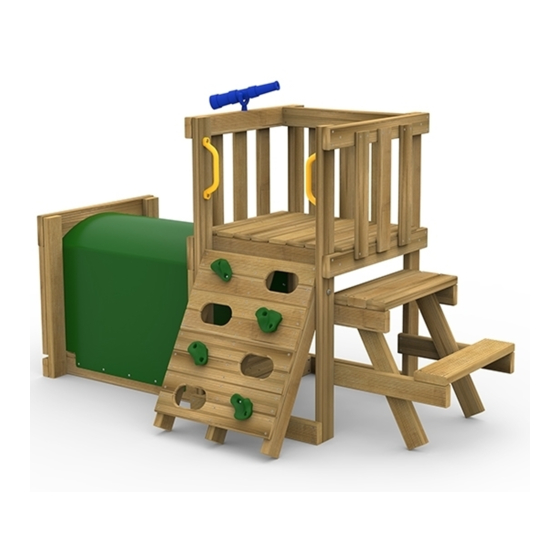
- Page 1 Grow With Me PlaySet Toddler Tunnel Safety Guide & Assembly Instructions Shown with optional Slide 1-888-752-9782 We’re Here To Help! Call Toll Free PS 8878 Customer Service: Monday - Friday, 8:00 A.M. to 5:00 P.M. C.S.T.
- Page 2 • Thoroughly read all safety instructions before Testing and Materials (ASTM) Home Playground beginning. Safety Standard. In order for PlayStar to comply with the ASTM Standard, we cannot recommend • Children must remain clear of construction site until anyone above these limits.
-
Page 3: Installation
SAFETY INSTALLATION: 2. Only one child, for each single planned 4. Dress children appropriately and do not seat or single planned activity should allow them to wear inappropriate items, 1. Follow the instructions provided, do not be allowed on this set at one time, with such as but not limited to, loose fitting alter its design in any way. - Page 4 COMPONENTS INCLUDED (not actual size) Climbing Anchor Auger (2) Rocks (4) Play Handles (2) Tunnel (1) Drill Template (1) Telescope (1) Corner Bracket (2) Assembly Tool Kit (1) TOOLS REQUIRED Level Adjustable Wrench Safety Glasses Square Socket Wrench Screwdriver (regular or phillips) Pencil Drill Shovel...
- Page 5 BOARDS INCLUDED Before starting to assemble your playset, make sure all boards and hardware are identified and stacked by size. This will improve your assembly time. All boards are identified by “nominal” dimensions. The “actual” width and thickness of boards will vary. During assembly process, hide the marked end of the board to the inside so it is not visible on your completed playset.
- Page 6 PLEASE NOTE: Letters represent pattern not position Note: When the PlayStar logo is showing, the three tabs on the bottom will position the template square with any two edges. When the arrow is showing, the two tabs on the bottom will position the template square with one edge only, which will allow you to slide the template anywhere along the board.
- Page 7 PLEASE NOTE (Letters represent pattern not position) Patterns can be created anywhere along the board by turning the template over (arrow side up) and sliding it to the desired 2" x 4" position. Use the shaded holes for that pattern. 1"...
- Page 8 Items for STEP 1: 2" x 4" x 24Z\v" board 2" x 4" x 33Z\v" board 2" x 4" x 46C\v" boards #8 x 2Z\x" deck screws 28¹⁄₄" 90º 90º 90º Flush On a flat work surface, lay out two 2" x 4" x 46C\v" boards 24Z\v"...
- Page 9 Items for STEP 3: STEP 1 assembly STEP 2 assembly Stand left (Step 1) and right side (Step 2) 2" x 4" x 28" board assemblies up as shown approximately 28" apart. 2" x 4" x 33Z\v" board #8 x 2Z\x" deck screws Pre-drill the 2"...
- Page 10 Items for STEP 4: 2" x 4" x 21Z\x" board #8 x 2Z\x" deck screws Pre-drill the 2" x 4" x 21Z\x" board at the dimensions shown. Attach pre-drilled 2" x 4" x 21Z\x" board as shown. Make sure assembly remains square while securing with #8 x 2Z\x"...
- Page 11 Items for STEP 5: (11) 1" x 4" x 21M\zn" boards (66) #8 x 1Z\x" deck screws Attach eleven pre-drilled and countersunk 1" x 4" x 21M\zn" boards. Attach the end boards first, flush with the 2" x 4" x 21Z\x" 1"...
- Page 12 Items for STEP 7: 2" x 4" x 28" board #8 x 2Z\x" deck screws Flush Attach 2" x 4" x 28" board flush with the top of 2" x 4" x 24Z\v" and sides as shown. Secure with #8 x 2Z\x" deck screws. SEE PAGES 6 AND 7 FOR HOLE PATTERNS Items for STEP 8:...
- Page 13 Items for STEP 9: 2" x 4" x 24Z\v" board #8 x 2Z\x" deck screws 2" x 6" x 28" arched board Attach 2" x 4" x 24Z\v" Flush board, centered and flush, with the top of the 2" x 4" x 28" and the 2"...
- Page 14 Items for STEP 11: 2" x 4" x 19" boards #8 x 2Z\x" deck screws Attach two 2" x 4" x 19" boards flush with the sides of the opening as shown. Secure with #8 x 2Z\x" deck screws. Flush 2"...
- Page 15 Items for STEP 13: 1" x 4" x 18 ZZ\zn" boards (12) #8 x 1Z\x" deck screws Attach three 1" x 4" x 18 ZZ\zn" boards at dimensions shown. Equally space the boards. 1" Secure with #8 x 1Z\x" deck screws.
- Page 16 STOP If you are attaching a slide to the Toddler Tunnel, TWO sides of the upper decking must STOP remain open. One for the Slide and one for the Rock Wall. Decide where to place the rock wall and the slide. Enclose the remaining side, following the steps in the next pages.
- Page 17 ENCLOSE FRONT Items for STEP 14A: 2" x 4" x 28" board Flush #8 x 2Z\x" deck screws Attach 2" x 4" x 28" board flush with the top and sides as shown. Secure with #8 x 2Z\x" deck screws. SEE PAGES 6 AND 7 FOR HOLE PATTERNS Items for STEP 15A:...
- Page 18 ENCLOSE LEFT HAND SIDE Flush Items for STEP 14B: 2" x 4" x 24Z\v" board #8 x 2Z\x" deck screws Attach 2" x 4" x 24Z\v" board flush with the top and sides as shown. Secure with #8 x 2Z\x" deck screws.
- Page 19 ENCLOSE RIGHT HAND SIDE Flush Items for STEP 14C: 2" x 4" x 24Z\v" board #8 x 2Z\x" deck screws Attach one 2" x 4" x 24Z\v" board flush with the top and sides as shown. Secure with #8 x 2Z\x" deck screws. SEE PAGES 6 AND 7 FOR HOLE PATTERNS Items for STEP 15C:...
- Page 20 ROCK WALL ATTACHMENT If you are attaching the Rock Wall to either side of the platform, continue following these instructions. If you are attaching the Rock Wall to the front of the platform, skip to Step 16B. (Page 24) If you are attaching the Rock Wall to the opposite side of the one shown here, continue following these instructions just mirroring the components.
- Page 21 Items for STEP 17A: C\," x 4Z\x" hex bolt C\," x 3Z\x" hex bolt C\," washers C\," lock nuts Secure the top of each board with one C\," hex bolt, C\," washers and C\," lock nut. Use a C\," x 3Z\x" hex bolt on the 2X boards thick side and a C\,"...
- Page 22 Items for STEP 18A: 2" x 4" x 28" board 1" x 4" x 21M\zn" C-O boards (12) #8 x 1Z\x" deck screws Attach two pre-drilled and countersunk 1" x 4" x 21M\zn" C-O boards as shown. Secure each board with #8 x 1Z\x" deck screws.
- Page 23 Items for STEP 19A: 1" x 4" x 21M\zn" C-O boards (36) #8 x 1Z\x" deck screws Attach the six pre-drilled and countersunk 1" x 4" x 21M\zn" C-O boards as shown. Start at the top and keep boards tight to each other.
- Page 24 Position two brackets 22Z|x" up from bottom of tower with the Corner Brackets long side of the brackets (w/PlayStar logo) against the #8 x 1Z\v" deck screws 2" x 4" x 46C\v" boards and the short side flush with the inside C\,"...
- Page 25 Items for STEP 17B: 2" x 4" x 28" boards #8 x 1Z\v" deck screws C\," x 2" hex bolts C\," washers C\," lock nuts Attach two 2" x 4" x 28" boards to corner brackets as shown. Bottom corner of board must rest on the ground and the top corner of board must be flush with the front of the 2"...
- Page 26 Items for STEP 19B: 1" x 4" x 21M\zn" C-O boards (36) #8 x 1Z\x" deck screws Attach the six predrilled and countersunk 1" x 4" x 21M\zn" C-O boards as shown. Start at the top and keep boards tight to each other.
- Page 27 PICNIC TABLE ATTACHMENT If you are attaching the Picnic Table to the front of the platform, continue following these instructions. If you are attaching the Picnic Table to either side of the platform, skip to Step 20B. (Page 29) Picnic Table Attachment To Front Items for STEP 20A: Note: Picnic table not to be used as a step.
- Page 28 Items for STEP 21A: 2" x 4" x 21Z\x" boards #8 x 2Z\x" deck screws Position 2" x 4" x 21Z\x" boards 4" at an angle so that the front corner is flush with the top Flush surface and 4" from the front end of the 2"...
- Page 29 Items for STEP 23A: 2" x 6" x 21Z\x" board #8 x 2Z\x" deck screws Position the 2" x 6" x 21Z\x" board flush with the ends of the 2" x 4" x 20Z\," boards as shown. Attach with #8 x 2Z\x" deck screws.
- Page 30 Items for STEP 21B: 2" x 4" x 21Z\x" boards #8 x 2Z\x" deck screws Position 2" x 4" x 21Z\x" boards at an angle so that the front 4" corner is flush with the top Flush surface and 4" from the front of the 2"...
- Page 31 Items for STEP 23B: 2" x 6" x 21Z\x" board #8 x 2Z\x" deck screws Position the 2" x 6" x 21Z\x" board flush with the ends of the 2" x 4" x 20Z\," boards as shown. Attach with #8 x 2Z\x" deck screws.
- Page 32 Then skip to the components section (Page 40). If you are attaching your Toddler Tunnel to a PlayStar Playhouse or Playset, follow the Add-On instructions in the section of this book (beginning on page 36). Then skip to the...
- Page 33 STAND-ALONE Items for STEP 24: 2" x 4" x 28" boards (10) #8 x 2Z\x" deck screws Shown without activities Attach one 2" x 4" x 28" board centered with the decking and flush with the bottom as shown. Attach 2" x 4" x 28" boards to the 2"...
- Page 34 Items for STEP 26: 2" x 4" x 19" boards #8 x 2Z\x" deck screws Attach two 2" x 4" x 19" boards flush with the sides of the opening as shown. Secure with #8 x 2Z\x" deck screws. Shown with two sides open 2"...
- Page 35 Items for STEP 27: Tunnel (36) #8 x B\," truss head screws Position the tunnel into the opening as shown. Make sure the tunnel is fully inserted and the flanges are firmly resting against the lumber and the ends are flush with the sides of the lumber as shown. Find the center of the arch and line it up with the screw hole at the top of the tunnel.
- Page 36 ADD-ON — ATTACHING TO PLAYSTAR PLAYHOUSE Items for STEP 24: Inside View #8 x 2Z\x" deck screws Bring the assembly from previous step to its final position as shown. Make sure the back of the decking frame is fully inserted into the Playhouse entryway opening without any gap in between as shown.
- Page 37 Items for STEP 25: 2" x 6" x 28" arched board #8 x 2Z\x" deck screws From inside of Playhouse attach one 2" x 6" x 28" arched board at the dimension shown, flush with the side of the upright boards as shown.
- Page 38 Items for STEP 27: Tunnel (36) #8 x B\," truss head screws Position the tunnel into the opening as shown. Make sure the tunnel is fully inserted and the flanges are firmly resting against the lumber and the ends are flush with the sides of the lumber as shown.
- Page 39 ADD-ON — ATTACHING TO PLAYSTAR PLAYSET Due to SAFETY Standards the Toddler Tunnel may or may not be attached to a PlayStar Playset; it depends on the specific Model and Design Option. For information regarding your specific PlayStar playset and design option, please call us toll free at 1-888-PLAYSTAR (752-9782).
- Page 40 COMPONENTS – Mounting Instructions PLAY HANDLES DISCOVERY TELESCOPE 1. Position Play Handle 1. Determine desired location for at desired location. pivot. 2. Mark pilot holes. 2. Drill a Z\," diameter hole 1" deep. 3. Drill Z|," holes 1" deep. 3. Fasten pivot with #8 x 2Z\x" deck 4.
- Page 41 Assembly Instructions PS 8817 or PS 8818 Scoop Wave Slide - 2 Piece (Optional) 1. On a flat work surface lay the two pieces together, upside down as shown. 2. Secure the two pieces together with ten C\," x 1" hex bolts, C\," washers and C\," lock nuts as shown.
- Page 42 Mounting Instructions PS 8813 Scoop Slide, PS 8814 Scoop Wave Slide, or PS 8817 and PS 8818 Scoop Wave Slides - 2 Piece (Optional) Align Slide at right angle (90°) to platform. Lip of Slide should rest on the platform 1Z|x". Using the Slide as a template, mark platform through the three holes in the Slide.
- Page 43 ANCHORING At the base of the Rock Wall, screw Playset Anchor into ground by hand (a long screwdriver will help). Use the anchor as a drill guide and drill a Z\v" hole 1" deep into the board. Attach with C|," x 1Z|x" lag screw and C|,"...
-
Page 44: Important - Please Read
PlayStar, Incorporated, Janesville, WI 53547 © 2015, 2009 PlayStar, Inc. Reproduction of this document in part or whole is prohibited without the permission of PlayStar, Inc. Protected by one or more of the following United States or Foreign Patents: US D418,189; US D409,708; US D424,154; US D428,637; US 6,402,663; US D422,332; US D410,059;...
Need help?
Do you have a question about the Little Sprout Grow With Me Toddler Tunnel and is the answer not in the manual?
Questions and answers