
Related Manuals for Next Level Racing GT LITE PRO


Summary of Contents for Next Level Racing GT LITE PRO
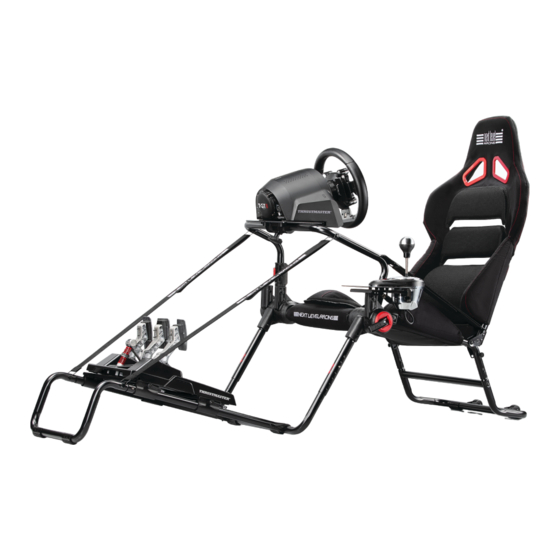
- Page 1 T A K E R A C I N G T O T H E N E X T L E V E L® Video Instruction: bit.ly/nlrbuild LITE INSTRUCTION MANUAL ELECTRONICS NOT INCLUDED...
- Page 2 T O T H E N E X T L E V E L® instruction booklet to fully optimize your product. N E X T L E V E L R A C I N G . C O M ASSEMBLY VIDEO bit.ly/nlrbuild @next_level_racing @nextlevelracingOfficial @nextlvlracing Next Level Racing FOLLOW support@nextlevelracing.com...
- Page 3 Video Instruction: bit.ly/nlrbuild support@nextlevelracing.com PRE-RACE IN THE CHECKS *NOT TO SCALE WARNING • Please do not use power tools for assembly as over tightening can damage your frame. • Do not adjust the Hubs while sitting in cockpit. • Make sure the Hubs are tightened fully before using the cockpit (Spin the Hub clockwise to ensure it is fully tight). •...
-
Page 4: Assembly Process
Video Instruction: bit.ly/nlrbuild support@nextlevelracing.com USING NLR LITE SERIES HUBS Do not adjust the hubs while user is sitting in cockpit, Make sure user is out 4 x REMOVABLE BUCKLES of the cockpit before adjusting. 1 x SHIFTER PLATE 1 x HANDBRAKE PLATE 2 x STRENGTHENING STRAPS (pre-installed) Electronic's Hardware... - Page 5 Video Instruction: bit.ly/nlrbuild support@nextlevelracing.com Repeat on Other Side Repeat Repeat on Other on Other Side Side A) Pull out the reclining knobs. B) Unfold the Backrest. C) Release the reclining knob to lock the Backrest in A) Uninstall the bolts and nuts from the Backrest Bottom Tube reclining hinges. B) Align the mounting holes on the Backrest place.
- Page 6 Video Instruction: bit.ly/nlrbuild support@nextlevelracing.com NOTE: The tight fit between the Inclined Pedals parts was designed to reduce flex and enhance driving performance. 15˚ Flat Pedals 0˚ Insert the Pedal Front Tube into the Pedal Frame. Press the spring-loaded pin and slide the tube onto the frame A) Remove the bolt and nut pre-installed in the Wheel Plate Socket.
- Page 7 Video Instruction: bit.ly/nlrbuild support@nextlevelracing.com NOTE: The shifter plate can be installed Repeat on either the Left or on Other the Right side. Side A) Remove the bolt and nut preinstalled in the Shifter Socket. B) Align the Shifter and Handbrake Plate assembly Connect the Strengthening Straps to the Wheel Plate Tube.
- Page 8 Video Instruction: bit.ly/nlrbuild support@nextlevelracing.com WHEEL PLATE - DISTANCE ADJUSTMENT BACKREST - HEIGHT ADJUSTMENT User Height A) Uninstall the 4 x bolts securing the Wheel Plate to the Wheel Plate Tube. B) Move the Wheel Plate forward (tall Press the spring-loaded pin and pull up or push down the top of the Backrest to choose your desired height. users) or back (short users).
- Page 9 Video Instruction: bit.ly/nlrbuild support@nextlevelracing.com FRONT LEG - HEIGHT ADJUSTMENT REINFORCED LEGS User Height To increase the rigidity of your cockpit you can use one or both of the Packaging Straps to connect the Front Leg Simultaneously press the spring-loaded pins on the sides of the Front Leg and adjust the Main Frame up to increase the distance to pedals.
- Page 10 Video Instruction: bit.ly/nlrbuild support@nextlevelracing.com The cockpit with all the peripherals is a heavy object, proceed with caution. Repeat on Other Side Repeat on Other Side Undo the Hub’s cam levers and rotate anti-clockwise to allow the Hubs to spin freely. Grab the Wheel Plate tube Pull both Backrest reclining knobs outwards and completely release the Backrest from the hinge to allow free and the top of the Backrest as shown.
- Page 11 Video Instruction: bit.ly/nlrbuild support@nextlevelracing.com WARNING Do not use power tools for assembly as over tightening can damage the frame. Do not adjust the Hubs while sitting in cockpit. Make sure the Hubs are tightened fully before using the cockpit. Spin the Hub's cam levers clockwise to ensure the Hubs are fully tight. Use the Strengthening Straps to secure all parts together.
- Page 12 Paso 10: consulte la imagen. A) Abra el pestillo de la placa de la rueda. B) Gire el tubo de la placa de la rueda. C) Asegúrelo en su lugar cerrando el pestil- MANUAL DE INSTRUCCIONES GT LITE PRO Paso 11: consulte la imagen. A) Retire el perno y la tuerca preinstalados en el casquillo de la palanca de cambios. B) Alinee el conjunto de la placa del TU VIAJE SIM RACING COMIENZA AQUÍ...
- Page 13 été conçu pour réduire la flexion et améliorer les performances de conduite. Étape 10 - Reportez-vous à l'image. A) Ouvrez le loquet de la plaque de roue. B) Faites pivoter le tube de la plaque de roue. C) Fixez-le en place en MANUEL D'INSTRUCTIONS GT LITE PRO fermant le loquet.
- Page 14 Stap 10 - Raadpleeg de afbeelding. A) Open de wielplaatvergrendeling. B) Zwaai de wielplaatbuis. C) Zet hem op zijn plaats vast door de vergrendeling GT LITE PRO-INSTRUCTIEHANDLEIDING te sluiten. Stap 1 1 – Zie afbeelding. A) Verwijder de bout en moer die vooraf in de schakeldop zijn gemonteerd. B) Lijn de versnellingspook en handremplaat JE SIM-RACREIS BEGINT HIER uit met de schakelmof van uw keuze.
- Page 15 Passaggio 10: fare riferimento all'immagine. A) Aprire il fermo della piastra della ruota. B) Oscillare il tubo della piastra della ruota. C) Fissarlo in posizione chiudendo il fermo. MANUALE DI ISTRUZIONI GT LITE PRO Passaggio 11: fare riferimento all'immagine. A) Rimuovere il bullone e il dado preinstallati nella presa del cambio. B) Allineare il gruppo della piastra del cambio e del freno a mano con la presa del cambio scelta.
- Page 16 C) Verschrauben und sichern Sie es mit der zuvor in Schritt 9A deinstallierten Hardware. HINWEIS: Die enge Passung zwischen den Teilen wurde entwickelt, um die Biegung zu reduzieren und die Fahrleistung zu verbessern. GT LITE PRO BEDIENUNGSANLEITUNG Schritt 10 – Siehe Bild. A) Öffnen Sie die Radplattenverriegelung. B) Schwenken Sie das Radplattenrohr. C) Sichern Sie es, indem Sie die Verriegelung schließen.
- Page 17 ステップ 11 – 写真を参照してください。 A) シフターソケットにあらかじめ取り付けられているボルトとナットを取り外します。 B) シフターとハンドブレーキ プレー JP - 日本 トのアセンブリを、 お好みのシフター ソケットに合わせます。 シフターソケットにあらかじめ取り付けられているハードウェアを使用してボルトで固定します。 注: シ フター プレートは、 左側または右側に取り付けることができます。 ステップ 12 – 写真を参照してください。 上の写真の指示に従って、 ホイールプレート強化ストラップを取り付けます。 コックピットの損傷を避けるため、 締めすぎな GT LITE PRO 取扱説明書 いでください。 警告 締めすぎないでください。 ステップ 13 – 写真を参照してください。 強化ストラップをホイール プレート チューブに接続します。 調整時にフレームが地面から浮き上がらないように、 足をペダ SIM レーシングの旅はここから始まります ルに乗せてコックピットに座った状態でこれらのストラップを調整します。...
- Page 18 Passo 11 – Consulte a imagem. A) Remova o parafuso e a porca pré-instalados no soquete do câmbio. B) Alinhe o conjunto do câmbio e da placa do freio MANUAL DE INSTRUÇÕES GT LITE PRO de mão com o soquete do câmbio de sua escolha. Aparafuse e prenda usando o hardware pré-instalado nos soquetes do câmbio. NOTA: A placa do câmbio pode ser instalada no lado esquerdo ou direito.
- Page 19 Шаг 10 – Обратитесь к картинке. A) Откройте защелку колесной пластины. B) Поверните трубку колесной пластины. C) Закрепите его на месте, закрыв защелку. GT LITE PRO РУКОВОДСТВО ПО ЭКСПЛУАТАЦИИ Шаг 11 – Обратитесь к картинке. A) Снимите болт и гайку, предварительно установленные в гнезде переключателя передач. B) Совместите...
- Page 20 Adım 12 – Resme bakın. Yukarıdaki resimlerdeki gösterimleri izleyerek Tekerlek Plakası güçlendirme kayışını takın. Kokpite zarar vermemek için aşırı sık- GT LITE PRO KULLANIM KILAVUZU mayın. UYARI Aşırı sıkmayın. Adım 13 – Resme bakın. Güçlendirme Kayışlarını Tekerlek Plakası Borusuna bağlayın. Ayarlama sırasında çerçevenin yerden kalkmasını önlemek için bu SIM YARIŞ...
- Page 21 Krok 12 – viz obrázek. Nainstalujte zpevňující popruh kotouče podle pokynů na obrázcích výše. Neutahujte příliš, aby nedošlo k poškození kokpitu. VAROVÁNÍ Neutahujte příliš. GT LITE PRO NÁVOD K POUŽITÍ Krok 13 – viz obrázek. Připojte zpevňovací popruhy k trubce kotouče. Nastavte tyto popruhy, když sedíte v kokpitu s nohama položenými na pedálech, abyste zabránili zvednutí...
- Page 22 UWAGA: Płytkę dźwigni zmiany biegów można zamontować po lewej lub prawej stronie. INSTRUKCJA OBSŁUGI GT LITE PRO Krok 12 – Patrz rysunek. Zamontuj pasek wzmacniający tarczę koła, postępując zgodnie ze wskazówkami na powyższych ilustracjach. Nie dokręcaj zbyt mocno, aby uniknąć...
- Page 23 .هديرت يذلا عافت ر الا رايتخال لفسأل هعفدا وأ ىلعأل رهظلا دنسم نم يولعلا ءزجلا بحساو ضبانب ل ّ محملا سوبدلا ىلع طغضا .ةروصلا ىلإ عوجرلا - 71 ةوطخلا تاميلعتGT LITE PRO اهتيبثتل ريماسملا تيبثت دعأو ةفلتخملا ةثالثلا تيبثتلا تاحتف نم ا ً يأ رتخا .يسيئرلا راطإلاب ةيفلخلا قاسلا تبثت يتلا ليماوصلاو يغاربلا كفب مق .ةروصلا ىلإ عوجرلا - 81 ةوطخلا...
- Page 24 CN - 简体中文 第 22 步 – 参考图片。 在折叠驾驶舱之前断开所有带子。 第 23 步 – 参考图片。 松开轮毂的凸轮杆并逆时针旋转以使轮毂自由旋转。 如图所示, 抓住轮板管和靠背的顶部。 警告:带有所有外围设备的驾驶舱是重物, 请 谨慎操作。 GT LITE PRO 使用说明书 第 22 步 – 参考图片。 折叠序列。 在折叠驾驶舱之前断开所有带子。 第 23 步 – 参考图片。 松开轮毂的凸轮杆并逆时针旋转以使轮毂自由旋转。 如图所示, 抓住轮板管和靠背的顶部。 警告:带所有外设的驾驶舱是重物, 小心操作 您的模拟赛车之旅从这里开始...
- Page 25 support@nextlevelracing.com support@nextlevelracing.com...
Need help?
Do you have a question about the GT LITE PRO and is the answer not in the manual?
Questions and answers