
Related Manuals for Next Level Racing GT ELITE LITE


Summary of Contents for Next Level Racing GT ELITE LITE
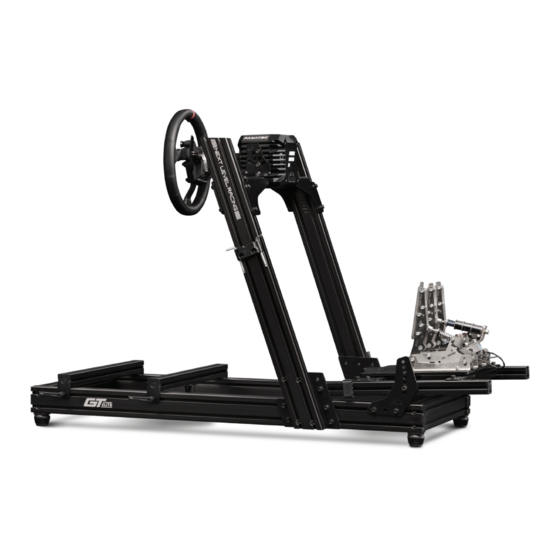
- Page 1 T A K E R A C I N G T O T H E N E X T L E V E L® Video Instruction: bit.ly/nlrbuild INSTRUCTION MANUAL *ELECTRONICS NOT INCLUDED...
- Page 2 T O T H E N E X T L E V E L® instruction booklet to fully optimize your product. N E X T L E V E L R A C I N G . C O M ASSEMBLY VIDEO bit.ly/nlrbuild @next_level_racing @nextlevelracingOfficial @nextlvlracing Next Level Racing FOLLOW support@nextlevelracing.com...
- Page 3 Video Instruction: bit.ly/nlrbuild support@nextlevelracing.com PRE-RACE IN THE CHECKS *NOT TO SCALE WARNING • Please do not use power tools for assembly as over tightening can damage your frame. • If you require further support, consult the installation video or contact us at support@nextlevelracing.com •...
- Page 4 Video Instruction: bit.ly/nlrbuild support@nextlevelracing.com MOUNTING BRACKETS PEDAL ADJUSTMENT FINS 34 x M8 16mm BOLTS 10 x M8 20mm BOLTS 8 x M8 35mm BOLTS 8 x M8 40mm BOLTS 4 x M8 16mm COUNTERSUNK BOLTS 5 x M8 14mm LOW PROFILE BOLTS LARGE PEDAL PLATE SMALL PEDAL PLATE WHEEL POST CONNECTION PLATES...
- Page 5 Video Instruction: bit.ly/nlrbuild support@nextlevelracing.com ALUMINIUM EXTRUSION TIPS Note: For easier installation hand • Please do not use power tools for assembly as over tightening can damage your frame. screw M8 bolt into T-Nut to assist sliding T-Nut into channel. • Please ensure T-Nuts are correctly placed within the extrusion.
- Page 6 Video Instruction: bit.ly/nlrbuild support@nextlevelracing.com PARTS: FRONT • • 4 x M8 40mm Bolts Note: For easier installation hand screw M8 bolt in to T-Nut to assist sliding T-Nut into channel. • • 4 x M8 Washers RIGHT REAR FRONT Align the threaded holes on the Front and Rear Base Members with the pre-drilled holes on the Right LEFT Base Member.
- Page 7 Video Instruction: bit.ly/nlrbuild support@nextlevelracing.com PARTS: PARTS: • • 4 x T-Nuts • • Wheel Post Connection Plates Note: Counterbore holes facing outside • • 8 x M8 35mm Bolts • • 4 x Adjustable Feet • • 8 x M8 Washers •...
- Page 8 Video Instruction: bit.ly/nlrbuild support@nextlevelracing.com PARTS: PARTS: ALTERNATE PEDAL INSTALLATION OUTSIDE VIEW TOP VIEW Repeat • • 8 x T-Nuts • • 2 x M8 20mm Bolts FOR SHORTER USERS on Other Side PRE-DRILLED HOLE • • 2 x M8 Washers LEFT •...
- Page 9 Video Instruction: bit.ly/nlrbuild support@nextlevelracing.com PARTS: PARTS: PEDAL ADJUSTMENT RANGE • • NIL • • 2 x Seat Sliders • • 4 x Seat Slider • • 4 x M8 Counter End Plates sunk Bolts • • 4 x Sticky Felt Pads (35mm x 40mm) Butt-Kicker T-Nut Locations •...
- Page 10 Video Instruction: bit.ly/nlrbuild support@nextlevelracing.com PARTS: PARTS: FRONT MOUNT ASSEMBLY • • 2 x Seat Slider Ratchet Handles • • Front Mount Bracket • • 4 x M8 16mm Bolts Repeat on Other Side • • 4 x M8 Washers A) Align the rear Seat Slider assembly with the T-Nuts previously installed in Step 01a & Step 01b. A) Align the slots on the Front Mount Bracket with the mounting holes on your Front Mount Wheel Base.
- Page 11 Video Instruction: bit.ly/nlrbuild support@nextlevelracing.com PARTS: PARTS: Note: Do not fully tighten the Bolts until the Wheel • • Side Mount Brackets • • 4 x M8 14mm Low Profile Bolts Assembly is set in the desired position. • • 4 x M8 Nylon Washers •...
- Page 12 Video Instruction: bit.ly/nlrbuild support@nextlevelracing.com PARTS: WHEEL ASSEMBLY HEIGHT ADJUSTMENT • • NIL Repeat on Other Side Note: Support the Wheel Assembly while adjusting to prevent it from slipping. Loosen the Bolts securing the Mounting Arms to the Wheel Posts. Adjust to the desired position and tighten the Bolts to secure in place.
- Page 13 Video Instruction: bit.ly/nlrbuild support@nextlevelracing.com Manuel d’instructions GTElite Lite Nous savons que vous avez hâte de commencer la course ! Prenez votre temps avec les instructions et suivez ce guide pour assembler votre produit. Vous vous préparerez au succès en suivant le livret d’instructions pour optimiser pleinement votre produit.
- Page 14 Video Instruction: bit.ly/nlrbuild support@nextlevelracing.com 17 - Reportez-vous à l’image. A) Alignez la grande plaque de pédale avec les écrous en T précédemment installés à l’étape 16. B) Boulonnez et fixez avec 4 boulons et rondelles M8. Remarque : ne serrez pas la plaque de la pédale tant que vous n’avez pas atteint la position souhaitée.
- Page 15 Video Instruction: bit.ly/nlrbuild support@nextlevelracing.com 17 - Zie afbeelding. A) Lijn de grote pedaalplaat uit met de T-moeren die eerder zijn geïnstalleerd in stap 16. B) Bout door en zet vast met 4 x M8 bouten en ringen. Opmerking: Draai de pedaalplaat pas vast als u de gewenste positie hebt bereikt.
- Page 16 Video Instruction: bit.ly/nlrbuild support@nextlevelracing.com 17 - Fare riferimento all’immagine. A) Allineare la piastra del pedale grande con i dadi a T precedentemente installati al punto 16. B) Imbullonare e fissare con 4 bulloni e rondelle M8. Nota: non serrare la piastra del pedale fino a raggiungere la posizione desiderata.
- Page 17 Video Instruction: bit.ly/nlrbuild support@nextlevelracing.com 16 - Consulte la imagen. INSTALACIÓN DE PEDALES ALTERNATIVOS (PARA USUARIOS MÁS BAJOS). Alinee los orificios de las placas de conexión verticales con las tuercas en T instaladas previamente en el paso 18. Atorníllelas y asegúrelas con 2 pernos y arandelas M8. Repita en el otro lado. Piezas: 2 pernos M8 de 20 mm, 2 arandelas M8. 17 - Consulte la imagen.
- Page 18 Video Instruction: bit.ly/nlrbuild support@nextlevelracing.com 17 - Siehe Bild. A) Richten Sie die große Pedalplatte mit den T-Muttern aus, die zuvor in Schritt 16 installiert wurden. B) Schrauben Sie sie durch und sichern Sie sie mit 4 x M8-Schrauben und Unterlegscheiben. Hinweis: Ziehen Sie die Pedalplatte erst fest, wenn Sie die gewünschte Position erreicht haben.
- Page 19 Video Instruction: bit.ly/nlrbuild support@nextlevelracing.com 21-画像を参照してください。 ペダル角度調整。 ペダルアセンブリを希望の角度に調整します。 手順16で前に取り付けたTナットをペダル調整フィンの穴に合わせます。 2xM8ボルトとワッシャーでボルトで固定します。 部品:2 x M8 16mmボ ルト、 2xM8ワッシャー。 22-画像を参照してください。 A) 将来のシート取り付けのために両方のシートスライダーの上部チャネルに2 x Tナットを取り付け、 バットキッカーマウントポール用のフロントシートスライダーの下部チャネルに2xTナットを取り付けます。 シートスライダーの底にフェルトパッドを取り付けます。 B) シートスライダーエンドプレートの穴をシートスライダーのネジ穴に合わせます。 4xM8皿ボルトでボルトで固定します。 ( バットキッカーTナットの位置) 。 パーツ :2 xシートスライダ ー、 4 xシートスライダーエンドプレート、 4 x M8皿ボルト、 4 xスティッキーフェルトパッド (35mm x 40mm) 、 6xTナット。 23-画像を参照してください。...
- Page 20 Video Instruction: bit.ly/nlrbuild support@nextlevelracing.com 17 - Consulte a imagem. A) Alinhe a placa do pedal grande com as porcas em T previamente instaladas na etapa 16. B) Aparafuse e prenda com 4 parafusos e arruelas M8. Nota: Não aperte a Placa do Pedal até atingir a posição desejada.
- Page 21 Video Instruction: bit.ly/nlrbuild support@nextlevelracing.com 17 - См. изображение. A) Совместите большую пластину педали с Т-образными гайками, ранее установленными на шаге 16. B) Вверните и закрепите с помощью 4 болтов M8 и шайб. Примечание. Не затягивайте пластину педали, пока не достигнете желаемого положения. Повторите с другой стороны. Детали: 4 болта M8 16 мм, 4 шайбы M8, 1 большая пластина педали. 18 - См.
- Page 22 Video Instruction: bit.ly/nlrbuild support@nextlevelracing.com 21 - resme bakın. PEDAL AÇISI AYARI. Pedal tertibatını istenen açıya ayarlayın. Adım 16’da önceden takılmış T-Somunları Pedal Ayar Kanatlarındaki deliklerle hizalayın. 2 x M8 Cıvata ve Pullarla cıvatalayın ve sabitleyin. Parçalar: 2 x M8 16mm Cıvata, 2 x M8 Pul. 22 - resme bakın.
- Page 23 Video Instruction: bit.ly/nlrbuild support@nextlevelracing.com 17 - Viz obrázek. A) Vyrovnejte velkou desku pedálu s T-maticemi dříve nainstalovanými v kroku 16. B) Prošroubujte a zajistěte pomocí 4 šroubů a podložek M8. Poznámka: Neutahujte pedál pedálu, dokud nedosáhnete požado- vané polohy. Opakujte na druhé straně. Části: 4 x M8 16mm šrouby, 4 x M8 podložky, 1 x velký pedálový talíř. 18 - Viz obrázek.
- Page 24 Video Instruction: bit.ly/nlrbuild support@nextlevelracing.com 17 - Patrz zdjęcie. A) Dopasuj dużą płytkę pedału do nakrętek teowych zainstalowanych wcześniej w kroku 16. B) Przykręć i zabezpiecz za pomocą 4 śrub M8 i podkładek. Uwaga: Nie dokręcaj płytki pedału, dopóki nie osiągniesz żądanej pozycji. Powtórz z drugiej strony. Części: 4 x śruby M8 16mm, 4 x podkładki M8, 1 x duży pedał. 18 - Patrz zdjęcie.
- Page 25 Video Instruction: bit.ly/nlrbuild support@nextlevelracing.com 22 - 2 تيبثتب مق )أ .ةروصلا ىلإ عوجرلاx T-Nuts 2 و لبقتسملا يف دعقملا بيكرتل دعقملا تاقلزنم نم لكل ةيولعلا تاونقلا يفx T-Nuts تيبثت دومعل يمامألا دعقملا قلزنم نم ةيلفسلا ةانقلا يفButt-kicker Mount. مق )ب .دعقملا تاقلزنم لفسأب دابللا تاداسو تيبثتب مق ...
- Page 26 Video Instruction: bit.ly/nlrbuild support@nextlevelracing.com NOTES 23 - 参考图片。 A) 将 Buttkicker 安装杆上的孔与之前在步骤 25 中安装的 T 形螺母对齐。 B) 用 2 个 M8 螺栓穿过并固定。 零件:1 x Buttkicker 安装杆, 2 x M8 16mm 螺栓, 2 x M8 垫圈。 24 - 参考图片。 A) 将前座椅滑块组件与先前安装在步骤 01a 和步骤 01b 中的 T 形螺母对齐。 B) 用 2 个 M8 棘轮手柄拧紧并固定。 在另一边重复。 零件:2 x 座椅滑块棘轮手柄。 25 - 参考图片。...
- Page 27 support@nextlevelracing.com support@nextlevelracing.com...
Need help?
Do you have a question about the GT ELITE LITE and is the answer not in the manual?
Questions and answers