
Related Manuals for Next Level Racing Formula Lite Pro


Summary of Contents for Next Level Racing Formula Lite Pro
- Page 1 T A K E R A C I N G T O T H E N E X T L E V E L® Video Instruction: bit.ly/nlrbuild INSTRUCTION MANUAL...
- Page 2 We know you’re eager to start racing! Take your time with the instructions and follow this guide to assemble your product. You’ll be setting yourself up for success by following the instruction booklet to fully optimize your product. ASSEMBLY VIDEO bit.ly/nlrbuild @next_level_racing @nextlevelracingOfficial @nextlvlracing Next Level Racing FOLLOW support@nextlevelracing.com...
- Page 3 Video Instruction: bit.ly/nlrbuild T A K E R A C I N G T O T H E N E X T L E V E L® N E X T L E V E L R A C I N G . C O M...
- Page 4 support@nextlevelracing.com PRE-RACE CHECKS WARNING • Please do not use power tools for assembly as over tightening can damage your frame. • Do not adjust the Hubs while sitting in cockpit. • Make sure the Hubs are tightened fully before using the cockpit (Spin the Hub clockwise to ensure it is fully tight). •...
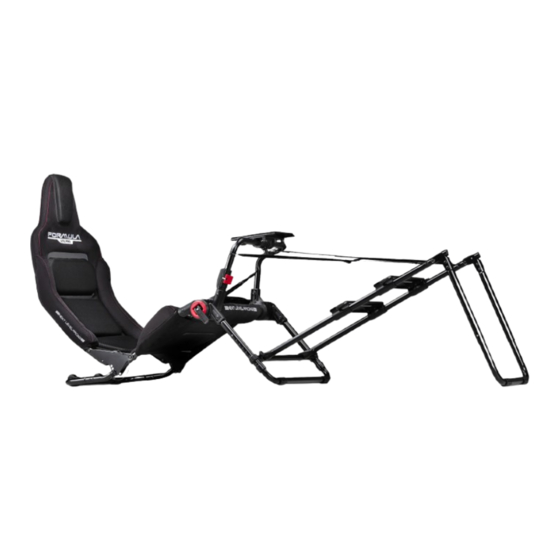
- Page 5 Video Instruction: bit.ly/nlrbuild IN THE *NOT TO SCALE Wheel Plate Backrest Reclining Hinge Locking Latch Backrest Front Leg Top Tube Securing Bolt Seat Quick Release Pin 2 x BACKREST BOTTOM TUBES Wheel Plate Socket Pedal Frame Swivel Bracket Front Leg Pedal Plates Pedal Slider Bracket Pedal Frame...
- Page 6 support@nextlevelracing.com 4 x VELCRO CABLE MANAGEMENT 2 x M6 NLR KNOB 2 x FRONT STRENGTHENING STRAPS 2 x PACKAGING STRAPS STRAPS 2 x M6 NYLOCK NUT 1 x M5 NYLOCK NUT 1 x M6 16mm COUNTERSUNK HEAD 3 x M6 NYLOCK NUT 1 x M5 25mm COUNTERSUNK HEAD 1 x M5 40mm WIDE BUTTON HEAD 1 x M8 40mm BUTTON HEAD...
-
Page 7: Assembly Process
Video Instruction: bit.ly/nlrbuild USING NLR LITE SERIES HUBS Do not adjust the hubs while user is Do not adjust the Hubs while user is sitting in cockpit, Make sure user is out sitting in Cockpit, make sure user is of the cockpit before adjusting. out of the Cockpit before adjusting. - Page 8 support@nextlevelracing.com Repeat on Other Side A) Uninstall the bolts and nuts from the Backrest Bottom Tube reclining hinges. B) Align the mounting holes on the Backrest Bottom Tube hinges with the Main Frame mounting holes. Bolt through and secure using the bolts and nuts uninstalled in Step 3A.
- Page 9 Video Instruction: bit.ly/nlrbuild Repeat on Other Side A) Unfold the Backrest and align the mounting holes on the Backrest Bottom Tube Hinges with the Main Frame through holes. B) Ensure the Pin is properly secured through the Reclining Hinge Side Plate to prevent failure. A) Remove the pre-installed bolts and nuts from the Rear Leg.
- Page 10 support@nextlevelracing.com NOTE: Pull the connection points on the Main Frame apart to the same width as the Rear Leg for easy installation. A) Align the tube ends of the Rear Leg with the tube openings of the Main Frame. B) Bolt through and secure using the bolts and nuts previously uninstalled in Step 6A.
- Page 11 Video Instruction: bit.ly/nlrbuild Repeat on Other Side A) Adjust the Front Leg Top Tube to your desired height. Install Knobs and secure the Front Leg Top Tube with Nuts. B) Install the Pedal Frame Swivel Bracket to the Front Leg of the Main Frame using the hardware previously uninstalled in Step 8B.
- Page 12 support@nextlevelracing.com A) Open Wheel Plate Latch. B) Swing Wheel Plate Tube into the opened Latch. C) Secure it by closing the Latch. Do not overtighten. Install the Wheel Plate Strengthening Strap following the indication of the pictures above. Do not overtighten to avoid damage to the Cockpit.
- Page 13 Video Instruction: bit.ly/nlrbuild Connect the Strengthening Straps to the Wheel Plate Tubes, following the Sub-Steps 1-4 above. Adjust these straps while seated in the Cockpit with the feet resting on the pedals to prevent the Frame lifting off the ground. WHEEL PLATE - ANGLE ADJUSTMENT Loosen the Large Knob under the Wheel Plate, adjust to the desired angle and tighten to lock the Wheel Plate in place.
-
Page 14: Backrest Angle Adjustment
support@nextlevelracing.com WHEEL PLATE - HORIZONTAL ADJUSTMENT Loosen the 4x Smaller Knobs under the Wheel Plate, adjust to the desired position and tighten all 4 Knobs to lock the Wheel Plate in place. BACKREST ANGLE ADJUSTMENT Repeat Repeat on Other on Other Side Side A) Remove Quick Release Pins out of each side of the Cockpit. -
Page 15: Backrest - Height Adjustment
Video Instruction: bit.ly/nlrbuild BACKREST - HEIGHT ADJUSTMENT Both Sides REAR VIEW Press the Spring-Loaded Pin on the inside of the Backrest and pull up or push down the top of the Backrest to choose your desired height. Repeat on the other side. FRONT LEG - HEIGHT ADJUSTMENT User Height Simultaneously press the Spring-Loaded Pins on the inner side of the Front Leg and adjust the Main Frame up... - Page 16 support@nextlevelracing.com PEDAL FRAME ADJUSTMENT User Height Simultaneously press the Spring-Loaded Pins on the outer side of the Pedal Frame Front Tube. Adjust the height of the Pedals to your desired angle. PEDAL PLATE - DISTANCE ADJUSTMENT Repeat on Other Do not overtighten to Side avoid cross threading the Locking Nuts.
- Page 17 Video Instruction: bit.ly/nlrbuild REINFORCED LEGS To increase the rigidity of your Cockpit, you can use one or both of the Packaging Straps to connect the Front Leg and Back Leg together. FOLDING SEQUENCE Disconnect all the straps before folding the Cockpit.
- Page 18 support@nextlevelracing.com Repeat on Other Side A) Press both Spring-Loaded Pins on the Pedal Corner Brackets. B) Fold the Pedal Frame Front Tube under the Pedals. Repeat on Other Side A) Loosen the 2x Knobs on the Front Leg Support Bar. B) Slide the Pedal Frame down to the bottom of the Front Leg.
- Page 19 Video Instruction: bit.ly/nlrbuild Repeat on Other Side Undo the Hub’s Cam Levers and rotate to allow the Hubs to spin freely. Grab the Wheel Plate Tube and the top of the Backrest as shown. Fold the Cockpit to the front, bringing the Backrest and the Wheel Plate towards the Pedal Frame as shown above.
- Page 20 support@nextlevelracing.com A) Loosen the Large Knob under the Wheel Plate. B) Fold the Pedal Frame under the the Seat. C) Fold to tuck the Wheel Plate infront of the Pedals as shown above. Repeat on Other Side Remove the Quick Release Pins from both sides.
- Page 21 Video Instruction: bit.ly/nlrbuild Fold the Backrest to cover all electronic as shown above. Use the Strengthening Straps to secure all parts together. Thread the Straps through the Wheel Plate, Backrest and Pedal Frame.
- Page 22 support@nextlevelracing.com The Cockpit with all the peripherals is a heavy object, proceed with caution. Use correct posture Repeat on Other Side A) Close the Hub’s Cam Levers to secure the Cockpit and prevent it from opening. B) Grab the Pedals Support Frame Tube and lift the Cockpit until it is resting on the Roller Wheels.
- Page 23 Video Instruction: bit.ly/nlrbuild WARNING Do not use power tools for assembly as over tightening can damage the Frame. Do not adjust the Hubs while sitting in Cockpit. Make sure the Hubs are tightened fully before using the Cockpit. (Spin the Hub's Cam Levers clockwise to ensure the Hubs are fully tight.) Make sure the Wheel Plate Strap on the Wheel Plate Tube is tight when adjusting the Hubs, otherwise the Wheel Plate Tube will fall when Hubs are open.
- Page 24 ES - ESPAÑOL MANUAL DE INSTRUCCIONES FORMULA LITE PRO TU VIAJE DE CARRERAS SIM COMIENZA AQUÍ ¡Sabemos que estás ansioso por empezar a correr! Tómate tu tiempo con las instrucciones y sigue esta guía para ensamblar tu producto. Se preparará...
- Page 25 Video Instruction: bit.ly/nlrbuild lados de los soportes giratorios del marco de los pedales. 09 - A) Ajuste el tubo superior de la pata delantera a la altura deseada. Instale las perillas y asegure el tubo superior de la pata delantera con tuercas. B) Instale el soporte giratorio del marco del pedal en la pata delantera del marco principal usando los accesorios que desinstaló...
- Page 26 FR - FRANÇAISE MANUEL D'INSTRUCTIONS FORMULA LITE PRO VOTRE VOYAGE SIM RACING COMMENCE ICI Nous savons que vous avez hâte de commencer la course ! Prenez votre temps avec les instructions et suivez ce guide pour assembler votre produit.
- Page 27 Video Instruction: bit.ly/nlrbuild côtés des supports pivotants du cadre de pédale. 09 - A) Ajustez le tube supérieur de la jambe avant à la hauteur souhaitée. Installez les boutons et fixez le tube supérieur du pied avant avec des écrous. B) Installez le support pivotant du cadre de pédale sur le pied avant du cadre principal à...
- Page 28 NL - NEDERLANDSE FORMULA LITE PRO-INSTRUCTIEHANDLEIDING UW SIM-RACINGREIS BEGINT HIER We weten dat je graag wilt beginnen met racen! Neem de tijd voor de instructies en volg deze handleiding om uw product in elkaar te zetten. U bereidt uzelf voor op succes door het instructieboekje te volgen om uw product volledig te optimaliseren.
- Page 29 Video Instruction: bit.ly/nlrbuild de draaibeugels van het pedaalframe los. 09 - A) Stel de bovenbuis van de voorpoot af op de gewenste hoogte. Installeer de knoppen en zet de bovenbuis van de voorpoot vast met moeren. B) Installeer de draaibeugel van het pedaalframe aan de voorpoot van het hoofdframe met behulp van de hardware die eerder in stap 8B is verwijderd. 10- A) Verwijder de vooraf geïnstalleerde bout en moer uit de wielplaathouder.
- Page 30 IT - ITALIANO MANUALE DI ISTRUZIONI FORMULA LITE PRO IL TUO VIAGGIO NELLE SIM RACING INIZIA QUI Sappiamo che non vedi l'ora di iniziare a correre! Prenditi il tuo tempo con le istruzioni e segui questa guida per assemblare il tuo prodotto. Ti preparerai per il successo seguendo il libretto di istruzioni per ottimizzare completamente il tuo prodotto.
- Page 31 Video Instruction: bit.ly/nlrbuild 09 - A) Regolare il tubo superiore della gamba anteriore all'altezza desiderata. Installa le manopole e fissa il tubo superiore della gamba anteriore con i dadi. B) Installare la staffa girevole del telaio dei pedali sulla gamba anteriore del telaio principale utilizzando l'hardware precedentemente disinstallato al punto 8B.
- Page 32 DE – DEUTSCH FORMULA LITE PRO BEDIENUNGSANLEITUNG HIER BEGINNT IHRE SIM-RACING-REISE Wir wissen, dass Sie es kaum erwarten können, mit dem Rennen zu beginnen! Nehmen Sie sich Zeit für die Anweisungen und befolgen Sie diese Anlei- tung, um Ihr Produkt zusammenzubauen. Sie sind auf Erfolgskurs, wenn Sie die Anleitung befolgen, um Ihr Produkt vollständig zu optimieren.
- Page 33 Video Instruction: bit.ly/nlrbuild Pedalrahmen-Schwenkhalterungen ab. 09 - A) Stellen Sie das Oberrohr des Vorderbeins auf die gewünschte Höhe ein. Bringen Sie die Knöpfe an und befestigen Sie das Oberrohr des Vorder- beins mit Muttern. B) Installieren Sie die Pedalrahmen-Schwenkhalterung am Vorderbein des Hauptrahmens, indem Sie die zuvor in Schritt 8B deinstal- lierte Hardware verwenden.
- Page 34 JP - 日本 FORMULA LITE PRO 取扱説明書 SIM レーシングの旅はここから始まります 私たちはあなたがレースを始めたいと思っていることを知っています!時間をかけて説明書を読み、 このガイドに従って製品を組み立ててください。 説明書に従っ て製品を完全に最適化することで、 成功への準備が整います。 レース前チェック 警告 •締めすぎるとフレームが損傷する可能性があるため、 組み立てには電動工具を使用しないでください。 •コックピットに座ったままハブを調整しないでください。 •コックピットを使用する前に、 ハブが完全に締められていることを確認してください (ハブを時計回りに回して、 完全に締められていることを確認してください)。 •ハブを調整するときは、 ホイール バーのホイール プレート ストラップがしっかりと締められていることを確認してください。 そうしないと、 ハブが開いているときに ホイール プレート チューブが落ちてしまいます。 •可動部品には挟み込まれる危険があります。 怪我をしないように調整する際は注意してください。 •毛玉を防ぐため、 ベルクロストラップをメッシュシートから遠ざけてください。 製品に関するサポートが必要な場合は、 フレンドリーなチーム ( support@nextlevelracing.com ) までご連絡ください。...
- Page 35 Video Instruction: bit.ly/nlrbuild 08- A) バネ仕掛けのピンがペダル フレームを所定の位置にロックするまで、 ペダル フレームのフロント チューブを広げます。 B) ペダルフレームスイベルブラケッ トの両側を取り外します。 09 - A) 前脚トップチューブを希望の高さに調整します。 ノブを取り付け、 フロントレッグトップチューブをナットで固定します。 B) ステップ 8B で取り外したハードウ ェアを使用して、 ペダル フレームのスイベル ブラケットをメイン フレームの前脚に取り付けます。 10- A) ホイールプレートソケットからあらかじめ取り付けられているボルトとナットを取り外します。 B) ホイールプレートチューブを左ホイールプレートソケットに 挿入します。 手順 10A で取り外したハードウェアを使用してボルトで固定します。 11- A) ホイールプレートラッチを開きます。 B) ホイールプレートチューブをスイングさせて、 開いたラッチに差し込みます。 C) ラッチを閉じて固定します。 12- 上の写真の指示に従って、...
- Page 36 PT – PORTUGUÊS MANUAL DE INSTRUÇÕES FORMULA LITE PRO SUA JORNADA DE SIM RACING COMEÇA AQUI Sabemos que você está ansioso para começar a correr! Não se apresse com as instruções e siga este guia para montar seu produto. Você estará se preparando para o sucesso seguindo o livreto de instruções para otimizar totalmente seu produto.
- Page 37 Video Instruction: bit.ly/nlrbuild e porcas desinstalados anteriormente na Etapa 6A. 08- A) Desdobre o tubo frontal da estrutura do pedal até que o pino com mola trave a estrutura do pedal no lugar. B) Solte os dois lados dos suportes giratórios da estrutura do pedal.
- Page 38 RU – РУССКИЙ FORMULA LITE PRO РУКОВОДСТВО ПО ЭКСПЛУАТАЦИИ ВАШЕ ПУТЕШЕСТВИЕ НА SIM-ГОНКАХ НАЧИНАЕТСЯ ЗДЕСЬ Мы знаем, что вам не терпится начать участвовать в гонках! Не торопитесь с инструкциями и следуйте этому руководству, чтобы собрать свой продукт. Вы настроитесь на успех, следуя инструкциям по полной оптимизации вашего продукта.
- Page 39 Video Instruction: bit.ly/nlrbuild 09 - A) Отрегулируйте верхнюю трубку передней ножки на желаемую высоту. Установите ручки и закрепите верхнюю трубку передней опоры гайками. B) Установите поворотный кронштейн рамы педалей на переднюю ножку основной рамы, используя крепеж, ранее снятый на этапе 8B. 10- А) Снимите...
- Page 40 TR – TÜRKÇE FORMULA LITE PRO KULLANIM KILAVUZU SIM YARIŞ YOLCULUĞUNUZ BURADA BAŞLIYOR Yarışmaya başlamak için istekli olduğunuzu biliyoruz! Talimatlara zaman ayırın ve ürününüzü monte etmek için bu kılavuzu izleyin. Ürününüzü tamamen optimize etmek için talimat kitapçığını takip ederek kendinizi başarıya hazırlayacaksınız.
- Page 41 Video Instruction: bit.ly/nlrbuild cıvatalayın ve sabitleyin. 08- A) Pedal Çerçevesi Ön Borusunu, Yaylı Pim Pedal Çerçevesini yerine kilitleyene kadar açın. B) Pedal Çerçevesi Döner Braketlerinin iki tarafını ayırın. 09 - A) Ön Ayak Üst Borusunu istediğiniz yüksekliğe ayarlayın. Düğmeleri takın ve Ön Ayak Üst Borusunu somunlarla sabitleyin. B) Daha önce Adım 8B'de kaldırılan donanımı...
- Page 42 CZ – ČEŠTINA FORMULA LITE PRO NÁVOD K POUŽITÍ VAŠE ZÁVODNÍ CESTA SIM ZAČÍNÁ ZDE Víme, že toužíte začít závodit! Udělejte si čas s pokyny a podle tohoto průvodce sestavte svůj produkt. Postupem podle návodu k plné optimalizaci vašeho produktu se připravíte na úspěch.
- Page 43 Video Instruction: bit.ly/nlrbuild stalovali v kroku 6A. 08- A) Rozložte přední trubku rámu pedálu, dokud pružinový kolík nezajistí rám pedálu na místě. B) Oddělte dvě strany otočných držáků rámu pedálu. 09 - A) Nastavte horní trubku přední nohy na požadovanou výšku. Nainstalujte knoflíky a zajistěte horní trubku přední nohy pomocí matic. B) Nainstalujte otočný...
- Page 44 PL - POLSKI INSTRUKCJA OBSŁUGI FORMULA LITE PRO TWOJA PODRÓŻ WYŚCIGOWA SIM ZACZYNA SIĘ TUTAJ Wiemy, że nie możesz się doczekać, aby zacząć się ścigać! Nie spiesz się z instrukcjami i postępuj zgodnie z tym przewodnikiem, aby złożyć produkt.
- Page 45 Video Instruction: bit.ly/nlrbuild kroku 6A. 08- A) Rozłóż przednią rurę ramy pedałów, aż sworzeń sprężynowy zablokuje ramę pedałów na miejscu. B) Odłącz obie strony wsporników obrotowych ramy pedałów. 09 - A) Wyreguluj górną rurę przedniej nogi do żądanej wysokości. Zamontuj pokrętła i zabezpiecz górną rurę przedniej nogi za pomocą nakrętek. B) Zamontuj wspornik obrotowy ramy pedałów na przedniej nóżce ramy głównej, korzystając z osprzętu odinstalowanego wcześniej w kroku 8B.
- Page 46 AR – برع تاميلعتFORMULA LITE PRO قابس ةلحرSIM انه أدبت كب ةصاخلا لكشب كجتنم نيسحتل تاميلعتلا بيتك عابتاب حاجنلا قيقحتل كسفن دادعإب موقتس .كجتنم عيمجتل ليلدلا اذه عبتاو تاميلعتلا عم كتقو ذخ !قابسلا ءدبل قوشتم كنأ ملعن نحن...
- Page 47 Video Instruction: bit.ly/nlrbuild .أ01 ةوطخلا يف ا ً قبسم اهتيبثت ءاغلإ مت يتلا ةزهجألا مادختساب نيمأتلاو تيبثتلاب مق .ىرسيلا ةلجعلا ةحول سبقم يف ةلجعلا ةحول 11- .جالزملا قالغإ قيرط نع هنيمأتب مق )ج .حوتفملا جالزملا يف ةلجعلا ةحول بوبنأ حج ر أتب مق )ب .ةلجعلا ةحول جالزم حتف )أ 12- .ةدايقلا...
- Page 48 CN - 简体中文 FORMULA LITE PRO 使用说明书 您的模拟赛车之旅从这里开始 我们知道您渴望开始比赛!请花些时间阅读说明并按照本指南组装您的产品。 按照说明手册全面优化您的产品, 您将为成功做好准备。 赛前检查 警告 •请不要使用电动工具进行组装, 因为过度拧紧可能会损坏您的框架。 •请勿坐在驾驶舱内调整集线器。 •使用驾驶舱之前, 请确保轮毂已完全拧紧 (顺时针旋转轮毂以确保其完全拧紧) 。 •调整轮毂时, 请确保轮杆上的轮板带拉紧, 否则轮毂打开时轮板管会掉落。 •移动部件存在夹伤危险。 调整时要小心, 以免受伤。 •使尼龙搭扣带远离网状座椅, 以防止起球。 如果您的产品需要任何支持, 请联系我们友好的团队: support@nextlevelracing.com 警告 窒息危险-小零件不适合 3 岁以下儿童或任何倾向于将不可食用物体放入口中的个人。 01 - 打开和关闭凸轮杆以分别解锁和锁定轮毂。 在坐进驾驶舱之前, 顺时针旋转控制杆, 确保凸轮已紧密关闭, 以避免发生故障。...
- Page 49 Video Instruction: bit.ly/nlrbuild 12- 按照上图指示安装轮板加强带。 请勿拧得太紧, 以免损坏驾驶舱。 13- 按照上述子步骤 1-4 将加固带连接至轮板管。 坐在驾驶舱中并将脚放在踏板上时调整这些带子, 以防止框架升离地面。 14- 松开轮板下方的大旋钮, 调整至所需角度并拧紧以将轮板锁定到位。 15- 松开轮板下方的 4 个小旋钮, 调整至所需位置, 然后拧紧所有 4 个旋钮以将轮板锁定到位。 16- A) 从驾驶舱两侧拆下快速释放销。 B) 将靠背的倾斜度更改为您想要的位置。 C) 重新安装快速释放销以将靠背锁定到位。 17- 按下靠背内侧的弹簧销, 然后向上拉或向下推靠背顶部以选择您所需的高度。 在另一侧重复。 18- 同时按下前腿内侧的弹簧销, 向上调整主机架以增加与踏板的距离。 踩住前腿以固定驾驶舱, 同时进行调整以防止其升离地面。 19 - 同时按下踏板框架前管外侧的弹簧销。...
- Page 50 support@nextlevelracing.com support@nextlevelracing.com...
Need help?
Do you have a question about the Formula Lite Pro and is the answer not in the manual?
Questions and answers