Advertisement
Available languages
Available languages
Quick Links
Advertisement

Subscribe to Our Youtube Channel
Related Manuals for Hach QbD1200+


Summary of Contents for Hach QbD1200+
- Page 1 DOC022.97.80647 QbD1200+ 09/2021, Edition 1 User Manual 用户手册 取扱説明書 사용 설명서 คู ่ ม ื อ ผู ้ ใ ช้ 使用手冊...
-
Page 2: Table Of Contents
Table of Contents English ..........................3 中文 ..........................24 日本語 ..........................44 한국어 ..........................65 ไทย ............................ 86 繁體中文 ........................106... -
Page 3: English 3
Table of Contents 1 Product overview on page 3 7 Operation on page 14 2 Specifications on page 4 8 Maintenance on page 19 3 General information on page 5 9 Troubleshooting on page 20 4 Installation on page 8 10 Replacement parts and accessories on page 22 5 User interface and navigation... - Page 4 Figure 2 Hydraulic connections overview 1 Syringe pump 6 Plumbing connections map 2 Ozone filter 7 Reagent bottle 3 Reagent tube 8 UV reactor 4 Sample tube 9 Drain tube 5 Removable drip tray 10 GLS (Gas Liquid Separator) water vessel Section 2 Specifications Specifications are subject to change without notice.
- Page 5 Specification Details Precision 2% RSD or 3 ppb (the larger value) Oxidation UV/persulfate Detection NDIR Display 264.2 mm (10.4 in.) color touch screen Air supply High purity air, oxygen or nitrogen; 684.4 kPa (100 psi) maximum air pressure Certifications Conforms to 21 CFR 11, USP <643>, JP <2.59>, EP <2.2.44>, IP, CP, KP and EPA method 415.3 and Standard Method 5310C;...
- Page 6 3.1.3 Precautionary labels Read all labels and tags attached to the instrument. Personal injury or damage to the instrument could occur if not observed. This symbol, if noted on the instrument, references the instruction manual for operation and/or safety information. This symbol indicates the presence of mercury.
- Page 7 3.1.6 Compliance and certification C A U T I O N This equipment is not intended for use in residential environments and may not provide adequate protection to radio reception in such environments. Canadian Radio Interference-Causing Equipment Regulation, ICES-003, Class A: Supporting test records reside with the manufacturer.
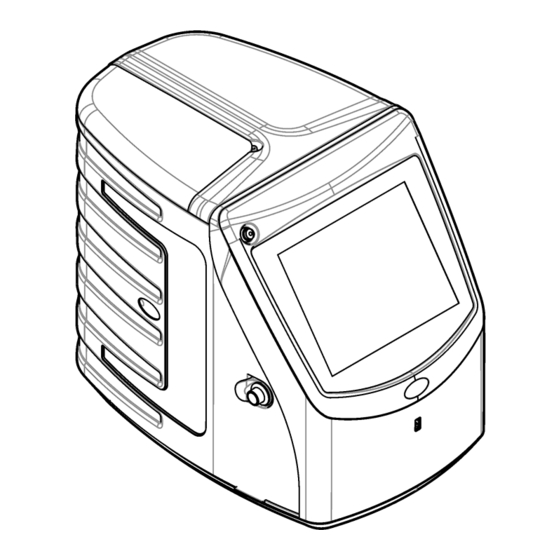
- Page 8 Figure 3 Product components 1 Analyzer 4 Power supply 2 Power cord 5 Gas inlet tube 3 Reagent bottle (empty) 6 GLS water vessel Section 4 Installation C A U T I O N Multiple hazards. Only qualified personnel must conduct the tasks described in this section of the document.
- Page 9 Install the instrument: • Indoors in a clean, dry, well-ventilated and temperature-controlled location • In a location with a flat surface to prevent the unit from movement • In a location with minimum mechanical vibrations and electronic noise • In a location with no electromagnetic interferences from equipment such as transmitters, power switching, etc.
- Page 10 4.2.2 Plumb the sample and the drain tubes Plumb the sample tube to an auto sampler (or a manual sample container) and plumb the drain tube to the waste container as shown in the illustrated steps that follow. 4.2.3 Install the reagent bottle Refer to the reagent preparation kit documentation to prepare the reagent solution.
- Page 11 4.2.4 Connect to air or carrier gas The instrument cannot operate without a carrier gas connection. The carrier gas must not contain carbon dioxide. Use the supplied gas inlet tubing to connect to carbon dioxide-free air, oxygen or nitrogen. 1. Make sure that the pressure on the carrier gas cylinder regulator is 241 to 689 kPA (35 to 100 psi).
- Page 12 Figure 4 Home screen 1 Log in icon 5 Menu icons 2 Log out icon 6 System status bar 3 Menu identification icon 7 User status 4 Home icon 8 Date and time Table 1 Icon description Icon Description Goes to the log in screen. Logs the user out of the system.
- Page 13 Table 1 Icon description (continued) Icon Description Configures the instrument settings. Starts the qualification procedures: calibration, SST500, background, SDBS, SST8000 and accuracy tests. Shows the maintenance procedures for the instrument. Shows help and more information. Shows when a user is logged into the instrument. Shows when no user is logged into the instrument.
- Page 14 Section 7 Operation 7.1 Configuration 7.1.1 Set the system settings Use the touch screen or connect a USB keyboard and a USB mouse to do the steps that follow. 1. Push Instrument Setup> System Settings. 2. Select an option. Option Description Date &...
- Page 15 Option Description Unlock user after Sets the period of time a user must wait to log in if they enter the wrong password the selected number of times. Options: Never or 5, 10, 30 or 60 minutes. Note: This option is only available when the "Lock user after" box is selected. Edit Password Sets the number of characters, capital and lower case letters, numerals Requirements...
- Page 16 Option Description Process Sets the default sample process settings. Settings • Auto Ranging—Sets the instrument to adjust the measurement range automatically. Do not select this option if the sample is less than 4 ppm. • Conditioning—Sets the instrument to wait for the lamp temperature to increase before a measurement is done to get accurate results.
- Page 17 7.2 Measurement 7.2.1 Do a measurement 1. Push Perform Measurement. 2. Select an option. Option Description Create New Tray Makes a new sample tray. Refer to Make a sample tray template on page 17. Load Tray From File Imports trays from a USB flash drive that has sample tray parameters set.
- Page 18 7.3 Data management 7.3.1 Select a report The instrument saves measurement, calibration, system health analyses, system suitability tests, error logs, background statistics and audit record data reports. Use the steps that follow to read or export a report. 1. Push Reports and Data. 2.
- Page 19 If necessary, push Pause or Cancel during the procedure. Section 8 Maintenance D A N G E R Multiple hazards. Only qualified personnel must conduct the tasks described in this section of the document. C A U T I O N Chemical exposure hazard.
- Page 20 1. Push Maintenance>Replace Component. 2. Select an option. Option Description Replace Ozone Shows the hourly usage of the ozone filter. Shows how to replace the Filter ozone filter on the display. Replace UV Lamp Shows the hourly usage of the UV lamp. Shows how to replace the UV lamp on the display.
- Page 21 Problem Possible cause Solution The measurements take too The UV reactor is almost Replace the UV reactor. Make much time to complete and/or expired. sure that there is a sufficient the results are consistently too quantity of carrier gas. low. The fittings around the reactor Make sure that the fittings are loose.
- Page 22 Problem Possible cause Solution The auto sampler does not The auto sampler is Connect the USB cable from operate. disconnected or the power is the auto sampler to the set to off. instrument again. Set the power to on. The electrical transients on the Install any commercially power line are too large, which available USB opto-isolator...
- Page 23 Ozone destructor replacement kit 9890500 Reagent bottle with custom cap kit 9890600 Power supply, 100–240 VAC 9898300 varies by region- Power cord contact Hach service Accessories Description Item no. Reagent stock solution 9459400 Calibration solution, KHP, 5 ppm C 9459500...
- Page 24 目录 1 产品概述 6 启动 第 24 页 第 34 页 2 规格 7 操作 第 25 页 第 35 页 3 基本信息 8 维护 第 26 页 第 39 页 4 安装 9 故障排除 第 29 页 第 41 页 5 用户界面及导航...
- Page 25 图 2 液压连接概览图 1 注射泵 6 管路连接图 2 臭氧过滤器 7 试剂瓶 3 试剂管 8 紫外线反应器 4 取样管 9 排液管 5 可拆卸滴盘 10 GLS(气液分离器)水容器 第 2 节 规格 产品规格如有变化,恕不另行通知。 规格 详细信息 尺寸(宽 x 深 x 高) 32 x 51 x 41 cm (12.6 x 20.0 x 16.2 in.) 14 kg (31 lb) 配重...
- Page 26 规格 详细信息 2% RSD 或 3 ppb(取较大值) 精度 氧化 紫外线/过硫酸盐 NDIR 检测 显示屏 264.2 mm (10.4 in)彩色触摸屏 高纯度空气、氧气或氮气;最大气压 684.4 kPa (100 psi) 气源 符合 21 CFR 11、USP <643>、JP <2.59>、EP <2.2.44>、IP、CP、KP 和 认证 EPA 方法 415.3 和标准方法 5310C;CE 标志 主机 I/O 以太网端口...
- Page 27 当仪器上标示此符号时,表示需要遵守说明手册中的操作和/或安全信息。 此标志指示存在汞。含汞组件必须根据地方和区域所有适用的法规进行处理。 此标记指示存在潜在的夹伤危险。 此标志表示化学伤害危险,并指示只有合格的人员以及在处理化学制品方面受过培训的人 员,才能处理化学制品,或执行与该设备有关的化学制品传送系统的维护工作。 标有此符号的电气设备在欧洲不能通过家庭或公共垃圾系统进行处理。请将老旧或报废设 备寄回至制造商处进行处置,用户无需承担费用。 3.1.4 插图中使用的图标 制造商 提供的零件 查看 阅读用户手册 3.1.5 产品危险 危 险 化学或生物危害。如果该仪器用于监测处理过程和/或监测有法规限制以及有与公众健康、 公众安全、食品或饮料制造或加工相关监测要求的化学药物添加系统时,仪器的使用者有 责任了解并遵守所有适用的法规,并且要建立适当的机制,确保在仪器发生故障的时候也 不会违法这些法规。 警 告 化学品暴露风险。该仪器的紫外线灯组件含汞。仪器报废处理之前应拆下紫外线灯组件。 依照当地、州和联邦法律法规报废处理紫外线灯组件。 警 告 化学品暴露风险。遵守实验室安全规程,穿戴适用于所处理化学品的所有个人防护装备。 有关安全规程,请参阅当前安全数据表(MSDS/SDS)。 3.1.6 合规性和证明 警 告 本设备不适合在住宅环境中使用,在此类环境中可能无法为无线电接收提供充分的保护。 加拿大无线电干扰产生设备法规(Canadian Radio Interference-Causing Equipment Regulation),ICES-003,A 类: 中文...
- Page 28 支持性测试结果在制造商处保存。 此 A 类数字设备符合加拿大由于无线电干扰所产生的设备法规的所有要求。 Cet appareil numérique de classe A répond à toutes les exigences de la réglementation canadienne sur les équipements provoquant des interférences. FCC 第 15 部分,“A”类限制 支持性测试结果在制造商处保存。该设备符合 FCC 规定第 15 部分的要求。设备操作满足以下两个条 件: 1. 本设备不会造成有害干扰。 2. 设备会接收任何干扰,包括可能造成意外的干扰。 若未经负责出具符合声明的一方明确同意擅自对本设备进行改动或改装,可能会导致取消用户操作该 设备的权限。本设备已经过测试,符合...
- Page 29 图 3 产品部件 1 分析仪 4 电源 2 电源线 5 进气管 3 试剂瓶(空瓶) 6 GLS 水容器 第 4 节 安装 警 告 多重危险。只有符有资质的专业人员才能从事文档本部分所述的任务。 4.1 安装指南 警 告 化学品暴露风险。遵守实验室安全规程,穿戴适用于所处理化学品的所有个人防护装备。 有关安全规程,请参阅当前安全数据表(MSDS/SDS)。 警 告 化学品暴露风险。请遵循地方、区域和国家法规处置化学品和废弃物。 警 告 火灾危险。此产品不得与易燃液体一同使用。 注 意 本仪器易受电磁和机电干扰。这些干扰可能会影响本仪器的分析性能。不要使本仪器靠近可能产生干 扰的设备。 安装仪器: •...
- Page 30 • 安装在平坦表面,以防装置移动 • 安装在机械振动和电子噪音最小的位置 • 安装在不受发射器、功率切换设备等电磁干扰的位置 • 安装在能够遮挡风雨和阳光直晒的防护罩中 • 安装在留有足够间隙进行管路敷设和电气连接的位置 • 安装在用户容易观看显示屏的位置 • 安装在可放置废液容器的位置。 4.2 装设管道 4.2.1 安装 GLS 水容器 按照下面的图示步骤向 GLS 水容器加水。打开仪器门并完成所示步骤。 在每个样品盘测量完成之后,检查 GLS 水容器中的水位,以确保容器容量不超过一半。如果容器容量 超过一半,则去除部分水以防止可能的溢出。 中文...
- Page 31 4.2.2 连接样品管和排液管 按照如下的图示步骤将样品管连接到自动进样器(或手动进样容器),将排液管连接到废液容器。 4.2.3 安装试剂瓶 关于试剂溶液的制备,请参阅试剂制备文档。制备试剂溶液之后,按照如下的图示步骤将试剂管连接 到试剂瓶。 中文 31...
- Page 32 4.2.4 连接空气或载气 如果没有载气连接,仪器将无法工作。载气绝不能含有二氧化碳。使用随附的进气管连接不含二氧化 碳的空气、氧气或氮气。 1. 确保载气钢瓶调节器的压力为 241 - 689 kPA (35 - 100 psi)。 2. 确保随附进气管(外径 1/8 英寸)的两端切割均匀并保持清洁。 3. 将进气管一端插入仪器后部的进气口中。请参阅 图 1 第 24 页。 4. 将进气管另一端与载气源相连。 5. 检查进气管和接头是否漏气。必要时进行调整。 4.3 电气安装 4.3.1 连接外部装置(可选) 该仪器有三个 USB 端口和 1 个以太网端口。如果使用辅助线缆,确保线缆长度不超过 3 米(9.84 英 第...
- Page 33 图 4 主界面 1 登录图标 5 菜单图标 2 注销图标 6 系统状态栏 3 菜单识别图标 7 用户状态 4 主屏幕图标 8 日期和时间 表 1 图标说明 图标 说明 进入登录屏幕。 从系统中注销用户。 当该按钮位于右上角时,可以进入主屏幕。当主屏幕出现在显示屏上时,显示 屏左侧附近将显示主屏幕图标。 新建托盘、从 USB 闪存盘导入托盘、启动保存的托盘或进行手动测量。 显示、选择和发送报告和仪器数据。 菜单识别图标用于显示当前所选菜单。 中文 33...
- Page 34 表 1 图标说明 (续) 图标 说明 配置仪器设置。 启动验证程序:校准、SST500、背景、SDBS、SST8000 及准确度测试。 显示仪器的维护程序。 显示帮助和更多信息。 显示有用户登录到仪器。 显示无用户登录到仪器。 选择上一屏幕。 保存所选屏幕上的信息,并进入下一屏幕。如果配置结束时选择该箭头,将启 动一个程序。 显示当前选择的屏幕。 第 6 节 启动 6.1 以管理员身份登录 1. 按下主屏幕上的登录。 2. 从用户列表中选择 “管理员”。 3. 输入密码:password 4. 输入新密码 确保记下新密码。 5. 按保存。 以管理员身份成功登录之后,创建指定的用户配置文件。请参见添加、更改或删除用户 第 35 页。 中文...
- Page 35 第 7 节 操作 7.1 配置 7.1.1 设置系统 使用触摸屏或连接并使用 USB 键盘和 USB 鼠标执行以下步骤。 1. 按下仪器设置>系统设置。 2. 选择一个选项。 选项 说明 日期和时间 设置日期格式、时间格式及日期和时间。 语言 设置显示语言。 网络 设置将数据无纸化导出至网络服务器所必需的网络地址。联系网络管理员以获取网 络地址。 设置显示屏待机时间。选项:2、5、10、30、60 分钟或 "Never"(从不) 显示屏 数据归档 选择手动备份到 USB 闪存盘。 3. 按保存或取消。 7.1.2 添加、更改或删除用户 1. 按下 仪器设置>用户设置。 2.
- Page 36 选项 说明 密码要求 设置密码必须包含的字符数、大写和小写字母、数字和特殊字符。选择“限制重复 字符”以设置密码允许某一字符重复的最多次数。 需要审计注 选择该选项会使用户在更改配置设置时需要输入注释。 释 3. 按保存或 取消。 7.1.3 设置报告 第 38 页以查看和导出报告和数据。 查看、添加或更改报告模板。请参阅 选择报告 1. 按下仪器设置>报告设置 2. 选择一个选项。 选项 说明 添加 新建报告模板。配置标题和页脚的格式和内容。 删除 删除报告模板。 设置默认模板 将现有报告模板设为默认模板。 编辑 更改现有模板。 3. 按保存或取消。 7.1.4 配置测量设置 1. 按下仪器设置>测量设置。 2. 选择一个选项。 选项...
- Page 37 选项 说明 流程 设置默认的样品流程设置。 设置 • 自动调整量程 — 将仪器设置为自动调整量程。如果样品少于 4 ppm,请勿选择该选 项。 • 调节 — 将仪器设置为在测量完成之前等待灯温升高以获得准确的结果。调节仅发生在 托盘上首个样品的首个复制品上。制造商推荐选择该选项。 • 均质处理 — 将自动进样器设置为在测量完成之前对样品进行均质处理。仅当使用自动 进样器时方可选择该选项。 注: 均质处理使样品成分均匀地穿过样品。每次测量过程中,仪器来回推拉 2 mL 样品 5 次。 • 稀释因子 — 如果在分析之前样品已被稀释,请选择该选项。选择该选项会提示用户在 测量完成之前输入一个稀释因子。仪器会使用稀释因子对结果进行调整。 • 调节温度 — 设置紫外线反应器的目标温度。 • 后台测量时间 — 设置后台重复样品的数量。 结果...
- Page 38 3. 读取所选托盘的参数,然后做出必要更改。 4. 按 开始测量。 7.2.2 创建托盘模板 1. 按下执行测量> 创建新托盘。 2. 选择托盘选项。按 进入下一屏幕。 选项 说明 样品数量 设置样品位置数。选择待测样品位置时,每个样品位置都标记一个蓝色圆圈。 重复测量次数 设置样品的重复测量次数 (1 - 5)。 样品 ID 标签 选择如何区分每个样品:逐个区分或通过托盘位置、时间戳或样品 ID 创建者自动 区分样品 ID 。 查看和确认 读取托盘参数。必要时更改托盘。 3. 按保存继续操作。 4. 输入托盘模板的名称。 5. 按保存托盘以保存托盘模板。 6. 选择 “设为默认值”使其作为默认托盘模板。 7.
- Page 39 开始验证之前,准备好必要物品。随后定期执行验证程序,或按管理机构的要求执行。 1. 按下鉴定。 2. 选择一个选项。 选项 说明 校准 在显示屏上显示试剂和标样的制备说明。 SST500 在显示屏上显示试剂和标样的制备说明。 背景 在显示屏上显示试剂的制备说明。 SDBS 在显示屏上显示试剂和标样的制备说明。 SST8000 在显示屏上显示试剂和标样的制备说明。 准确度 在显示屏上显示试剂和标样的制备说明。 3. 输入标样的批号(批次 ID)和过期日期。 4. 按 启动验证程序。 必要时在程序执行期间按暂停或 取消。 第 8 节 维护 危 险 多重危险。只有符有资质的专业人员才能从事文档本部分所述的任务。 警 告 化学品暴露风险。遵守实验室安全规程,穿戴适用于所处理化学品的所有个人防护装备。 有关安全规程,请参阅当前安全数据表(MSDS/SDS)。 8.1 清洁溅出物 警...
- Page 40 8.3 清洗分析仪 完成维护任务后或存放后清洁分析仪,以获得最佳的低水平测量精度。清洁过程可去除可聚集在内部 组件中来自空气的少量碳。 1. 按照以下步骤为一个清洁循环准备清洁溶液: a. 将 30 mL 试剂母液加入干净的试剂瓶中。 b. 向瓶中加入 30 mL 超纯水。 c. 摇匀。 2. 将分析仪的试剂管和样本管放入清洁溶液中。 3. 按维护 > 清洁分析仪。分析仪将用清洁溶液冲洗内部组件。 注: 大约 30 分钟后完成一个清洁循环。状态随即显示在显示屏上。 8.4 更换仪器部件 警 告 夹伤危险。移动的部件可能夹住人体而导致伤害。切勿接触移动部件。 请参阅臭氧过滤器、紫外线反应器、注射泵及接管更换文档。开始执行维护程序之前,备齐所有必要 物品。有关更多更换信息,请参阅显示屏上的信息。 1. 按下维护> 更换部件。 2. 选择一个选项。 选项...
- Page 41 5. 将 GLS 水容器重新安装到仪器内。 6. 按下排空分析仪以排出仪器中的所有液体。 7. 当仪器完成排液程序时,便可以装运了。 第 9 节 故障排除 问题 可能的原因 解决方案 无法开始测定。 设置测定过程中出现错误。 • 关闭仪器电源,然后重新打 开。 • 必要时联系技术支持人员。 系统测试失败。 系统测试期间出现错误。 • 确保正确连接载气气源。 • 必要时联系技术支持人员。 硬件部件出现故障。 测定耗时太长和/或结果一直过 紫外线反应器将要过期。 更换紫外反应器。确保载气量充 足。 低。 反应器周围的接头松动。 确保拧紧反应器周围接头。 紫外线反应器不工作。 紫外线反应器过期或损坏。 更换紫外反应器。请联系技术支 持部门。 未找到样品。...
- Page 42 注: 一些销售地区的产品和物品数量可能有所不同。请与相关分销商联系或参考公司网站上的联系信息。 备件 说明 物品编号 9880200 紫外线反应器更换套件 9891700 注射泵更换套件 9898900 接管更换套件 9890500 臭氧消除装置更换套件 9890600 带有定制瓶盖的试剂瓶套件 9898300 电源,100-240 伏交流电 因地区而异 - 请联系 电源线 Hach 服务部门 配件 说明 物品编号 9459400 试剂母液 校准溶液,KHP,5 ppm C 9459500 9459600 SDBS 验证套件 9459700 USP 系统适用性套件,500 ppb 中文...
- Page 43 配件 (续) 说明 物品编号 USP 系统适用性套件,8 ppm 9459800 9459900 专向性测试套件 9460000 稳健性测试套件 9460100 验证协议套件 中文 43...
-
Page 44: 日本語
目次 1 製品概要 6 スタートアップ 44 ページ 54 ページ 2 仕様 7 操作 45 ページ 55 ページ 3 総合情報 8 メンテナンス 46 ページ 60 ページ 4 設置 9 トラブルシューティング 49 ページ 61 ページ 5 ユーザインターフェースとナビゲーション 10 交換部品とアクセサリー 63 ページ 52 ページ 第... - Page 45 図 2 試料チューブとドレーンチューブの概要 1 シリンジポンプ 6 配管接続マップ 2 オゾンフィルター 7 試薬ボトル 3 試薬チューブ 8 UV リアクター 4 試料用チューブ 9 ドレーンチューブ 5 着脱式ドリップトレイ 10 GLS (気液分離器) 水容器 第 2 章 仕様 この仕様は予告なく変更されることがあります。 仕様 詳細 寸法 (幅 × 奥行き × 高さ) 32 x 51 x 41 cm 14 kg 質量...
- Page 46 仕様 詳細 2% RSD または 3 ppb (大きいほうの値) 再現性 湿式 UV/過硫酸塩 酸化方式 NDIR 検出方式 ディスプレイ 264.2 mm カラータッチスクリーン 高純度エアー、酸素、または窒素、最大エアー圧 684.4 kPa エアー供給 21 CFR 11、USP <643>、JP <2.59>、EP <2.2.44>、IP、CP、KP、EPA 認証 method 415.3、Standard Method 5310C に準拠、CE マーク ホスト I/O イーサネットポート 1 年 保証...
- Page 47 3.1.3 使用上の注意ラベル 装置に取り付けてあるラベルとタグをすべてお読みください。これを怠ると、 人身傷害や装置の損傷 につながるおそれがあります。 この記号が測定器に記載されている場合、 操作用の指示マニュアル、 または安全情報を参 照してください。 このシンボルは、 水銀が存在することを示します。水銀を含む装置は、 該当するすべての 地域の法律に従って廃棄する必要があります。 このシンボルは、指や皮膚を挟み込む可能性があることを示します。 このシンボルは、 化学的危険性を有していることを示します。この場合、 相応の資格をも ち、 化学物質をともなう業務における訓練を受けた者のみに化学物質の取り扱いまたは測 定器に連結中の化学物質供給システムのメンテナンス作業実施が許されます。 このシンボルが付いている電気機器は、 ヨーロッパ域内または公共の廃棄処理システム で処分できません。古くなったり耐用年数を経た機器は、 廃棄するためにメーカーに無償 返却してください。 3.1.4 イラストで使用されているアイコン メ-カ- 供給部品 見る ユーザーマニュアルを読む 3.1.5 製品の危険性 危 険 化学的および生物学的な危険。この装置の用途が処理工程や薬液注入システムの監視で あり、それらに対して公衆衛生、公衆安全、食品/飲料の製造/加工に関する規制や監視要 件が存在する場合、この装置の使用者には、該当するすべての規制を把握して遵守する 責任、および装置の異常時に関する当該規制に従って十分かつ適切な措置を講じる責任 があります。 注...
- Page 48 3.1.6 準拠および認証 注 意 本機器は、住宅環境での使用を意図しておらず、そのような環境ではラジオの聴取に対する十分な 保護が得られない可能性があります。 カナダ電波妨害装置規則、ICES-003、クラス A: これを裏付けるテスト記録はメーカーにあります。 このクラス A デジタル装置は、カナダの障害発生機器規則の要件をすべて満たしています。 FCC PART 15、クラス 「A」 限度値 これを裏付けるテスト記録はメーカーにあります。この機器は FCC 規則のパート 15 に準拠します。 この機器の動作は以下の条件を前提としています: 1. この装置が有害な干渉の原因とならないこと。 2. この装置が望ましくない動作の原因となる可能性のある干渉を含めた、いかなる干渉にも対応し なければなりません。 これらの規格への準拠に責任を持つ当事者による明示的承認を伴わずにこの装置に対する改変また は改造を行うと、ユーザーはこの機器を使用する権限を失う可能性があります。この装置は、FCC 規則のパート 15 に従って、クラス A のデジタル機器の制限に準拠することが試験によって確認され ています。これらの制限は、この機器が商用の環境で使用されたときに、有害な干渉から適切に保護 することを目的に設定されています。この機器は、 無線周波数エネルギーを生成および使用するもの で、取扱説明書に従って取り付けおよび使用しない場合にはそれを放射する場合があり、無線通信に 対して有害な干渉を発生させる可能性があります。住宅地域における本装置の使用は有害な電波妨 害を引き起こすことがあり、...
- Page 49 図 3 製品コンポーネント 1 分析装置 4 電源アダプタ 2 電源コード 5 ガスインレットチューブ 3 試薬ボトル (空) 6 GLS 水容器 第 4 章 設置 注 意 複合的な危険。本書のこのセクションに記載されている作業は、必ず資格のある作業員 が 行う必要があります。 4.1 取り付けのガイドライン 注 意 化学物質による人体被害の危険。検査室の安全手順に従い、取り扱う薬品に適した個人 用保護具をすべて装着してください。安全手順に関する現在の安全性データシート (MSDS/SDS) を参照してください。 注 意 化学物質による人体被害の危険。化学物質および廃液は、地域、県、または国の環境規 制に従って廃棄してください。 警 告 火災の危険。本製品は、可燃性の液体を使用するように設計されていません。...
- Page 50 • ユニットが移動しないように平面のある場所 • 機械的振動や電子ノイズが最低限の場所 • トランスミッターや電力スイッチングなど、機器からの電磁干渉がない場所 • 降水や直射日光から保護する環境筐体内 • 配管や電気接続を行う十分なクリアランスがある場所 • ユーザーがディスプレイを見やすい場所 • ドレーンチューブと互換性のある廃棄物容器のある場所 4.2 配管 4.2.1 GLS 水容器の取り付け 以下の図解手順に示すように、 GLS 水容器に水を追加します。装置のドアを開けて、 手順を実行しま す。 各サンプルトレイの後、 GLS 水容器の水位が容器の表示範囲内になっていることを確認します。水位 が表示範囲を超えている場合は、溢れないように水を一部捨ててください。 日本語...
- Page 51 4.2.2 試料チューブとドレーンチューブの配管 以下の図解手順に示すように、 試料チューブをオートサンプラー (または手動試料容器) に配管し、 ド レーンチューブを廃液容器に配管します。 4.2.3 試薬ボトルの取り付け 試薬液の準備については、試薬準備キットのドキュメントを参照してください。試薬液を準備した ら、以下の図解手順に示すように、試薬チューブを試薬ボトルに接続します。 日本語 51...
- Page 52 4.2.4 エアーまたはキャリアーガスへの接続 本装置はキャリアーガス接続なしでは作動できません。キャリアーガスは、 二酸化炭素が含まれてい ないものを使用する必要があります。供給ガスインレットチューブを使用して、 二酸化炭素を含まな いエアー、酸素、または窒素に接続します。 1. キャリアーガスシリンダー調整器への圧力が 241 ~ 689 kPA であることを確認します。 2. 供給チューブの両端 (3.175 mm 外径) が均等に切断されてクリーンであることを確認します。 チューブの一端を装置の背面にあるガスインレットポートに差し込みます。図 1 44 ページ を参 照してください。 4. チューブのもう一方の端をキャリアーガス供給に接続します。 5. チューブや接続部に漏れがないか点検します。必要に応じて、調整を行います。 4.3 配線 4.3.1 外部デバイスへの接続 (オプション) 装置には 3 基の USB ポートと 1 基のイーサネットポートが装備されています。補助ケーブルを使 用する場合は、...
- Page 53 図 4 ホーム画面 1 ログインアイコン 5 メニューアイコン 2 ログアウトアイコン 6 システムのステータスバー 3 メニュー識別アイコン 7 ユーザーのステータス 4 ホームアイコン 8 日付と時刻 表 1 アイコンの説明 アイコン 解説 ログイン画面に移動します。 システムからユーザーをログアウトします。 このボタンが右上隅にある場合は、ホーム画面に移動できます。ホーム画面が ディスプレイ上にある場合、ホームアイコンはディスプレイの左側近くに表示 されます。 新しいトレイの作成、 USB フラッシュドライブからトレイをインポート、 事前 構成トレイの開始、または手動測定を実行します。 レポートおよび装置データを表示、選択、送信します。 メニュー識別アイコンには現在のメニュー選択が表示されます。 日本語 53...
- Page 54 表 1 アイコンの説明 (続き) アイコン 解説 装置設定を構成します。 適格性確認手順: 校正、SST500、バックグラウンド、SDBS、SST8000、およ び精度テストを開始します。 本装置のメンテナンス手順を表示します。 ヘルプおよび詳細情報を表示します。 ユーザーが本装置にログインしていることを示します。 ユーザーが本装置にログインしていないことを示します。 前の画面を選択します。 選択した画面の情報を保存して、次の画面に移動します。設定の最後にこの矢 印を選択すると、手順が開始されます。 現在選択している画面を示します。 第 6 章 スタートアップ 6.1 管理者としてのログイン 1. ホーム画面で[ログイン] を押します。 2. ユーザーのリストから「admin」を選択します。 3. パスワード「password」を入力します。 4. 新しいパスワードを入力します。 必ず新しいパスワードを記録してください。 5. [保存] を押します。 管理者として正常にログインしたら、指定のユーザープロファイルを作成します。ユーザーの追 55 ページ を参照してください。 加、変更、または削除...
- Page 55 第 7 章 操作 7.1 設定 7.1.1 システム設定 タッチスクリーンを使用するか、USB キーボードおよび USB マウスを接続して、以下の手順を実行 します。 1. [装置設定]>[システム設定] を押します。 2. オプションを選択します。 オプション 解説 日付と時刻 日付の形式、時刻の形式、および日付と時刻を設定します。 [言語] 表示言語を設定します。 ネットワーク ネットワークサーバーへのデータのペーパーレスエクスポートに必要なネッ トワークアドレスを設定します。ネットワーク管理者に連絡して、 ネットワー クアドレスを取得してください。 [表示] 表示のタイムアウトを有効に設定します。オプション: 2、5、10、30、60 分 または [なし]。 [データアーカ USB フラッシュドライブへの手動バックアップを選択します。 イブ] 3. [保存] または [キャンセル] を押します。 7.1.2 ユーザーの追加、変更、または削除...
- Page 56 オプション 解説 [ロック設 選択すると、ユーザーがパスワード入力を所定の回数だけ間違えた場合に、所定 定] の時間が経過しないとログインできなくなります。 [ログイン ユーザーがログインするためにパスワードの入力を試行できる回数の上限を設定 します。オプション: 1、2、3、4、5。 試行回数の 注 : このオプションは、 [ 所定数の失敗後にロック ] ボックスがオンの場合のみ指定できます。 上限] [ロック解 ユーザーが間違ったパスワードを所定の回数入力した場合に待たなければいけな い時間を設定します。オプション: [なし] または 5、10、30、60 分。 除までの時 注 : このオプションは、 [ ロック設定 ] ボックスがオンの場合のみ指定できます。 間] [パスワー パスワードに含める必要のある文字数、大文字と小文字、数字、特殊文字を設定 ドの必要条 します。パスワード内で同じ文字を使用できる回数の上限を設定する場合は、[文 件の編集] 字の繰り返しの上限] を選択します。...
- Page 57 オプシ 解説 ョン [プロセ デフォルトのサンプルプロセス設定を設定します。 ス設定] • [オートレンジ]—測定範囲を自動的に調整するように装置を設定します。試料が 4 ppm 未満の場合はこのオプションを選択しないでください。 • [コンディショニング]—精度の高い結果が必要な測定を行う前に、ランプの温度が 上がるまで装置を待たせるよう設定します。コンディショニングは、トレイ上の最 初のサンプルの最初のレプリケイトに対してのみ実施されます。このオプションを 選択しておくことをお勧めします。 • [均質化]—測定を行う前にオートサンプラーで試料を均質化するように設定しま す。このオプションはオートサンプラーが使用されている場合のみ選択してくださ い。 注 : サンプル内の成分を均質化します。装置が 2 mL のサンプルを前後に 5 回動かします。 • [希釈ファクター]—分析前に試料を希釈する場合にこのオプションを選択します。 選択すると、測定を行う前に希釈ファクターの入力が求められます。装置がこの希 釈ファクターをふまえて結果を調整します。 • [温度の調整]— UV リアクターの目標温度を設定します。 • [バックグラウンド測定回数]: バックグラウンドレプリケイトの数を設定します。 [結果の 結果のデフォルト表示設定を指定します。...
- Page 58 7.2 測定 7.2.1 測定の実行 1. [測定の実行] を押します。 2. オプションを選択します。 オプション 説明 [新規トレイの作成] 新しい試料トレイを作成します。試料トレイテンプレートの作成 58 ページ を参照してください。 [ファイルからトレイを USB フラッシュドライブから試料トレイパラメーターが設定された ロード] トレイをインポートします。 [手動測定] 1 つの指定試料に関する手動測定を設定します。試料 ID とレプリケ イトする試料の量を入力します。 [リストから事前に構成 システムに保存されている試料トレイを測定のために選択します。 されたトレイを選択す る] 3. 選択したトレイのパラメーターを読み取り、必要な変更を行います。 を押して測定を開始します。 7.2.2 試料トレイテンプレートの作成 1. [測定]>[新規トレイの作成] を押します。 2. トレイオプションを選択します。 を押して次の画面に移動します。...
- Page 59 7.3 データ管理 7.3.1 レポートの選択 本装置には、測定、校正、システム正常性分析、システム適合性テスト、エラーログ、バックグラウ ンド統計、 および監査記録データのレポートが保存されています。レポートを読み取ったりエクスポ ートするには、以下の手順に従ってください。 1. [レポートとデータ] を押します。 2. リストからレポートを選択し、 を押して出力オプションを選択します。 オプション 解説 [フィルタ データ範囲を選択して、日付やオペレーターで並べ替えます。 ー][結果] [フォーマッ レポートテンプレートの出力形式 (PDF、CSV、または XML) を選択します。 トの選択] [出力] 出力デバイスとして、プリンター、USB への転送、ペーパーレスエクスポート、 またはディスプレイ表示を選択します。 プリンターでレポートを取得する場合は、プリンターが本装置に接続されている 57 ページ を参照してくださ ことを確認してください。周辺機器設定の構成 い。プロンプトが表示されたら、[印刷] を押します。 USB ポートを通じてレポートを出力する場合は、USB フラッシュドライブを接 続します。プロンプトが表示されたら、[開始] を押します。 7.4 適格性確認手順の実行...
- Page 60 第 8 章 メンテナンス 危 険 複合的な危険。本書のこのセクションに記載されている作業は、必ず資格のある作業員 が 行う必要があります。 注 意 化学物質による人体被害の危険。検査室の安全手順に従い、取り扱う薬品に適した個人 用保護具をすべて装着してください。安全手順に関する現在の安全性データシート (MSDS/SDS) を参照してください。 8.1 流出液の洗浄 注 意 化学物質による人体被害の危険。化学物質および廃液は、地域、県、または国の環境規 制に従って廃棄してください。 1. 流出液の扱いに関するすべての安全上の注意事項を遵守してください。 2. 廃棄物は該当する規定に従って廃棄します。 8.2 装置の洗浄 湿った布で装置の外側を洗浄してから、装置を拭いて乾燥させます。 8.3 分析装置の洗浄 メンテナンス作業後または保管後に分析装置を洗浄して、低濃度域の測定精度を最大限に高めます。 洗浄プロセスでは、内部コンポーネントに回収できる空気中の少量の炭素を除去します。 1. 次のように、1 回の洗浄サイクルに使用する洗浄液を準備します。 a. 30 mL の試薬原液を清潔な試薬ボトルに加えます。 b. ボトルに 30 mL の超純水を加えます。 c.
- Page 61 1. [メンテナンス]>[コンポーネントを交換する] を押します。 2. オプションを選択します。 オプション 解説 [オゾンフィルター オゾンフィルターの使用時間を表示します。オゾンフィルターを交換す 交換] る方法をディスプレイに表示します。 [UV ランプ交換] UV ランプの使用時間を表示します。UV ランプを交換する方法をディス プレイに表示します。 [シリンジ交換] シリンジを交換する方法をディスプレイに表示します。[開始] を押して、 シリンジを交換します。 8.5 ファームウェア更新のインストール 製品 Web サイトでファームウェア更新ファイルを検索します。Web サイトから USB フラッシュド ライブにファイルを保存し、以下の手順を実行して、ファームウェアアップグレードをインストール します。 1. [メンテナンス]>[ファームウェアのアップデート] を押します。 2. USB フラッシュドライブを USB ポートに差し込みます。ファイルの一覧が表示されます。 3. ファームウェア更新用の setup.exe ファイルを選択します。 4.
- Page 62 問題 考えられる原因 対処方法 UV リアクターの使用期限が近 UV リアクターを交換してくだ 測定が完了するのに時間がかか りすぎたり、 結果が一貫して低す づいています。 さい。十分な量のキャリアーガ ぎる。 スがあるか確認します。 リアクターの周りの管継手が リアクターの周りの管継手が締 緩んでいます。 まっているか確認します。 UV リアクターが機能していな UV リアクターが期限切れであ UV リアクターを交換してくだ い。 るか損傷しています。 さい。技術サポートにお問い合 わせください。 試料が見つからない。 試薬ボトルに十分な試薬があ 試薬ボトルに試薬を充填しま りません。 す。 試料チューブがオートサンプ 試料チューブがオートサンプラ ラーに接続されていないか、 試 ーに接続されているか、試料フ 料フラスコに試料がありませ ラスコに試料があるか確認しま ん。...
- Page 63 問題 考えられる原因 対処方法 オートサンプラーが作動しない。 オートサンプラーが接続され オートサンプラーと本装置を USB ケーブルでもう一度接続 ていないか、 電源がオフになっ ています。 します。電源をオンにします。 電源系統の電気的過渡現象が 分析装置とオートサンプラーの 間に市販の USB 光遮断器を取 大きすぎると、 分析装置とサン プラー間の USB 接続を中断さ り付けます。USB 接続を修復 せる可能性があります。 するには、両装置の電源をオフ にしてからオンに戻します。 「Invalid Password (無効なパス 入力したパスワードが正しい 正しいパスワードを入力する パスワードではありません。 か、別のユーザー名を選択しま ワードです)」というメッセージ す。 が表示される。 「Access Denied (アクセスが拒 ユーザーに指定のアクセス許...
- Page 64 交換部品 (続き) 品目 アイテム番号 9890500 オゾンディストラクター交換キット 9890600 試薬ボトル (カスタムキャップ付き) キット 電源装置、100 ~ 240 VAC 9898300 地域によって異なり ます。Hach のサー 電源コード ビス担当にお問い合 わせください アクセサリー 解説 アイテム番号 9459400 試薬原液 9459500 校正液、KHP、5 ppm C SDBS 検証キット 9459600 9459700 USP システム適合キット、500 ppb 9459800 USP システム適合キット、8 ppm 9459900 特異性テストキット...
-
Page 65: 한국어 65
목차 1 제품 개요 6 시작 65 페이지 75 페이지 2 사양 7 작동 66 페이지 76 페이지 3 일반 정보 8 유지보수 67 페이지 81 페이지 4 설치 9 문제 해결 70 페이지 82 페이지 5 사용자 인터페이스 및 탐색 10 교체... - Page 66 그림 2 유압 접속부 개요 1 주사기 펌프 6 배관 연결부 맵 2 오존 필터 7 시약병 3 시약 튜브 8 자외선 반응기 4 시료 튜브 9 배출 튜브 5 탈착 가능한 드립 트레이 10 GLS(Gas Liquid Separator) 물 용기 섹션...
- Page 67 사양 세부 사항 2% RSD 또는 3ppb(더 큰 값) 정밀도 UV/과황산염 산화 NDIR 검출 264.2 mm(10.4 인치) 컬러 터치 스크린 디스플레이 고순도 공기, 산소 또는 질소, 684.4 kPa(100 psi) 최대 기압 공기 공급 인증 21 CFR 11, USP <643>, JP<2.59>, EP<2.2.44>, IP, CP, KP 및 EPA 방법, 표준 방법...
- Page 68 3.1.3 주의 경고 라벨 본 기기에 부착된 모든 라벨 및 태그를 참조하시기 바랍니다. 지침을 따르지 않을 경우 부상 또는 기기 손상이 발생할 수 있습니다. 기기에 이 심볼이 표시되어 있으면 지침서에서 작동 및 안전 주의사항을 참조해야 합니다. 본 심볼은 수은이 있음을 나타냅니다. 수은을 함유한 구성 부품은 해당 지역의 관계법에 따라...
- Page 69 3.1.6 규정 준수 및 인증 주 의 이 장비는 거주 환경에서는 사용할 수 없으며 이러한 환경에서의 주파수 수신에 대한 적절한 보호를 제공하지 않을 수 있습니다. 캐나다 무선 간섭 유발 장치 규정, IECS-003, 등급 A: 보조 테스트 기록은 제조업체가 제공합니다. 본 등급 A 디지털 장치는 캐나다 간섭 유발 장치 규제의 모든 요구조건을 만족합니다. Cet appareil numérique de classe A répond à...
- Page 70 그림 3 제품 구성품 1 분석기 4 전원 공급 장치 2 전원 코드 5 가스 주입구 튜브 3 시약병(비어 있음) 6 GLS 물 용기 섹션 4 설치 주 의 여러 가지 위험이 존재합니다. 자격을 부여받은 담당자만 본 문서에 의거하여 작업을 수행 해야...
- Page 71 • 기기가 흔들리지 않도록 지면이 평평한 장소 • 기계적 진동과 전기적 소음이 적은 장소 • 전송기, 전원 스위치 등과 같은 장비로부터 전자기 간섭이 없는 장소 • 강수 및 직사 광선으로부터 보호 받을 수 있는 케이스 • 배관 및 전기적 연결이 가능하도록 충분한 공간이 있는 장소 •...
- Page 72 4.2.2 샘플 및 배출 튜브 배관 아래의 그림 단계에 따라 샘플 튜브를 자동 샘플 채취기(수동 샘플 용기)로 배관하고 배출 튜브를 폐기 물 용기로 배관합니다 4.2.3 시약병 설치 시약 용액을 준비하려면 시약 준비 키트 설명서를 참조하십시오. 시약 용액을 준비한 후 아래의 그림 단계에...
- Page 73 4.2.4 공기 또는 운반 가스에 연결 운반 가스에 연결하지 않으면 기기가 작동하지 않습니다. 운반 가스에는 이산화탄소가 포함되어서는 안 됩니다.제공된 가스 주입구 튜브를 사용하여 이산화탄소가 없는 공기, 산소 또는 질소에 연결합니 다. 1. 운반 가스 실린더 조절기의 압력이 241~689 kPA(35~100 psi)인지 확인합니다. 2.
- Page 74 그림 4 홈 화면 1 로그인 아이콘 5 메뉴 아이콘 2 로그아웃 아이콘 6 시스템 상태 표시줄 3 메뉴 식별 아이콘 7 사용자 상태 4 홈 아이콘 8 날짜 및 시간 표 1 아이콘 설명 아이콘 설명 로그인 화면으로 이동합니다. 시스템에서...
- Page 75 표 1 아이콘 설명 (계속) 아이콘 설명 기기 설정을 구성합니다. 교정, SST500, 배경, SDBS, SST8000 및 정확도 검사 등 자격 획득 절차를 시 작합니다. 기기에 대한 유지관리 절차를 표시합니다. 도움말과 자세한 내용을 표시합니다. 사용자가 기기에 로그인하면 표시됩니다. 사용자가 기기에 로그인하지 않으면 표시됩니다. 이전...
- Page 76 섹션 7 작동 7.1 설정 7.1.1 시스템 설정 터치 스크린을 사용하거나 USB 키보드와 USB 마우스를 연결하여 아래 단계를 수행합니다. 1. 기기 설정>시스템 설정을 누릅니다. 2. 옵션을 선택합니다. 옵션 설명 날짜 및 시간 날짜 형식, 시간 형식 및 날짜와 시간을 설정합니다. 언어...
- Page 77 옵션 설명 실패한 로 사용자가 로그인하기 위해 올바른 암호를 입력할 수 있는 최대 횟수를 설정합니다. 옵션: 1, 2, 3, 4 또는 5. 그인 시도 참고 : 이 옵션은 " 사용자 잠금 시간 " 항목이 선택된 경우에만 사용할 수 있습니다 . 사용자...
- Page 78 옵션 설명 프로세 기본 샘플 프로세스 설정 값을 지정합니다. 스 설정 • 자동 범위—측정 범위를 자동으로 조정하도록 기기를 설정합니다. 샘플이 4ppm 미 만일 경우 이 옵션을 선택하지 마십시오. • 컨디셔닝—정확한 결과를 얻기 위해 램프 온도가 높아질 때까지 기다렸다가 측정하 도록 기기를 설정합니다. 컨디셔닝은 트레이의 첫 번째 샘플의 첫 번째 사본에서만 수행됩니다.
- Page 79 7.2 측정 7.2.1 측정 시작 1. 측정 시작을 누릅니다. 2. 옵션을 선택합니다. 옵션 설명 새로운 트레이 만들기 새로운 샘플 트레이를 만듭니다. 샘플 트레이 템플릿 만들기 79 페이지을 참조하십시오. 샘플 트레이 매개변수가 설정된 USB 플래시 드라이브에서 트레이를 가 파일에서 트레이 로드 져옵니다.
- Page 80 7.3 데이터 관리 7.3.1 보고서 선택 이 기기는 측정, 교정, 시스템 상태 분석, 시스템 적합성 검사, 오류 일지, 배경 통계 및 감사 기록 데이 터 보고서를 저장합니다. 아래 단계를 사용하여 보고서를 참조하거나 내보냅니다. 1. 보고서 및 데이터를 누릅니다. 2. 목록에서 보고서를 선택한 다음, 출력 옵션에 대해 키를...
- Page 81 섹션 8 유지보수 위 험 여러 가지 위험이 존재합니다. 자격을 부여받은 담당자만 본 문서에 의거하여 작업을 수행 해야 합니다. 주 의 화학물질에 노출될 위험이 있습니다. 실험실의 안전절차를 준수하고, 취급하는 화학 물질 에 맞는 개인보호장비를 안전하게 착용하십시오. 최신 물질안전보건자료(MSDS/SDS)에 서 안전 규정을 참조하십시오. 8.1 유출물...
- Page 82 1. 유지관리>구성품 교체를 누릅니다. 2. 옵션을 선택합니다. 옵션 설명 오존 필터 교체 오존 필터의 매 시간 사용량을 표시합니다. 디스플레이에 오존 필터 교체 방법을 표시합니다. UV 램프 교체 UV 램프의 매 시간 사용량을 표시합니다. 디스플레이에 UV 램프 교체 방법을 표 시합니다. 주사기...
- Page 83 문제 발생 원인 해결 방법 측정을 완료하는 데 시간이 너무 자외선 반응기의 수명이 다했 자외선 반응기를 교체합니다. 많이 걸리고 지속적으로 낮은 결 습니다. 운반 가스 양이 충분한지 확인 과가 나타납니다. 합니다. 반응기 주변의 피팅이 느슨합 반응기 주변의 피팅이 조여졌는 니다. 지...
- Page 84 문제 발생 원인 해결 방법 자동 샘플 채취기가 작동하지 않 자동 샘플 채취기가 연결되어 자동 샘플 채취기에서 기기로 USB 케이블을 다시 연결합니 습니다. 있지 않거나 전원이 꺼진 상태 로 설정되어 있습니다. 다. 전원을 켠 상태로 설정합니 다. 시판되고 있는 USB 광 아이솔 전원...
- Page 85 교체 부품 (계속) 설명 품목 번호 9890600 맞춤형 캡 키트가 있는 시약병 9898300 전원 공급장치 100-240 VAC 지역에 따라 다를 수 있습니다. Hach 서비 전원 코드 스에 문의하십시오 부속품 설명 품목 번호 9459400 시약 원액 9459500 교정 용액, KHP, 5 ppm C 9459600 SDBS 유효성...
-
Page 86: ไทย
สารบั ญ ภาพรวมผลิ ต ภั ณ ฑ์ ในหน้ า การเริ ่ ม ทํ า งาน ในหน้ า รายละเอี ย ดทางเทคนิ ค ในหน้ า การทํ า งาน ในหน้ า ข้ อ มู ล ทั ่ ว ไป ในหน้ า การบํ า รุ ง รั ก ษา ในหน้... - Page 87 รู ป ที ่ ภาพรวมการเชื ่ อ มต่ อ ไฮดรอลิ ก ปั ๊ ม หลอดดู ด ยา แผนที ่ ก ารเชื ่ อ มต่ อ ท่ อ ตั ว กรองโอโซน ขวดรี เ อเจนต์ ท่ อ รี เ อเจนต์ ปฏิ ก รณ์ ท่...
- Page 88 รายละเอี ย ดทางเทคนิ ค รายละเอี ย ด ความแม่ น ยํ า ± 3% ≥ 500 ppb ความแม่ น ยํ า หรื อ ค่ า ที ่ ส ู ง กว่ า 2% RSD 3 ppb ( ออกซิ เ ดชั น UV/Persulfate การตรวจจั...
- Page 89 ห ม า ย เ ห ต ุ ข้ อ ควรทราบระบุ ก รณี ท ี ่ ห ากไม่ ห ลี ก เลี ่ ย ง อาจทํ า ให้ อ ุ ป กรณ์ ไ ด้ ร ั บ ความเสี ย หายได้ ข้ อ มู ล ที ่ ต ้ อ งมี ก ารเน้ น ยํ ้ า เป็ น พิ เ ศษ ฉลากระบุ...
- Page 90 ข้ อ ค ว ร ร ะ วั ง อาจได้ ร ั บ อั น ตรายจากการสั ม ผั ส สารเคมี ปฏิ บ ั ต ิ ต ามขั ้ น ตอนเพื ่ อ ความปลอดภั ย ในห้ อ งปฏิ บ ั ต ิ ก าร และสวมใส่ อ ุ ป กรณ์ ป ้ อ งกั น ทั...
- Page 91 รู ป ที ่ ส่ ว นประกอบของผลิ ต ภั ณ ฑ์ เครื ่ อ งวิ เ คราะห์ อุ ป กรณ์ จ ่ า ยไฟ สายไฟ ท่ อ จ่ า ยก๊ า ซ ขวดรี เ อเจนต์ เปล่ า ถั ง นํ ้ า หั...
- Page 92 ติ ด ตั ้ ง อุ ป กรณ์ ภายในอาคารตํ า แหน่ ง ที ่ แ ห้ ง และสะอาด ระบายอากาศได้ ด ี แ ละมี ก ารควบคุ ม อุ ณ หภู ม ิ • ในพื ้ น ที ่ ท ี ่ ม ี ผ ิ ว เรี ย บเพื ่ อ ไม่ ใ ห้ เ คลื ่ อ นไหว •...
- Page 93 ต่ อ ท่ อ ตั ว อย่ า งและท่ อ ระบาย 4.2.2 ต่ อ ท่ อ ตั ว อย่ า งเข้ า กั บ เครื ่ อ งฉี ด สารตั ว อย่ า งอั ต โนมั ต ิ หรื อ คอนเทนเนอร์ ต ั ว อย่ า งด้ ว ยตนเอง แล้...
- Page 94 เชื ่ อ มต่ อ กั บ อากาศ หรื อ ก๊ า ซพา 4.2.4 เครื ่ อ งจะไม่ ส ามารถทํ า งานถ้ า ไม่ ม ี ก ารเชื ่ อ มต่ อ กั บ ก๊ า ซพา ก๊ า ซพาต้ อ งปราศจากคาร์ บ อนไดออกไซด์ ใช้ ท ่ อ จ่ า ยก๊ า ซเพื ่ อ เชื ่ อ มต่ อ อากาศที ่ ปราศจากคาร์...
- Page 95 รู ป ที ่ หน้ า จอหลั ก ไอคอนล็ อ กอิ น ไอคอนเมนู ไอคอนล็ อ กเอาท์ แถบสถานะระบบ ไอคอนการระบุ เ มนู สถานะผู ้ ใ ช้ ไอคอนหน้ า หลั ก วั น ที ่ แ ละเวลา ตาราง คํ า อธิ บ ายไอคอน ไอคอน...
- Page 96 ตาราง คํ า อธิ บ ายไอคอน ต่ อ ไอคอน คํ า อธิ บ าย กํ า หนดค่ า อุ ป กรณ์ เริ ่ ม กระบวนการพิ จ ารณาคุ ณ สมบั ต ิ การสอบเที ย บ พื ้ น หลั ง และการ , SST500, , SDBS, SST8000 ทดสอบความแม่...
- Page 97 หั ว ข้ อ ที ่ การทํ า งาน การกํ า หนดค่ า ตั ้ ง การตั ้ ง ค่ า ระบบ 7.1.1 ใช้ ห น้ า จอสั ม ผั ส หรื อ เชื ่ อ มต่ อ คี ย ์ บ อร์ ด และเมาส์ เพื...
- Page 98 ตั ว เลื อ ก คํ า อธิ บ าย แก้ ไ ขข้ อ กํ า หนดรหั ส ตั ้ ง จํ า นวนอั ก ขระ ตั ว พิ ม พ์ ใ หญ่ แ ละตั ว พิ ม พ์ เ ล็ ก ตั ว เลข และอั ก ขระพิ เ ศษที ่ ต ้ อ งมี ใ นรหั ส ผ่ า น เลื อ ก จํ...
- Page 99 ตั ว เลื อ ก คํ า อธิ บ าย การตั ้ ง ค่ า ตั ้ ง การตั ้ ง ค่ า กระบวนการตั ว อย่ า งเริ ่ ม ต้ น กระบวนการ ช่ ว งอั ต โนมั ต ิ ตั...
- Page 100 ตั ว เลื อ ก คํ า อธิ บ าย การวั ด ด้ ว ยตนเอง ตั ้ ง การวั ด ตั ว อย่ า งที ่ ร ะบุ ห นึ ่ ง ตั ว อย่ า งด้ ว ยตนเอง ป้ อ น ตั...
- Page 101 ทํ า กระบวนการพิ จ ารณาคุ ณ สมบั ต ิ ข้ อ ค ว ร ร ะ วั ง อาจได้ ร ั บ อั น ตรายจากการสั ม ผั ส สารเคมี ปฏิ บ ั ต ิ ต ามขั ้ น ตอนเพื ่ อ ความปลอดภั ย ในห้ อ งปฏิ บ ั ต ิ ก าร และสวมใส่ อ ุ ป กรณ์ ป ้ อ งกั น ทั...
- Page 102 การทํ า ความสะอาดอุ ป กรณ์ ทํ า ความสะอาดภายนอกของอุ ป กรณ์ ด ้ ว ยผ้ า ชุ บ นํ ้ า หมาดๆ แล้ ว เช็ ด อุ ป กรณ์ ใ ห้ แ ห้ ง ทํ า ความสะอาดเครื ่ อ งวิ เ คราะห์ ทํ...
- Page 103 เตรี ย มจั ด ส่ ง ห ม า ย เ ห ต ุ เครื ่ อ งต้ อ งผ่ า นการขจั ด สิ ่ ง เจื อ ปนก่ อ นการจั ด ส่ ง ต้ อ งระบายของเหลวทั ้ ง หมดออกจากเครื ่ อ ง กด...
- Page 104 ปั ญ หา สาเหตุ ท ี ่ เ ป็ นไปได้ แนวทางแก้ ไ ขปั ญ หา รายงานที ่ ส ่ ง ออกนั ้ น ไม่ ม ี ข ้ อ มู ล เกิ ด ความผิ ด พลาดเมื ่ อ ทํ า การรายงาน ติ...
- Page 105 , 100–240 VAC แตกต่ า งไปตามภู ม ิ ภ าค สายไฟ โปรดติ ด ต่ อ ฝ่ ายบริ ก ารของ Hach อุ ป กรณ์ เ สริ ม คํ า อธิ บ าย หมายเลขสิ น ค้ า สารละลายเข้ ม ข้ น รี เ อเจนต์...
-
Page 106: 繁體中文
目錄 1 產品概述 6 啟動 第 106 頁 第 116 頁 2 規格 7 操作 第 107 頁 第 117 頁 3 一般資訊 8 維護 第 108 頁 第 121 頁 4 安裝 9 故障排除 第 111 頁 第 123 頁 5 使用者介面與導覽... - Page 107 圖 2 液壓連接概述 1 注射泵 6 管道連接圖 2 臭氧過濾器 7 試劑瓶 3 試劑管 8 紫外線反應器 4 取樣管 9 排水管 5 可拆卸式滴水盤 10 GLS (氣液分離器) 水容器 第 2 節 規格 規格如有變更,恕不另行通知。 規格 詳細資料 尺寸 (寬 x 深 x 高) 32 x 51 x 41 cm (12.6 x 20.0 x 16.2 in.) 14 kg (31 lb) 重量...
- Page 108 規格 詳細資料 2% RSD 或 3 ppb (較大值) 精度 氧化 紫外線/過硫酸鹽 NDIR 檢測 顯示器 264.2 mm (10.4 in.)彩色觸控式螢幕 高純度空氣、氧氣或氮氣;最大氣壓 684.4 kPa (100 psi) 氣體供應 符合 21 CFR 11、USP <643>、JP <2.59>、EP <2.2.44>、IP、CP、KP 和 認證 EPA 方法 415.3 和標準方法 5310C;CE 標誌 主機 I/O 乙太網路連接埠...
- Page 109 當儀器上貼有此標誌,請參考說明書以瞭解操作和/或安全資訊。 此標誌表示有水銀。必須依照所有適用的當地和地區法律,處理含有水銀的零件。 此標誌表示有潛在的捲夾危險。 此標誌表示化學傷害之風險,並指示只有受過化學品處理訓練的合格人員才能處理化學 品,或對和設備有關的化學品傳遞系統執行維護。 電氣設備若標有此標誌,不可棄置於歐洲家庭或公共垃圾處理系統。使用者可免費將老舊 或已無法使用的設備交回給製造商報廢處理。 3.1.4 例圖內使用的圖示 製造商提供的零件 查看 閱讀使用手冊 3.1.5 產品危險 危 險 化學或生物性危險。若利用此儀器監控處理製程和/或化學投藥系統,而且這些系統必須符 合與公共衛生、公共安全、食品或飲料製造或加工有關的法規限制和監控要求,此儀器之 使用者有責任瞭解並遵守任何適用的法規,並備妥足夠且適當的機制,以確保在儀器故障 時遵循適用的法規。 警 告 化學暴露危險。本儀器的 UV 燈零件含有水銀。在丟棄儀器之前,請先移除 UV 燈零件。請 遵守當地、國家及聯邦之相關法規來報廢處理 UV 燈零件。 警 告 化學品暴露危險。遵守實驗室安全程序,並針對所處理的化學品穿戴所有適當的個人防護 裝備。請參閱現行的安全資料表 (MSDS/SDS) 以瞭解安全協定。 3.1.6 合規性與認證 警 告 此設備不適用於居住環境,且可能無法對這類環境中的無線電接收提供足夠的防護。...
- Page 110 佐證測試記錄留存於製造商處。 此 Class A 數位設備合乎加拿大無線電干擾生成設備法規的全數規定。 Cet appareil numérique de classe A répond à toutes les exigences de la réglementation canadienne sur les équipements provoquant des interférences. FCC 第 15 部分,「A」類限制 佐證測試記錄留存於製造商處。此裝置符合 FCC 規定的第 15 條。操作必須合乎下列條件: 1. 該設備不會造成有害的干擾。 2. 該設備必須接受任何接收到的干擾,包括可能導致意外操作的干擾。 倘若更動或修改此設備,但其方式並未獲得負責遵從方的明確認可,使用者可能會喪失操作此設備的 權利。此設備已經過測試,並符合...
- Page 111 圖 3 產品零件 1 分析儀 4 電源供應器 2 電源線 5 進氣管 3 試劑瓶 (空) 6 GLS 水容器 第 4 節 安裝 警 告 多重危險。唯有合格的人員才能執行本章節中描述的作業。 4.1 安裝準則 警 告 化學品暴露危險。遵守實驗室安全程序,並針對所處理的化學品穿戴所有適當的個人防護 裝備。請參閱現行的安全資料表 (MSDS/SDS) 以瞭解安全協定。 警 告 化學品暴露危險。請依照當地、地區和國家法規要求處置化學品和廢棄物。 警 告 有起火的危險。此產品不得與易燃液體搭配使用。 注 意 本儀器容易受到電磁和機電干擾。這些干擾可能會影響本儀器的分析效能。請勿將本儀器放在可能會...
- Page 112 • 放置位置應具有平坦表面,以避免設備移動 • 放置位置應儘量避免機械振動和電子雜訊 • 放置位置不能有設備 (例如發射器、電源開關等) 發出的電磁干擾 • 安裝於可保護免受雨水及陽光直射影響的環境室中 • 放置位置應有足夠的間隙,以進行管道和電氣連接 • 放置位置可以讓使用者輕易看到螢幕 • 放置位置可以讓排水管連接至廢液容器 4.2 配管 4.2.1 安裝 GLS 水容器 依照下列圖示步驟所示,將水加到 GLS 水容器中。打開儀器的門以執行這項程序。 在測量過樣品托盤上的所有樣品後,請檢查 GLS 水容器中的水位,以確保容器水位不會超過一半。如 果容器內的水位超過一半,請倒出一些水,以防溢出。 繁體中文...
- Page 113 4.2.2 設置取樣管及排水管 將取樣管接到自動取樣器 (或手動取樣容器),並將排水管接到廢液容器,如下列圖示步驟所示。 4.2.3 安裝試劑瓶 請參閱試劑準備套件說明文件以準備試劑溶液。試劑溶液備妥之後,請依照下列圖示步驟所示,將試 劑管連接至試劑瓶。 繁體中文 113...
- Page 114 4.2.4 連接至空氣或載氣 必須連接載體氣體,儀器才能運作。載氣不得包含二氧化碳。使用進氣管來連接不含二氧化碳的空 氣、氧氣或氮氣。 1. 確定載氣鋼瓶調節器上的壓力介於 241 至 689 kPA (35 至 100 psi)。 2. 確定進氣管兩端 (外徑 ⅛ 英吋)切割整齊且乾淨。 將進氣管的一端插入儀器後方的進氣口中。請參閱圖 1 第 106 頁。 4. 將進氣管的另一端連接至載氣供給。 5. 檢查進氣管和連接口是否有洩漏。必要時進行調整。 4.3 電氣安裝 4.3.1 連接至外部裝置 (選配) 本儀器有三個 USB 連接埠和一個乙太網路連接埠。如果使用輔助電纜,請確定電纜長度少於 3 公尺 (9.84 第 106 頁。請參閱選配 英呎)。連接選配的外部裝置,以協助設定與使用儀器。請參閱產品概述...
- Page 115 圖 4 首頁畫面 1 登入圖示 5 功能表圖示 2 登出圖示 6 系統狀態列 3 功能表識別圖示 7 使用者狀態 4 首頁圖示 8 日期與時間 表 1 圖示說明 圖示 說明 前往登入畫面。 將使用者登出系統。 當此按鈕位於右上角時,可前往首頁畫面。當顯示螢幕上為首頁畫面時,首頁 圖示會顯示在顯示螢幕的左側附近。 製作新的托盤、從 USB 隨身碟匯入托盤、啟動預先配置的托盤,或是進行手動 測量。 顯示、選擇和傳送報告及儀器資料。 功能表識別圖示顯示幕前的功能表選擇。 繁體中文 115...
- Page 116 表 1 圖示說明 (續) 圖示 說明 配置儀器設定。 啟動驗證程序:校正、SST500、背景、SDBS、SST8000 和準確度測試。 顯示儀器的維護程序。 顯示說明及更多資訊。 顯示有使用者登入儀器。 顯示沒有使用者登入儀器。 選擇前一個畫面。 儲存所選畫面上的資訊,然後移至下一個畫面。如果在配置結束時選擇此箭 頭,即會啟動程序。 顯示目前選擇的畫面。 第 6 節 啟動 6.1 以管理員身分登入 1. 按下首頁畫面上的登入。 2. 從使用者名單中選擇「admin」。 3. 輸入密碼:password 4. 輸入新密碼。 請確實記錄新密碼。 5. 按下儲存。 順利以管理員身分登入後,可製作指定的使用者設定檔。請參閱新增、變更或移除使用者 第 117 頁。 繁體中文...
- Page 117 第 7 節 操作 7.1 配置 7.1.1 設定系統設定 使用觸控式螢幕或連接 USB 鍵盤和 USB 滑鼠,以執行下列步驟。 1. 按下儀器設定 > 系統設定。 2. 選擇選項。 選項 說明 日期與時間 設定日期格式、時間格式,以及日期與時間。 語言 設定顯示語言。 網路 設定所需的網路位址,以將無紙化資料匯出至網路伺服器。聯絡網路管理員以取得 網路位址。 顯示器 「顯示逾時」設定啟用。選項:2、5、10、30、60 分鐘,或永不。 資料封存 選擇手動備份至 USB 隨身碟。 3. 按下儲存或取消。 7.1.2 新增、變更或移除使用者 1. 按下儀器設定 > 使用者設定。 2.
- Page 118 選項 說明 編輯密碼要 設定密碼必須包含的字符、大小寫字母、數字和特殊字符數量。選擇「限制重複 求 字符」以設定字符在密碼中允許出現的最多次數。 需要稽核意 此選項讓使用者在變更配置設定時需輸入註解。 見 3. 按下儲存或取消。 7.1.3 設定報告設定 第 120 頁 以檢視及匯出報告與資料。 檢視、新增或變更報告範本。請參閱 選擇報告 1. 按下儀器設定 > 報告設定 2. 選擇選項。 選項 說明 新增 製作新的報告範本。配置頁首及頁尾格式與內容。 刪除 清除報告範本。 設定預設值 將現有的報告範本設為預設範本。 編輯 變更現有的範本。 3. 按下儲存或取消。 7.1.4 配置測量設定 1. 按下儀器設定 > 測量設定。 2.
- Page 119 選項 說明 流程 設定預設樣品流程設置。 設定 • 自動設定範圍—將儀器設定為自動調整測量範圍。若樣品少於 4 ppm,請勿選擇此選 項。 • 調節—將儀器設定為完成測量前先等待燈溫增加,以取得準確的結果。調理僅作用於 托盤上第一樣品的第一個重複值上。製造商建議選取此選項。 • 均質—將自動取樣器設定為在完成測量前先均質樣品。僅在使用自動取樣器時選擇此 選項。 註 均質化讓樣品成分均勻分佈在樣品中。在每次測量期間,儀器會來回推拉 2 mL 樣品 5 次。 • 稀釋因子—如果樣品在分析前已稀釋過,請選擇此選項。選擇以提示使用者在完成測 量前先輸入稀釋因子。儀器會納入稀釋因子來調整結果。 • 調整溫度—設定紫外線反應器的目標溫度。 • 背景測量次數—設定背景複本數量。 結果 為結果設定預設顯示設定。 顯示 • 測量單位—將結果顯示單位設定為 ppm 或 ppb。選擇「採用國際單位制」方塊,使結 設定 果以 mg/L 或 µg/L 顯示。 •...
- Page 120 選項 說明 設定一個指定樣品的手動測量。輸入樣品 ID 及要重複測量的樣品數 手動測量 量。 從清單中選取預先設定 選擇儲存於系統的樣品托盤以進行測量。 的托盤 3. 讀取所選托盤的參數,然後進行必要變更。 4. 按下 開始進行測量。 7.2.2 製作樣品托盤範本 1. 按下執行測量 > 建立新托盤。 2. 選擇托盤選項。按下 前往下一個畫面。 選項 說明 有幾個樣品 設定樣品位置的數量。選擇測量的樣品位置之後,每個樣品位置都會以藍色圓 圈標示。 設定要測量的樣品複本數量 (1 至 5)。 有幾個重複 樣品識別碼標記 選擇每個樣品的識別方式:個別、使用具有時間戳記之托盤位置的自動樣品 ID,或是使用樣品 ID 建立器的自動樣品 ID。 檢閱與確認...
- Page 121 7.4 進行驗證程序 警 告 化學品暴露危險。遵守實驗室安全程序,並針對所處理的化學品穿戴所有適當的個人防護 裝備。請參閱現行的安全資料表 (MSDS/SDS) 以瞭解安全協定。 在驗證程序開始前,先收集必要的項目。請定期或依照監管機構的要求,進行下列程序。 1. 按下驗證。 2. 選擇選項。 選項 說明 校正 在顯示器上顯示如何準備試劑及標準品的說明。 SST500 在顯示器上顯示如何準備試劑及標準品的說明。 背景 在顯示器上顯示如何準備試劑的說明。 SDBS 在顯示器上顯示如何準備試劑及標準品的說明。 SST8000 在顯示器上顯示如何準備試劑及標準品的說明。 準確度 在顯示器上顯示如何準備試劑及標準品的說明。 3. 輸入標準品的批次識別碼 (Lot ID) 及失效日期。 4. 按下 以啟動程序。 必要時可在程序進行期間,按下暫停或取消。 第 8 節 維護 危...
- Page 122 8.3 清潔分析儀 需在維護工作結束後或由存放處取出使用之前清潔分析儀,以獲得最佳的低水平測量準確度。清潔程 序可移除來自空氣並累積於內部零件的少量碳。 1. 請依照下列步驟準備單次清潔循環程序使用的清潔溶液: a. 將 30 mL 的 One Reagent Stock Solution 加入乾淨的試劑瓶中。 b. 在瓶中加入 30 mL 的超純水。 c. 以旋轉搖晃方式將其混合均勻。 2. 將分析儀的試劑管和取樣管放入清潔溶液中。 3. 按下維護 > 清潔分析儀。分析儀會用清潔溶液沖洗內部零件。 註 單次清潔程序約於 30 分鐘後完成。狀態會顯示於顯示器上。 8.4 更換儀器零件 警 告 夾傷危險。移動式零件可能會夾住人體而導致傷害。請勿觸摸移動式零件。 請參閱臭氧過濾器、紫外線反應器、注射器和配管更換套件說明文件。在開始進行這些維護程序前, 請先收集所有必要項目。請參閱顯示螢幕上的資訊,以取得關於更換的詳細資訊。 1.
- Page 123 5. 將 GLS 水容器裝回儀器內。 6. 按下排乾分析儀以排出儀器的所有液體。 7. 儀器完成排水程序之後,儀器即可裝運。 第 9 節 故障排除 問題 可能的原因 解決方案 未能開始測量。 測量設定期間發生錯誤。 • 關閉儀器電源,然後再次開 啟。 • 如有必要,請聯絡技術支 援。 系統測試失敗。 系統測試期間發生錯誤。 • 請確定正確連接至載氣供 應。 硬體零件發生故障。 • 如有必要,請聯絡技術支 援。 UV 反應器快要過期。 更換 UV 反應器。確定有足量的 完成測量的所需時間太長,及/或 結果持續偏低。 載氣量。 反應器周圍的配件鬆動。...
- Page 124 關閉儀器電源,然後再次開啟。 面錯誤訊息。 如有必要,請聯絡技術支援。 測量結果報告出現隨機錯誤。 硬體零件的溫度或電壓過高。 請聯絡技術支援。 第 10 節 更換零件和配件 警 告 有使人受傷的危險。使用未經核准的零件可能造成人員受傷、儀器受損或設備故障。本節 中的更換零件已經過製造商認可。 註 某些銷售地區可能會有不同的產品和文章編號。請聯絡適當的經銷商,或是參閱公司網站上的聯絡資訊。 更換零件 說明 項目編號 UV 反應器更換套件 9880200 9891700 注射器更換套件 9898900 配管更換套件 9890500 臭氧解離器更換套件 9890600 試劑瓶與有客製瓶蓋的套件 9898300 電源供應器,100–240 VAC 依地區而異 - 請聯絡 電源線 Hach 服務中心 繁體中文...
- Page 125 配件 說明 項目編號 9459400 試劑儲備溶液 校正溶液,KHP,5 ppm C 9459500 9459600 SDBS 驗證套件 9459700 USP 系統適用性套件,500 ppb USP 系統適用性套件,8 ppm 9459800 9459900 特定性測試套件 9460000 穩健性測試套件 9460100 驗證協定套件 繁體中文 125...
- Page 128 Tel. +49 (0) 2 11 52 88-320 SWITZERLAND Fax (970) 669-2932 Fax +49 (0) 2 11 52 88-210 Tel. +41 22 594 6400 orders@hach.com info-de@hach.com Fax +41 22 594 6499 www.hach.com www.de.hach.com © Hach Company/Hach Lange GmbH, 2021. All rights reserved. Printed in China.
Need help?
Do you have a question about the QbD1200+ and is the answer not in the manual?
Questions and answers