Advertisement
Quick Links
Advertisement

Subscribe to Our Youtube Channel
Related Manuals for ClearView EXPANDA EXP-02


Summary of Contents for ClearView EXPANDA EXP-02
- Page 1 EXP-02 ASSEMBLY INSTRUCTIONS VERSION 3...
-
Page 2: Introduction
Phone: (03) 8351 9933 Email: info@clearviewaccessories.com.au Website: clearviewaccessories.com.au Find us on social media facebook.com/clearviewaccessories instagram.com/clearviewaccessories youtube.com/clearviewaccessories Due to Clearview's Continuous Improvement Program, information may change without notice. Clearview takes no responsibility for the result of incorrect use of these installation instructions. clearviewaccessories.com.au... -
Page 3: Table Of Contents
Contents Introduction Getting Started Before You Start Bill of Materials 7-13 Assembly Instructions FAQS Warranty clearviewaccessories.com.au... -
Page 4: Getting Started
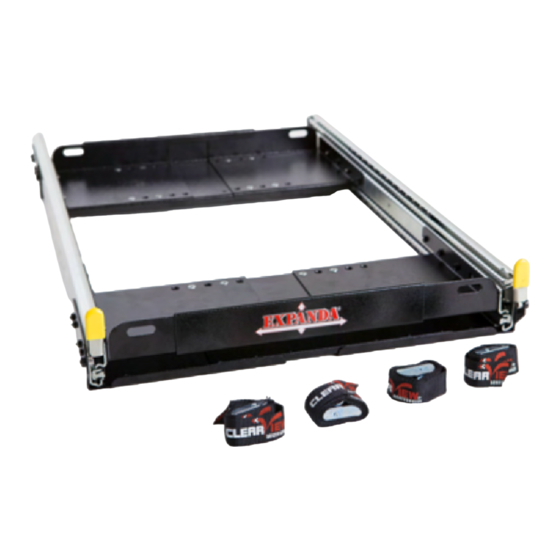
Getting Started The straight fridge slide that fully adjusts to fit most portable fridges. What's in the box 1 x 3mm T-Handle Hex Allen Key 1 x 5mm Hex Allen Key 4 x Tie Down Straps If anything is missing, or damaged, please do not install your new Expanda Slide and contact us on 03 8351 9933 or via: info@clearviewaccessories.com.au Tools Required: G Clamp... -
Page 5: Before You Start
Before you Start Cautions | warnings WARNING CAUTION Read through the fitting instructions before installation of Clearview Accessories. Always install the accessory following the fitting instructions. Failure to do so may cause damage to the vehicle or the accessory. Ensure all recyclable discarded vehicle accessory components and packaging are recycled following local recycling regulations. -
Page 6: Bill Of Materials
Bills of Materials The Expanda XL Tray Size Adjusts every 20mm from 490mm to 650mm. EXP-02 FOR TECHNICAL SUPPORT CALL 03 8351 9933... -
Page 7: Assembly Instructions
Assembly Instructions Begin by preparing the pieces from your kit. Lay out each panel, as per the bill of materials on page 6. clearviewaccessories.com.au... - Page 8 Assembly Instructions Begin with Part A, BB and C, which will make up the front tray assembly. (BB is for the front tray assembly which has the 'Expanda' Logo) Insert and slide plate A (LHS) and plate C (RHS) into both sides of plate BB (Middle). Adjust your sizing widths to suit your fridge application.
- Page 9 Assembly Instructions Locate the bag of screws included in your Expanda Box. Using the Metric 3mm Hex Allen Key, and the M5 x8 Soc CSK screws to secure plates together as shown. x4 into Part A (LHS) and C (RHS) front tray assembly Repeat above for rear tray assembly (Plates A, B and C).
- Page 10 Assembly Instructions Use the 5mm Hex Allen Key to secure the x2 M6 Cap screws provided, screw them into the legs of the front mounting bracket. Attach Part D, E, and F to the bearing runners, starting from the rear end to the front end. Using x3 M5 Soc CSK screws, secure in the ends.
- Page 11 Assembly Instructions We will now fit the A, BB and C into place. Pull your bearing runners out, and align the holes to the front of the bearing runners. Locate the third furthest hole, and align it to the button head screw.
- Page 12 Assembly Instructions Place your fridge onto the extended slide. Use your remaining plate to find the back of your fridge, and place the plate under the fridge. Remove the fridge, but do not move the plate. Then, with your screws, find the holes to align your plate into position, followed by the other side.
- Page 13 How do I maintain my Expanda Slide? Regular routine maintenance will help to ensure continued smooth operation of your Clearview Expanda! Keep the slide runners, tray and bearings free from dirt and grit Clean your slide regularly, wiping it down with a clean, damp cloth to remove any dirt or grit.
-
Page 14: Faqs
FAQS: Can I install my Expanda slide myself? What size Expanda Slide do I need? Yes! The Clearview Expanda slide is The Expanda slide is the straight fridge easy to install into your vehicle. slide that fully adjusts to fit most portable fridges. -
Page 15: Warranty
If your claim is accepted for defects in material or workmanship Clearview® will, at its discretion, offer to repair, replace parts, or return and refund. - Page 16 Clearview Accessories 3 Frog Court, Craigieburn VIC 3064 (03) 8351 9933 info@clearviewaccessories.com.au clearviewaccessories.com.au...
Need help?
Do you have a question about the EXPANDA EXP-02 and is the answer not in the manual?
Questions and answers