Table of Contents
Advertisement
Quick Links
Advertisement
Table of Contents

Related Manuals for ClearView POWER SLIDE


Summary of Contents for ClearView POWER SLIDE
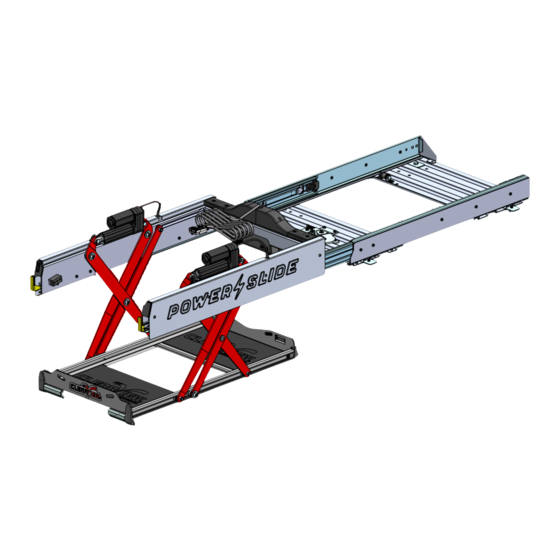
- Page 1 ASSEMBLY INSTRUCTIONS VERSION 2...
-
Page 2: Our Range
Our Range Towing Mirrors Power Boards Rock Tamers Tyre Spider Power Slides Easy Slides Expanda Slide Fridge Cage Cutlery Set Pantry Clip on Trays Cable Saver clearviewaccessories.com.au... -
Page 3: Introduction
Phone: (03) 8351 9933 Email: info@clearviewaccessories.com.au Website: clearviewaccessories.com.au Find us on social media facebook.com/clearviewaccessories instagram.com/clearviewaccessories youtube.com/clearviewaccessories Due to Clearview's Continuous Improvement Program, information may change without notice. Clearview takes no responsibility for the result of incorrect use of these installation instructions. clearviewaccessories.com.au... -
Page 4: Table Of Contents
Contents Our Range Introduction Getting Started Before You Start Assembly Instructions Positioning the Slide Installing your Fridge Safe Usage FAQs Warranty clearviewaccessories.com.au... -
Page 5: Getting Started
8x clamp plates 4x stainless steel bolts 2x Clevis pins 2x Clevis clips If anything is missing, or damaged, please do not install your new Power Slide™ and contact us on 03 8351 9933 or via: info@clearviewaccessories.com.au Tools Required: T25mm Allen Key... -
Page 6: Before You Start
Release the latch and push your slide in gently. If you’re slamming the slide in, it will cause damage, resulting in the latches not releasing properly. Please note that our Clearview Power Slide® is not designed for safe operation in an outdoor environment or to withstand the elements. Constant exposure to the elements such as rain and moisture can cause damage to the electrical components. -
Page 7: Assembly Instructions
Power Slide™ will be made void if attempted. This guide is for fitting a Clearview Power Slide® to a vehicle drawer system. Some assembly of the slide is required prior to installation, as it has been partially dismantled for packaging and freight. - Page 8 Slightly hang the front end of the Power Slide™ over the edge of the bench/table, ensuring that it will remain in its spot. NB: It is recommended to use a G-Clamp to help keep the Power Slide™ secure on the bench/table.
- Page 9 IMPORTANT - If you are running the Anderson Plug power supply from the vehicle to the Power Slide™, you need to secure the Power Slide™ to your vehicle before the next step, as you will need power to extend the actuators and place the clevis pins and clips in.
- Page 10 Then secure the clevis pins with the clevis clips, attaching the clip from the outer side (Refer image 3) Once the Clevis clips are secure, you will need to cycle the Power Slide™ until the actuators reach their home position.
-
Page 11: Positioning The Slide
Temporarily place your fridge into the Power Slide™ in the stowed position. Test the position of the Power Slide™ to ensure it remains clear of vehicle side trims and rear door in all possible configurations, including closing the vehicle rear door with the Power Slide™... -
Page 12: Installing Your Fridge
An additional strap bracket is included on the tray, should you choose to use this as a tie down point instead. To secure fridge, hold the strap by the buckle above the Power Slide™ and feed the loose end of the strap down through the tie down point and through the Power Slide™ strap provision from inside to out. -
Page 13: Safe Usage
Safe Usage The Clearview Power Slide® has a maximum weight capacity of 180Kg on the fridge tray at the maximum extension of slide. Do not overload or use the slide in a manner contrary to its intended operation as you may damage your equipment and void warranty. -
Page 14: Faqs
The Clearview Power Slide® smoothly lowers the fridge up to 290mm. Please note that the Clearview Power Slide® is not designed for safe operation in an outdoor environment or to withstand the elements. Constant exposure to the elements such as rain and moisture can cause damage to the electrical components. -
Page 15: Warranty
A receipt will be required to make a warranty claim on any Clearview® product. If we determine that a Clearview Easy Slide® or Clearview Power Slide® is defective in materials or workmanship during the Warranty, we will either repair or replace the product. - Page 16 Clearview Accessories 3 Frog Court, Craigieburn VIC 3064 (03) 8351 9933 info@clearviewaccessories.com.au clearviewaccessories.com.au...
Need help?
Do you have a question about the POWER SLIDE and is the answer not in the manual?
Questions and answers