Table of Contents
Advertisement
Quick Links
HDS Series
Hot Water - Gas Powered - Diesel Heated
Operator's Manual
E N
E M
IS S
ted.
RIS
R T
mit
V E
whe
/ A
RIS
mis
G
D OP-
pas
IN
REA
ORE
RIE
SGO
R N
RY,
LLY
BEF
by
sea
W A
K OF
INJU
EFU
only
aña
RIS
NS
CAR
be
to
used
NT
UCE
THE
CTIO
is
R
AVA
se
par
noz
RIS
RED
G INS
mac
TRU
hine
ERA
être
TEU
utili
of
TO
TIN
This
rato
rs.
DE
L'OP
l doit
DE
US-
te
stre
USI
ERA
ed
NG.
ope
app
UEL
arei
ANT
ES
men
RIS
qua
LE
lifi
MAN
Cet
N.
lifi
es.
ION
o sola
t
PRE
SGO
LIR
E
TIO
urs
OPE
qua
RAC
e ser
usad
pro
duc
téng
RIE
UTI
LISA
ope
rate
UAL
ipo
deb
os.
this
en-
A ALT
des
EL
MAN
equ
cali
fi cad
ON.
a.
Use
s un
LEA
E.
Este
rado
res
IATI
are
dan
un
RIS
ARS
ope
ASP
tila
HYX
ted
Util
iser
to
en
CLO
por
K
OF
a wel
l ven
YXI
E.
pro
duc
RIS
prot
RIS
in
D'A
SPH
. Use
el
da.
RIE
only
QUE
aér
é.
IXIA
ade
cua
s.
uad
RIS
it bien
DE
ASF
ción
both
hand
à
ir
dro
SGO
ven
tila
with
SE.
Ten
RIS
und
gro
RIE
a de
K .
Hold
OUS
SIÓ
N.
ER
are
S BAC
ET
REP
PRE
NG
RIS
être
et
GUN
E PIS
KICK
TOL
CON
LA
DA
fi ls
SPR
AY
GNE
EVE
os.
CAU
SE
SGO
RIE
LA
POI
ns.
SE
MU
man
CAN
as
of
cas
deu
x mai
TOL
A
las
dos
FAC
ES
ping
are
LA
PIS
a con
SUR
d grip
ent
les
Sos
teng
. HOT
des
igne
r seu
lem
lanc
es.
INJ
URY
only
d.
che
olet
s et
te
las
RIS
K OF
Use
wan
S.
Tou
pist
sola
men
BUR
NS.
y gun
and
CHA
UDE
poig
née
. Use
lanz
a.
spra
ES
ées
des
IEN
llo
TES
y la
SUR
ies
FAC
isol
S CAL
gati
part
ERF
ada
ICIE
s del
SUP
as
aisl
áre
WARNING:
This product can expose you to chemicals known to the State of
California to cause cancer and birth defects or other reproductive harm.
For more information about this regulation:
N
h is
per-
fuel
C IO
or
torc
add
A U
n fl
ame
Do
not
E C
ope
FIR
E.
per-
est
. Ne
whe
RIS
re
K OF
e nue
DE
FEU
rati
on.
P R
only
ids.
fl amm
QUE
en
opé
a
T /
. Ope
rate
able
liqu
où
une
RIS
est
o o
GO.
llam
No
ION
y fl
amm
ng.
end
roits
able
s.
mac
hine
el fueg
FUE
DE
EXP
LOS
spra
ope
rati
aux
infl
amm
t que
la
s don
de
SGO
r
K OF
Do
not
hine
is
N.
Util
iser
liqu
ides
dan
en
.
área
RIE
p clea
ge
mac
SIO
er
de
el
pen
ucto
bles
ajan
do.
S.
Kee
disc
har
n the
D'EX
vap
PLO
oris
uran
t dies
el
prod
infl
ama
trab
SON
ct
S
QUE
Ne
pas
carb
ION
e liqu
Use
idos
uina
este
TO
PER
h or
dire
SOU
es.
e.
ter
de
LOS
roci
la
mág
URY
touc
CHA
UDE
onn
-
ajou
DE
EXP
s.
No
ndo
ERE
Do
INJ
not
s.
EAU
des
pers
AS.
Man
TE
n perm
olin
itido
a cua
SEV
FLU
ID.
buse
u vers
SON
A CAL
as.
IEN
gas
ION
OR
RGE
r loin
des
jet
d'ea
S A
AGU
PER
s per
son
dir
INJ
ECT
DIS
CHA
teni
ger
SEV
le
ERA
GA
a o
DE
otra
IVE
K
OF
HOT
s.
. Se
pas
diri
ES
DES
CAR
agu
PRO
TECT
ts
zle.
at
per
son
SSU
RES
Ne
O LES
uill
ION
a.
fl ujo
del
OTH
ER
.
men
am
DE
BLE
SOR
TIE.
ÓN
de
boq
el
ja
AND
mac
hine
n et
vête
QUE
ON
A LA
ETR
ACI
nce
e ni
diri
WEA
ng
R
this
prot
ectio
-
SSI
DE
a del
PEN
alca
toqu
EYE
n ope
rati
de
cuer
po adec
fuer
N.
No
TEC
whe
TIVE
lune
ttes
hine
.
ja su
off
the
ase
A PRE
SIO
PRO
WO
RN
tez
des
e mac
d y
prote
and
ents
.
s
INU
ST
RY.
BE
Por
sez
cett
segu
rida
s dry
com
pon
us
sec
s et
K
OF
G MU
SSU
s utili
RE.
lent
es
ipo.
de
nec
tion
and
mai
nten
ante
THIN
DE
BLE
nd
vou
este
Use
equ
all
con
wiri
ng
être
com
pos
se-
QUE
urs
qua
ION
ES.
ope
re
Kee
p
tric
doiv
al
u sur
ent
les
cion
es
0.0
ecte
DE
LES
ndo
y from
TIO
N.
s les
elec
fi ls
r d'ea
con
nec
8.92
.
3-56
SGO
nte
cua
y awa
OCU
. Tou
jete
s las
tric
os
ame
ELE
CTR
p spra
CUT
ION
ais
pro
a toda
s eléc
. Kee
OF
K
TRO
. Ne
jam
teng
ente
D'E
dus
LEC
N.
Man
e com
pon
QUE
pen
sus
ues
.
OCU
CIÓ
roci
triq
ELE
CTR
lo.
No
élec
DE
del
sue
y arri
ba
www.P65Warnings.ca.gov
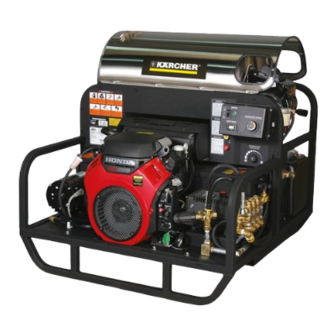
Pressure Washer
MODELS:
HDS 3.9/30 Pe Cage
HDS 4.8/30 Pe Cage
HDS 4.8/30 Pe Cage
HDS 4.7/35 Pe Cage
HDS 4.7/35 Pe Cage
HDS 5.6/35 Pe Cage
HDS 5.6/35 Pe Cage
HDS 8.0/30 Ge Cage
HDS 8.0/30 Ge Cage
To locate your local Kärcher
Commercial Pressure Washer
Dealer nearest you, visit
www.karchercommercial.com
9.800-080.0-AK
1.575-600.0
1.575-601.0
1.575-602.0
1.575-603.0
1.575-604.0
1.575-605.0
1.575-606.0
1.575-611.0
1.575-612.0
09/05/18
Advertisement
Table of Contents

Related Manuals for Kärcher HDS 3.9/30 Pe Cage


Summary of Contents for Kärcher HDS 3.9/30 Pe Cage
- Page 1 HDS Series Hot Water - Gas Powered - Diesel Heated Operator’s Manual Pressure Washer MODELS: HDS 3.9/30 Pe Cage 1.575-600.0 HDS 4.8/30 Pe Cage 1.575-601.0 HDS 4.8/30 Pe Cage 1.575-602.0 HDS 4.7/35 Pe Cage 1.575-603.0 HDS 4.7/35 Pe Cage 1.575-604.0 HDS 5.6/35 Pe Cage...
-
Page 2: Machine Data Label
Machine Data Label Karcher HDS 600-612 Operator’s Manual 9.800-080.0 - AK... -
Page 3: Table Of Contents
Table of Contents Machine Data Label ......2 Table of Contents ......3 How To Use This Manual . -
Page 4: How To Use This Manual
How To Use This Manual This manual contains the following sections: The MAINTENANCE section contains preventive main- tenance to keep the machine and its components in • How to Use This Manual good working condition. They are listed in this general •... -
Page 5: Safety
Safety Introduction & Safety Information Thank you for purchasing this Pressure Washer. We reserve the right to make changes at any time without incurring any obligation. Owner/User Responsibility: The owner and/or user must have an understanding of the manufacturer’s operating instructions and warnings before using this pressure washer. -
Page 6: Important Safety Information
Safety Important Safety Information des mains et des pieds doit être portée lors de l'utilisation de cet équipement. projection à hautes WARNING: To reduce the risk of WARNING vitesses. injury, read operating instructions 5. Always wear properly rated eye protection such as carefully before using. - Page 7 Safety b. with the engine on the equipment stopped; cela risquerait de causer des blessures graves ou c. with no source of ignition within 10 feet of the même la mort. dispensing point; and WARNING: This machine produces WARNING d. with an allowance made for expansion of the fuel hot water and must have insulated should the equipment be exposed to a higher components attached to protect...
- Page 8 Safety WARNING: Protect machine from 22. Never run pump dry or leave spray gun closed WARNING freezing. longer than 1-2 minutes. AVERTISSEMENT: Protéger la 23. Machines with shut-off spray gun should not be machine contre le gel. operated with the spray gun in the off position for extensive periods of time as this may cause 1.
-
Page 9: Operations
Operations Component Identification Flue Adapter Optional 7-10049 Insulation Gasket Optional 7-01471 Water Supply Hose (not included) Detergent Valve 22mm Coupling Adjustable Thermostat Outlet Burner Switch Hour Meter C IO e or n fl per- . Ne y wh K OF . -
Page 10: Assembly Instructions
Operations Assembly Instructions Safety Latch Cold Spray Water Source Wand High Pressure Hose Garden Hose STEP 1: Attach wand and hose to STEP 2: Connect garden hose to STEP 3: Remove shipping cap and the spray gun using teflon tape on the cold water source. -
Page 11: Battery Installation
Operations Battery Installation Due to Federal Regulations concerning shipment of corrosive chemicals, batteries are not shipped with this machine. Local purchase of battery will be the responsibility of the owner. Automotive type 12 Volt Group 24 battery is recom- mended for placement within the weather resistant box. Follow safety and installation instructions furnished with the battery. -
Page 12: Operating Instructions
Operations Operating Instructions Dipstick Tank STEP 2: Fill gas tank with unleaded gasoline. Do not use leaded STEP 1: Check engine oil level. Oil level should be level to the fill markings gasoline. on the dipstick. Be sure the machine is level when checking the oil level. (Refer to the engine's operating manual included with machine.) We recommend that the oil be changed after the first 5 hours of use, then once every 100 hours. - Page 13 AVERTISSEMENT: Le retour du cordon de lancement (rétraction rapide) peut causer des lésions corporelles. La rétraction rapide de la corde du démarreur (recul) attire la main et le bras vers le moteur plus vite qu'il n'est possible de lâcher la corde. Toujours réduire la pression du pistolet pulvérisateur avant de tirer sur le START cordon de lancement.
-
Page 14: Detergents & General Cleaning Techniques
Operations Detergents & General Cleaning Thermal Pump Protection Techniques If you run the engine on your pressure washer for 3-5 minutes without pressing the trigger on the spray gun, WARNING: Some detergents may WARNING circulating water in the pump can reach high tempera- be harmful if inhaled or ingested, tures. -
Page 15: Shutting Down And Clean Up
Operations Shutting Down And Clean Up On-Off Switch STEP 3: Turn off water supply. STEP 1: Remove detergent suction STEP 2: Turn off the engine. tube from container and insert into one gallon of fresh water. Open detergent metering valve. Pull trigger on spray gun and siphon water for one minute. -
Page 16: Maintenance
Maintenance Storage tank of the engine, or to the gasoline in a storage container. CAUTION: Always store your pressure washer in a location where the temperature will not fall below After Extended Storage 32°F (0°C). The pump in this machine is susceptible to permanent damage if frozen. -
Page 17: Maintenance And Service
Maintenance It is advisable, periodically, to visually inspect the Pumps burner. Check air inlet to make sure it is not clogged or Before running the pump check the pump crankcase for blocked. Wipe off any oil spills and keep equipment a proper oil level. -
Page 18: Fuel
Maintenance Fuel Also, as ambient temperature changes seasonally, the fuel temperature in the feed tank and air temperature Use clean fuel oil that is not contaminated with water inlet can impact fuel flow. In more extreme tempera- and debris. Replace fuel filter and drain tank every 100 tures, this local-site adjustment may also require hours of operation. -
Page 19: Burner Air Adjustment
Maintenance Burner Air Adjustment Coil Removal The oil burner on this machine is preset for operation at Removal of coil because of freeze breakage, or to altitudes below 500 feet. If operated at higher altitudes, clean soot from it can be done quickly and easily. it may be necessary to adjust the air band for a #1 or #2 1. -
Page 20: Preventive Maintenance
Maintenance Preventive Maintenance This pressure washer was produced with the best available materials and quality craftsmanship. However, you as the owner have certain responsibilities for the correct care of the equipment. Attention to regular preventative main- tenance procedures will assist in preserving the performance of your equipment. Contact your dealer for mainte- nance. -
Page 21: Oil Change Record
Maintenance Oil Change Record PUMP OIL Estimated Operating ENGINE OIL Estimated Operating Date Oil Changed Hours Since Last Oil Date Oil Changed Hours Since Last Oil Month/Day/Year Change Month/Day/Year Change Karcher HDS 600-612 Operator’s Manual 9.800-080.0 - AK... -
Page 22: Troubleshooting
Maintenance Troubleshooting PROBLEM SOLUTION POSSIBLE CAUSE Faulty pressure gauge Install new gauge. Insufficient water supply Use larger supply hose; clean filter at water inlet. Match nozzle number to machine and/or replace Old, worn or incorrect spray nozzle with new nozzle. Belt slippage Tighten or replace;... - Page 23 Maintenance PROBLEM SOLUTION POSSIBLE CAUSE Flex coupling slipping on fuel Replace if needed. pump shaft or burner motor shaft Check for electrical current reaching burner assembly On-Off switch defective with burner switch on. Heavy sooting on coil and burner can cause interruption of air flow Clean as required.
- Page 24 Maintenance SOLUTION PROBLEM POSSIBLE CAUSE Improper fuel or water in fuel Replace with clean and proper fuel. Low fuel pressure Increase fuel pressure. Check fuel pump pressure. Replace pump if Weak fuel pump needed. WATER Fuel filter partially clogged Replace as needed. TEMPERATURE Soot build-up on coils not allowing Clean coils.
- Page 25 Maintenance PROBLEM POSSIBLE CAUSE SOLUTION Oil seal worn Check and replace if necessary. DRIPPING EXCESSIVE VIBRATION IN Irregular functioning of the valves Check and replace if necessary. DELIVERY LINE Tighten all clamps. Check detergent lines for Air leak holes. Replace restrictor. Check for proper orifice in Restrictor in float tank is missing restrictor.
- Page 26 Notes Karcher HDS 600-612 Operator’s Manual 9.800-080.0 - AK...
-
Page 27: Parts
Parts Parts KARCHER HDS HDS 3.9/30 Pe Cage 1.575-600.0 HDS 4.8/30 Pe Cage 1.575-601.0 HDS 4.8/30 Pe Cage 1.575-602.0 HDS 4.7/35 Pe Cage 1.575-603.0 HDS 4.7/35 Pe Cage 1.575-604.0 HDS 5.6/35 Pe Cage 1.575-605.0 HDS 5.6/35 Pe Cage 1.575-606.0 HDS 8.0/30 Ge Cage 1.575-611.0... -
Page 28: Karcher Hds
Karcher HDS To Burner Pump From Burner Return 68, 69 C IO e or n fl per- . Ne K OF y wh . RIS E DE rati liqu fl am opé o llam s où . No fl am roit les. - Page 29 Karcher HDS Attach battery terminal cover to wire on E-start solenoid Vanguard with Heat Shield Rear view of engine (Honda Only) Engine Carb Port For models 611.0 & 612.0 Not Installed 8gpm Units To Float Tank To Detergent Valve Karcher HDS 600-612 Operator’s Manual 9.800-080.0 - AK...
- Page 30 Karcher HDS PART NO. DESCRIPTION NOTES 9.803-014.0 COIL, RODLESS 9.803-005.0 TOP WRAP, SS 9.802-071.0 2 ft. TRIM NOT SHOWN 9.802-902.0 INSULATION/BLANKET, DIE CUT 28" X 24" 9.802-896.0 INSULATION/BLANKET, NO FOIL, 24" X 57" 9.802-883.0 INSULATION, BURNER HEAD, NO HOLE 8.921-606.0 WELDMENT, BOTTOM WRAP, 9.802-727.0 BOLT, 3/8"...
- Page 31 Karcher HDS PART NO. DESCRIPTION NOTES 9.800-026.0 LABEL, OPEN FOR STEAM 9.802-131.0 ELBOW, 1/2" JIC X 1/2" MPT 9.802-129.0 ELBOW, 1/2" X 3/8, 90° 9.802-039.0 ELBOW, 1/2" MJIC X 3/8" MNPT 9.802-036.0 NIPPLE, 1/2" JIC X 3/8" MPT STEEL 9.802-048.0 SWIVEL, 1/2"...
- Page 32 Karcher HDS PART NO. DESCRIPTION NOTES 9.802-872.0 TAB, BELT GUARD AB, BELT GUARD (W/GENERATOR) 9.802-753.0 SCREW, HH, NC, 1/4" X 3/4" NOT SHOWN SCREW, HH, NC, 1/4" X 3/4" (W/GENERATOR) 9.802-794.0 CAGE, NUT, 1/4" X 12 GAUGE CAGE, NUT, 1/4" X 12 GAUGE (W/GENERATOR) 9.802-728.0 BOLT, 3/8"...
- Page 33 Karcher HDS PART NO. DESCRIPTION NOTES NOT SHOWN 9.802-519.0 STRAIN RELIEF, 1/2" (602.0, 604.0, 605.0 - w/Gen) 8.706-955.0 HOSE BARB, 90°, 1/4" X 1/8" NPT 9.802-039.0 ELBOW, 1/2" MJIC X 3/8" MNPT (601.0, 602.0) NOT SHOWN 9.802-154.0 PLUG, PUSH-ON, OIL DRAIN (3.9/30) 9.800-006.0 LABEL, HOT...
- Page 34 Karcher HDS PART NO. DESCRIPTION NOTES 9.803-559.0 CLAMP,SCREW, 9/16"W, 1-1/4"OD, SS 8.706-248.0 PLUG, 3/8" 9.802-015.0 NIPPLE, 1/2" X 4", GALVANIZED SCH 80 PIPE 8.752-114.0 NIPPLE, 1/4" 8.706-984.0 ADAPTER, 1/2" X 1/2" BRASS NOT ON 8 GPM UNITS 8.718-781.0 SCREW, PAN HEAD 9.802-775.0 NUT, 1/4"...
-
Page 35: Float Tank
Float Tank 8.928-276.0 To Pump PART NO. DESCRIPTION NOTES 9.804-042.0 TANK, FLOAT, 2-1/2 GALLON, BLANK 8.749-328.0 VALVE, FLOAT PLASTIC 9.802-162.0 STRAINER, 1/2" BASKET 9.802-128.0 NIPPLE, 1/2" JIC X 1/2" MPT 8.750-743.0 BULKHEAD, 1/2" POLYPRO 9.802-132.0 ELBOW, 3/4" JIC X 1/2", 90° 8.928-239.0 BRACKET, FLOAT TANK SUPPORT 9.802-775.0... -
Page 36: Control Panel
Control Panel (Reversed View of Label) Detergent Valve Pump h is to rc d fu C IO t ad e or fl am . Do t pe FI RE e es w he io n. . RI ér at e on ui ds e fl... - Page 37 Control Panel PART NO. DESCRIPTION NOTES 9.803-693.0 BOX, PLASTIC, BACK 9.802-482.0 BOX, PLASTIC, FRONT, FABRICATED 8.750-094.0 THERMOSTAT, 302°F 9.804-072.0 42" WIRE, COVER, 1/4" NOT SHOWN 9.802-700.0 BOLT, 1/4" X 3/4" HH NC (600.0, 601.0, 603.0,605.0 - W/O 9.800-044.0 DECAL, 12V ELECTRICAL BOX GEN) 9.800-043.0 DECAL, 120V ELECTRICAL BOX...
-
Page 38: Hose & Spray Gun
Hose & Spray Gun Karcher HDS 600-612 Operator’s Manual 9.800-080.0 - AK... - Page 39 Hose & Spray Gun PART NO. DESCRIPTION NOTES (600.0, 601.0, 602.0, 8.925-132.0 HOSE, 3/8" X 50' 2W 6000PSI SW/SO/CPL 603.0, 604.0, 605.0, 606.0) 8.925-245.0 HOSE, 1/2"X50' 2W 5000PSI KAR SW,SO,CPL (611.0, 612.0) (601.0, 602.0, 603.0, 4.775-054.0 EASY! FORCE ADVANCED KNA 604.0, 605.0, 606.0) 8.710-384.0 GUN, ST-1500, 5000 PSI, 10.4 GPM...
-
Page 40: Specifications
Specifications Wayne EHASR Burner FUEL NOZZLE W/ BURNER MODEL NO. 100PSI ASSY NO. CHECK VALVE 1.575-600.0 8.756-480.0 8.756-491.0 1.575-601.0 8.756-480.0 8.756-697.0 1.575-602.0 8.756-413.0 8.756-697.0 1.575-603.0 8.756-480.0 8.756-697.0 1.575-604.0 8.756-413.0 8.756-697.0 1.575-605.0 8.756-890.0 8.756-900.0 1.575-606.0 8.756-413.0 8.756-900.0 1.575-611.0 8.756-890.0 8.756-900.0 1.575-612.0 8.756-413.0 8.756-900.0 Pump PUMP PULLY... - Page 41 Specifications Engine ENGINE ENGINE PULLY BUSHING BELT BELT MODEL ENGINE BUSHING PART # PULLY PART # PART # SIZE PART # GX390 1.575-600.0 8.750-579.0 2BK34H 9.802-382.0 H X 1 9.802-399.0 BX44(2) 8.715-705.0 (389 cc) 1.575-601.0 8.754-819.0 2BK34H 9.802-382.0 H X 1 9.802-399.0 BX42(2) 8.715-703.0...
-
Page 42: Wayne Burner
Wayne Burner Karcher HDS 600-612 Operator’s Manual 9.800-080.0 - AK... - Page 43 Wayne Burner PART NO. DESCRIPTION NOTES 8.756-716.0 MOTOR, 1/4 13.5VDC AMETEK 13121 MOTOR CORD COVER 8.756-726.0 FAN, 3.44"W X 5.25"D 5/16" BORE 8.700-735.0 BURNER HOUSING EHASR 9.107-507.0 IGNITOR 13392 SLOT COVER PLATE 8.700-732.0 BAND, AIR BURNER INNER EHA/SR 8.700-729.0 AIR BAND 8 HOLE OUTER EHA/SR 8.756-715.0 COUPLING, "E"...
-
Page 44: Kt.2 Series Pump
KT.2 Series Pump TORQUE SPECS ITEM # FT. LBS. TORQUE SPECS ITEM # FT. LBS. PART NO. DESCRIPTION NOTES 8.752-825.0 CRANKCASE PLUNGER OIL SEAL SEE KITS TABLE O-RING Ø1.78 X 37.82 SEE KITS TABLE PRESSURE RING, 18MM SEE KITS TABLE U-SEAL, 18MM SEE KITS TABLE INTERMEDIATE RING, 18MM... - Page 45 KT.2 Series Pump PART NO. DESCRIPTION NOTES VALVE SPRING SEE KITS TABLE VALVE CAGE SEE KITS TABLE 8.752-830.0 HEX SCREW 9.802-884.0 WASHER 9.803-182.0 CLOSED BEARING HOUSING 9.803-186.0 O-RING Ø2.62 X 71.12 9.803-160.0 ROLLER BEARING 8.753-818.0 CRANKSHAFT Ø25 (4540) 8.752-827.0 CRANKSHAFT Ø25 (6036) 9.803-167.0 CRANKSHAFT KEY 8.752-834.0...
-
Page 46: Vrt3 Unloader
VRT3 Unloader 8.750-297.0, 8 GPM, 2320 PSI 8.750-298.0, 8 GPM, 3630 PSI 8.750-299.0, 8 GPM, 4500 PSI PART NO. DESCRIPTION NOTES 8.750-713.0 OUTLET FITTING 8.750-712.0 KNOB, UNLOADER 8.750-709.0 REPAIR KIT, VRT3, 2320/3630 PSI 8.750-710.0 REPAIR KIT, VRT3, 4500 PSI (KIT ITEMS: 3, 4, 6, 9-12, 21, 24) Karcher HDS 600-612 Operator’s Manual 9.800-080.0 - AK... - Page 47 VRT3 Unloader Unloader Adjustment Procedures 1. Remove lock nut (Item 19). 2. Remove adjustment knob (Item 18). 3. Loosen the two (2) nuts (Item 15), move them upward on stem (Item 8) until you see 4 or more threads below the nut.
- Page 48 9.800-080.0 • Printed in U.S.A.
Need help?
Do you have a question about the HDS 3.9/30 Pe Cage and is the answer not in the manual?
Questions and answers