Table of Contents
Advertisement
Quick Links
Advertisement
Table of Contents

Related Manuals for Harvia XENIO CX45J


Summary of Contents for Harvia XENIO CX45J
- Page 1 HARVIA XENIO CX45J Control unit 04052022/Y05-0917...
-
Page 2: Table Of Contents
CONTROL UNIT HARVIA XENIO (CX170) Control unit's purpose of use: the control unit is meant for controlling the functions of a sauna heater. -
Page 3: Harvia Xenio
1.1. General The control unit can be equipped with a safety The purpose of Harvia Xenio control unit is to con- switch (see figure 1). The control unit can be used trol an electric sauna heater within an output range to preset the start of the heater (pre-setting time). -
Page 4: Technical Data
1.2. Technical Data The temperature sensor is equipped with • Control panel: a resettable overheat protector and a Temperature adjustment range: 40–110 °C. temperature-sensing NTC thermistor (22 kΩ/ • On-time adjustment range: family saunas T=25 °C). • 1–6 h, public saunas in apartment buildings Weight: 175 g with leads (ca 4 m) •... -
Page 5: Instructions For Use
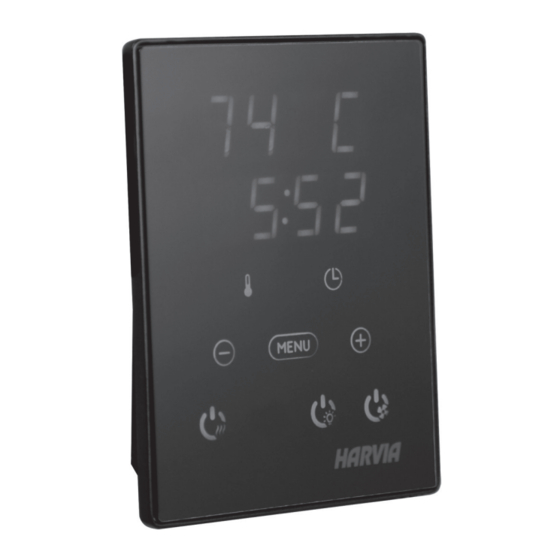
2.3.3. Safety switch 2.1.2. Heater Off Safety switch refers to e.g. Harvia SFE, a safety The heater turns off and the control unit switches device installed above or integrated to the heater, to standby-mode when... - Page 6 BASIC SETTINGS/GRUNDEINSTELLUNGEN Basic mode (heater on) The top row shows the sauna room temperature. The bottom row shows the remaining on-time. Both indicator lights glow. Press the MENU button to open the settings menu. Sauna room temperature The display shows the sauna room temperature setting. Temperature indicator light blinks. Change the setting to the desired temperature with the –...
- Page 7 ADDITIONAL SETTINGS/WEITERE EINSTELLUNGEN Control unit standby I/O button’s background light glows on the control panel. Open the settings menu by simultaneously pressing the locations of the buttons –, MENU and + (see figure 2). Press for 5 seconds. The buttons do not glow when the control unit is in standby mode. Setting the remote use The remote use setting can be changed with the —...
-
Page 8: Control Panel Lock
Press the MENU button to access the next setting. Sauna dehumidifying interval The sauna dehumidifying interval can be turned ON or OFF*). The interval will begin when the devices are switched off from the I/O buttons or when the set on-time runs out. During the interval the heater is on •... -
Page 9: Instructions For Installation
3. INSTRUCTIONS FOR INSTALLATION The electrical connections of the control unit washing or dressing room, or in the living quarters. If the panel is installed in the sauna room, it must may only be made by an authorised, professional electrician and in accordance with the current be at the minimum 500 mm safety distance from regulations. -
Page 10: Installing The Power Unit
3.2. Installing the Power Unit 3.2.2. Power Unit Fuse Faults Install the power unit to a wall outside the sauna Replace a blown fuse by a new one with the same room, in a dry place with an ambient temperature value. - Page 11 Figure 6. Electrical connections...
- Page 12 WX232 Temperature sensor WX232 150 mm Figure 7. The place of the temperature sensors in connection with wall-mounted heaters min. 100 mm max. 200 mm WX232 WX232 WX232 WX232 Tempera- ture sensor Figure 8. The place of the temperature sensors in connection with floor-mounted heaters...
-
Page 13: Installing The Temperature Sensor
3.3. Installing the Temperature Sensor Option 2: Fasten the temperature sensor to • Note! Do not install the temperature sensor closer the ceiling above the heater, at a distance of than 1000 mm to an omnidirectional air vent or 100–200 mm from the vertical centre line of closer than 500 mm to an air vent directed away the heater’s side. -
Page 14: Spare Parts
4. SPARE PARTS 1 Control panel WX387 2 Temperature sensor WX232 3 Data cable 5 m WX311 4 Data cable extension 10 m (optional) WX313 5 Circuit board WX361J We recommend to use only the manufacturer’s spare parts. - Page 16 P.O.Box 12 Teollisuustie 1-7 40951 Muurame FINLAND +358 207 464 000 harvia@harvia.fi www.harvia.com...
Need help?
Do you have a question about the XENIO CX45J and is the answer not in the manual?
Questions and answers