Chapters
Table of Contents
Troubleshooting

Related Manuals for Watson-Marlow qdos 20


Summary of Contents for Watson-Marlow qdos 20
- Page 1 INSTRUCTIONS FOR USE Machine Designation - all model variants of: qdos 20 Pump qdos 30 Pump qdos 60 Pump qdos 120 Pump qdos CWT Pump Date of publication: 30 June 2023 Version of publication: 10 ORIGINAL INSTRUCTIONS...
-
Page 2: Preface
Preface Disclaimer The information contained in this document is believed to be correct but Watson-Marlow accepts no liability for any errors it contains and reserves the right to alter specifications without notice. If the product is used in a manner which has not been specified in these instructions, then the protection provided by the equipment may be impaired. -
Page 3: Table Of Contents
Table of contents Preface Disclaimer Translation of the original instructions Introduction to the document User groups Information types Terminology Trademarks Acronyms Introduction: Product General description Intended use 3.2.1 Prohibited use Safety Safety symbols 4.1.1 Instructions for renewing safety symbols Safety signals 4.2.1 Signals: With risk of personal injury 4.2.2 Signals: With risk of equipment or property damage only Personal protective equipment (PPE) - Page 4 5.1.6 Food applications Accessories Product labels Product code guide Specification overview 5.5.1 Performance 5.5.2 Physical specification 5.5.3 Electrical power specification 5.5.4 Control specification Storage Storage conditions Shelf life Lifting and carrying Product still in original packaging Product removed from original packaging Unpacking your pump Components supplied with your pump Unpacking, inspection and packaging disposal...
- Page 5 Installation: Part 2 (Electrical power) 11.1 Identification of electrical power required 11.2 Alternating current (AC) power 11.2.1 Power specification requirements 11.2.2 Protection device 11.2.3 Electrical isolation 11.2.4 Cable (wiring) specification 11.2.5 Pre-electrical installation requirement checklist 11.2.6 Connect to AC Power supply 11.2.7 Earth continuity testing using the earth bond test point 11.3 Direct current (DC) power 11.3.1 Power specification requirements...
- Page 6 First time pumphead installation: (qdos ReNu 20, 60, 120 and qdos CWT all models 12.3.2 variants) 12.4 Connecting the pumphead to the fluid path for the first time 12.4.1 Step 1 Check the seals in the pumphead ports 12.4.2 Step 2: Choose the connector type to be used 12.4.3 Step 3: follow the procedure for the connector type 12.4.4 Step 4: Connect the pumphead safety overflow Installation: Part 4 (Control connections and wiring)
- Page 7 14.2.2 Security settings > PIN protection Installation: Part 6 (Setting up the pump (control settings)) 15.1 Control settings menu 15.1.1 Control settings > Speed limit 15.1.2 Control settings > Reset run hours 15.1.3 Control settings > Reset volume counter 15.1.4 Control settings > Invert alarm logic - Universal model 15.1.5 Control settings >...
- Page 8 17.2.3 Replacement of fuses 17.3 Pumphead maintenance 17.3.1 Life of pumphead 17.3.2 Replacement of pumphead (Model: qdos 30 - All variants) 17.3.3 Replacement of pumphead (Model qdos 20, 60, 120, CWT - All variants) Errors, breakdown and troubleshooting 18.1 Errors 18.1.1 Remote model 18.1.2 Manual, PROFIBUS, Universal, Universal+ models...
- Page 9 18.4.1 Pumphead end of life 18.4.2 Flowrate 18.4.3 Leak detection message 18.4.4 General pump help (Manual, PROFIBUS, Universal and Universal+ ) 18.5 Technical support 18.5.1 Manufacturer 18.6 Warranty 18.6.1 Conditions 18.6.2 Exceptions 18.7 Returning pumps Chemical compatibility 19.1 Chemical compatibility overview 19.2 How to check chemical compatibility 19.2.1 Scenario 1: Fluid Path (wetted by the pumped fluid in normal use) 19.2.2 Scenario 2: Potential of being wetted due to environment or spillage...
- Page 10 20.6 Start up defaults 20.7 Dimensions 20.8 Weight 20.8.1 qdos 30 20.8.2 qdos 20, 60 and 120 fitted with ReNu pumpheads 20.8.3 qdos CWT fitted with CWT pumphead 20.9 Compliance and certification 20.9.1 Compliance markings on the product 20.10 Product certification 20.11 Standards...
-
Page 11: Introduction To The Document
Introduction to the document 2.1 User groups 2.2 Information types 2.3 Terminology 2.4 Trademarks 2.5 Acronyms 2 INTRODUCTION TO THE DOCUMENT... -
Page 12: User Groups
User groups These instructions are for the safe use of all model variants of the Watson-Marlow qdos 20, 30, 60, 120 and/or qdos CWT pumps during the products life cycle by a: Responsible Individual designated by the users organisation, responsible for the installation, safe use and person maintenance of the product. -
Page 13: Terminology
Trademarks Watson-Marlow, Qdos, ReNU and CWT are registered trademarks of Watson-Marlow Limited. ReNu™ and CWT™ are registered trademarks of Watson-Marlow Limited. PROFIBUS® is a registered trademark of PROFIBUS and PROFINET International (PI). Viton® is a registered trademark of Dupont Dow Elastomers L.L.C. -
Page 14: Acronyms
Acronyms Table 1 - Acronym list EPDM Ethylene propylene diene monomer Glass fibre reinforced Human Machine Interface MSDS Material Safety Data Sheet Nitrile rubber Polyamide Nylon 6 Polycarbonate PEEK Polyether ether ketone PFPE Perfluoropolyether Polyoxymethylene Polypropylene Personal Protective Equipment Polyphenylene sulfide Polystyrene PVCu Poly Vinyl Chloride... -
Page 15: Introduction: Product
Introduction: Product 3.1 General description 3.2 Intended use 3.2.1 Prohibited use 3 INTRODUCTION: PRODUCT... -
Page 16: General Description
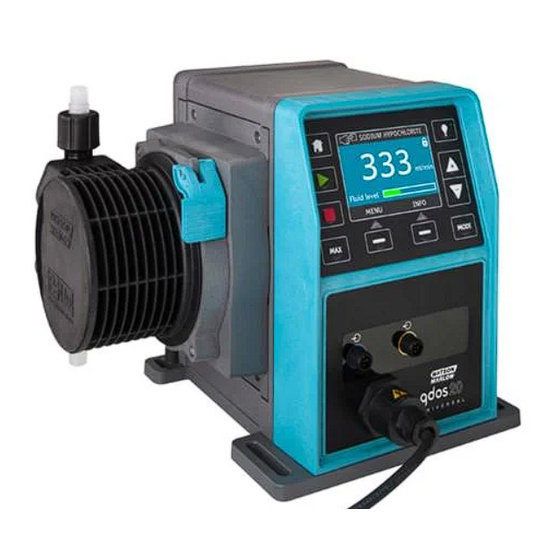
General description A Watson-Marlow qdos pump, provides a flow rate of fluid positive displacement. The pump is connected to a process fluid path. Fluid flows through this fluid path. General illustration provided below. Exact arrangement will vary by model. 1. Pump drive 2. -
Page 17: Safety
Safety This section provides general safety information for the safe use of the product. Safety information relevant to a specific task is provided when relevant to the task. 4.1 Safety symbols 4.1.1 Instructions for renewing safety symbols 4.2 Safety signals 4.2.1 Signals: With risk of personal injury 4.2.2 Signals: With risk of equipment or property damage only 4.3 Personal protective equipment (PPE) -
Page 18: Safety Symbols
4.1.1 Instructions for renewing safety symbols If the safety symbols become accidently damaged through improper handling of the product, contact your local Watson-Marlow representative for information on obtaining replacements. Safety signals Signals indicate a possible hazard. -
Page 19: Signals: With Risk Of Personal Injury
4.2.1 Signals: With risk of personal injury Signals indicating risk of a personal injury are presented when relevant to a task in this format: WARNING The WARNING signal word indicates a hazard. Risk of serious injury or death exists if hazard not avoided. Equipment or property damage may also occur. -
Page 20: Personal Protective Equipment (Ppe)
Personal protective equipment (PPE) The following minimum PPE will be required during specific tasks: 1. Safety glasses 2. Safety boots 3. Gloves chemically compatible with the chemicals being pumped A risk assessment by a responsible person must be undertaken to identify: Suitability of PPE for the application If additional PPE is required prior to use or for specific tasks 4 SAFETY... -
Page 21: Product Overview
Product overview This section provides a product overview with summary specification. Detailed specification is provided in the appendix. 5.1 Pump models 5.1.1 Drive—Variations 5.1.2 Drive—General arrangement 5.1.3 Pumphead—Variations 5.1.4 Pumphead—General arrangement 5.1.5 Pumphead—General arrangement of connections 5.1.6 Food applications 5.2 Accessories 5.3 Product labels 5.4 Product code guide 5.5 Specification overview... -
Page 22: Pump Models
Pump models A qdos 'pump' is a combination of two main components, a 'Drive' and a 'Pumphead' 5 PRODUCT OVERVIEW... -
Page 23: Drive-Variations
5.1.1 Drive—Variations A qdos drive is available in the following variations Drive model 5 drive models (20, 30, 60, 120, CWT) Pumphead mounting 2 pumphead mounting variations (left or right) variations 5 control models for each drive model: Manual Remote PROFIBUS Universal Universal+... -
Page 24: Drive-General Arrangement
Pressure sensor connection Not available on Remote or Manual model The pressure sensor connection is for a Watson-Marlow pressure sensor for use with PROFIBUS, NOTE 3 Universal, and Universal+ models. The pressure sensor will be available for purchase in 2023. -
Page 25: Pumphead-Variations
5.1.3 Pumphead—Variations Pumpheads are available in 5 models: ReNu 20 ReNu 30 Pumphead model ReNu 60 ReNu 120 CWT 30 There are 5 different pumphead types. Picture of Pumphead Application pumphead Wide range of chemical compatibility. Optimised for sodium ReNu SEBS hypochlorite and sulphuric acid applications Pumphead ReNu... - Page 26 Drive Pumphead Maximum pressure Pumphead Maximum pressure ReNu 20 SEBS 7 Bar / 100 psi CWT 30 EPDM 7 Bar / 100 psi qdos 20 ReNu 20 PU 4 Bar / 60 psi ReNu 30 SEBS 7 Bar / 100 psi qdos 30 ReNu 30 4 Bar / 60 psi Santoprene ReNu 60 7 Bar / 100 psi...
-
Page 27: Pumphead-General Arrangement
5.1.4 Pumphead—General arrangement The general arrangement of a pumphead is provided in the picture below: Pumphead discharge head port Pumphead fluid path Discharge hydraulic connector Pumphead fluid path Discharge interface tubing (optional accessory) Pumphead fluid path Pumphead inlet head port Pumphead fluid path Inlet hydraulic connector Pumphead fluid path... -
Page 28: Pumphead-General Arrangement Of Connections
5.1.5 Pumphead—General arrangement of connections The general arrangement of the pumphead connections are shown below. The exact arrangement will vary with model. Pumphead head port Pumphead fluid path Pumphead to hydraulic connector seal Pumphead fluid path Hydraulic connector Pumphead fluid path Connection collar 5 PRODUCT OVERVIEW... -
Page 29: Food Applications
5.1.6 Food applications EC1935/2004 Acidic Alcoholic Alcoholic Aqueous Fatty Repeated Pumphead foods foods (<20% foods (>20% Dairy foods foods (pH<4.5) alcohol) alcohol) ReNu 20 PU û ✔ ✔ ✔ ✔ ✔ ✔ ReNu 20/30/60 SEBS û ✔ ✔ ✔ ✔ ✔... -
Page 30: Accessories
P o l y e t h y l e n e Further information such as part numbers for ordering are provided in "17.1 Spare parts" on page 177. Do not fit any devices or accessories other than those tested and approved by Watson-Marlow. 5 PRODUCT OVERVIEW... -
Page 31: Product Labels
Product labels A nameplate is fixed to the rear of the pump. There are 2 versions, based upon power supply: 100 – 240V AC power supply model nameplate: 12 – 24 V DC power supply model nameplate: Manufacturer details Product code Product name Serial number Compliance symbols... -
Page 32: Product Code Guide
The product model may be identified from its product code using this guide. Pump part numbers Fluid path Pumphead Model Model Digital I/O type Plug options material orientation 1: qdos 20 2: Santoprene 1: Remote L: Left A: US Manual, Remote and 2: qdos 30 5: PU 3: Manual R: Right... -
Page 33: Specification Overview
Model: (Manual, PROFIBUS, Universal, Model: Remote Universal+) Speed Flow rate Flow rate Drive Pump head ml/min ml/min ReNu 20 SEBS 5.30 5.30 qdos 20 ReNu 20 PU 7.29 7.29 CWT 30 EPDM 7.93 û û û ReNu 30 Santoprene 7.93 7.93 qdos 30 ReNu 30 SEBS 7.93... -
Page 34: Physical Specification
"19 Chemical compatibility" on page 202. Under certain conditions the pump is suitable for limited outdoor use. Contact your NOTE 10 Watson-Marlow representative for advice. Protection of drive to NEMA 250 with the HMI cover (optional accessory) installed NOTE 11 5 PRODUCT OVERVIEW... - Page 35 5.5.2.2 Dimensions (12) Model 234 mm 214 mm 104.8 mm 266 mm 43 mm 173 mm 40 mm 140 mm 10 mm Qdos 20 (9.2”) (8.4”) (4.1”) (10.5”) (1.7”) (6.8”) (1.6”) (5.5”) (0.4”) 234 mm 214 mm 71.5 mm 233 mm 43 mm 173 mm 40 mm 140 mm 10 mm Qdos 30 (9.2”) (8.4”) (2.8”) (9.2”) (1.7”) (6.8”) (1.6”) (5.5”) (0.4”) 234 mm...
-
Page 36: Electrical Power Specification
The speed increment depends on the control model, and operating mode of the pump. This information is summarised in the table below. Control methods Manual PROFIBUS Universal Universal+ Remote 3333:1 (Qdos 20) 5000:1 (Qdos 30) Manual speed adjustment range 10000:1 (Qdos 60) 20000:1 (Qdos 120) 5000:1 (Qdos CWT) Minimum driveshaft adjustment speed increment 0.007... - Page 37 5.5.4.2 Control feature summary table Operational modes Manual Remote PROFIBUS Universal Universal+ Manual — ✔ ✔ ✔ ✔ PROFIBUS — — — — ✔ Contact — — — ✔ ✔ 4-20mA — — ✔ ✔ ✔ Fault reporting ✔ ✔ ✔...
- Page 38 PROFIBUS Manual Remote PROFIBUS Universal Universal+ Speed set point — — — — ✔ Speed feedback — — — — ✔ Flow calibration function — — — — ✔ Hours run — — — — ✔ Revolution counter — — —...
- Page 39 5.5.4.2.1 Control panel overview The control panel is a TFT display with keys. It is available on all models, except the Remote model. The control panel is referred to as a HMI in these instructions with the layout and features provided below: Colour After 30 minutes of no keypad activity, the HMI display will dim to 50 % brightness.
-
Page 40: Storage
Storage 6.1 Storage conditions 6.2 Shelf life 6 STORAGE... -
Page 41: Storage Conditions
Storage conditions Storage temperature range: -20 °C to 70 °C (-4 °F to 158 °F) Indoors Not in direct sunlight Shelf life Store pumphead in original packaging, until ready for use. (16) Pumphead type Shelf life ReNu 2 years 3 years The pumphead shelf life is written on the label on the side of the box. -
Page 42: Lifting And Carrying
Lifting and carrying 7.1 Product still in original packaging 7.2 Product removed from original packaging 7 LIFTING AND CARRYING... -
Page 43: Product Still In Original Packaging
Product still in original packaging CAUTION The pump weighs up to 5.70 kg (12.6 lb) depending upon model. The weight of the pump could cause a foot injury if dropped. Wear steel toe cap safety boots when lifting and moving the pump. -
Page 44: Unpacking Your Pump
Unpacking your pump 8.1 Components supplied with your pump 8.2 Unpacking, inspection and packaging disposal 8 UNPACKING YOUR PUMP... -
Page 45: Components Supplied With Your Pump
Components supplied with your pump Components supplied with a complete pump (drive and pumphead) are provided in the table below. Item Description Comment Pump drive unit Qdos 30 shown (other models will vary in appearance) Pumphead ReNu 30 shown Pumphead connection collars Pumphead port seals are pre-fitted in pumpheads Pumphead port seals... -
Page 46: Unpacking, Inspection And Packaging Disposal
3. Inspect components for damage in transit. 4. If anything is missing or damaged, contact your Watson-Marlow representative immediately. 5. Dispose of the packaging according to local procedures. Outer carton: corrugated cardboard (recyclable). Inner tray: paper (recyclable). -
Page 47: Installation Overview
Installation overview The installation section, is provided in the following order. 1. Installation: Part 1 (Physical) 2. Installation: Part 2 (Electrical power) 3. Installation: Part 3 (Fluid path) 4. Installation: Part 4 (Control system connections and wiring) 5. Installation: Part 5 (Setting the pump up (general)) 6. -
Page 48: Installation: Part 1 (Physical)
Installation: Part 1 (Physical) 10.1 Conceptualisation 10.2 Location 10.2.1 Environmental and operating conditions 10.2.2 Area around the product—not enclosed 10.3 Mounting 10.3.1 Surface and orientation 10.3.2 Anchorage (bolting down the pump) 10.4 HMI Cover 10.5 Other accessories 10 INSTALLATION: PART 1 (PHYSICAL) -
Page 49: Conceptualisation
"19 Chemical compatibility" on page 202. Under certain conditions the pump is suitable for limited outdoor use. Contact your NOTE 19 Watson-Marlow representative for advice. Protection of drive to NEMA 250 with the HMI cover (optional accessory) installed. NOTE 20 10 INSTALLATION: PART 1 (PHYSICAL) -
Page 50: Area Around The Product-Not Enclosed
10.2.2 Area around the product—not enclosed If the pump is to be installed inside an enclosure, contact your Watson-Marlow representative for NOTE 21 advice. The pump must always be accessible to facilitate additional installation, operation, maintenance, and cleaning. Access points must not be obstructed or blocked. -
Page 51: Mounting
10.3 Mounting 10.3.1 Surface and orientation The pump must be installed as follows in accordance with the illustrations and explanations table below: 10 INSTALLATION: PART 1 (PHYSICAL) - Page 52 On a surface : 1. Install the pump on a surface which does not exceed a slope of 20° from horizontal NOTICE An excessive mounting slope can cause poor lubrication, resulting in damage to the pump though accelerated wear. Install the pump on a surface which does not exceed a slope of 20° from horizontal 2.
-
Page 53: Anchorage (Bolting Down The Pump)
10.3.2 Anchorage (bolting down the pump) Dimension Measurement 214 mm (8.4 ”) 173 mm (6.8 ”) 40 mm (1.6 ”) 140 mm (5.5 ”) 10 mm (0.4 ”) 10 INSTALLATION: PART 1 (PHYSICAL) -
Page 54: Hmi Cover
10.4 HMI Cover The HMI cover is illustrated by the picture below : Follow the procedure below for the installation of the HMI cover Procedure 1. Check the pump casing surrounding the HMI is clean and free of debris 2. Press the frame of the HMI cover onto the pump casing surrounding the HMI 3. -
Page 55: Installation: Part 2 (Electrical Power)
Installation: Part 2 (Electrical power) 11.1 Identification of electrical power required 11.2 Alternating current (AC) power 11.2.1 Power specification requirements 11.2.2 Protection device 11.2.3 Electrical isolation 11.2.4 Cable (wiring) specification 11.2.5 Pre-electrical installation requirement checklist 11.2.6 Connect to AC Power supply 11.2.7 Earth continuity testing using the earth bond test point 11.3 Direct current (DC) power 11.3.1 Power specification requirements... -
Page 56: Identification Of Electrical Power Required
11.1 Identification of electrical power required Pumps models are available in two power model options: 12–24 V DC 100–240 V AC (50/60 Hz) The power supply requirement of a specific model may be checked by looking at the power supply listed on the nameplate of the pump (2), or checking the product code (1). -
Page 57: Protection Device
The power cable and plug is specific to the product code, based upon the geographical use of the pump. The power cable is not-detachable or user replaceable. If the cable becomes damaged contact your Watson-Marlow representative to discuss the repair of the pump at a Watson-Marlow service centre. -
Page 58: Pre-Electrical Installation Requirement Checklist
Country Cable specification Plug specification 2950 mm length. 3 core, yellow/green, EU cable/plug (Part numbers 16 A, 250 V AC. CEE (7) VII, brown, blue. ending in E) IEC60884. EN 50525-2-21. 2950 mm length. 3 core, yellow/green, Swiss plug (Part numbers ending 10 A, 250 V AC. -
Page 59: Earth Continuity Testing Using The Earth Bond Test Point
11.2.7 Earth continuity testing using the earth bond test point Earth continuity from the power plug to the pump must be tested at the earth bond test point ( ) is located on the back of the pump. The location is illustrated in the image below: Do not use the earth bond for any other connection. -
Page 60: Overcurrent Protection
11.3.4.1 Power cable specification The power cable is non-detachable or user replaceable. If the cable becomes damaged contact your Watson- Marlow representative to discuss the repair of the pump at a Watson-Marlow service centre. WARNING The blade fuse it not IP66 rated. An IP66 blade fuse must be installed in place of the supplied blade fuse, where an IP66 rating is required. -
Page 61: Pre-Electrical Installation Checklist
11.3.5 Pre-electrical installation checklist Carry out the following pre-electrical installation check. At this point in the full installation procedure, the fluid path or pumphead should not yet be installed. Ensure then pump has been physically installed in accordance with "10 Installation: Part 1 (Physical)" on page 48 Ensure the power cable is not damaged Ensure the electrical isolation device is installed, tested and ready for operation. -
Page 62: Installation: Part 3 (Fluid Path)
Installation: Part 3 (Fluid path) 12.1 Fluid path system requirements 12.1.1 Overpressure safety device 12.1.2 Non-return valve 12.1.3 Isolation and drain valves 12.1.4 Inlet and discharge pipework 12.1.5 Piping vibration 12.2 Pre-Fluid path installation requirement checklist 12.3 Installing the pumphead for the first time 12.3.1 First time pumphead installation: qdos ReNu 30: all models variants 12.3.2 First time pumphead installation: (qdos ReNu 20, 60, 120 and qdos CWT all models variants) 12.4 Connecting the pumphead to the fluid path for the first time... -
Page 63: Fluid Path System Requirements
12.1 Fluid path system requirements A Watson-Marlow pump should be installed into a fluid path system with specific ancillary devices to ensure safe operation. These requirements are detailed in the sections below. All devices, connections or pipework must be: Chemically compatible with the pumped fluid Have a specification rating higher than that of the application. -
Page 64: Isolation And Drain Valves
12.1.3 Isolation and drain valves Isolation and drain valves must be installed in the fluid path. This is necessary for the following reasons. The pumphead replacement procedure requires the fluid path to be isolated, and parts of the fluid path drained prior to being disconnected. -
Page 65: Pre-Fluid Path Installation Requirement Checklist
12.2 Pre-Fluid path installation requirement checklist Carry out the following pre-fluid path installation check. Ensure then pump has been physically installed in accordance with "10 Installation: Part 1 (Physical)" on page 48 Ensure then pump has been electrically installed in accordance with "11 Installation: Part 2 (Electrical power)"... -
Page 66: First Time Pumphead Installation: Qdos Renu 30: All Models Variants
3. If the venting screw is not fitted in a pump manufactured after January 2020 or you do not have venting screw contact your Watson-Marlow representative. WARNING If the venting screw is not fitted, the pump leak detection will not function when process pressures are less than 1 bar. - Page 67 5. Tighten the pumphead retaining clamps by hand. Do not use a tool. 6. Apply electrical power to pump. The pump will go into its first time start up sequence. The Watson-Marlow Pumps logo displays for three seconds. 12 INSTALLATION: PART 3 (FLUID PATH)
- Page 68 12.3.1.2.1 First time start up: Choose language You will now be asked to select display language of all on screen text: Procedure 1. Use +/- keys to highlight required language. SELECT to choose. Procedure CONFIRM to continue. Procedure 4. To change your selection, REJECT 5.
- Page 69 12.3.1.2.2 First time start up: Pumphead selection language Procedure 1. Use +/- keys to highlight pumphead. Procedure 2. Choose CONFIRM to continue. Procedure 3. To change selection, REJECT 4. Press START and run pumphead for a few revolutions. 5. Stop pump. 6.
-
Page 70: First Time Pumphead Installation: (Qdos Renu 20, 60, 120 And Qdos Cwt All Models Variants)
CWT all models variants) A qdos 20, 60 or 120 requires the pumphead pressure valve to be set to the in use position, prior to the installation of the pumphead. This is not a feature of CWT pumpheads, and this section may be skipped for CWT models. - Page 71 5. Lock pumphead into position by hand using pumphead locking lever. Do not use a tool 6. Apply electrical power to pump. The pump will go into its first time start up sequence. The Watson-Marlow Pumps logo displays for three seconds 12 INSTALLATION: PART 3 (FLUID PATH)
- Page 72 12.3.2.2.1 First time start up: Choose language You will now be asked to select display language of all on screen text: Procedure 1. Use +/- keys to highlight required language. SELECT to choose. Procedure CONFIRM to continue. Procedure 4. To change your selection, REJECT 5.
- Page 73 12.3.2.2.2 First time start up: Pumphead selection language Procedure 1. Use +/- keys to highlight pumphead. Procedure 2. Choose CONFIRM to continue. Procedure 3. To change selection, REJECT 4. Press START and run pumphead for a few revolutions. 5. Stop pump. 6.
-
Page 74: Connecting The Pumphead To The Fluid Path For The First Time
12.4 Connecting the pumphead to the fluid path for the first time With the pumphead installed, the next step is to connect to fluid path for the first time. This is a multi part procedure which is provided in the following sections Step 1: Check the seals in the pumphead ports Step 2: Choose the connector type to be used Step 3: Follow the procedure for the connector type... -
Page 75: Step 1 Check The Seals In The Pumphead Ports
12.4.1 Step 1 Check the seals in the pumphead ports 12.4.1.1 Qdos 30: All model variants Qdos 30 pumpheads are pre-installed with FKM (Viton) seals as illustrated by 1a in the image below. Check these seals are present and fully seated in groove. To achieve FDA or EC1935 certification replace the two FKM (Viton®) seals fitted as standard in qdos 30 pumphead, with the supplied EPDM1 seals using the procedure below. - Page 76 NOTE 23 0M9.401H.F03 0M9.401H.F04 Qdos 20, 60, 120 and CWT are pre-installed with seal material as illustrated by 1a in the image below, depending upon the pumphead type Check these seals are present and fully seated in groove. 12 INSTALLATION: PART 3 (FLUID PATH)
-
Page 77: Step 2: Choose The Connector Type To Be Used
12.4.2 Step 2: Choose the connector type to be used The second step is to select the connectors to be used. There are 3 main types of hydraulic connector. Hose barb Threaded fitting Compression Fittings The selection of the connector for the application is based upon Type of connection required Size of connection required Chemical compatibility of connection... - Page 78 The availability of the connectors based on size, type, material, and pumphead fitment is provided in the table below: Hydraulic Connection Pack Qdos Qdos Qdos Qdos Qdos Material Fitting Sizes 6.3x11.5 mm Metric compression 10x16 mm ✔ ✔ ✔ ✔ ✔...
-
Page 79: Step 3: Follow The Procedure For The Connector Type
12.4.3 Step 3: follow the procedure for the connector type The installation procedure differs depending upon the connection type, follow the procedure for that specific connection type in sections below. Where there are any differences due to model type this is explained in the procedure 12.4.3.1 Fitting hose barb connectors Procedure... - Page 80 12.4.3.2 Fitting threaded connectors Procedure 1. For 1/4 inch threaded connectors, detach desired threaded connector from hydraulic connector pack 1. 1/2 inch connectors also available. 2. For 1/4 inch threaded connectors, place connection collar over threaded connector and place on top of the pumphead seal.
- Page 81 12.4.3.3 Fitting compression fittings Procedure 1. Select correct compression fittings for the size of Watson-Marlow interface tubing to be used. WARNING Compression fittings may leak if used with the wrong interface tubing. Only use Watson-Marlow interface tubing with Watson-Marlow compression fittings.
- Page 82 Procedure 6. Press tube onto cone until it reaches back face (it may be necessary to widen end of tube). As illustrated in the images below. Procedure 7. Whilst continuing to hold the tube against back face of cone, slide compression ring and connection collar back down tube on top of pumphead head port seal and tighten onto the pump head.
-
Page 83: Step 4: Connect The Pumphead Safety Overflow
12.4.4 Step 4: Connect the pumphead safety overflow The safety overflow of all pumphead models is a hose barb as illustrated by the image below : In the unlikely event of a leak detection sensor failure, the safety overflow provides a safe leak path for mixture of fluid and lubricant. -
Page 84: Installation: Part 4 (Control Connections And Wiring)
Installation: Part 4 (Control connections and wiring) 13.1 Location of connections 13.2 Front Input/Output connections (Models: Remote, Universal, Universal+) 13.2.1 Input connection 13.3 Relay module—Option for Universal/Universal+ 13.3.1 Relay module specifications 13.3.2 Control cable specification requirements 13.3.3 Relay module PCB layout 13.3.4 Relay module terminal connectors 13.3.5 Control cable installation 13.4 PROFIBUS connection... -
Page 85: Location Of Connections
The information in this section, is not applicable to the manual model. Manual model users should carry on to "14 Installation: Part 5 (setting up the pump (General and security))" on page 101. This chapter will only provide information on the control system connections and wiring. The set up of the control system is provided in the next installation section ("15 Installation: Part 6 (Setting up the pump (control settings))"... -
Page 86: Front Input/Output Connections (Models: Remote, Universal, Universal+)
(25) Option for Universal and Universal+ models NOTE 24 Option for PROFIBUS, Universal and Universal+ models for connection to a Watson-Marlow NOTE 25 Pressure Sensor. Pressure sensor not currently for sale, to be released 2023. 13.2 Front Input/Output connections (Models:... -
Page 87: Input Connection
13.2.1 Input connection 13.2.1.1 Input connection pin assignment Input Function Specification Referenced to lead colour Connect 5-24 V DC supply to stop (referenced to pin 4). Min. 5 V, Run/stop Alternatively, connect pin 5 of the output connector to this Brown Max. 30 V pin via normally open switch. - Page 88 13.2.1.2 Optional input cable An input cable can be purchased as an accessory from Watson-Marlow. The specification of this cable is provided below. Blue insert Brown White Blue Black Grey Input lead length: 3 m (10 ft) 13.2.1.3 Example input wiring Do not strap the control and mains cable together.
- Page 89 13.2.1.3.2 Remote control speed: analog input Increase/decrease pump speed via rising/falling analog current control signal: Range M12 input connector 4-20 mA Pin 3 The Universal+ model can be calibrated by the user to control speed proportionally or inversely proportional to input mA signal. 4-20 mA circuit impedance: 250 Ω.
- Page 90 13.2.1.4.2 Optional output lead An output cable can be purchased as an accessory from Watson-Marlow. The specification of this cable is provided below. Yellow insert Brown White Blue Black Grey Output lead length: 3 m (10 ft) 13.2.1.4.3 Example output wiring Do not strap the control and electrical power supply cable together.
- Page 91 External relay (Only applies to Pin 1 and Pin 2) Example wiring for an external relay, the N/O or N/C contacts could be used for any device. The relay in the illustration below needs to be sized correctly for the application to prevent damage to the pump transistors.
-
Page 92: Relay Module-Option For Universal/Universal
13.3 Relay module—Option for Universal/Universal+ The relay module is a unique variant available for a Universal and Universal+ control model only. The relay module is mounted on the opposite side of the pumphead. The general arrangement is shown below : 13.3.1 Relay module specifications Relay terminal connections 240 V AC 4 A... -
Page 93: Relay Module Pcb Layout
13.3.3 Relay module PCB layout Module variants: Universal = 2 terminal blocks, 2 relays with 2 output options Universal+ = 4 terminal blocks, 4 relays with 4 output options The Universal+ PCB layout is illustrated by the image below Refer to this diagram for terminal connector naming and location. On DC versions of the pump the DC supply 0V and input and output control ground are not NOTE 32 galvanically isolated. - Page 94 General Alarm output (J2) RLY1 The default for Relay 1 is General Alarm, on Universal+ models this output (1) can be configured in the control settings menu. Table 15 – Run status output (J2) RLY2 Connect the output device to the C (common) terminal of the relay connector and either the N/C (normally closed) or N/O (normally open) terminal as required.
- Page 95 Remote stop input (J1A), 110 V logic 110 VAC-Stop input Apply a signal of 85 VAC to 130 VAC across terminals AC1 and AC2 to stop the pump. Polarity is not important. In the default condition the pump will not run while this signal is applied. In manual and analog mode, the pump will start when the signal is removed.
-
Page 96: Control Cable Installation
13.3.5 Control cable installation Procedure 1. Remove four M3x10 Pozidriv screws from relay module cover in order shown. 2. Remove cover from drive. If cover adheres to drive housing, gently tap to free it. Do not prise off with tools. 3. - Page 97 9. Loosen, but do not remove the gland cap. 10. Insert control cable into loosened gland. 11. Pull through sufficient cable to reach the connectors required, leaving a little slack. 12. Strip the outer sheath as necessary. 13. Remove 5 mm of insulation from conductors. No tinning/ferrule required. 14.
-
Page 98: Profibus Connection
22. Use 21 mm spanner to tighten gland cap to 2.5 Nm to ensure ingress rating. 13.4 PROFIBUS connection All PROFIBUS systems must be installed or certified by a PROFIBUS approved installation engineer. 13.4.1 PROFIBUS connection A PROFIBUS pump has a PROFIBUS connection on the front of the pump as illustrated by the image below: PROFIBUS connector location PROFIBUS connection specifications: Female M12 connectors... -
Page 99: Profibus Connection Pin Assignment
13.4.2 PROFIBUS connection pin assignment PROFIBUS Pin assignments at pump Pin No. Signal Function +5 V supply for terminating resistors RxD/TxD-N Data line minus (A-line) DGND Data ground RxD/TxD-P Data line plus (B-line) 13.4.3 PROFIBUS wiring Requirements: Do avoid tight bends in the PROFIBUS signal cable. All devices in bus system must be connected in a line. -
Page 100: Pressure Sensor Control Connection (Models: Profibus, Universal, Universal)
13.4.3.1 Max. length of type A bus cable (m) The permissible overall length of the bus cabling will vary according to the required bit rate. If a longer cable or higher bit rate are required repeaters must be used. Total stub length must not exceed 6.6 m. The maximum bit rates achievable are shown in the table below. -
Page 101: Installation: Part 5 (Setting Up The Pump (General And Security))
Installation: Part 5 (setting up the pump (General and security)) 14.1 General settings (Models: Manual, PROFIBUS, Universal and Universal+) 14.1.1 GENERAL SETTINGS > Auto restart 14.1.2 GENERAL SETTINGS > Flow units 14.1.3 GENERAL SETTINGS > Asset number 14.1.4 GENERAL SETTINGS > Pump label 14.1.5 GENERAL SETTINGS >... -
Page 102: General Settings (Models: Manual, Profibus, Universal And Universal+)
14.1 General settings (Models: Manual, PROFIBUS, Universal and Universal+) General settings overview Auto restart returns pump to previous operating state/mode after power loss. Flow units Set flow units display preference. Asset number User defined 10 digit alphanumeric number accessed via Help screen. Pump label User defined 20 digit alphanumeric label displayed on home screen header bar. -
Page 103: General Settings > Auto Restart
14.1.1 GENERAL SETTINGS > Auto restart This pump offers an auto restart feature. When enabled, the feature will allow the pump to return to the operating state (mode and speed) it was in when power was lost. Example pumping scenarios using auto restart Before power loss After power loss Pump running analog mode... -
Page 104: General Settings > Flow Units
14.1.2 GENERAL SETTINGS > Flow units Set displayed Flow units for all pump display Procedure 1. Use the +/- keys to highlight preferred flow unit SELECT to store preference. 14 INSTALLATION: PART 5 (SETTING UP THE PUMP (GENERAL AND SECURITY)) -
Page 105: General Settings > Asset Number
14.1.3 GENERAL SETTINGS > Asset number To define/edit the asset number: Procedure 1. Highlight Asset Number option SELECT 3. Use +/- keys to highlight characters for editing. Available characters: 0-9, A-Z, and SPACE. Any previously defined asset number will be displayed on screen to allow editing NOTE 37 Procedure 4. - Page 106 Procedure 5. Choose FINISH to save entry and return to GENERAL SETTINGS menu. 14 INSTALLATION: PART 5 (SETTING UP THE PUMP (GENERAL AND SECURITY))
-
Page 107: General Settings > Pump Label
SELECT 3. Use +/- keys to highlight characters for editing. Available characters: 0-9, A-Z, and SPACE. Any previously defined pump label will be displayed on screen to allow editing. ‘WATSON-MARLOW’ NOTE 38 displayed by default. 14 INSTALLATION: PART 5 (SETTING UP THE PUMP (GENERAL AND SECURITY)) - Page 108 Procedure 4. Choose NEXT/PREVIOUS to edit next/previous character. Procedure 5. Choose FINISH to save entry and return to general settings menu. 14 INSTALLATION: PART 5 (SETTING UP THE PUMP (GENERAL AND SECURITY))
-
Page 109: General Settings > Language
14.1.5 GENERAL SETTINGS > Language To define/edit display language: Procedure 1. Highlight Language option SELECT 3. Stop pump Procedure 4. Use +/- keys to highlight required language. SELECT 14 INSTALLATION: PART 5 (SETTING UP THE PUMP (GENERAL AND SECURITY)) - Page 110 Procedure CONFIRM to continue. All display text will appear in chosen language. To cancel: Procedure REJECT to return to the language choice screen. 14 INSTALLATION: PART 5 (SETTING UP THE PUMP (GENERAL AND SECURITY))
-
Page 111: Security Settings (Models: Manual, Profibus, Universal And Universal+ Only)
14.2 Security settings (Models: Manual, PROFIBUS, Universal and Universal+ only) Security settings overview Auto keypad When active keypad will ‘lock’ after 20 seconds of inactivity lock When active, PIN protection will request a PIN before allowing any change of operating mode protection settings, or entry to the menu. -
Page 112: Security Settings > Auto Keypad Lock
14.2.1 Security settings > Auto keypad lock To enable the Auto keypad lock: Procedure 1. Highlight Auto Keypad Lock option ENABLE Status symbol displays Procedure 3. Padlock icon displays on home screen to indicate Auto Keypad Lock activated. When Auto Keypad Lock enabled;... - Page 113 To access keypad functions: Procedure 1. Simultaneously press two unlock keys together. To disable the Auto keypad lock: Procedure 1. Highlight Auto Keypad Lock option DISABLE Status symbol displays. 14 INSTALLATION: PART 5 (SETTING UP THE PUMP (GENERAL AND SECURITY))
-
Page 114: Security Settings > Pin Protection
14.2.2 Security settings > PIN protection Once correct PIN has been entered all menu options can be accessed. PIN protection re-activates after 20 seconds of no keypad activity. Activate PIN protection: Procedure 1. Highlight PIN Protection option ACTIVATE Status symbol displays Deactivate PIN protection: Procedure... - Page 115 Procedure 3. After selecting fourth digit press ENTER Procedure 4. Check number entered is correct, then CONFIRM CHANGE to return to Entry. 14 INSTALLATION: PART 5 (SETTING UP THE PUMP (GENERAL AND SECURITY))
- Page 116 Procedure Pressing HOME or MODE key at any time before confirming PIN will abort process. Forgotten PIN: Contact Watson-Marlow for PIN reset instruction. 14 INSTALLATION: PART 5 (SETTING UP THE PUMP (GENERAL AND SECURITY))
-
Page 117: Installation: Part 6 (Setting Up The Pump (Control Settings))
Installation: Part 6 (Setting up the pump (control settings)) 15.1 Control settings menu 15.1.1 Control settings > Speed limit 15.1.2 Control settings > Reset run hours 15.1.3 Control settings > Reset volume counter 15.1.4 Control settings > Invert alarm logic - Universal model 15.1.5 Control settings >... -
Page 118: Control Settings Menu
15.1 Control settings menu Control settings overview Speed limit User defined maximum pump speed limit Reset run hours Zero’s run hours counter Reset volume counter Zero’s volume counter Invert alarm logic - Universal Invert alarm output model Configure outputs Allows user to define function of each output 4-20 mA Output (Universal+ model Choose full scale 4-20 mA input or match input scaling to your 4-20mA input only) -
Page 119: Control Settings > Speed Limit
15.1.1 Control settings > Speed limit The maximum pumphead speed limit may be change. This limit is dependent on the pumphead which is fitted to the drive unit. Maximum pump speed qdos20 qdos30 qdos60 qdos120 qdosCWT 55 rpm (ReNu 20) 125 rpm 125 rpm 140 rpm (ReNu 120) 125 rpm (CWT) -
Page 120: Control Settings > Reset Run Hours
Figure 2 - The effect of a 30 rpm speed limit on user-defined 4-20 mA response profiles Calibrated 4-20 mA user_max_flow recalibrated 15.1.2 Control settings > Reset run hours To zero run hours counter: Procedure 1. Highlight Reset Run Hours option SELECT 3. -
Page 121: Control Settings > Reset Volume Counter
15.1.3 Control settings > Reset volume counter To zero volume counter: Procedure 1. Highlight Reset Volume Counter option SELECT 3. Choose RESET. To view volume counter Procedure 1. Choose Info from HOME screen. 15.1.4 Control settings > Invert alarm logic - Universal model To invert alarm logic: Procedure 1. -
Page 122: Control Settings > Configurable Outputs - Universal+ Model
15.1.5 Control settings > Configurable outputs - Universal+ model Procedure 1. Highlight Configure Outputs option SELECT 3. Use +/- keys to highlight required option SELECT Choose pump status of chosen option: Procedure 5. Use +/- keys to highlight required option Tick symbol indicates current setting SELECT... - Page 123 Choose logic state of chosen output: Procedure 7. Use +/- keys to highlight required option SELECT To store/reject settings: Procedure 7. Choose SELECT to program output EXIT to cancel 15 INSTALLATION: PART 6 (SETTING UP THE PUMP (CONTROL SETTINGS))
-
Page 124: Control Settings 4-20 Ma Output (Universal+ Model Only)
15.1.6 Control settings 4-20 mA Output (Universal+ model only) To configure 4-20 mA output response: Procedure 1. Highlight Configure Outputs option SELECT 3. Use +/- keys to highlight 4-20mA SELECT 15 INSTALLATION: PART 6 (SETTING UP THE PUMP (CONTROL SETTINGS)) - Page 125 Choose output option: Procedure 5. Use +/- keys to highlight required option Tick symbol indicates current setting SELECT Full scale – 4-20 mA output is based on pumps full speed range. 0 rpm Maximum rpm 4 mA 20 mA Match Input Scale – 4-20 mA output will scale to same range as 4-20 mA input. Example: If the 4-20 mA input has been scaled to provide 4 mA=0 rpm and 20 mA=20 rpm then an input of 12 mA will result in a set speed of 10 rpm and an output of 12 mA.
-
Page 126: Control Settings > Configurable Start/Stop Input
15.1.7 Control settings > Configurable Start/Stop input To configure 4-20 mA output response: Procedure 1. Highlight Configure Start/Stop Input option. SELECT Procedure 3. Highlight Configure Start/Stop Input option SELECT 15 INSTALLATION: PART 6 (SETTING UP THE PUMP (CONTROL SETTINGS)) - Page 127 Procedure 5. Use +/- keys to highlight options (41) SELECT Low stop input recommended—pump will stop if input signal lost. NOTE 41 Disable remote/automatic control at pump: Procedure 1. Highlight Configure Disable Input option SELECT 15 INSTALLATION: PART 6 (SETTING UP THE PUMP (CONTROL SETTINGS))
- Page 128 Manually override remote/automatic control of pump: Procedure 1. Use +/- keys to change from (42), (43) SELECT Only disables remote stop in manual mode. NOTE 42 Remote stop cannot be disabled in analog mode. Pump will not accept remote control until remote/automatic control is re-enabled via pump menu NOTE 43 settings.
-
Page 129: Control Settings Pumphead Selection
15.1.8 Control settings Pumphead selection To configure pumphead material selection (or confirm pumphead has replaced early) Procedure 1. Highlight Pumphead Selection option SELECT 3. Use +/- keys to highlight options. SELECT 15.1.9 Change mode (Manual, PROFIBUS, Universal and Universal+ only) Remote model does not feature selectable modes. - Page 130 To access the CHANGE MODE menu: Procedure 1. Press MODE key Choose Mode Menu from MAIN MENU. Procedure 2. Use the +/- keys to highlight options. 15 INSTALLATION: PART 6 (SETTING UP THE PUMP (CONTROL SETTINGS))
- Page 131 15.1.9.1 Change mode: Flow calibration (Manual, PROFIBUS, Universal and Universal+ only) Recalibrate: After changing pumphead After changing process fluid After changing any connecting pipework. Periodically to maintain accuracy. This pump displays flow rate in ml/min. To calibrate pump flow: Procedure 1.
- Page 132 Procedure 3. Use +/- keys to enter maximum flow rate limit. ENTER 5. Press START to begin pumping a volume of fluid for calibration. Procedure 5. Press STOP to stop pumping fluid for the calibration. 15 INSTALLATION: PART 6 (SETTING UP THE PUMP (CONTROL SETTINGS))
- Page 133 Procedure 6. Using the +/- keys enter the actual volume of fluid pumped. Procedure 7. Pump now calibrated. ACCEPT RECALIBRATE to repeat procedure. Procedure 9. Press HOME or MODE to abort. 15 INSTALLATION: PART 6 (SETTING UP THE PUMP (CONTROL SETTINGS))
- Page 134 15.1.9.2 Change mode: Contact mode (All Universal and Universal+ models) Contact Mode: Allows intermittent on/off dosing with variable duration controlled via external positive voltage pulse received by pump. Delivers a user defined dose volume when the START key is pressed. Turned off by default.
- Page 135 Procedure 5. Referring to table below, use +/- keys to enter a value for each setting. Choose NEXT to cycle through settings Save settings Procedure FINISH SAVE Contact mode settings Contact Volume of fluid dispensed when external voltage pulse is received at input pin 2, or the green start dose button is pressed.
- Page 136 View Contact mode home screen: Procedure 1. Press MODE button 2. Highlight Contact SELECT Procedure 4. The contact mode home screen will be displayed. Home screen displays: Contact dose Flow rate Dose time remaining for dose in progress. Dose time only displayed on screen when dose time is between 3–999 seconds. 15 INSTALLATION: PART 6 (SETTING UP THE PUMP (CONTROL SETTINGS))
- Page 137 15.1.9.2.1 Manual dosing Press START key to activate a single pre-configured dose. Manual dosing only available when not dosing automatically via external voltage pulse. NOTE 45 15.1.9.2.2 Analog 4-20 mA mode With the ability to operate at very low speeds, Analog 4-20 mA mode allows accurate metering of chemicals. Usually a better solution than dosing at intervals.
- Page 138 Procedure 4. Choose calibration method: MANUAL method—Enter value using +/- keys. INPUT method—Apply current signals electrically to analog input. Setting a high signal Procedure MANUAL —Enter value using +/- keys INPUT —Send high signal input to pump. 15 INSTALLATION: PART 6 (SETTING UP THE PUMP (CONTROL SETTINGS))
- Page 139 Procedure ACCEPT option displays when high 4-20 mA signal is within tolerance: Press ACCEPT to set signal input CANCEL to return to previous screen. Setting high flow calibration Procedure 7. Use +/- keys to scroll to choose flow rate: Select SET FLOW BACK to return to previous screen.
- Page 140 Setting a low signal Procedure 8. MANUAL—Enter value using +/- keys INPUT—Send low signal input to pump If range between low and high signal is less than 1.5 mA, error message displayed. Procedure ACCEPT option displays when low 4-20 mA signal is within tolerance: ACCEPT to set signal input CANCEL...
- Page 141 Setting low flow calibration Procedure 10. Use +/- keys to choose flow rate: SET FLOW BACK to return to previous screen. When all settings entered, the calibration confirmation screen is displayed: Procedure CONTINUE to start in proportional mode MANUAL to continue in manual mode. 15 INSTALLATION: PART 6 (SETTING UP THE PUMP (CONTROL SETTINGS))
- Page 142 15.1.9.3 Analog 4-20 mA mode (Universal and Universal+ only) Flowrate proportional to external mA signal input received. Universal pump will operate at: 0 rpm when 4.1 mA received. User defined maximum rpm when 19.8 mA received. Universal+ pump: Relationship between external mA signal and flow rate determined by configuring two points A and B as shown in graph below.
- Page 143 To select Analog 4-20 mA mode: Procedure 1. Press MODE button 2. Use +/- keys to scroll to Analog 4-20 mA SELECT With Analog 4-20 mA mode enabled: Procedure Current signal received by pump displayed on HOME screen. Press INFO key to display more information.
- Page 144 Procedure Press INFO key again to display 4-20 mA calibration figures. 15.1.9.4 Analog Scaling Factor Scaling Factor adjusts 4-20 mA profile using a multiplication factor. To select Analog 4-20 mA mode: Procedure 1. Press +/- from HOME screen to access scaling factor 2.
- Page 145 Procedure SELECT Procedure ACCEPT to confirm new 4-20mA Profile Figures. This will not alter stored A and B points, multiplication factor will re-scale 4-20 mA profile. To re-set original flow rates re-set multiplication factor to 1.00. 4-20 mA profile is linear relationship where y=mx+c the scaling factor alters gradient m. Speed limit function in control settings will also scale analog signal.
-
Page 146: Profibus Mode
Flowrate % Original 4-20 mA profile Scaling factor of 0.5 Scaling factor of 1.5 Flow (%) Scaling factor Output (%) Qdos20 4-20 0-100 Qdos20 4-20 0-100 Scaling factor will never cause pump to exceed speed limit. NOTE 47 15.2 PROFIBUS mode This section provides instructions on how to: Enable PROFIBUS mode Configure PROFIBUS communication settings... -
Page 147: Setting Profibus Mode
15.2.1 Setting PROFIBUS mode Qdos PROFIBUS pump only requires station address to be set from pump. NOTE 49 To select PROFIBUS mode: Procedure 1. Press MODE key 2. Use +/- keys to scroll to PROFIBUS SELECT If PROFIBUS not enabled: Procedure 4. -
Page 148: Assigning The Profibus Station Address At The Pump
Procedure 5. Pressing INFO function key displays further information. 15.2.2 Assigning the PROFIBUS station address at the pump Station address: Set from PROFIBUS settings. Cannot be automatically assigned by master. To select PROFIBUS mode: Procedure 1. Press MODE key 2. Use +/- keys to highlight PROFIBUS SELECT 15 INSTALLATION: PART 6 (SETTING UP THE PUMP (CONTROL SETTINGS)) -
Page 149: Profibus Data Exchange
Procedure 4. Use +/- keys to alter station address, in range from 1 to 125. (126 is the default station address) 5. Choose: FINISH to set station address NEXT to enable/disable PROFIBUS Communication Procedure 6. Use +/- keys to enable/disable PROFIBUS communication FINISH store choice. -
Page 150: Cyclic Data Write (From Master To Pump)
15.2.4 Cyclic Data Write (from Master to pump) Cyclic Data Write (from Master to pump) 16 bit Byte 1 (low), 2 (high) Control Word 16 bit Byte 3 (low), 4 (high) Pumphead Speed Setpoint (unsigned) 16 bit Byte 5 (low), 6 (high) Set Flow Calibration in μl per revolution Control Word Description... -
Page 151: Cyclic Data Read (From Pump To Master)
15.2.7 Cyclic Data Read (from pump to master) Cyclic data read (from pump to Master) 16 bit Byte 1, 2 Status Word 16 bit Byte 3, 4 Pumphead Measured Speed (unsigned) 16 bit Byte 5, 6 Hours Run 16 bit Byte 10,9 Number of full motor revolutions 16 bit... - Page 152 15.2.7.1 Pumphead Speed Pumphead speed is 16-bit unsigned integer value representing speed of pump head in 1/10th of RPM. For example, 1205 represents 120.5 RPM. 15.2.7.2 Hours Run Hours run parameter is 16-bit unsigned integer representing whole hours of runtime. 15.2.7.3 Number of full motor revolutions Counts down from FF for each complete motor revolution.
-
Page 153: Profibus Gsd File
Diagnostic information it can pass to PROFIBUS master on interrogation. The GSD file—WAMA0E7D.GSD—can be either be: Downloaded from Watson-Marlow website and installed. Typed into PROFIBUS master directly using a GSD editor program. Dataflow to/from pump may need to be byte-reversed, due to differences of handling data NOTE 52 between suppliers of master devices. - Page 154 93.75_supp = 1 187.5_supp = 1 500_supp = 1 1.5M_supp = 1 3M_supp = 1 6M_supp = 1 12M_supp = 1 MaxTsdr_9.6=60 MaxTsdr_19.2=60 MaxTsdr_45.45=60 MaxTsdr_93.75=60 MaxTsdr_187.5=60 MaxTsdr_500=100 MaxTsdr_1.5M=150 MaxTsdr_3M=250 MaxTsdr_6M=450 MaxTsdr_12M=800 Slave_Family = 0 Implementation_Type = “VPC3+S” Info_Text=”PROFICHIP: PROFIBUS DPV0 - slave, Watson Marlow Qdos” Bitmap_Device = “WAMA_1N”...
-
Page 155: Channel-Related Diagnostic Data
15.2.9 Channel-related diagnostic data Channel-related diagnostic blocks are always three bytes long in following format: Channel-related diagnostic block format Byte 26 Header Byte 27 Channel type Byte 28 Channel-related error code Channel-related diagnostic data Channel-related diagnostic data Byte 3 Global error =0xA9 (General error) Over current =0xA1 (Short circuit) -
Page 156: User Parameter Data
User parameter data is set by entering values into ‘Ext_User_Prm_Data_ Const(0)’ line of GSD file. Values and relevant bytes are listed in tables below. No further changes should be made to GSD file and Watson-Marlow accepts no responsibility for pump failures arising from changes to GSD file. - Page 157 15.2.11.2Fail Safe Fail-safe user parameter sets correct course of action in event of PROFIBUS communications failure. Fail-safe byte is configured as shown in following table. If no bits set or invalid bit pattern is set, default fail safe behaviour stops pump. NOTE 53 Description 0x00...
-
Page 158: Master Slave Communications Sequence
15.2.12 Master Slave communications sequence In PROFIBUS mode, the screen below is displayed, the P indicates data exchange is happening. This screen will only be displayed after successful implementation of Master Slave communications, which always follow the sequence described below. Master Slave communications sequence Power On Reset Power ON / reset of Master or Slave... - Page 159 If data exchange is lost at any time, the following screen will be displayed. The first red dot corresponds to the stage at which the error occurred, and subsequent stages will indicate a red dot because the communication sequence halted before this point. The screen will state running or stopped, depending on how the user has set up the fail-safe function within the PROFIBUS GSD file (see "15.2.8 PROFIBUS GSD file"...
-
Page 160: Operation
Operation 16.1 Pre-operation check list 16.2 Safety 16.2.1 Hazards that may occur during operation 16.3 Limits of operation—Dry running 16.4 Pump operation (Models: Manual, PROFIBUS, Universal, Universal) 16.4.1 Switching pump on in subsequent power cycles (Models: Manual, PROFIBUS, Universal and Universal+) 16.4.2 Understanding and using menus and modes 16.4.3 Using the fluid level monitor (Models: Manual, PROFIBUS, Universal and Universal+) -
Page 161: Pre-Operation Check List
16.1 Pre-operation check list Ensure the pump has been installed correctly: Carry out the following pre-operation checks: Ensure the pump has been mounted to a surface. Ensure the power cable is not damaged. Ensure electrical isolation device if fitted and working. Ensure the pumphead has been installed. -
Page 162: Safety
16.2 Safety 16.2.1 Hazards that may occur during operation The following hazards may occur during operation of the pump. 16.2.1.1 Unexpected operation All pump models may operate either in response to the control system (Analog, PROFIBUS or Contact mode) or because of the auto-restart feature (start-up following a power cut) being enabled. -
Page 163: Limits Of Operation-Dry Running
Manual, PROFIBUS, Universal and Universal+) Subsequent power-up sequences jump from start-up screen to home screen: Pump runs power-on test confirming proper functioning of memory and hardware. Faults display as error codes. Watson-Marlow Pumps logo displayed for three seconds Home screen displayed. 16 OPERATION... -
Page 164: Understanding And Using Menus And Modes
16.4.2 Understanding and using menus and modes 16.4.2.1 Main menu (Models: Manual, PROFIBUS, Universal and Universal+) To access MAIN MENU: Procedure 1. Choose MENU a. From HOME screen b. From INFO screen. Procedure 2. Use the +/- keys to highlight available options. SELECT to choose an option. - Page 165 To exit MAIN MENU: Procedure EXIT 16.4.2.2 Modes The pump modes are: In this mode the pump is operated manually (Start/Stop/Speed) Manual Pump can also be operated via start/stop input, but only if it is enabled and only if it is a Universal or Universal+ pump Flow calibration In this mode the flowrate is calibrated to the pump...
-
Page 166: Using The Fluid Level Monitor (Models: Manual, Profibus, Universal And Universal+)
16.4.3 Using the fluid level monitor (Models: Manual, PROFIBUS, Universal and Universal+) All models except the remote model feature a fluid level monitor to monitor the fluid level (quantity) remaining in inlet supply vessel during operation. When this feature is enabled, a ‘progress' bar displayed on home screen indicates an estimated volume of fluid remaining in supply container. - Page 167 To activate/deactivate Fluid level monitor: Procedure 1. Enable level monitor will already be highlighted. ENABLE Fluid volume level will display on HOME screen. Procedure 3. Choose DISABLE to deactivate the fluid level monitor. Fluid volume level will no longer appear on the HOME screen.
- Page 168 To change Fluid volume unit of measure: Procedure 4. Choose Fluid Volume Unit 5. Use key to toggle US GALLONS LITRES To configure the level monitor: Procedure 6. Choose Configure Level Monitor SELECT 8. Use +/- keys to enter maximum volume of supply container. 16 OPERATION...
- Page 169 Procedure NEXT 10. Use +/- keys to set Alert Level. Procedure SELECT to return to FLUID LEVEL SETTINGS. 16 OPERATION...
-
Page 170: Using Fluid Recovery Manual Operation (Manual, Profibus, Universal And Universal+ Only)
To adjust fluid volume if different to maximum container volume (e.g., after partial refill) Procedure 12. Choose Adjust Level option. Procedure 13. Use +/- keys set volume of fluid in container. 16.4.4 Using fluid recovery manual operation (Manual, PROFIBUS, Universal and Universal+ only) In this operating mode, the pump can manually be operated in reverse for short periods to recover fluid/chemicals pumped. - Page 171 Procedure 2. If the pump is already running, then the following screen will be displayed. The pump must be stopped before it can be reversed to recover fluid. Press STOP PUMP Procedure An instruction is now displayed. There is a warning to ensure that your system design permits reverse flow. If the flow path has unidirectional valves installed, then reverse flow will not function and the pump will build up excessive pressure within the pipework.
- Page 172 Procedure 3. Press and hold RECOVER to start running the pump in reverse and recover fluid. The screen below will be displayed whilst RECOVER is held down. As fluid is recovered the volume recovered and time elapsed will increase. Procedure 4.
-
Page 173: Remote Fluid Recovery Using Analog Control (Remote, Universal And Universal+ Models Without Relay Modules)
16.4.5 Remote fluid recovery using analog control (Remote, Universal and Universal+ models without relay modules) Remote fluid recovery should not be used for bulk fluid transfer. 16.4.5.1 Universal and Universal+ models To run pump in reverse and recover fluid automatically in analog 4-20 mA mode: Procedure 1. -
Page 174: Pump Status Overview
16.4.5.2 Remote, and Universal and Universal+ models Remote fluid recovery must be operated in following sequence: Procedure 1. Send remote stop signal (apply 5 - 24 volts to input pin 1). 2. Apply 5 - 24 volt to pin 5 of pump input. 3. -
Page 175: Front Cover Leds (Model: Remote)
16.5.2 Front cover LEDs (Model: Remote) The remote pump has LED icons on the front panel to indicate its status. The location of these LED’s is provided in figure below: A description of the icons and definition of each error state is provided in the table below. Status LEDs 4-20 mA Status... - Page 176 17.2.2 Replacement of power cable 17.2.3 Replacement of fuses 17.3 Pumphead maintenance 17.3.1 Life of pumphead 17.3.2 Replacement of pumphead (Model: qdos 30 - All variants) 17.3.3 Replacement of pumphead (Model qdos 20, 60, 120, CWT - All variants) 17 MAINTENANCE...
-
Page 177: Maintenance
17.1 Spare parts The table below provides a list of spare parts which may be used during installation, servicing or maintenance. Pumpheads Image Description Part number qdos30 0M3.2200.PFP ReNu Santoprene pumphead qdos60 0M3.3200.PFP (PFPE lubricant) qdos120 0M3.4200.PFP qdos20 0M3.1800.PFP ReNu SEBS pumphead (PFPE lubricant) qdos30 0M3.2800.PFP qdos60... - Page 178 Connectors Image Description Part number Hydraulic connection pack, polypropylene compression fittings— Metric - Set of four sizes: 6.3x11.5 mm, 10x16 mm, 9x12 mm, 5x8 mm for use with 0M9.221H.P01 WM Interface tubing Hydraulic connection pack, pvdf compression fittings—Set of two sizes: 3/8'' 0M9.001H.F20 x 1/4"...
- Page 179 Connectors Image Description Part number Qdos solvent connector kit Note: PVCU Solvent connector in accordance with schedule 80 PVC 1/4 " 0M9.001H.U90 nominal pipe, Dia 13.75 +/-0.05. Installation: Customer must choose a solvent weld product compatible with the fluid to be pumped, ensuring the full material interface length is welded.
-
Page 180: Electrical Maintenance
There are no replaceable or serviceable parts within the drive. If the pump drive is damaged remove the pump from service and contact your Watson-Marlow representative to discuss how the pump can be repaired. Do not attempt to remove the pump casing to inspect the internal parts within the drive. -
Page 181: Replacement Of Fuses
Instructions for replacement of the pumphead are in this section: 17.3.1 Life of pumphead The pumphead is a key consumable item. It is not possible for Watson-Marlow to predict the precise life of a pumphead due to multiple factors such as speed, chemical compatibility, pressure amongst other factors. - Page 182 17.3.2.1 Removing the pumphead Procedure 1. Stop the pump. 2. Isolate the pump from electrical power. 3. Drain down the fluid path in accordance with your organisation’s procedure 4. Remove the inlet and discharge fluid path connections pumphead (protecting the pump from any process fluid spillages), by unscrewing the connection collars and gently pulling the connections off the pumphead ports.
- Page 183 Procedure 6. Disengage the pumphead from the retaining clamps by carefully detaching the pumphead from the pump housing and rotating it in an anti-clockwise direction by approximately 15°. Procedure 7. Remove the pumphead from the pump housing. 17 MAINTENANCE...
- Page 184 9. Check the leak detect sensor and driveshaft are both clean and free from process chemical. If any evidence of chemical residue is found, remove the pump from service and contact your local Watson-Marlow representative for advice. 17 MAINTENANCE...
- Page 185 17.3.2.2 Fitting a new pumphead Fitting a new pumphead is a similar procedure of the pumphead removal. This procedure is written based on a new pumphead which would not contain any previous chemical. Do not fit a used pumphead. Procedure 1.
-
Page 186: Replacement Of Pumphead (Model Qdos 20, 60, 120, Cwt - All Variants)
The pumphead retaining clamps are not designed to be loosened or tightened with a tool. Using a tool may result in breakage. Always tighten or loosen the clamps by hand. 17.3.3 Replacement of pumphead (Model qdos 20, 60, 120, CWT - All variants) - Page 187 17.3.3.1 Removing the pumphead Procedure 1. Stop the pump. 2. Isolate the pump from electrical power. 3. Drain down the fluid path in accordance with your organisation’s procedure 4. Remove the inlet discharge fluid path connections pumphead (protecting the pump from any process fluid spillages), by unscrewing the connection collars and gently pull the connections off the pumphead ports.
- Page 188 Procedure 6. To disengage the pumphead from the drive, rotate it in a clockwise direction by approximately 15°. Procedure 7. Remove the pumphead 17 MAINTENANCE...
- Page 189 Procedure 8. Rotate the pressure valve in the pumphead back to the 'transport position' (This specific step is not required for CWT models). Transport position P>1 bar (15 psi) 17 MAINTENANCE...
- Page 190 10. Check the leak detect sensor and driveshaft are clean and free from process chemical. If any evidence of chemical residue is found, remove the pump from service and contact your local Watson-Marlow representative for advice. 17 MAINTENANCE...
- Page 191 17.3.3.2 Fitting a new pumphead Fitting a new pumphead is a similar procedure of the pumphead removal. This procedure is written based on a new pumphead which would not contain any previous chemical. Do not fit a used pumphead. Procedure 1.
- Page 192 NOTICE The pumphead locking lever is designed to be loosened or tightened by hand. 17 MAINTENANCE...
- Page 193 Errors, breakdown and troubleshooting 18.1 Errors 18.1.1 Remote model 18.1.2 Manual, PROFIBUS, Universal, Universal+ models 18.2 Error reporting 18.3 Breakdown 18.3.1 Leak detection message (Models: Manual, PROFIBUS, Universal and Universal+ models) 18.3.2 Leak detection message (Remote only) 18.3.3 Leak detection procedure 18.4 Troubleshooting 18.4.1 Pumphead end of life 18.4.2 Flowrate...
-
Page 194: Errors, Breakdown And Troubleshooting
This section will provide information on errors or a breakdown which may occur during operation, along with possible causes to assist with troubleshooting. If the problem cannot be solved, information on how to seek technical support along with our comprehensive warranty is provided at the end of this section. -
Page 195: Manual, Profibus, Universal, Universal+ Models
Signal out of range and Leak detected error screens report the nature of an external condition. NOTE 54 They do not flash. 18.2 Error reporting If any unexpected faults or failures are experienced report them to your Watson-Marlow representative. 18 ERRORS, BREAKDOWN AND TROUBLESHOOTING... -
Page 196: Breakdown
18.3 Breakdown 18.3.1 Leak detection message (Models: Manual, PROFIBUS, Universal and Universal+ models) If a leak is detected the pump will display the message provided on the following image: 18.3.2 Leak detection message (Remote only) If a leak is detected, the following LED icon will display: LED icons (Leak detect) 4-20 mA Status... -
Page 197: Leak Detection Procedure
18.3.3 Leak detection procedure As soon as a leak is detected either as a result of a message on the screen, the remote model icons, or due to observing a fluid leak from the pumphead. The following procedure must be immediately followed 1. -
Page 198: Troubleshooting
If the message constantly repeats after several pumphead installations, then there may be a leak detection sensor failure. Please contact your local Watson-Marlow representative to determine further leak detection troubleshooting or repair. 18 ERRORS, BREAKDOWN AND TROUBLESHOOTING... -
Page 199: General Pump Help (Manual, Profibus, Universal And Universal+ )
Should you be unable to resolve the error or breakdown, or have another query please contact your Watson-Marlow representative for technical support. 18.5.1 Manufacturer This product is manufactured by Watson-Marlow. For guidance or support of this product please contact : Watson-Marlow Limited Bickland Water Road... -
Page 200: Warranty
Watson-Marlow has been advised of the possibility of such damages. Watson-Marlow shall not be liable for any loss, damage, or expense directly or indirectly related to or arising out of the use of its products, including damage or injury caused to other products, machinery, buildings, or property. -
Page 201: Returning Pumps
You are required to complete and return a decontamination declaration stating all fluids that have been in contact with the equipment being returned to us. On receipt of the declaration, a Returns Authorisation Number will be issued. Watson-Marlow reserves the right to quarantine or refuse any equipment that is not displaying a Returns Authorisation Number. - Page 202 Chemical compatibility 19.1 Chemical compatibility overview 19.2 How to check chemical compatibility 19.2.1 Scenario 1: Fluid Path (wetted by the pumped fluid in normal use) 19.2.2 Scenario 2: Potential of being wetted due to environment or spillage 19.2.3 Scenario 3: Potential of being wetted due to operating the pumphead to the point of failure 19 CHEMICAL COMPATIBILITY...
-
Page 203: Chemical Compatibility Overview
19.1 Chemical compatibility overview Ensuring chemical compatibility is a key requirement in determining if the pumped fluid and the chemical environment the pump is operating in, is within scope of the intended use of the product. Chemical compatibility analysis is based on which materials of construction would be in contact (wetted) with the fluid or environment, as represented by the 3 scenarios in this table Scenario 1 Scenario 2... -
Page 204: Chemical Compatibility
2. Read the information on the page 3. Search for the fluid or select from the list 4. Check the fluid is compatible using steps 5 to 7 below: The Watson-Marlow chemical compatibility guide provides a combined (57) check of the three items of the pumphead: fluid path Tube or fluid contacting element inside the pumphead 5. - Page 205 ✔ ✔ Procedure Watson-Marlow interface tubing is available in the following sizes for use with the Watson-Marlow metric hydraulic compression fittings only : Using the chemical compatibility guide choose an interface material which chemically compatible and available in the size required.
- Page 206 19.2.1.1 Materials of construction - Pumphead: Fluid path The combined check in step 5 in the procedure above, may be verified using the Watson-Marlow chemical compatibility guide and the individual items in the table below Pumphead Tube or fluid contacting element Pumphead ports Fluid connection seals...
-
Page 207: Scenario 2: Potential Of Being Wetted Due To Environment Or Spillage
Potential of being wetted due to environment or spillage" below should be checked for chemical compatibility using standard engineering chemical compatibility guides. Materials of construction: Potential of being wetted due to environment or spillage Component qdos 20 qdos 30 qdos 60 qdos 120 qdos® CWT™... -
Page 208: Scenario 3: Potential Of Being Wetted Due To Operating The Pumphead To The Point Of Failure
19.2.3 Scenario 3: Potential of being wetted due to operating the pumphead to the point of failure If there is risk in a users organisation that the pumphead would be operated to the point of failure, or if the point of pumphead failure cannot be monitored, then a check of chemical compatibility of the materiasls in "19.2.3.1 Materials of construction that have the potential of being wetted when the tube or fluid contacting element fails"... - Page 209 19.2.3.1 Materials of construction that have the potential of being wetted when the tube or fluid contacting element fails Pump qdos® Component qdos 20 qdos 30 qdos 60 qdos 120 CWT™ Pumphead 30 % GF Polyphenyl 30 % GF Polyphenyl 40 % GF PPS 20 % GF PP...
- Page 210 The materials of construction in the pumphead to drive interface area would only be wetted by the fluid in the event of operating the pumphead to the point of failure, and the fluid being incompatible with the pumphead internals in "19.2.3.1 Materials of construction that have the NOTE 59 potential of being wetted when the tube or fluid contacting element fails"...
- Page 211 20.6 Start up defaults 20.7 Dimensions 20.8 Weight 20.8.1 qdos 30 20.8.2 qdos 20, 60 and 120 fitted with ReNu pumpheads 20.8.3 qdos CWT fitted with CWT pumphead 20.9 Compliance and certification 20.9.1 Compliance markings on the product 20.10 Product certification 20.11 Standards...
- Page 212 20.1 Performance 20.1.1 Maximum speed and flowrate The maximum speed and flowrate is provided in the table below. Model: (Manual, PROFIBUS, Universal, Model: Remote Universal+) Speed Flowrate 1 Speed Flowrate 2 Drive Pumphead ml/min USGPH ml/min USGPH ReNu 20 SEBS 5.30 5.30 qdos 20...
- Page 213 The speed increment depends on the control model, and operating mode of the pump. This information is summarised in the table below. Control methods Manual PROFIBUS Universal Universal+ Remote 3333:1 (Qdos 20) 5000:1 (Qdos 30) Manual speed adjustment range 10000:1 (Qdos 60) 20000:1 (Qdos 120) 5000:1 (Qdos CWT) Minimum driveshaft adjustment speed increment 0.007...
- Page 214 20.1.3 Pressure 20.1.3.1 Maximum discharge pressure Maximum Discharge Pressure (62) Drive Pump Head ReNu 20 SEBS qdos 20 ReNu 20 PU CWT 30 EPDM ReNu 30 Santoprene qdos 30 ReNu 30 SEBS ReNu 60 Santoprene qdos 60 ReNu 60 SEBS...
- Page 215 The performance curves for those drives which can have alternative pumpheads fitted from standard are not shown. 20.1.4.1 Qdos 20 Performance curve pump speed: 55 rpm (ReNu 20 SEBS, ReNu 20 PU), 125 rpm (CWT 30 EPDM) Fluid: Water at 20 °C...
- Page 216 20.1.4.2 Qdos 30 Performance curve speed: 125 rpm Fluid: Water at 20 °C Inlet pressure psi Discharge pressure psi 2200 2000 1800 1600 1400 1200 1000 ReNu 30 ReNu 30 Santoprene or SEBS Santoprene -0.5 Inlet pressure bar Discharge pressure bar 20 PRODUCT SPECIFICATION AND EQUIPMENT RATINGS...
- Page 217 20.1.4.3 Qdos 60 Performance curve pump speed: 125 rpm Fluid: Water at 20 °C Inlet pressure psi Discharge pressure psi 2200 2000 1800 1600 1400 1200 1000 ReNu 60 ReNu ReNu 60 Santoprene or SEBS 60 PU Santoprene -0.5 Inlet pressure bar Discharge pressure bar 20 PRODUCT SPECIFICATION AND EQUIPMENT RATINGS...
- Page 218 20.1.4.4 qdos 120 Performance curve pump speed: 125 rpm (ReNu 60 SEBS, ReNu 60 Santoprene, ReNu 60 PU), 140 rpm (ReNu 120 Santoprene) Fluid: Water at 20 °C Inlet pressure psi Discharge pressure psi 2200 2000 1800 1600 ReNu 120 Santoprene 1400 1200 1000...
- Page 219 20.1.4.5 CWT Performance curve pump speed: 55 rpm (ReNu 20 SEBS, ReNu 20 PU), 125 rpm (CWT 30 EPDM) Fluid: Water at 20 °C Inlet pressure psi Discharge pressure psi 2200 2000 1800 1600 1400 1200 1000 CWT EPDM ReNu 20 PU ReNu 20 SEBS -0.5 Inlet pressure bar...
- Page 220 "19 Chemical compatibility" on page 202. Under certain conditions the pump is suitable for limited outdoor use. Contact your NOTE 64 Watson-Marlow representative for advice. Protection of drive to NEMA 250 with the HMI cover (optional accessory) installed. NOTE 65 20.3 Ingress protection (IP Rating)
- Page 221 At 24V/200W Inrush current No Load Inrush current duration Efficiency @ ring terminals 100W@10/12/24V Typical qdos pump power required qdos 20, 30, 60, 120, CWT Maximum rated input power qdos 20, 30, 60, 120, CWT 20 PRODUCT SPECIFICATION AND EQUIPMENT RATINGS...
- Page 222 CWT™: 300 ml/min qdos120: 16 ml/rev qdos60: 8 ml/rev qdos60 PU: 8.8 ml/rev Calibration qdos30: 4 ml/rev Flow unit ml/min qdos20: 6.67 ml/rev qdos20 PU: 8.8 ml/rev qdos® CWT™: 4.9 ml/rev Backlight 30 minutes Pump tag WATSON-MARLOW Auto restart 20 PRODUCT SPECIFICATION AND EQUIPMENT RATINGS...
- Page 223 20.7 Dimensions Dimensions Dimension qdos 20 (67) qdos 30 qdos 60 qdos 120 qdos CWT (68) 234 mm (9.2 ̎ ) 234 mm (9.2 ̎ ) 234 mm (9.2 ̎ ) 234 mm (9.2 ̎ ) 234 mm (9.2 ̎ ) 214 mm (8.4 ̎ ) 214 mm (8.4 ̎ ) 214 mm (8.4 ̎ ) 214 mm (8.4 ̎ ) 214 mm (8.4 ̎ ) 104.8 mm (4.1 ̎...
- Page 224 9 lb 8 oz 5.25 11 lb 9 oz Universal+ 110V relay 9 lb 8 oz 5.25 11 lb 9 oz 20.8.2 qdos 20, 60 and 120 fitted with ReNu pumpheads Weights - qdos 20, 60 and 120 Drive Drive with pumphead Model Manual 10 lb 2 oz 12 lb 9 oz Remote 9 lb 15 oz...
- Page 225 20.8.3 qdos CWT fitted with CWT pumphead Weights - qdos® CWT™ Drive Drive with pumphead Model Manual 10 lb 2 oz 15 lb 0 oz Remote 9 lb 15 oz 14 lb 13 oz Universal 10 lb 2 oz 15 lb 0 oz Universal+ 10 lb 2 oz 15 lb 0 oz PROFIBUS 10 lb 2 oz 15 lb 0 oz Universal 24V relay 10 lb 9 oz 15 lb 7 oz...
- Page 226 20.9 Compliance and certification 20.9.1 Compliance markings on the product All markings are listed, however some may apply only to some models. Complies with the applicable EC Complies with the applicable directives UK regulations The pump or packaging cannot be handled as domestic waste.
- Page 227 EU declaration of conformity Manufacturer: Watson-Marlow Limited, Bickland Water Road, Falmouth, TR11 4RU, UK This declaration of conformity is issued under the sole responsibility of the manufacturer. Object of the Declaration: Watson-Marlow qdos pumps. The object of the declaration described above is in conformity with the relevant Union...
- Page 228 UK declaration of conformity Manufacturer: Watson-Marlow Limited, Bickland Water Road, Falmouth, TR11 4RU, UK This declaration of conformity is issued under the sole responsibility of the manufacturer. Object of the Declaration: Watson-Marlow qdos pumps. The object of the declaration described above is in conformity with the relevant statutory...
- Page 229 CHINA 符合性证书 制造商:Watson Marlow Ltd, Bickland Water Road, Falmouth, TR11 4RU, UK 本符合性证书由制造商全权负责发布。 声明的对象: Watson-Marlow qdos pumps. 本声明的对象符合以下标准的适用要求 GB/T 26572-2011 - 电气和电子产品中某些受限物质的浓度限值要求 GB 4793.1-2007 / IEC EN 61010-1.2001-用于测量、控制与实验室用途的电气设备安全要求- 第1 GB/T 18268-1 / IEC EN 61326-1 - 用于测量、控制与实验室用途-- EMC 要求-- 第1 部分:一般要求...
- Page 230 CHINA China RoHS Manufacturer: Watson-Marlow Limited, Bickland Water Road, Falmouth, TR11 4RU, UK This certificate of compliance is issued under the sole responsibility of the manufacturer. Object of the Declaration: Watson-Marlow qdos pumps. The Object of this Declaration is in conformity with the applicable requirements of the following...
- Page 231 20.11 Standards 20.11.1 Standards (AC mains power supply) Safety requirements for electrical equipment for measurement, control and laboratory use: BS EN 61010- 1 Degrees of protection provided by enclosures (IP code): BS EN 60529 EC standards amendments 1 and 2 EN61326-1:2013 Electrical Equipment for measurement control and laboratory use EMC requirements Part 1 UL 61010-1:2012 Ed.3 +R:21Nov2018...
- Page 232 List of tables and figures 21.1 List of tables Table 1 - Acronym list 21.2 List of figures Figure 1 - The effect of a 75 rpm speed limit on user-defined 4-20 mA response profiles Figure 2 - The effect of a 30 rpm speed limit on user-defined 4-20 mA response profiles Figure 3 - The default mA/rpm values stored in the pump 21 LIST OF TABLES AND FIGURES...
- Page 233 Glossary Bold Heavy typeface Discharge The line, pipe or connection containing fluid flowing out of the pumphead Dry running running with gas in the pumphead Element Hazard Inlet The line, pipe or connection containing fluid flowing into the pumphead 22 GLOSSARY...
- Page 234 Intended use The use of machinery in accordance with the information provided in the instructions for use; Maintenance Personnel responsible for maintenance, servicing, performance monitoring or troubleshooting of the product Operator Person operating the product for its intended use. Peristaltic tubing Prime Draw fluid into the pumphead Pump...
- Page 235 Responsible person Individual designated by the users organisation, responsible for the installation, safe use and maintenance of the product. Run dry running with gas in the pumphead Signals 22 GLOSSARY...
Need help?
Do you have a question about the qdos 20 and is the answer not in the manual?
Questions and answers