Advertisement
Available languages
Available languages
Quick Links
H-10295
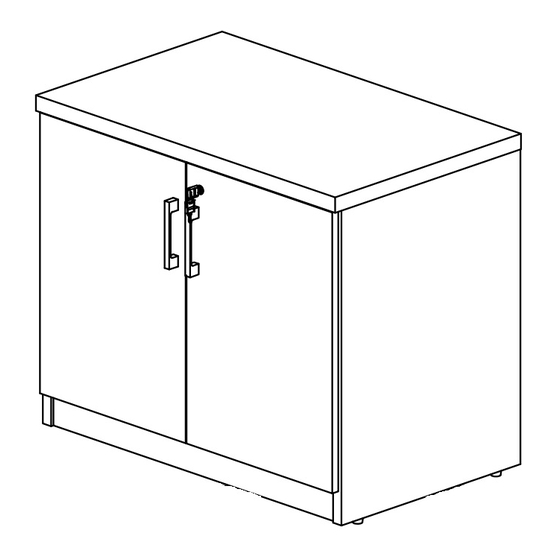
METRO COLLECTION –
30" HEIGHT STORAGE CABINET
TOOLS NEEDED
Phillips
Rubber Mallet
Screwdriver
3
5
1
7
4
A
Adjustable Glide x 4
F
L-Bracket x 1
E
Cam Lock x 18
I
Cam Lock Cap x 18
PAGE 1 OF 15
Drill
(Optional)
STORAGE CABINET PARTS
10
6
8
B
Metal Handle x 2
M4 x 22 mm Bolt x 4
S-Bracket x 1
M3 x 12 mm Screw x 4
G
H
Dowel x 12
K
R
Door Plug x 1
Wall Anchor Kit x 1
1-800-295-5510
uline.com
Two Person Assembly
5/16" Drill Bit
Recommended
(Optional)
PARTS
2
9
C
J
Shelf Dowel x 4
M4 x 10 mm Bolt x 8
Para Español, vea páginas 6-10.
Pour le français, consulter les pages 11-15.
#
DESCRIPTION
1
Left Side Panel
2
Right Side Panel
3
Top Panel
4
Bottom Panel
5
Back Panel
6
Skirt Panel
7
Shelf
8
Left Door
9
Right Door
10
Support Beam
M6 x 30 mm Bolt x 8
M3.5 x 16 mm Screw x 2
Lock x 1
Hinge x 4
M3.5 x 14 mm Screw x 16
QTY
1
1
1
1
1
1
1
1
1
2
D
Cam Lock Pin x 18
0223 IH-10295
Advertisement

Related Manuals for U-Line METRO H-10295


Summary of Contents for U-Line METRO H-10295
- Page 1 Para Español, vea páginas 6-10. Pour le français, consulter les pages 11-15. H-10295 1-800-295-5510 uline.com METRO COLLECTION – 30" HEIGHT STORAGE CABINET TOOLS NEEDED Two Person Assembly Phillips Rubber Mallet Drill 5/16" Drill Bit Recommended Screwdriver (Optional) (Optional) STORAGE CABINET PARTS PARTS DESCRIPTION Left Side Panel...
- Page 2 ASSEMBLY For H-10306 and H-10307 storage credenza Install one cam lock pin (D) in bottom panel (4). assembly, refer to instructions included with Insert one cam lock (E) into corresponding hole H-10308 storage credenza top and side frames. in skirt panel (6). Fit bottom panel and skirt panel together and tighten cam locks.
- Page 3 ASSEMBLY CONTINUED 3. Install seven cam lock pins (D) and six dowels (G) 5. Attach top panel (3) to support beams using eight in left side panel (1). Insert seven cam locks (E) into M6 x 30 mm bolts (C). (See Figure 5) corresponding holes in back panel (5), bottom 6.
- Page 4 ASSEMBLY CONTINUED 8. Place left door (8) and right door (9) panels on a 12. Using two people, hold door panel in line with side smooth, non-marring surface to prevent scratching. panel. Attach hinge (J) to inside of side panels Align holes in hinge (J) with pre-drilled holes in door using four M3.5 x 14 mm screws (J).
- Page 5 ASSEMBLY CONTINUED 14. Attach one bracket of wall anchor to back of top of cabinet using two M4 x 20 mm bolts. Mark holes on wall where plastic anchors will be located. Drill holes using 5/16" drill bit. Mount remaining bracket of wall anchor to wall with two M4 x 40 mm bolts and two plastic anchors.
- Page 6 H-10295 800-295-5510 uline.mx COLECCIÓN METROPOLITANA – GABINETE PARA ALMACENAMIENTO DE 30" DE ALTURA HERRAMIENTAS NECESARIAS Se Recomienda Armar Desarmador Mazo de Caucho Taladro Broca de 5/16" de Cruz (Opcional) (Opcional) Entre Dos Personas PARTES DEL GABINETE PARA ALMACENAMIENTO PARTES DESCRIPCIÓN CANT.
- Page 7 ENSAMBLE Para el ensamble de la credenza para Instale un pasador para tuerca minifix (D) en el almacenamiento H-10306 y H-10307, consulte panel inferior (4). Inserte una tuerca minifix (E) en las instrucciones incluidas con los armazones el orificio correspondiente de la moldura (6). Junte el panel inferior a la moldura y apriete las tuercas superior y laterales de la credenza de almacenamiento H-10308.
- Page 8 CONTINUACIÓN DEL ENSAMBLE 3. Instale siete pasadores para tuercas minifix (D) y 5. Fije el panel superior (3) a las vigas de soporte seis taquetes (G) en el panel lateral izquierdo (1). utilizando ocho pernos M6 x 30 mm (C). Inserte las siete tuercas minifix (E) en los orificios (Vea Diagrama 5) correspondientes del panel posterior (5), panel...
- Page 9 CONTINUACIÓN DEL ENSAMBLE 8. Coloque los paneles de la puerta izquierda (8) y 12. Entre dos personas, alinee el panel de la puerta derecha (9) sobre una superficie lisa que no deje con el panel lateral. Fije la bisagra (J) a la parte marcas para evitar rayones.
- Page 10 CONTINUACIÓN DEL ENSAMBLE 14. Fije un taquete para pared a la parte posterior del archivero superior con dos pernos M4 x 20 mm. Marque los orificios en la pared donde se colocarán los taquetes de plástico. Perfore los orificios utilizando una broca de 5/16". Instale el soporte restante del anclaje en la pared con dos pernos M4 x 40 mm y dos taquetes de plástico.
- Page 11 H-10295 1-800-295-5510 uline.ca COLLECTION METRO – ARMOIRE DE RANGEMENT – 30 PO DE HAUTEUR OUTILS REQUIS Montage à deux Tournevis Maillet en Perceuse Mèche de perceuse cruciforme caoutchouc (optionnel) de 5/16 po personnes recommandé (optionnel) PIÈCES DE L'ARMOIRE DE RANGEMENT PIÈCES DESCRIPTION QTÉ...
- Page 12 MONTAGE Pour le montage des bahuts de rangement Installez un goujon d'excentrique (D) dans le ARRÊT H-10306 et H-10307, reportez-vous aux panneau inférieur (4). Insérez un excentrique (E) instructions fournies avec la surface/le cadre dans le trou correspondant du panneau de base (6). Assemblez les panneaux inférieur et de base et du bahut de rangement H-10308.
- Page 13 MONTAGE SUITE 3. Installez sept goujons d'excentrique (D) et six 5. Fixez le panneau supérieur (3) aux barres de support chevilles (G) dans le panneau latéral gauche (1). avec huit boulons M6 x 30 mm (C). (Voir Figure 5) Insérez sept excentriques (E) dans les trous 6.
- Page 14 MONTAGE SUITE 8. Placez les portes gauche (8) et droite (9) sur une 12. À deux, tenez la porte au niveau du panneau surface lisse qui ne marque pas pour éviter les latéral. Fixez la charnière (J) à l’intérieur des rayures.
- Page 15 MONTAGE SUITE 14. Fixez un support d'ancrage mural sur la partie supérieure arrière de l'armoire avec deux boulons M4 x 20 mm. Marquez l'emplacement des trous sur le mur pour les ancrages en plastique. Percez les trous en vous servant d'une mèche de perceuse de 5/16 po.
Need help?
Do you have a question about the METRO H-10295 and is the answer not in the manual?
Questions and answers