
Subscribe to Our Youtube Channel
Related Manuals for Sage Precision Brewer


Summary of Contents for Sage Precision Brewer
- Page 1 Sage Precision Brewer ® BDC400/SDC400 BDC450/SDC450 QUICK GUIDE KURZANLEITUNG GUIDE RAPIDE SNELSTARTGIDS GUIDA RAPIDA GUÍA RÁPIDA MANUAL RÁPIDO...
-
Page 2: Table Of Contents
RECOMMENDS Follow the instructions provided in this book. SAFETY FIRST • Keep the appliance clean. At Sage we are very safety Follow the cleaning instructions ® conscious. We design and provided in this book. manufacture consumer •... - Page 3 • The use of attachments not in a microwave. sold or recommended by • Scalding may occur if the carafe Sage may cause fire, ® lid or basket is removed during electric shock or injuries.
- Page 4 We do cleaning is required, please not recommend the use of contact Sage Customer Service de‑mineralised or distilled or go to sageappliances.com water as this may affect the • Fully unwind the power cord taste of brewed coffee.
- Page 5 SHORT CORD INSTRUCTIONS NOTICE TO CUSTOMERS REGARDING MEMORY • Your Sage appliance is fitted ® STORAGE with a short power cord to reduce the risk of personal Please note that in order to better injury or property damage serve our customers, internal...
- Page 6 NOTE This appliance has a three wire grounded plug. To reduce the risk of electric shock, this plug will fit in a polarised outlet only one way. If the plug does not fit properly into the outlet, contact a qualified electrician. Do not use an adapter or modify the plug in any way.
-
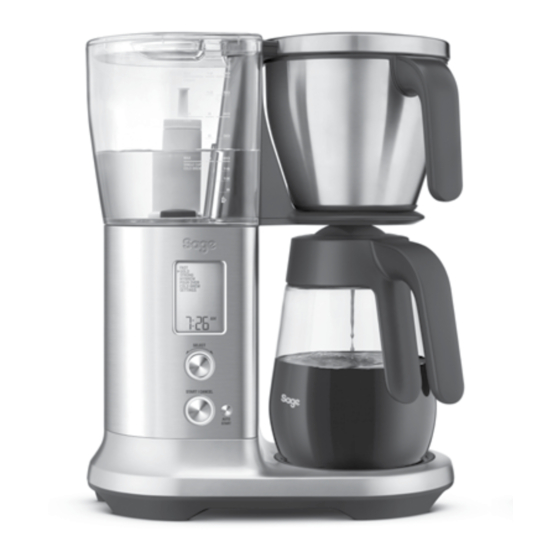
Page 7: Components
Components A. Tank lid H. AUTO START button B. Water tank I. Brew basket C. Water filter J. Showerhead K. Showerhead ring D. Water filter adapter L. Drip stop lever E. LCD display M. Carafe lid F. SELECT dial N. Carafe G. - Page 8 ACCESSORIES A. Cone filter basket insert D. Water hardness test strip (see page 8 for directions) B. Mesh basket filter C. Sage coffee measuring scoop E. Flat bottom basket filter paper pack ® (10 pieces) Rating Information SDC400 220‑240V ~50‑60Hz 1550‑1850W...
-
Page 9: Operation
INSTALLING THE WATER FILTER Operation This product is designed to be used with a water filter installed in the water tank. Not doing so will affect the internal components and performance of the appliance. The filter cartridges should be replaced regularly; WATER HARDNESS SETTING when indicated on the LCD screen. - Page 10 Otherwise the coffee basket will overflow. COFFEE/WATER RATIO We recommend 1 level Sage scoop of coffee grounds per 150ml cup of water. Adjust the amount according to your individual taste. The maximum capacity for pre-ground coffee is 12 level Sage scoops.
- Page 11 Never fill the water tank once the coffee machine (LESS THAN 450 MLS) has started a brewing cycle. 1. Your Sage Precision Brewer will recognise when ® BREW MODES the brewer has less than 450 mls of water and will adjust the brew settings, automatically.
- Page 12 7. The machine will prompt you to set the time NOTE for Auto Start. Rotate the SELECT dial to adjust Auto Start time, press SELECT dial to set. DO NOT fill the water tank above the SINGLE Auto Start is now set and the machine will CUP marking or the volume of the cup being used.
-
Page 13: Care & Cleaning
KEEP WARM Care & * Applicable to the Sage Precision Brewer ® ™ Cleaning Glass (SDC400) only. FAST CUSTOMIZE Always turn the coffee machine off and remove the GOLD BLOOM TIME plug from the power outlet before cleaning. STRONG BLOOM VOL. - Page 14 We recommend to descale regularly. When LCD shows “DESCALE” (flashing), descaling cycle is needed but the cycle can be performed at anytime. Descaler is available on the Sage website. NOTE It takes approximately 33 minutes to complete descaling cycle.
-
Page 15: Troubleshooting
Troubleshooting PROBLEM POSSIBLE CAUSE WHAT TO DO Coffee too • Amount of coffee and water is not • Check correct amount of coffee or water strong or weak correct (1 spoon : 150ml cup). is used. Coffee leaking • The basket drip‑stop seal doesn’t •... - Page 16 • Clean the drip stop for any foreign objects of coffee grinds or stains. • If the problem persists and drip stop does not return to top position please call Sage ® Consumer Support. Unit produces • Brewing performance is affected •...
-
Page 17: Guarantee
During this guarantee period Sage Appliances will repair, replace, or refund any defective product (at the sole discretion of Sage Appliances). All legal warranty rights under applicable national legislation will be respected and will not be impaired by our guarantee. - Page 18 Note...
- Page 19 Sage Precision Brewer ® KURZANLEITUNG...
- Page 20 HINWEISE ZUR Inhalt SICHERHEIT BITTE ALLE ANWEISUNGEN VOR GEBRAUCH LESEN 2 Bei Sage steht Sicherheit ® UND ZUM SPÄTEREN NACH- an erster Stelle SCHLAGEN AUFBEWAHREN 8 Komponenten • Dieses Dokument ist auch 10 Bedienung zum Download verfügbar unter 16 Pflege und Reinigung sageappliances.com...
- Page 21 einem flachen Boden, ca. Mikrowelle. 8,25 cm Ø) vor Verwendung des • Das Entfernen des Filterhalters Geräts im Filterhalter befindet. oder Kannendeckels während des Brühvorgangs kann zu • Verwenden Sie den feinen Verbrühungen führen. Korbfilter nicht in Verbindung mit Papierfiltern. ACHTUNG •...
- Page 22 Beaufsichtigung benutzt oder Scheuerschwämme. werden oder wenn sie in die sichere Handhabung des • Die Verwendung von Zube‑ Geräts eingewiesen wurden hörteilen, die nicht von Sage ® und die damit verbundenen vertrieben oder empfohlen Gefahren verstehen. werden, kann zu Bränden, Stromschlägen oder...
- Page 23 Bestimmungszweck. Verwenden Sie das Gerät nicht in fahrenden ANLEITUNG FÜR KURZE Fahrzeugen oder Booten. NETZKABEL Verwenden Sie das Gerät nicht • Ihr Sage ‑Gerät ist mit einem ® im Freien. Fehlgebrauch kann zu kurzen Netzkabel ausgestattet, Verletzungen führen. um dem Risiko für Körperverlet‑...
- Page 24 (3) muss das Verlängerungskabel Dieses Symbol bedeutet, mit einem 3‑poligen Erdungs‑ dass das Gerät nicht mit stecker versehen sein. dem gewöhnlichen Haushaltsmüll entsorgt • Als zusätzliche Schutzmaßnah‑ werden darf. Stattdessen muss me bei der Verwendung von es zu einer für diesen Zweck Elektrogeräten wird die Installa‑...
-
Page 25: Komponenten
Komponenten A. Wassertankdeckel H. AUTO START‑Taste B. Wassertank I. Filterhalter C. Wasserfilter J. Brausekopf K. Brausekopf‑Sicherungsring D. Wasserfilter-Adapter L. Tropfstopper E. LCD‑Display M. Kannendeckel F. SELECT‑Drehregler N. Kanne G. START/CANCEL‑Taste LEISTUNGSDATEN SDC450 220‑240 V ~50‑60 Hz 1550‑1760 W... - Page 26 ZUBEHÖR A. Filtereinsatz D. Wasserhärte‑Teststreifen (siehe Seite 22 für Anwendungshinweise) B. Feiner Korbfilter C. Sage Kaffeemesslöffel E. Papier-Korbfilter mit flachem Boden ® (10 Stück) LEISTUNGSDATEN SDC400 220‑240 V ~50‑60 Hz 1550‑1850 W...
-
Page 27: Bedienung
Bedienung EINSETZEN DES WASSER FILTERS EINSTELLEN DER WASSERHÄRTE UND SPÜLEN Dieses Produkt ist für den Einsatz mit einem im Wassertank installierten Wasserfilter konzipiert. 1. Achten Sie darauf, dass der Filterhalter und die Andernfalls werden die internen Komponenten Kanne leer (und mit aufgesetztem Deckel) und die Leistung des Geräts beeinträchtigt. - Page 28 3. Mahlen Sie genügend Kaffeebohnen für das zu brühende Kaffeevolumen. Für eine vollständig gefüllte Kanne mit 12‑Tassen‑Volumen empfehlen wir 108 g Kaffee. Dies entspricht ca. 13 gestrichenen Sage -Messlöffeln. ® 5. Befüllen Sie den Wassertank mit frischem, Verwenden Sie ca. 1 Messlöffel pro 150 ml kaltem Wasser bis zur MAX‑Markierung.
- Page 29 KAFFEE/WASSER-VERHÄLTNIS Wir empfehlen 1 gestrichenen Sage-Messlöffel Kaffeepulver pro 150 ml Wasser. Sie können die Kaffeepulvermenge je nach persönlichem Geschmack individuell anpassen. Die maximale Kapazität für vorgemahlenen Kaffee beträgt 12 gestrichene Sage-Messlöffel. Eine Überschreitung dieser Menge kann zum Überlaufen des Filterhalters führen.
- Page 30 Adapters™ sollten Sie in diesem Modus brühen. MENGEN (WENIGER ALS 450 MLS) Der Adapter ist separat erhältlich. 1. Sage Precision Brewer erkennt, wenn weniger ® • COLD BREW: als 450 mls Wasser verfügbar sind und Aufgrund des langen Brühvorgangs von passt die Brüheinstellungen automatisch...
- Page 31 3. Wir empfehlen für einzelne Tassen die 7. Die Maschine fordert Sie nun auf, Verwendung des Filtereinsatzes. den Startzeitpunkt für den automatischen Start festzulegen. Drehen Sie den SELECT‑ 4. Setzen Sie den Filtereinsatz in den Drehregler auf die gewünschte Autostart‑Zeit Filterhalter ein.
- Page 32 PRÄFERENZ heiße Warmhalteplatte. Um zwischen C° und F° zu wechseln, drücken Sie den SELECT‑Drehregler und die AUTOSTART‑Taste gleichzeitig. Stellen Sie den SELECT‑Drehregler auf die gewünschte Position. WARMHALTEFUNKTION * Gilt nur für Sage Precision Brewer Glass ® ™ (SDC400) FAST CUSTOMIZE...
-
Page 33: Pflege Und Reinigung
Pflege und Reinigung Schalten Sie das Gerät vor der Reinigung stets REINIGEN DES GEHÄUSES aus und ziehen Sie den Netzstecker aus der Das Gehäuse und das LCD‑Display können mit Steckdose. einem weichen, feuchten Tuch gereinigt werden. Bei Verwenden eines Reinigungsmittels tragen Sie REINIGEN DES FILTERHALTERS dieses auf das Tuch und nicht direkt auf das LCD‑... - Page 34 Steckdose. werden. Der Entkalkungsvorgang kann jederzeit durchgeführt werden. Ein geeigneter Entkalker ZURÜCKSETZEN AUF WERKSEIN- ist auf der Website von Sage erhältlich. STELLUNGEN Diese Funktion setzt die Maschine auf die Werkseinstellungen zurück, inklusive der Wasserhärteeinstellung. Halten Sie die START‑...
-
Page 35: Störungsbehebung
Störungsbehebung PROBLEM MÖGLICHE URSACHE LÖSUNG Kaffee ist zu stark • Das Verhältnis von Kaffee • Überprüfen Sie, ob die richtige Menge oder schwach und Wasser ist nicht optimal an Kaffee bzw. Wasser verwendet wird. (1 Messlöffel pro 150 ml Wasser). Kaffee tritt aus •... - Page 36 Sicherungsring und die Dichtung und wenn er nicht richtig eingesetzt setzen Sie sie wieder ein. und befestigt wurde. Filter im • Der Filter wurde nicht richtig • Rufen Sie den Support von Sage ® Wassertank hat eingesetzt und befestigt. sich abgelöst Tropfstopper •...
- Page 37 PROBLEM MÖGLICHE URSACHE LÖSUNG Display zeigt • Das Gerät wurde zu oft • Lassen Sie das Gerät mindestens „Too Hot“ hintereinander betrieben und die 20 Minuten ruhen, bevor Sie einen (zu heiß) an Komponenten sind überhitzt. weiteren Brühvorgang starten. Auf dem LCD- •...
-
Page 38: Garantie
Garantie 2 JAHRE BESCHRÄNKTE GARANTIE Sage Appliances bietet für dieses Produkt für den häuslichen Gebrauch in bestimmten Bereichen ab Kaufdatum eine 2-jährige Garantie gegen Mängel, die durch fehlerhafte Verarbeitung und Materialien verursacht wurden. Während dieser Garantiezeit repariert, ersetzt oder erstattet Sage Appliances ein defektes Produkt (nach eigenem Ermessen von Sage Appliances). - Page 39 Sage Precision Brewer ® GUIDE RAPIDE...
- Page 40 • Une version téléchargeable Table des de ce document est matières également disponible sur sageappliances.com. • Avant une première utilisation, 2 Sage recommande ® assurez‑vous que votre la sécurité avant tout alimentation électrique est 7 Composants identique à celle illustrée sur 9 Fonctionnement l'étiquette située en dessous...
- Page 41 • Avant de démarrer un nouveau la carafe est retiré pendant le cycle d'infusion : cycle d'infusion. − Vérifiez que le système ATTENTION anti‑goutte de la carafe se • Risque de blessure. Il est déplace librement vers le haut nécessaire d'installer / d'enlever et vers le bas.
- Page 42 Ne vous déconseillons d'utiliser le nettoyage est nécessaire, de l'eau déminéralisée ou veuillez contacter le service distillée, car elle affecterait client Sage ou consulter le site le goût du café infusé. sageappliances.com • Déroulez entièrement le cordon MESURES IMPORTANTES DE d'alimentation avant utilisation.
- Page 43 INSTRUCTIONS RELATIVES en mouvement. Ne l'utilisez AU CORDON COURT pas en plein air. Une mauvaise utilisation peut engendrer des • Votre appareil Sage est fourni ® blessures. avec un cordon d'alimentation court afin de réduire les • Il est recommandé de risques de blessure ou les l'inspecter régulièrement.
- Page 44 Le symbole illustré indique REMARQUE que cet appareil ne doit pas être jeté aux ordures Cet appareil est muni d'une fiche ménagères habituelles. de terre à trois fils. Pour réduire Il doit être déposé dans un centre les risques de choc électrique, cette fiche s'insère dans une municipal de collecte de déchets désigné...
- Page 45 Composants A. Couvercle du réservoir H. Bouton AUTO START (Démarrage automatique) B. Réservoir d'eau I. Panier à infusion C. Filtre à eau J. Tête de douchette D. Adaptateur du filtre à eau K. Anneau de la tête de douchette E. Écran LCD L.
- Page 46 D. Bandelette de test de dureté de l'eau (voir page 9 pour le mode d'emploi) B. Panier à filtre en mailles C. Cuillère de mesure à café Sage E. Lot de 10 filtres papier pour panier ® à filtre à fond plat Informations sur la tension nominale SDC400 220 ‑...
- Page 47 Fonctionne- ment INSTALLATION DU FILTRE À EAU RÉGLAGE DE LA DURETÉ DE L'EAU & RINÇAGE Ce produit a été conçu pour être utilisé avec un filtre à eau installé dans le réservoir d'eau. 1. Assurez‑vous que le panier à café et la carafe Procéder autrement pourrait affecter les vides (avec le couvercle attaché) sont bien composants internes ainsi que les performances...
- Page 48 RATIO CAFÉ / EAU Nous recommandons 1 cuillère de mesure Sage de café moulu pour une tasse de 150 ml d'eau. Ajustez la quantité en fonction de vos goûts personnels. La capacité maximale pour le café pré-moulu est de 12 cuillères de mesure Sage.
- Page 49 5. Verrouillez le couvercle de la carafe sur la REMARQUE carafe et insérez‑le sous la sortie anti‑goutte. Ne remplissez jamais le réservoir d'eau une fois que la machine à café a démarré un cycle d'infusion. MODES D'INFUSION • FAST : Ce mode permet de réaliser le café infusé...
- Page 50 450 mls d'eau. UNE TASSE / PETITS VOLUMES (MOINS DE 450 MLS) 3. Pour les tasses uniques, nous recommandons 1. Votre Precision Brewer Sage reconnaît ® d'utiliser un panier à filtre conique. quand la machine à café contient moins 4.
- Page 51 PARAMÈTRES 6. Appuyez sur le bouton AUTO START. • SET CLOCK (réglage de l'horloge) : Réglez l'heure affichée sur l'écran LCD. FAST CUSTOMIZE GOLD • DESCALE (détartrage) : Élimine l'accumulation BLOOM TIME STRONG BLOOM VOL. de minéraux sur les composants internes. MYBREW BREW TEMP.
- Page 52 KEEP WARM (MAINTIEN AU CHAUD) * Valable uniquement pour la Sage Precision ® Brewer Glass (SDC400). ™ CUSTOMIZE FAST GOLD BLOOM TIME STRONG BLOOM VOL. MYBREW BREW TEMP. POUROVER FLOW RATE COLD BREW REMOVE SETTINGS CARAFE LID SET CLOCK STANDBY...
- Page 53 Entretien et nettoyage NETTOYAGE DU BOÎTIER Veillez à toujours éteindre la machine à café et à débrancher la fiche de la prise de courant EXTÉRIEUR avant de la nettoyer. Le boîtier extérieur et l'écran LCD peuvent être nettoyés à l'aide d'un chiffon doux et humide. NETTOYAGE DU PANIER À...
- Page 54 SELECT pour démarrer. Tournez sur YES (Oui) nécessaire mais qu'il peut être effectué à tout ou NO (Non) et appuyez pour confirmer. moment. Le détartrant est disponible sur le site Internet de Sage. REMARQUE Un cycle de détartrage dure environ 33 minutes.
- Page 55 Dépannage PROBLÈME CAUSE POSSIBLE SOLUTION Café trop fort ou • La quantité de café et d'eau est • Vérifiez que la quantité de café ou trop faible incorrecte (1 cuillère : une tasse d'eau utilisée est correcte. de 150 ml). Du café...
- Page 56 Le filtre à mailles du • Le filtre à mailles n'est pas inséré • Veuillez contacter le réservoir d'eau se ou serré correctement. service client Sage ® détache et flotte Le système anti- • Le système anti‑goutte est • Remontez‑le vers le haut.
- Page 57 Garantie GARANTIE LIMITÉE DE 2 ANS Sage Appliances garantit ce produit pour un usage domestique sur les territoires spécifiés pendant 2 ans à compter de la date d'achat, contre les défauts de fabrication et de matériaux. Au cours de cette période de garantie, Sage Appliances s'engage à...
- Page 58 Déclaration à l'intention du consommateur SAGE FRANCE - GARANTIE LIMITÉE Sage Appliances garantit ce produit pour un usage Article L. 217-4 du Code de la consommation : domestique sur les territoires spécifiés pendant 2 « Le vendeur livre un bien conforme au contrat et ans à...
- Page 59 Sage Precision Brewer ® GUIDA RAPIDA...
- Page 60 • Sul sito sageappliances. com è disponibile anche una Sommario versione scaricabile di questo documento. • Prima di usare l'apparecchio per 2 Sage consiglia: la ® la prima volta, verificare che la sicurezza prima di tutto tensione della rete corrisponda...
- Page 61 − Verificare che il sistema ATTENZIONE antigoccia della caraffa si • Rischio di lesioni. Per ridurre il muova su e giù liberamente. rischio di schizzi di acqua calda − Svuotare completamente la è necessario inserire/rimuovere caraffa e fissarne il coperchio correttamente il cestello.
- Page 62 NORME DI SICUREZZA intervento di manutenzione IMPORTANTI PER TUTTI diverso dalla pulizia, contattare GLI ELETTRODOMESTICI il Servizio clienti Sage o visitare • L'elettrodomestico può essere il sito Web sageappliances.com. utilizzato da bambini di età • Svolgere completamente il cavo superiore a 8 anni e da persone prima dell'uso.
- Page 63 ISTRUZIONI PER L'UTILIZZO movimento o barche. Non CON IL CAVO CORTO utilizzare all'aperto. L'uso non • Questo apparecchio corretto potrebbe provocare Sage è dotato di un cavo di lesioni. ® alimentazione corto per ridurre • Si raccomanda di ispezionare il rischio di lesioni personali regolarmente l'apparecchio.
- Page 64 elettrici. Si consiglia l'uso di Questo simbolo indica che un salvavita con corrente l'apparecchio non può operativa nominale non essere smaltito con i rifiuti superiore a 30 mA. Rivolgersi domestici comuni. Deve a un elettricista per un parere essere conferito presso un centro professionale.
-
Page 65: Componenti
Componenti A. Coperchio del serbatoio H. Pulsante AUTO START (avvio automatico) B. Serbatoio dell'acqua I. Cestello portafiltro C. Filtro dell'acqua J. Disco forato D. Adattatore del filtro dell'acqua K. Guarnizione ad anello del disco forato E. Display LCD L. Leva del sistema antigoccia F. - Page 66 A. Inserto a cono per il cestello portafiltro D. Striscia per il test di durezza dell'acqua (vedere pag. 8 per istruzioni) B. Filtro a maglie C. Misurino da caffè Sage E. Filtri in carta a fondo piatto ® (confezione da 10 pezzi) Informazioni sui valori nominali SDC400 220‑240 V ~50‑60 Hz 1550‑1850 W...
-
Page 67: Funzionamento
Funzionamento INSTALLARE IL FILTRO IMPOSTAZIONE DELLA DUREZZA DELL'ACQUA DELL'ACQUA E LAVAGGIO Questo prodotto è progettato per essere 1. Assicurarsi che il cestello portafiltro vuoto utilizzato con un filtro dell'acqua installato nel e la caraffa vuota (con coperchio) siano inseriti nell'apparecchio. serbatoio. - Page 68 RAPPORTO CAFFÈ/ACQUA Si consiglia di utilizzare 1 misurino Sage di caffè macinato per 150 ml di acqua. Regolare la quantità in base al gusto personale. La capacità massima per il caffè premacinato è di 12 misurini Sage.
- Page 69 5. Fissare il coperchio sulla caraffa e inserirla NOTA sotto l'uscita antigoccia. Non riempire mai il serbatoio dell'acqua una volta che la macchina del caffè ha avviato un ciclo di estrazione. MODALITÀ DI ESTRAZIONE • VELOCE: La modalità di estrazione più veloce. •...
- Page 70 (MENO DI 450 MLS) singola. 4. Posizionare l'inserto a cono nel cestello 1. Il Precision Brewer di Sage rileverà se ® portafiltro. Utilizzare i segni di allineamento il serbatoio contiene meno di 450 mls come guida.
- Page 71 IMPOSTAZIONI 6. Premere il pulsante AUTO START (avvio automatico). • IMPOSTAZIONE DELL'OROLOGIO: Imposta l'ora visualizzata sul display LCD. FAST CUSTOMIZE • DECALCIFICAZIONE: Rimuove l'accumulo GOLD BLOOM TIME STRONG di residui minerali sui componenti interni. BLOOM VOL. MYBREW BREW TEMP. POUROVER FLOW RATE •...
- Page 72 KEEP WARM (MANTIENI CALDO) * Valido esclusivamente per Sage Precision ® Brewer Glass (SDC400). ™ CUSTOMIZE FAST GOLD BLOOM TIME STRONG BLOOM VOL. MYBREW BREW TEMP. POUROVER FLOW RATE COLD BREW REMOVE SETTINGS CARAFE LID SET CLOCK STANDBY KEEP WARM...
-
Page 73: Manutenzione E Pulizia
Manutenzione e pulizia PULIRE L'INVOLUCRO ESTERNO Spegnere sempre l'apparecchio e scollegarlo dalla presa di alimentazione prima di pulirlo. L'involucro esterno e il display LCD possono essere puliti con un panno morbido e umido. PULIRE IL CESTELLO PORTAFILTRO Applicare il detergente sul panno, non sulla E IL FILTRO A MAGLIE superficie del display LCD. - Page 74 è necessario eseguire un ciclo di decalcificazione; Questa opzione ripristinerà le impostazioni è tuttavia possibile eseguirlo in qualsiasi momento. di fabbrica dell'apparecchio, compresa Il decalcificante è disponibile sul sito Web di Sage. l'impostazione della durezza dell'acqua. Tenere premuti il pulsante START (avvio), la manopola NOTA SELECT (selezione) e il pulsante AUTO START (avvio automatico) insieme per 3 secondi.
-
Page 75: Risoluzione Dei Problemi
Risoluzione dei problemi PROBLEMA POSSIBILE CAUSA COME PROCEDERE Caffè troppo forte • La quantità di caffè e acqua non • Controllare che la quantità di caffè o acqua o troppo blando è corretta (1 cucchiaio: tazza da utilizzata sia corretta. 150 ml). - Page 76 è stato inserito o fissato correttamente. Il filtro a maglie • Il filtro a maglie non è inserito • Contattare il servizio di assistenza Sage ® nel serbatoio o fissato correttamente. dell'acqua si allenta...
- Page 77 • Il profilo della temperatura di • Se il problema persiste, contattare o funziona per estrazione non è impostato il servizio di assistenza Sage ® periodi prolungati correttamente. producendo solo vapore Sul display LCD • Le prestazioni di estrazione •...
-
Page 78: Garanzia
Garanzia GARANZIA LIMITATA DI 2 ANNI Sage Appliances offre una garanzia per l'utilizzo domestico di questo prodotto in specifiche aree geografiche; la copertura è di 2 anni a partire dalla data di acquisto. La garanzia copre eventuali malfunzionamenti causati da difetti di fabbricazione o dei materiali. - Page 79 Sage Precision Brewer ® SNELSTARTGIDS...
- Page 80 • Een downloadbare versie van dit document Inhoud is ook beschikbaar op sageappliances.com • Zorg er vóór het eerste gebruik 2 Sage stelt veiligheid voorop ® voor dat uw elektriciteits‑ 7 Onderdelen voorziening dezelfde is als die 9 Bediening op het label aan de onderkant 15 Onderhoud en reiniging van het apparaat.
- Page 81 • Het verwijderen van het bakje of het deksel van de karaf • Het gebruik van opzetstukken tijdens de bereidingscyclus kan die niet door Sage® zijn brandwonden veroorzaken. verkocht of aangeraden, kan risico op brand, elektrische LET OP schokken of letsel met zich meebrengen.
- Page 82 We raden het gebruik beschadigd is. Neem contact op van gedemineraliseerd of met de klantenservice van Sage gedestilleerd water af, omdat of ga naar sageappliances.com dit de smaak van de koffie kan als er sprake is van schade of er beïnvloeden.
- Page 83 Veiligheidsschakelaars met een contact met ons op via nominale bedrijfsstroom van privacy@sageappliances.com. niet meer dan 30 mA worden aanbevolen. Raadpleeg een INSTRUCTIES VOOR KORT elektricien voor professioneel SNOER advies. • Uw Sage ‑apparaat is uitgerust ® met een kort netsnoer om het...
- Page 84 Het weergegeven symbool OPMERKING geeft aan dat dit apparaat Dit apparaat heeft een geaarde niet met het normale stekker met drie draden. Om het huishoudelijke afval mag risico van een elektrische schok worden weggegooid. Het moet te beperken, past deze stekker naar een geschikt plaatselijk slechts op één manier in een afvalverwerkingscentrum worden...
- Page 85 Onderdelen A. Reservoirdeksel H. Knop AUTO START (Automatische start) B. Waterreservoir I. Bereidingsbakje C. Waterfilter J. Filterhouder D. Waterfilteradapter K. Filterhouderring E. LCD‑scherm L. Druppelstophendel F. Knop SELECT (Selectie) M. Karafdeksel G. Knop START/CANCEL N. Karaf (Starten/annuleren) Classificatiegegevens SDC450 220‑240 V ~50‑60 Hz 1550‑1760 W...
- Page 86 ACCESSOIRES A. Kegelvormig inzetstuk voor filterbakje D. Teststrip voor waterhardheid (zie pagina 8 voor instructies) B. Filterbakje met gaas C. Sage -koffiemaatlepel E. Papieren filters voor plat filterbakje ® (10 stuks) Classificatiegegevens SDC400 220‑240 V ~50‑60 Hz 1550‑1850 W...
- Page 87 Bediening INSTELLINGEN WATERHARDHEID DE WATERFILTER PLAATSEN & SPOELEN Dit product is ontworpen voor gebruik met een waterfilter geïnstalleerd in het waterreservoir. Als u 1. Zorg ervoor dat het lege koffiebakje en de lege dit niet doet, heeft dit invloed op de interne compo‑ karaf (met deksel erop) in het apparaat zijn nenten en prestaties van het apparaat.
- Page 88 KOFFIE-/WATER-RATIO We raden 1 Sage-maatlepel gemalen koffie per 150 ml kopje water aan. Pas de hoeveelheid aan naar uw smaak. De maximale capaciteit voor voorgemalen koffie is 12 afgestreken Sage-maatlepels. Als dit aantal wordt overschreden, kan het koffiebakje overlopen.
- Page 89 5. Vergrendel het deksel van de karaf en plaats OPMERKING deze onder de druppelstopuitloop. Vul het waterreservoir nooit als het koffiezetapparaat een bereidingscyclus gestart is. BEREIDINGSMODI • FAST (Snel): In deze modus wordt uw koffie zo snel mogelijk bereid. • GOLD (aanbevolen): Deze modus voldoet aan de criteria voor een optimale bereiding en de vereisten voor gold cup‑standaard* van de ECBC (European Coffee Brewing Centre).
- Page 90 450 mls water in het reservoir zijn. ENKELE KOP/KLEINERE VOLUMES (MINDER DAN 450 MLS) 1. Uw Sage Precision Brewer detecteert ® wanneer er minder dan 450 mls water zijn en zal de bereidingsinstellingen automatisch aanpassen. Vul uw kopje met vers koud water...
- Page 91 Draai de SELECT‑knop om de voorkeur in te stellen. KEEP WARM (WARM HOUDEN) FAST CUSTOMIZE GOLD BLOOM TIME STRONG BLOOM VOL. * Enkel van toepassing op de Sage Precision MYBREW ® BREW TEMP. POUROVER FLOW RATE Brewer Glass (SDC400).
- Page 92 KEEP WARM wordt automatisch geactiveerd voor volumes boven 450 mls. • KEEP WARM kan worden uitgeschakeld door in het menu SETTINGS naar KEEP WARM te gaan, draai dan en druk op de SELECT‑knop om AAN of UIT te zetten. • KEEP WARM zal niet werken in COLD BREW‑ of POUR OVER‑modus.
- Page 93 Onderhoud en reiniging DE BEHUIZING REINIGEN Schakel het koffiezetapparaat altijd uit en haal de stekker uit het stopcontact voordat u het De behuizing en het LCD‑scherm kunnen met apparaat schoonmaakt. een zachte, vochtige doek worden gereinigd. Breng het reinigingsmiddel op de doek aan en HET KOFFIEBAKJE EN HET niet op het LCD‑scherm.
- Page 94 We raden aan om regelmatig te ontkalken. Wanneer het LCD‑scherm "DESCALE" (knipperend) weergeeft, is een ontkalkingscyclus nodig, maar de cyclus kan op elk moment worden uitgevoerd. Ontkalker is beschikbaar op de Sage‑ website. OPMERKING Het duurt ongeveer 33 minuten om de ontkal‑...
- Page 95 Probleemoplossing PROBLEEM MOGELIJKE OORZAAK WAT TE DOEN Koffie te sterk • Hoeveelheid koffie en water klopt • Controleer of de juiste hoeveelheid koffie of te zwak niet (1 lepel: 150 ml kop). of water wordt gebruikt. Koffie lekt uit het •...
- Page 96 • Verwijder vreemde voorwerpen uit de blijft staan druppelstop. • Als het probleem aanhoudt en de druppelstop niet terugkeert naar de bovenste positie, belt u de Sage ‑ ® consumentenondersteuning. Het apparaat • De bereidingsprestaties worden • Ontkalk het apparaat.
- Page 97 Garantie BEPERKTE GARANTIE VAN 2 JAAR Sage Appliances biedt een garantie op dit product voor huishoudelijk gebruik in genoemde gebieden gedurende 2 jaar vanaf de datum van aankoop voor defecten veroorzaakt door gebrekkige afwerking en materialen. Gedurende deze garantieperiode zal Sage Appliances...
- Page 98 Opmerkingen...
- Page 99 Sage Precision Brewer ® GUÍA RÁPIDA...
- Page 100 MEDIDAS DE Índice SEGURIDAD IMPORTANTES LEE TODAS LAS 2 Sage recomienda ® INSTRUCCIONES ANTES seguridad ante todo DEL USO Y GUÁRDALAS 7 Componentes 9 Funcionamiento • Hay una versión de este 14 Cuidado y limpieza documento disponible en 16 Resolución de problemas sageappliances.com para...
- Page 101 • Quitar la tapa de la jarra o el filtro • El uso de accesorios no durante la extracción del café vendidos o recomendados podría provocar quemaduras. por Sage puede provocar ® incendios, descargas eléctricas o lesiones.
- Page 102 No recomendamos el uso (que no sea la limpieza), ponte de agua desmineralizada en contacto con el servicio o destilada, ya que podría de atención al cliente de Sage afectar al sabor del café. o visita sageappliances.com. • Desenrolla completamente MEDIDAS DE SEGURIDAD el cable de alimentación antes...
- Page 103 INSTRUCCIONES DE CABLE • Se recomienda inspeccionar CORTO el aparato regularmente. • Tu cafetera Sage está ® AVISO A LOS CLIENTES equipada con un cable de SOBRE EL alimentación corto para evitar ALMACENA MIENTO lesiones personales o daños DE MEMORIA...
- Page 104 NOTA Este aparato dispone de un enchufe de tres clavijas con conexión a tierra. Para reducir el riesgo de descarga eléctrica, el enchufe solo puede introducirse en tomas de corriente polarizadas de una manera. Si el enchufe no encaja correctamente en la toma de corriente, contacta con un electricista calificado.
- Page 105 Componentes A. Tapa del depósito de agua H. Botón AUTO START B. Depósito de agua I. Portafiltros C. Filtro de agua J. Ducha K. Anilla de sujeción de la ducha D. Adaptador del filtro de agua L. Mecanismo antigoteo E. Pantalla LCD M.
- Page 106 D. Tira de prueba de dureza del agua (instrucciones en la página 8) B. Filtro de malla E. Pack de 10 filtros de papel de base plana C. Cuchara dosificadora de Sage ® Datos técnicos del modelo SDC400 220‑240 V ~50‑60 Hz 1550‑1850 W...
- Page 107 Funcionamiento CONFIGURACIÓN DE DUREZA NOTA DEL AGUA Ten en cuenta que las marcas de nivel de agua 1. Comprueba que la jarra (con la tapa puesta) indicadas en el depósito serán incorrectas y el filtro estén vacíos y correctamente si se usa la máquina sin un filtro de agua colocados.
- Page 108 PROPORCIÓN DE CAFÉ/AGUA Recomendamos usar 1 cucharada al ras de café molido, medida con el dosificador Sage, por cada 150 ml de agua. Puedes modificar las cantidades para adaptarlas a tu gusto. La capacidad máxima de café molido es de 12 cucharadas del dosificador Sage al ras. Superar esta cantidad podría causar que el filtro rebose.
- Page 109 • MY BREW: Te permite personalizar todos los NOTA parámetros de la preparación del café. − Bloom Time: El tiempo de preinfusión te Siempre comprueba que la jarra esté vacía permite indicar cuánto tiempo quieres que y limpia antes de preparar café. el café...
- Page 110 DE 450 MLS 4. Inserta el adaptador para filtros cónicos en 1. Sage Precision Brewer detecta cuando hay ® el portafiltros. Usa las marcas de alineación menos de 450 mls de agua y modifica los como referencia.
- Page 111 FUNCIÓN KEEP WARM NOTA * Aplicable solo a the Sage Precision Brewer ® ™ Glass (modelo SDC400). Se te pedirá que ajustes la hora si aún no lo has hecho. Asegúrate de que la hora que muestra el reloj sea correcta. El reloj se restablecerá cada...
- Page 112 Cuidado y limpieza REEMPLAZO DEL FILTRO DE AGUA Antes de limpiar la cafetera, apágala y desenc‑ húfala de la toma de corriente. 1. Retira el filtro de agua usado y sepáralo del adaptador. Desecha el filtro usado. LIMPIEZA DEL PORTAFILTROS Y FILTRO DE MALLA Retira el portafiltros.
- Page 113 LCD, significará que es necesario confirmar tu selección. descalcificar la cafetera, pero puedes hacerlo en cualquier momento. El kit de descalcificación está disponible en la página web de Sage. NOTA Se tarda aproximadamente 33 minutos en completar el ciclo de descalcificación.
- Page 114 Resolución de problemas PROBLEMA CAUSA POSIBLE QUÉ HACER Café demasiado • Las cantidades de café y agua no • Comprueba que has utilizado las canti‑ fuerte o aguado son correctas (1 cucharada para dades de café y agua correctas. una taza de 150 ml). Fuga de café...
- Page 115 • Si el problema persiste y el mecanismo antigoteo no vuelve a su posición, llama al servicio de atención al cliente de Sage ® La unidad • El rendimiento de la extracción •...
- Page 116 Garantía GARANTÍA LIMITADA DE 2 AÑOS La garantía de Sage Appliances cubre este producto para uso doméstico en territorios específicos durante 2 años a partir de la fecha de compra contra fallos causados por mano de obra y materiales defectuosos. Durante el plazo de la garantía, Sage Appliances reparará,...
- Page 117 Sage Precision Brewer ® MANUAL RÁPIDO...
- Page 118 CUIDADOS Índice IMPORTANTES LEIA TODAS AS INSTRUÇÕES ANTES DE UTILIZAR A Sage recomenda a segurança ® E GUARDE-AS PARA como máxima prioridade Componentes CONSULTA FUTURA Funcionamento • Está disponível uma versão 13 Cuidados e limpeza transferível deste documento 16 Resolução de problemas em sageappliances.com...
- Page 119 • O uso de acessórios não • Podem ocorrer queimaduras por vendidos ou recomendados vapor se remover a tampa da pela Sage pode provocar ® jarra durante o ciclo de extração. incêndios, choque elétrico ou lesões.
- Page 120 Contacte • Recomendamos o uso de água o serviço de atendimento fria filtrada. Não recomendamos ao cliente da Sage ou aceda a utilização de água desminera‑ a sageappliances.com se lizada ou destilada porque pode o aparelho estiver danificado afetar o sabor do café.
- Page 121 INSTRUÇÕES DO CABO utilize no exterior. A utilização DE ALIMENTAÇÃO incorreta pode causar ferimentos. • O aparelho Sage inclui um ® • Recomendamos a inspeção cabo de alimentação curto para regular do aparelho. reduzir o risco de ferimentos pessoais ou danos materiais AVISO AOS CLIENTES EM resultantes de puxar, tropeçar...
- Page 122 O símbolo apresentado NOTA indica que este aparelho não deve ser eliminado Este aparelho tem uma ficha juntamente com os resíduos de três fios com ligação à terra. domésticos normais. Deve ser Para reduzir o risco de choque encaminhado para um centro de elétrico, esta ficha apenas tem recolha de resíduos da autoridade uma posição de entrada na...
- Page 123 Componentes A. Tampa do depósito H. Botão AUTO START (Início automático) B. Depósito de água I. Cesto de café C. Filtro de água J. Cabeça de evaporação K. Anel da cabeça de evaporação D. Adaptador do filtro de água L. Alavanca da tampa antigotas E.
- Page 124 9 para obter instruções) B. Cesto de filtro de rede E. Conjunto de cesto de filtros de papel C. Colher de medida Sage de base plana (10 itens) ® D. Tira de teste de dureza da água (consulte Informação de classificação SDC400...
- Page 125 Funcionamento INSTALAR O FILTRO DE ÁGUA DEFINIÇÃO DE DUREZA DA ÁGUA Este produto destina‑se a ser utilizado com E LIMPEZA um filtro de água instalado no depósito de água. Se não utilizar o filtro, os componentes internos 1. Certifique-se de que o cesto de café vazio e o desempenho do aparelho serão afetados.
- Page 126 à marca MAX (Máximo) no depósito de água. PROPORÇÃO CAFÉ/ÁGUA Recomendamos 1 colher de medida Sage de café moído por 150 ml de água. Ajuste a quantidade de acordo com a sua preferência individual. A capacidade máxima para café pré‑moído é de 12 colheres Sage rasas.
- Page 127 MODOS DE EXTRAÇÃO CUIDADO • FAST (Rápido): Este modo serve o café mais rápido. A jarra TEM de estar colocada no respetivo lugar antes de extrair o café com o nível de água • GOLD (Ouro) (recomendado): Este modo cumpre acima da marca SINGLE CUP (Uma chávena).
- Page 128 450 mls de água no depósito. SINGLE CUP (UMA CHÁVENA)/ VOLUMES MAIS PEQUENOS (MENOS DE 450 MLS) 1. A sua máquina Sage Precision Brewer deteta ® quando a jarra tem menos de 450 mls de água e ajusta automaticamente as definições de extração.
- Page 129 DEFINIÇÕES 6. Prima o botão AUTO START (Início automático). • SET CLOCK (Definição do relógio): Defina a hora apresentada no LCD. CUSTOMIZE FAST GOLD BLOOM TIME STRONG BLOOM VOL. • DESCALE (Descalcificar): Limpe a acumulação MYBREW BREW TEMP. POUROVER FLOW RATE calcária dos componentes internos.
- Page 130 KEEP WARM (MANTER QUENTE) Cuidados * Aplicável apenas ao Sage Precision Brewer ® ™ e limpeza Glass (SDC400). FAST CUSTOMIZE GOLD BLOOM TIME Desligue sempre a máquina de café e retire a ficha da STRONG BLOOM VOL. tomada elétrica antes de limpar.
- Page 131 Quando o LCD apresenta "DESCALE" (Descal cificar) a piscar, é necessário descalcificar, mas pode efetuar o ciclo de descalcificação em qualquer momento. O Descalcificador está disponível no website da Sage. NOTA Demora aproximadamente 33 minutos para concluir o ciclo de descalcificação.
- Page 132 Resolução de problemas PROBLEMA CAUSA POSSÍVEL O QUE FAZER O café está • A quantidade de café e água • Certifique-se de que utiliza a quantidade demasiado forte ou não é correta (1 colher: chávena correta de café e água. de 150 ml).
- Page 133 água ou funciona dura. • Contacte o serviço de suporte ao durante longos • O perfil de temperatura da consumidor da Sage® se o problema períodos apenas extração não está corretamente persistir. com saída de vapor definido.
- Page 134 Garantia GARANTIA LIMITADA DE 2 ANOS A Sage Appliances fornece uma garantia para este produto para uso doméstico nos territórios especificados de 2 anos a partir da data de compra contra avarias provocadas por defeitos na mão‑de‑obra e nos materiais. Durante este período da garantia, a Sage Appliances irá...
- Page 135 Notas...
- Page 136 Deutschland: 08005053104 Österreich: 0800 80 2551 Switzerland 0800 009 933 Spain 0900 838 534 Sage Appliances France SAS Siège social : 66 avenue des Champs Elysées – 75008 Paris 879 449 866 RCS Paris Portugal France: 0800 903 235 0800 180 243 www.sageappliances.com...
Need help?
Do you have a question about the Precision Brewer and is the answer not in the manual?
Questions and answers