Ambu aBox 2 Instructions For Use Manual
Hide thumbs
Also See for aBox 2:
- Replacement manual (16 pages) ,
- Instructions for use manual (52 pages)

Related Manuals for Ambu aBox 2


Summary of Contents for Ambu aBox 2
- Page 1 INSTRUCTIONS FOR USE Ambu aBox ® ™ For use by trained healthcare professionals only. For use with Ambu ® visualization devices.
- Page 2 INSTRUCTIONS FOR USE Ambu aBox ® ™ For use by trained healthcare professionals only. For use with Ambu ® visualization devices.
- Page 3 Quick Guide Ambu is a registered trademark and aScope and aBox are trademarks of Ambu A/S.
-
Page 4: Table Of Contents
6.3. Connecting to an External Medical Imaging Recorder .............24 7. Operating the Displaying Unit..........................24 7.1. Preparation and Inspection of the Displaying Unit Before Use ..........24 7.2. Preparing and Operating the Ambu Visualization Device ............24 7.3. Live View Functions ..........................24 7.4. Archive ................................33 7.5. -
Page 5: Important Information - Read Before Use
1. Important Information – Read Before Use Read the Instructions for Use carefully before using the Ambu® aBox™ 2. The Instructions for Use may be updated without further notice. Copies of the current version are available upon request. The latest version is available on ambu.com. Please be aware that the instructions do not explain or discuss clinical procedures. -
Page 6: Potential Adverse Events
7.1 fails. To avoid malfunction of the equipment only use spare parts supplied by Ambu. Do not modify the spare parts. Cleaning and disinfection wipes shall be moist, but not dripping to ensure no damage to internal electronics of the displaying unit. -
Page 7: Device Description
Compatible Ambu visualization devices • Ambu® aScope™ Gastro The listed devices may not be available in all countries. Please contact your local Ambu representative. Please refer to the Instructions for Use of the relevant visualization device. Compatible external equipment •... -
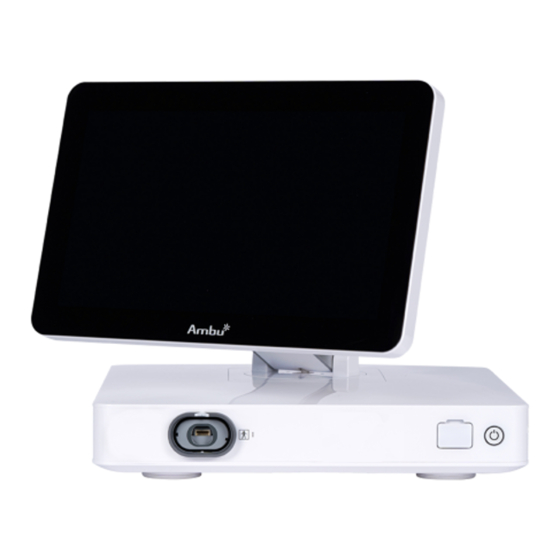
Page 8: Description Of Components
2.4. Description of Components Wi-Fi Component Function Displays the image from the Ambu visualization Touch screen device and the graphical user interface. Connector port geometry and colour ensures VDI port (connector port for correct connection with compatible visualization Ambu visualization devices) devices. -
Page 9: System Overview
2.5. System Overview A complete Ambu Imaging System is configured as illustrated in the figure below. The various connections are described in more detail in chapter 6. Ambu Imaging System External Connection Options... -
Page 10: Explanation Of Symbols Used
• Management of the displaying unit user profiles • Maintenance of user passwords • Monitoring and audit of the Ambu imaging system • Complete data erasure before disposal of the displaying unit 3. Explanation of Symbols Used Symbols for Symbols for... -
Page 11: First-Time Setup
4. First-Time Setup Before using the displaying unit for the first time, follow the steps described here. Letters in grey circles refer to the illustrations in the Quick Guide on page 2. Unpack the displaying unit and verify that no parts are missing. Refer to the parts described in chapter 2. -
Page 12: User Profiles
Press Log in 4 . The password must be changed during first-time setup. Find password requirements in section 5.3.4. If you lose the Administrator password, contact your local Ambu representative for assistance. NOTE: Access to Archive without login can be enabled by an Administrator in General settings explained in section 5.8. - Page 13 Administrator and Service user profiles. The Administrator has privileges to change settings for all users. All users can change their own passwords. If the Administrator password is lost and a new one is required, please contact your local Ambu representative. 5.3.2 Create a new Advanced user profile: To access the User profiles menu: •...
- Page 14 Note: By default, the Archive containing all photos and videos is password protected apart from the current procedure folder and the bin. The Archive can be accessed by an Administrator or an Advanced user profile. 5.3.3. Edit an existing Advanced user profile: •...
-
Page 15: Language
5.3.4. Password requirement Passwords are required to be at least 8 characters. Any character is allowed. It is recommended to use a combination of upper- and lower-case letter, numbers and symbols to enhance password protection. Ensure to follow local guidelines. 5.4. -
Page 16: Network Setup
NOTE: The settings are updated as soon as they are chosen. 5.6. Network Setup In Network setup under the Setup menu you can setup connection to Wi-Fi and local area network (LAN). For instructions on how to connect LAN cable or Wi-Fi antenna, see section 5.6.1. - Page 17 characters are allowed: a - z (lowercase letters), A - Z (uppercase letters), 0 - 9 (numbers), "-" (hyphens are not allowed as the first and last character). Press Configure 26 and a list of available networks is shown. If a network is already connected, it will be listed under Currently selected network.
- Page 18 Connecting to a hidden network: Press the Add network button 29 . Enter the hidden network name and password. The network will hereafter automatically appear on the list of Available networks 28 . NOTES: • Wi-Fi networks which require redirection to a login webpage for entering user name and password are not supported on the displaying unit.
-
Page 19: Pacs And Worklist Setup
Connecting to Wi-Fi network The supplied Wi-Fi antenna can be connected for better reception. Connect the antenna to the Wi-Fi antenna connection on the back of the displaying unit. Orient the antenna to ensure optimal connection to the Wi-Fi signal. If a network error occurs in your organization, the displaying unit has full functionality while being off-line except for exportation to a PACS server. - Page 20 The table below shows the information that must be filled. Please contact your hospital IT or department PACS manager if you do not have this information. Information needed Explanation PACS name This is the name of the PACS. Used in the export menu to select the PACS when transferring photos and videos.
-
Page 21: General Settings
5.8. General Settings In General Settings under the Setup menu, the Administrator can enable or disable Communication Settings, Archive Settings, the functions Zoom and Stopwatch, and allow Access to archive without login as well as set User inactivity logout time. •... -
Page 22: Output Setup
The login settings, also makes it possible to set a time for User inactivity logout 54 . This will define when the logged in user is automatically logged out if the displaying unit is inactive. The displaying unit is defined as inactive when no visualization device is connected and no functions on the user interface are activated. -
Page 23: Endoscope Buttons Configuration
57 . An overview will appear. NOTE: With administrator login, Ambu® aScope™ Colon will also be visible on the screen. The aScope™ Colon will only be available for specific markets. Please contact your local Ambu representative for further information. -
Page 24: Connect External Equipment
NOTE: Some functions may be greyed out in the button configuration menu if disabled by an Administrator. To enable the function, navigate to General settings (see section 5.8.). 6. Connect External Equipment See the overview of input and output connections in section 2.4. Please consult the Instructions for Use of the external equipment for further information. -
Page 25: Connecting To An External Medical Imaging Recorder
This section describes the functions in the user interface of the displaying unit. To use the functions, it is a prerequisite that the system is turned ON and an Ambu visualization device is connected to the appropriate connector port. Letters in grey circles refer to the illustrations in the Quick Guide on page 2. - Page 26 Explanations of functions in Live View Icon Name Function This tab shows the live image when an Ambu visualization device is Live view connected. Video Press the blue video recording button to start recording video recording during a procedure.
- Page 27 7.3.2. To record a photo or video: • Press the green Photo button to take a photo or the Video recording button to record a video sequence during a procedure. • It is also possible to take photos while recording a video. When a photo or video has been recorded it will be stored in the Current procedure folder.
- Page 28 • To access the current procedure overview in the Archive , press the arrow (see section 7.4.). • Press < Back 6 or press the Live view tab to return to the live image. Ending the Current procedure: When the visualization device is disconnected, a pop-up box will show information on the procedure folder, recorded timestamps, and procedure duration before ending the Current procedure.
- Page 29 failed. Press the Clear information button 11 to reenter patient information manually or with the use of access to the worklist. Explanations of functions in export menu Icon Name Function Photos and videos can be exported to a USB flash drive or a DICOM* PACS server in DICOM format.
- Page 30 Explanations of functions in Worklist Icon Name Function Press update to retrieve patient information from the hospital system Update via a PACS* server. The information is downloaded in DICOM** format. Press the search field and type to search for a patient name or another Search parameter.
- Page 31 Ambu® aScope™ Gastro, these will also apply to all other endoscopes of the same type but will not apply to any other aScope variant. Explanations of functions in Image adjustments +ARC Icon Name Function Colour Adjusts the image colour temperature from cold to warm.
- Page 32 7.3.9. ARC (Advanced Red Contrast) ARC is Ambu's proprietary red-colour contrast enhancement algorithm, which amplifies the red colour relative to other colour components at the same location. It is intended to improve the visibility of red colour tones in the image.
- Page 33 NOTES: • ARC can be activated by using the buttons on a connected endoscope (see section 5.10.). • An adjustment of the strength of ARC for each individual type of visualization device will be stored after the displaying unit has been turned off. •...
-
Page 34: Archive
disconnected. If the same visualization device is reconnected after 60 seconds, the user must press Continue procedure 26 to return to the live view image, continue the procedure and continue the counter from the time the device was disconnected. When the procedure has ended, the timestamp table will be displayed in a pop-up window and saved to the procedure folder. - Page 35 The Search 28 field can be used to find specific procedures. Press the field and type a procedure date or words from a note added to a specific procedure. You can also choose to filter the procedure list to only see procedures in a given date range. •...
- Page 36 Below the full-size image, all photos and videos from the procedure are shown in descending order with the most recent on the left. Scroll sideways on the thumbnails to see all photos and videos from the procedure. On the right side of the screen, File information is listed for the viewed photo or video. These data are stored on the displaying unit with the files and not exported to USB and PACS.
- Page 37 To delete files or procedure folders: • Select the photo(s), video(s) or folder(s) to be deleted by the specific selection boxes or press Select all . Pressing the same button again will deselect all. • Press the Bin 36 to delete selected files or folders. •...
-
Page 38: After Use Of The Displaying Unit
PACS server. 7.5. After Use of the Displaying Unit Letters in grey circles refer to the illustrations in the Quick Guide on page 2. Disconnect the Ambu visualization device from the displaying unit. For disposal of the... -
Page 39: System Information And Upgrade
A software upgrade can be supplied and installed either by using a USB flash drive (please contact your local Ambu representative) 3 or downloaded and installed by an Administrator, if the displaying unit is connected to the Internet via Wi-Fi or Ethernet 4 . -
Page 40: Reporting A Problem
Ambu representative. 8.3.1. Export log files Log files can be used by Ambu for troubleshooting purposes. This require the log files to be exported from the displaying unit. A log file consists of compressed text files containing information about the displaying unit system. -
Page 41: Backup
NOTE: Ensure that the connected USB flash drive is displayed below Export to 10 . If it does not show here, USB connectivity might have been disabled in the General settings menu. Refer to section 5.8. for information on how to enable USB connectivity. 8.4. - Page 42 Disinfecting: For heavily soiled surfaces, use a wipe to pre-clean the displaying unit prior to disinfecting. Unfold a clean wipe and thoroughly wet the surface of the displaying unit. The treated surfaces must remain visibly wet for a full four (4) minutes (or the time recommended by the manufacturer of the disinfectant, at least 4 minutes).
-
Page 43: Maintenance
10. Maintenance The displaying unit shall be subject to preventive inspection prior to use according to section 7.1. and shall be cleaned and disinfected according to chapter 9. No other preventive inspection, maintenance or calibration activities are required for the displaying unit. - Page 44 Swiss: Type J, AC grounded power plug Length of power cables - EU, UK, CH 1830mm (72") including connector Length of power cables - US, AUS, DK 1800mm (71") including connector Contact your local Ambu representative for further information.
-
Page 45: Troubleshooting
If a problem occurs with the displaying unit, please use this troubleshooting guide to identify the cause and correct the error. If the problem cannot be resolved by the actions in the troubleshooting guide, contact your local Ambu representative. Many problems can be solved by restarting the displaying unit through a Power OFF Cycle. - Page 46 Connect/reconnect device. connection. visualization device. The displaying unit and the Perform a Power OFF Cycle Ambu visualization device have (follow the procedure above communication problems. this table). Failure on visualization device Connect a new visualization or VDI-port on the displaying device.
- Page 47 Problem Possible cause Recommended action Touch interface The displaying unit has internal Perform a Power OFF Cycle does not respond. communication problems. (follow the procedure above this table). Low picture Dirty/damp screen. Wipe the screen with a clean quality. cloth as described in chapter 9. Image adjustment settings are Open the Image adjustment not optimal.
-
Page 48: Warranty And Replacement
The warranty applies only to the original customer of Ambu and cannot be assigned or otherwise transferred. In order to avail itself of this limited warranty, if requested by Ambu, the customer must return the displaying unit to Ambu (at its own expense and risk of shipment). In compliance with... - Page 49 Guidance and manufacturer’s declaration – electromagnetic emission The system is intended for use in the electromagnetic environment specified below. The customer or the user of the system should assure that it is used in such an environment. Emissions Test Compliance Electromagnetic Environment Guidance RF emission Group 1...
- Page 50 Guidance and manufacturer’s declaration – electromagnetic immunity The system is intended for use in the electromagnetic environment specified below. The customer or the user of the system should assure that it is used in such an environment. Immunity test IEC 60601-1-2 Compliance Electromagnetic test level...
- Page 51 Guidance and manufacturer’s declaration – electromagnetic immunity The system is intended for use in the electromagnetic environment specified below. The customer or the user of the system should assure that it is used in such an environment. Immunity test IEC 60601-1-2 Compliance Electromagnetic test level...
- Page 52 observed to verify normal operation. If abnormal performance is observed, additional measures may be necessary, such as reorienting or relocating the system. Over the frequency range 150kHz to 80MHz, field strengths shall be less than 3 V/m. Recommended Separation Distances Between Portable and Mobile RF Communication Equipment and system.
-
Page 53: Appendix 2. Radio Frequency Compliance
Appendix 2. Radio Frequency Compliance To ensure Radio Frequency Compliance (RF) the system must be installed and operated according to the RF information provided in this Instructions for Use. Guidance and manufacturer’s declaration – Radio frequencies This device complies with Directive 2014/53/EU issued by the Commission of the European Community. - Page 54 FR: Cet équipement est conforme aux limites d'exposition aux rayonnements ISED établies pour un environnement non contrôlé. Cet équipement doit être installé et utilisé à plus de 20 cm entre le radiateur et votre corps. Federal Communication Commission Interference Statement (FCC) This device complies with Part 15 of the FCC Rules.
- Page 55 802.11a: 54, 48, 36, 24, 18, 12, 9, 6 Mbps 802.11b: 11, 5.5, 2, 1 Mbps 802.11g: 54, 48, 36, 24, 18, 12, 9, 6 Mbps Data Rate 802.11n: MCS 0 to 15 for HT20MHz MCS 0 to 15 for HT40MHz 802.11ac: MCS 0 to 8 for HT20MHz MCS 0 to 9 for HT40MHz...
-
Page 56: Appendix 3. Cybersecurity
The displaying unit is of medium security risk (according to NIST) as: • The displaying unit does not allow any input from external devices (except from Ambu visualization devices and secured software updates). •... -
Page 57: Appendix 3.3. Software Bill Of Materials (Cbom)
Main known vulnerabilities of each component including explanations of why they are acceptable for this application are continuously updated by Ambu. Contact your local Ambu representative for an up to date list with this information. Vulnerabilities with a low CVSS score are omitted as a consequence of the medium security risk rating of the displaying unit. - Page 58 Title Version Used for GStreamer 1.18.3 The following plugins are used: v4l2src glupload glcolorconvert vaapipostproc vaapih264enc matroskamux tcpserversink tcpclientsrc filesink qmlglsink OpenSSL 1.1.1i Used to generate the private key and authenticate the public key used to sign the upgrade package. dcmtk 3.6.5 Used for the DICOM protocol communicating to the PACS...
- Page 59 Ambu A/S Baltorpbakken 13 2750 Ballerup Denmark T +45 72 25 20 00 ambu.com...
Need help?
Do you have a question about the aBox 2 and is the answer not in the manual?
Questions and answers