
Subscribe to Our Youtube Channel
Related Manuals for Ambu aScope Duodeno


Summary of Contents for Ambu aScope Duodeno
- Page 1 Instruction For Use Ambu® aScope™ Duodeno For use by trained clinicians/physicians only. For in-hospital use. For use with Ambu® aBox™ Duodeno.
- Page 2 Ambu is a registered trademark and aScope™ Duodeno is a trademark of Ambu A/S.
-
Page 3: Table Of Contents
Table of Contents Important Information – Please Read Before Use! 1.1 Intended Use / Indication For Use 1.2 General Information 1.3 Contraindications 1.4 Warnings And Cautions System Description System Components 2.2 Compatible/Applicable Device 2.3 aScope™ Duodeno Description And Function Explanation Of Symbols Used Preparations For Use 4.1 Preparation And Inspection Of The aScope™ Duodeno 4.2 Preparation Of The Endoscope 4.3 Attaching Ancillary Equipment To The Endoscope 4.4 Operating The aScope™ Duodeno Ending A Procedure 5.1 Concluding A Patient Procedure After Use Technical Data aScope™ Duodeno 7.2 Storage And Operation Environment Specifications 7.3 List Of Ancillary Equipment Accessories Troubleshooting... -
Page 4: Important Information - Please Read Before Use
Important Information – Please Read Before Use! Read this Instructions For Use (IFU) carefully before using the aScope™ Duodeno and keep for future reference. Failure to read and thoroughly understand the information presented in this IFU, as well as those developed for ancillary endoscopic equipment and accessories, may result in serious injury to the patient and/or user. Furthermore, failure to follow the instructions in this IFU may result in damage to, and/or malfunction of, the equipment. This IFU describes the recommended procedures for inspecting and preparing the system prior to its use. It does not describe how an actual procedure is to be performed, nor does it attempt to teach the beginner the proper technique or any medical aspects regarding the use of the equipment. It is the responsibility of each medical facility to ensure that only appropriately trained personnel, who are competent and knowledgeable about endoscopic equipment, antimicrobial agents/processes and hospital infection control protocol are involved in the use, handling and the care of these medical devices. The IFU may be updated without further notice. Copies of the current version are available upon request. -
Page 5: Warnings And Cautions
Warnings And Cautions Failure to observe these warnings and cautions may result in patient injury or damage to the equipment. Ambu is not responsible for any damage to the system or patient injury resulting from incorrect use. Warnings Indicates a potentially hazardous situation which, if not avoided, could result in death or serious injury. Connection of Devices • Do not connect non-medical grade devices to the endoscope. Connection of devices that are not medical grade (IEC 60601 conform) could have negative impact on the safety of the system. Connect only medical grade equipment to the endoscope. For detailed... - Page 6 Ancillary Equipment • If combinations of ancillary equiment other than those described in this IFU are used, full responsability is assumed by the medical treatment facility. • A defective vacuum pump could lead to a loss of cooling and increased temperature at the tip of the endoscope. Make sure to have another vacuum source available. Operation of the Endoscope • Never perform angulation control forcibly or abruptly. Never forcefully pull, twist, or rotate the angulated bending section. Patient injury, bleeding, and/or perforation may result. It may also become impossible to straighten the bending section during an examination. Never operate the bending section, feed air or perform suction, insert or withdraw the endoscope’s insertion section, or use endoscopic accessories without viewing the live endoscopic image or when the image is frozen or magnified. Patient...
- Page 7 • Do not insufflate flammable gas into the patient otherwise patient injury may occur Distal-end Temperature • The temperature of the distal end of the endoscope may exceed 41˚C (106˚F) and reach 50˚C (122˚F) due to intense endoscopic illumination. Therefore, do not leave the endoscope illuminated before and/or after an examination and always maintain a suitable distance necessary for adequate viewing while using the minimum level of illumination for the minimum amount of time. Continued illumination will cause the distal end of the endoscope to become hot and could cause operator and/or patient burns. Do not leave the endoscope illuminated before and after examination.
- Page 8 Avoid aspirating solid matter or thick fluids; instrument channel, suction channel, or suction valve clogging can occur. • When aspirating, maintain the suction pressure at the lowest level necessary to perform the procedure. Excessive suction pressure could cause aspiration of and/or injury to the mucous membrane. In addition, patient fluids could leak or spray from the biopsy valve, posing an infection control risk. Cautions Indicates a potentially hazardous situation which, if not avoided, may result in minor or moderate injury. It may also be used to alert against unsafe practices or potential equipment damage. General • US federal law restricts this device for sale only by, or on the order of, a physician. • Keep the aScope™ Duodeno dry during preparation, use and storage. • The aScope™ Duodeno is not intended to be repaired. If defective the aScope™ Duodeno should be returned to Ambu. For more information please refer to Section 6.1. • Electromagnetic interference may occur on this instrument near equipment marked with the following symbol or other portable and mobile RF (radio frequency) communications equipment, such as cellular phones. If electromagnetic interference occurs, mitigation measures may be necessary, such as reorienting or relocating this instrument, or shielding the location. Unpacking and Placing the Endoscope • Do not use a knife or another sharp instrument to open the pouch or cardboard box. • Place the aScope™ Duodeno on a level surface while unpacking. Dropping the aScope™ Duodeno could damage it.
- Page 9 Prior to Use • To prevent the patient from biting the endoscope is recommended that a mouthpiece be placed in the patient’s mouth before inserting the endoscope. • Never use a mouthpiece that is deformed, damaged or shows other irregularities, otherwise patient injury and/or equipment damage may occur. • To prevent the patient from breaking one or more teeth, make sure there are no teeth that are not permanetly capped or no missing teeth, prior examination. • To prevent the patient of losing a dental prosthesis, make sure the patient removes it prior to examination. • Do not allow the suction canister to fill completely. The suction canister must be changed after each examination. Using a filled suction canister may lead to loss of the suction function, loss of cooling or malfunction of the suction pump.
-
Page 10: System Description
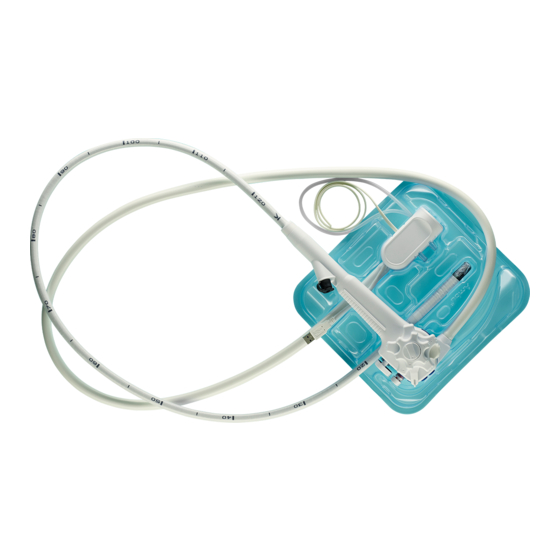
System Description System Components Ambu® aScope™ Duodeno Part number Distal End Outer Working Channel Diameter ø Inner Diameter ø Sterile and single-use device 482001000 41.2 Fr 12.6 Fr (13.7 mm) (4.2 mm) The aScope™ Duodeno is not available in all countries. For detailed information please contact your local sales office. Compatible/Applicable Device Ambu® aBox™ Duodeno Part number Reusable device 485001000US The aBox™ Duodeno is not available in all countries. For detailed information please contact your local sales office. aScope™ Duodeno Description And Function The aScope™ Duodeno is a flexible endoscope with side viewing optics, deflectable tip and an elevator to control the position of inserted accessories. The endoscope tip deflection is controlled... - Page 11 Part Function Elevator control lever When this lever is moved in the “Up” direction, the elevator is raised. When the lever is moved in the Elevator down opposite direction, the elevator is lowered. Elevator up Remote switches Programable switches for e.g. freeze, record video, image capture. The function of the remote switches can be set on the aBox™ Duodeno. Refer to the IFU of the aBox™...
-
Page 12: Explanation Of Symbols Used
Instrument channel The instrument channel functions: • Channel for the insertion of endoscopic accessories • Suction channel • Fluid feed channel (from a syringe via the biopsy valve) Insertion limit mark This mark indicates the maximum point to which the endoscope may be inserted into the patient´s body. Insertion tube Flexible insertion tube Bending section When the Up-Down and Right-Left levers are operated, the distal end of the endoscope is deflected. Distal end Contains the camera, LEDs, the working channel exit and the elevator. Camera Provides live image stream. Elevator The elevator positions endoscopic accessories when the elevator control lever is operated. Vacuum connector Connects the endoscope to the suction tube of the suction pump. -
Page 13: Preparations For Use
Preparations For Use Numbers in gray circles below refer to illustrations on page 2. Before each procedure, prepare and inspect a new instrument as instructed below. Inspect other equipment to be used with this instrument as instructed in their respective instruction manuals. Should any irregularity be observed after inspection, follow the instructions as described in section 8, “Troubleshooting”. If this instru- ment malfunctions, do not use it. Contact your Ambu sales representative for further assistance. Preparation And Inspection Of The aScope™ Duodeno Inspection of the Endoscope • Check that the pouch seal is intact. •... -
Page 14: Preparation Of The Endoscope
• Carefully run your hand back and forth over the entire length of the insertion tube, including the bending section and distal end, of the aScope™ Duodeno to make sure that there are no impurities or damage on the product such as rough surfaces, sharp edges or protrusi- ons which may harm the patient. Make sure to use aseptic technique when performing the above. Otherwise the sterility of the product will be compromised. • Inspect the distal end of the endoscope´s insertion section for scratches, cracks or other irregularities. • Turn the Up-Down and Right-Left control wheels in each direction until it stops and return to neutral position. Confirm that the bending section functions smoothly and correctly, that maximum angulation is achieved and returned to the neutral position. • Operate the elevator control lever to confirm that the elevator can be operated smoothly and correctly and return to the neutral position. • Confirm that the angulation locks are functional by locking and releasing the angulation locks according to section 2.3. Turn the angulation wheels fully in all directions, lock the angulation in a fully angulated position and confirm that the bending section can be sta- bilized. Release the angulation locks and confirm that the bending section straightens out. • Confirm that the top hole of the insufflation/rinsing valve is not blocked. • Using a syringe insert sterile water into the intrument channel. Press the plunger, ensure that there are no leaks and that the water is emitted from the distal end. • If applicable, confirm compatibility with applicable accessory devices as appropriate. Preparation Of The Endoscope Prepare and inspect aBox™ Duodeno, medical grade monitor, suction pump, and insufflator as described in their respective manuals. - Page 15 The aScope™ Duodeno does not itself produce negative pressure and therefore an external vacuum source (e.g. wall suction or medical grade suction pump) will be required to operate the system. Standard suction tubings with a nominal diameter should be sufficient, as long as they simply and securely fit over the standard size suction connector of the aScope™ Duodeno. Nomenclature used in this section follows the established convention that each canister utilized will have multiple connection ports labelled either "To Vacuum" or "To Patient". However, it is the responsibility of the user to follow all manufacturer instructions and guidance applicable to the endoscopic fluid management system chosen for the use with the aScope™ Duodeno. Connection to the Fluid Canister To perform patient examinations or procedures, all fluid containers (e.g. sterile water bottle) must be properly and securely connected to the aBox™ Duodeno to prevent spillage, thereby maintaining a safe work environment. Place the containers in the designated locations and connect them according to the instructions in this chapter. Please note that a new suction canister/sterile water bottle must be used for each procedure.
-
Page 16: Operating The Ascope™ Duodeno
• Verify that a live video image appears on the screen by pointing the distal end of the aScope™ Duodeno towards an object, e.g. the palm of your hand and make sure that the orientation of the image is correct. • Adjust the image preferences if necessary, by accessing the settings and information menu of the aBox™ Duodeno. For detailed information please refer to the aBox™ Duodeno IFU. • Angulate the endoscope distal end and confirm there are no disruptions to the live image, nor are there any other irregularities or noted artifacts. • If the image is impaired and/or unclear, wipe the lens at the distal end using a sterile cloth. Check of the Remote Switches All remote switches should be checked to work normally even if they are not expected to be used. The endoscopic image may freeze or other irregularities may occur during examination and may cause patient injury, bleeding, and/or perforation. • Press every remote switch and confirm that the specified functions work as expected. Checking the endoscope's suction, rinsing and insufflation functionality • Check that the suction and insufflation/rinsing valve work as expected by pressing the suction and rinsing valve. Cover the opening of the insufflation valve and confirm that the corresponding function works properly. -
Page 17: Ending A Procedure
channel with ca. 5 seconds of air. Suction • Press the suction valve to aspirate excess fluids or other debris obscuring the endoscopic image. • For optimal suction capability it is recommended to remove accessories entirely during suction. Insertion of Endoscopic Accessories Always make sure to select the correct size endoscopic accessory for the aScope™ Duodeno. Inspect the endoscopic accessory before using it. If there is any irregularity in its operation or external appearance, replace it. Insert the endoscopic accessory into the instrument channel port and advance it carefully through the working channel until it can be seen on the monitor. -
Page 18: Technical Data
• Discard the endoscope. 13 In case of any adverse events please contact the manufacturer of the device or your local Ambu distributor. In Europe the relevant country health agency or authority should also be informed. Returning Devices to Ambu Should it be necessary to send an aScope™ Duodeno to Ambu for evaluation, please inform your representative at Ambu beforehand for instructions and/or guidance. To prevent infection, it is strictly forbidden to ship contaminated medical devices. The medical device aScope™ Duodeno must be decontaminated on site before shipment to Ambu. Ambu reserve the right to return contaminated medical devices to the sender. Disposal of the aScope™ Duodeno The Single-Use aScope™ Duodeno is considered medical waste after use and must be disposed of in accordance with local guidelines for medical waste with electronic components. This is a single- use device, so do not soak, rinse or sterilize as it may leave harmful residues or cause malfunction of the device. The design and material used are not compatible with conventional cleaning and sterilization procedures. Technical Data All the following reported measurements (e.g. weight, dimensions) are average values. Therefore,... -
Page 19: List Of Ancillary Equipment
Endoscopic devices should have a maximum diameter of 4 mm and must be type BF or CF. Endoscopic accessories shuld not have any sharp edges or corners. Connected equipment, especially electrical equipment, must conform to relevant medical standards (medical grade). There is no guarantee that instruments selected only on the basis of the working channel diameter will function in combination with the system. For information regarding instruments compatibility please contact your Ambu sales representative. Troubleshooting The following table shows the possible causes of and countermeasures against troubles that may occur due to equipment setting errors or deterioration of consumable. Troubles or failure due to other causes than those listed below should be reported to Ambu A/S. Make sure to contact your Ambu sales representative for detailed information. Angulation, Bending And Locking Levers Possible Problem Possible Cause Solution Increased resistance during... -
Page 20: Rinsing And Insufflation
Possible Problem Possible Cause Solution aScope™ Duodeno is Withdraw the aScope™ Distal end does not angulate defective Duodeno carefully and when control wheel is connect a new aScope™ operated Duodeno aScope™ Duodeno is Withdraw the aScope™ Max. bending angles cannot defective Duodeno carefully and be achieved connect a new aScope™... -
Page 21: Suction
Suction Possible Problem Possible Pause Solution Vacuum source/suction Connect the vacuum source/ pump is not connected or suction pump and power ON not switched ON Suction canister is full or not Change the suction canister connected if it’s full. Connect a suction canister Biopsy valve is not properly Attach valve correctly connected Biopsy valve cap is open Close cap Biopsy valve is damaged Replace with new one Diminished or no suction Vacuum source/suction Increase vacuum pressure pump to weak (min. -7 kPa) Vacuum source/suction Replace with a new vacuum pump is defective source/suction pump Instrument channel blocked Flush sterile water with a... -
Page 22: Image Quality And Brightness
Image Quality And Brightness Possible Problem Possible Cause Solution aBox ™ Duodeno or ancillary Switch aBox™ Duodeno and equipment not switched on. ancillary equipment on. Endoscope connector is not Connect the endoscope con- properly connected to the nector properly to the aBox™ aBox™ Duodeno. Duodeno. LED´s switched OFF. Switch LED´s ON. Medical grade monitor Contact support for the parti- No video image defective cular device. -
Page 23: Remote Switches
Remote Switches Possible Problem Possible Cause Solution Endoscope connector is not Connect the endoscope con- properly connected to the nector properly to the aBox™ aBox™ Duodeno Duodeno Remote switches configura- Return to standard configura- tion changed tion of the remote switches or The remote switches are change the settings not working or not working Wrong remote switch Operate the correct remote properly operated switch aScope™ Duodeno defective Connect a new aScope™ Duodeno aBox™ Duodeno defective Contact support... - Page 24 Table 1 Recommended Safety Distance Nominal power, Recommended safety distance, d, expressed in meters, based on the P, of transmitter, nominal transmitter power and transmission frequency measured in watts 150kHz – 80MHz 80Mhz – 80MHz 800MHz – 2.5GHz d=3.5/3 √P d=3.5/3 √P d=3.5/3 √P 0.01 0.12 0.12 0.23 0.37 0.37 0.74 For transmitter whose maximum nominal power is not specified, the recommended safety distance can be determined by use of the formulas above. Table 2 Electromagnetic Compatibility 1 Guidelines and manufacturer’s declaration – resistance to electromagnetic interference The aScope™ Duodeno is intended for operation in the electromagnetic environment specified below. The user of the aScope™ Duodeno should ensure that is used in such an environment. Electromagnetic IEC 60601 test level Compliance level Electromagnetic compatibility testing Environment Guidelines Electrostatic dischar- ± 8 kV contact ± 8 kV contact Floors should be ge (ESD) according to discharge discharge wood or concrete or...
- Page 25 Table 2 Electromagnetic Compatibility 1 Magnetic field at 30A/m (50Hz) 30A/m (50Hz) the power supply frequency (50/60Hz) according to IEC Table 3 Electromagnetic Compatibility 2 Guidelines and manufacturer’s declaration – resistance to electromagnetic interference The aScope™ Duodeno is intended for operation in the electromagnetic environment specified below. The user of the aScope™ Duodeno should ensure that it is used in such an environment Electromagnetic IEC 60601 test level Compliance level Electromagnetic compatibility testing Environment Guidelines Line-conducted HF 3 V;AM/1 kHz/ Portable and mobile coupling according to radio equipment 80%150 KHz – 80 IEC 61000 – 4 – 6 should not be used closer to the unit, Electromagnetic including cords, fields according to 3V/m;...
-
Page 26: Contact
Warning: This device is intended only for use by trained medical personnel. This is a Class A device according to CISPR 11. In a residential area, this unit can cause radio inter- ference, so it is necessary in this case to take suitable corrective measures, such as readjusting it, rearran- ging it, or shielding the unit or filtering its power connection. Contact Manufacturer: Ambu A/S Baltorpbakken 13 2750 Ballerup, Denmark... - Page 27 Manufacturer: Ambu A/S Baltorpbakken 13, DK-2750 Ballerup, Denmark T +45 72 25 20 00 F +45 72 25 20 50 www.ambu.com...
Need help?
Do you have a question about the aScope Duodeno and is the answer not in the manual?
Questions and answers